


HarmonyOS 鸿蒙Next:基于ArkUI实现类似.9图的拉伸能力
HarmonyOS 鸿蒙Next:基于ArkUI实现类似.9图的拉伸能力
<markdown _ngcontent-sef-c237="" class="markdownPreContainer">
场景描述
应用聊天界面简单气泡的拉伸实现。
效果图
最上方是未被拉伸的气泡图效果。

方案描述
分别使用backgroundImageResizable和resizable实现聊天气泡的拉伸。
backgroundImageResizable和resizable使用详解。
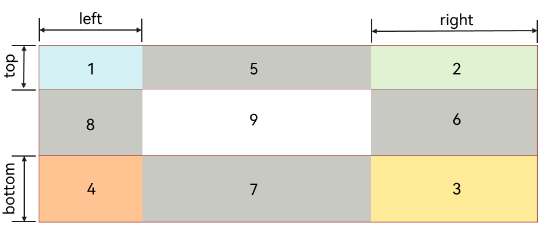
文档提供的图片,在设置了top、right、bottom、left四个参数后,图上的4角也就是1234区域不会被拉伸,关键点在于这4个参数的大小必须是原图的基础上的大小,所以需要将原图像素值转为vp后,在此基础上来确认参数。
效果图
核心代码
// bubble3 宽472px高200px
[@State](/user/State) w: number = px2vp(472)
[@State](/user/State) h: number = px2vp(200)
......
Stack() {
  Image($r('app.media.bubble3'))
    .width(this.w)
    .height(this.h)
    .borderRadius(4)
    .resizable({
      slice: {
        top: this.top,
        bottom: this.bottom,
        left: this.left,
        right: this.right
      }
    })
    .objectFit(this.fit)
  Divider().strokeWidth(1).color(Color.Red)
    .position({ top: this.top })
  Divider().strokeWidth(1).color(Color.Yellow)
    .position({ bottom: this.bottom })
  Divider().strokeWidth(1).color(Color.Blue).vertical(true)
    .position({ left: this.left })
  Divider().strokeWidth(1).color(Color.Green).vertical(true)
    .position({ right: this.right })
}
.width(this.w)
.height(this.h)
<button style="position: absolute; padding: 4px 8px 0px; cursor: pointer; top: 4px; right: 8px; font-size: 14px;">复制</button>
详细方案
1.给Text设置背景图并将backgroundImageSize宽高都设置为100%,再使用backgroundImageResizable限定背景图拉伸区域。
2.使用Stack组件嵌套Image和Text,在Text组件onAreaChange事件中将宽高值给到Image。
核心代码
List({ space: 10 }) {
  ForEach(this.leftData, (item: string) => {
    ListItem() {
      Text(item)
        .padding({
          top: 10,
          bottom: 10,
          left: 10,
          right: 20
        })
        .backgroundImage($r('app.media.bubble3'))
        .backgroundImageSize({
          width: '100%',
          height: '100%'
        })
        .backgroundImageResizable({
          slice: {
            top: 30,
            bottom: 16,
            left: 16,
            right: 24
          }
        })
    }
  }, (item: string) => item)
}
.width('50%')
.height('100%')
.alignListItem(ListItemAlign.End)
......
Stack() {
  Image($r('app.media.bubble3'))
    .width(this.item.textWidth)
    .height(this.item.textHeight)
    .resizable({
      slice: {
        top: 30,
        bottom: 16,
        left: 16,
        right: 24
      }
    })
  Text(this.item.content)
    .padding({
      top: 10,
      bottom: 10,
      left: 10,
      right: 20
    })
    .onAreaChange((_oldValue: Area, newValue: Area) => {
      this.item.textWidth = newValue.width as number
      this.item.textHeight = newValue.height as number
    })
}
<button style="position: absolute; padding: 4px 8px 0px; cursor: pointer; top: 4px; right: 8px; font-size: 14px;">复制</button>关于HarmonyOS 鸿蒙Next:基于ArkUI实现类似.9图的拉伸能力的问题,您也可以访问:https://www.itying.com/category-93-b0.html 联系官网客服。
更多关于HarmonyOS 鸿蒙Next:基于ArkUI实现类似.9图的拉伸能力的实战系列教程也可以访问 https://www.itying.com/category-93-b0.html


更多关于HarmonyOS 鸿蒙Next:基于ArkUI实现类似.9图的拉伸能力的实战系列教程也可以访问 https://www.itying.com/category-93-b0.html

找HarmonyOS工作还需要会Flutter的哦,有需要Flutter教程的可以学学大地老师的教程,很不错,B站免费学的哦:https://www.bilibili.com/video/BV1S4411E7LY/?p=17


