Flutter Windows平台交互插件win32的使用
Flutter Windows平台交互插件win32的使用
🎯 什么是win32?
win32 是一个Dart包,它提供了对最常见Win32 API的访问权限,通过FFI(Foreign Function Interface)使这些API可以在Dart代码中直接调用,而无需C编译器或Windows SDK。
💡 为什么使用win32?
- Flutter Development on Windows:需要在应用程序中访问游戏手柄或从Windows注册表中检索设置?
win32可以轻松实现。 - Cross-Platform Package Development:编写新的跨平台包时,可以使用
win32来实现特定于Windows的功能。 - Enhanced Command-Line Utilities:开发命令行工具时,需要更高级的文件API。
- Integration with Existing Windows Libraries:与已发布元数据的其他Windows库平滑集成。
🚀 快速开始
添加依赖
对于Flutter项目:
flutter pub add ffi win32
对于Dart-only项目:
dart pub add ffi win32
示例代码
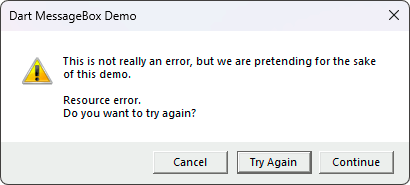
下面是一个简单的示例,演示如何使用Windows API中的MessageBox函数显示消息框:
import 'package:ffi/ffi.dart';
import 'package:win32/win32.dart';

void main() {
  final lpCaption = 'Dart MessageBox Demo'.toNativeUtf16();
  final lpText = '''
This is not really an error, but we are pretending for the sake of this demo.

Resource error.
Do you want to try again?
'''
      .toNativeUtf16();

  final result = MessageBox(
    NULL,
    lpText,
    lpCaption,
    MESSAGEBOX_STYLE.MB_ICONWARNING | // Warning icon
        MESSAGEBOX_STYLE.MB_CANCELTRYCONTINUE | // Action button
        MESSAGEBOX_STYLE.MB_DEFBUTTON2, // Second button is the default
  );

  free(lpText);
  free(lpCaption);

  switch (result) {
    case MESSAGEBOX_RESULT.IDCANCEL:
      print('Cancel pressed');
    case MESSAGEBOX_RESULT.IDTRYAGAIN:
      print('Try Again pressed');
    case MESSAGEBOX_RESULT.IDCONTINUE:
      print('Continue pressed');
  }
}

🌟 使用场景
- Building Windows Apps with Flutter:创建基于Flutter的Windows应用程序。
- Accessing System Information:检索系统信息。
- Enumerating Installed Fonts:列出所有已安装字体。
- Developing Traditional Win32 Apps in Dart:使用Dart构建传统Win32应用程序。
- Game Development:使用GDI等技术创建游戏。
- Advanced Console Applications:构建高级控制台应用程序。
- Modern File Pickers:提供现代的Windows文件选择体验。
- Access .NET Components:通过COM互操作访问.NET组件。
- Monitor System Events:检测和响应USB驱动器插入和移除事件。
📚 示例
win32 包含了许多示例,涵盖了不同的方面,如调用Windows API、构建经典桌面UI、使用回调函数、调用COM类以及将Windows代码与Flutter集成。这些示例可以在examples子目录找到。
📦 构建在win32之上的包
一些基于win32构建的包包括但不限于:
更多包可以在pub.dev上找到。
🐛 功能和Bug
win32包提供了Win32 API的一个子集,并根据用户需求定期添加新功能。如果您需要额外的功能或遇到任何bug,请在issue tracker上提交问题。
🔄 向后兼容性
虽然win32遵循语义版本化(semver),但某些次要版本可能会由于win32metadata抓取器的改进或新API的添加而发生破坏性更改。
🙏 贡献者
感谢所有帮助改进win32的贡献者,他们通过创建包、协助解决问题和拉取请求以及参与讨论做出了巨大贡献。
🎉 致谢
特别感谢为win32做出贡献的所有开发者和开源社区成员。
更多关于Flutter Windows平台交互插件win32的使用的实战系列教程也可以访问 https://www.itying.com/category-92-b0.html
更多关于Flutter Windows平台交互插件win32的使用的实战系列教程也可以访问 https://www.itying.com/category-92-b0.html
当然,以下是一个关于如何在Flutter中使用win32插件与Windows平台进行交互的示例。这个示例将展示如何通过Flutter插件调用Windows API来获取窗口标题。
步骤1:设置Flutter项目
首先,确保你已经安装了Flutter和Dart SDK,并创建了一个新的Flutter项目。
flutter create flutter_win32_example
cd flutter_win32_example
步骤2:添加Windows平台插件支持
在pubspec.yaml文件中,添加对flutter_windows_plugins的依赖(如果还没有的话)。不过,由于win32库通常通过自定义插件来使用,这里我们不会直接依赖某个现成的插件,而是自己编写插件代码。
步骤3:创建自定义插件
在flutter_win32_example项目目录下,创建一个新的目录来存放Windows平台插件代码,例如windows_plugin。
3.1 创建CMakeLists.txt
在windows_plugin目录下,创建一个CMakeLists.txt文件来配置CMake构建。
cmake_minimum_required(VERSION 3.10)

project(windowsplugin)

set(CMAKE_CXX_STANDARD 17)

add_library(
    windowsplugin
    SHARED
    windowsplugin_plugin.cpp
)

find_package(Flutter REQUIRED)

target_link_libraries(
    windowsplugin
    PRIVATE
    Flutter::dart_wrapper
    Flutter::encoder
    Flutter::logging
    Flutter::registrar
    Flutter::settings
    Flutter::window
    kernel32.lib
    user32.lib
)
3.2 创建windowsplugin_plugin.cpp
在windows_plugin目录下,创建一个windowsplugin_plugin.cpp文件,并编写插件代码。
#include <flutter/method_channel.h>
#include <flutter/plugin_registrar.h>
#include <windows.h>
#include <string>

const char* CHANNEL_NAME = "com.example.windowsplugin/channel";

class Windowsplugin : public flutter::Plugin {
public:
    static void RegisterWithRegistrar(flutter::PluginRegistrar* registrar) {
        auto channel =
            flutter::MethodChannel<flutter::EncodableValue>(
                registrar->messenger(), CHANNEL_NAME);

        channel.SetMethodCallHandler(
            [](const flutter::MethodCall<flutter::EncodableValue>& call,
               flutter::MethodResult<flutter::EncodableValue> result) {
                if (call.method_name() == "getWindowTitle") {
                    HWND hwnd = GetForegroundWindow();
                    if (hwnd != nullptr) {
                        int length = GetWindowTextLength(hwnd);
                        std::wstring title(length + 1, L'\0');
                        GetWindowText(hwnd, &title[0], length + 1);
                        std::string utf8_title;
                        utf8_title.assign(title.begin(), title.end());
                        result.Success(flutter::EncodableValue(utf8_title));
                    } else {
                        result.Error("UNAVAILABLE", "No active window found");
                    }
                } else {
                    result.NotImplemented();
                }
            });
    }
};

void FlutterWindowspluginPluginRegisterWithRegistrar(
    flutter::PluginRegistrar* registrar) {
    Windowsplugin::RegisterWithRegistrar(registrar);
}
3.3 修改CMakeSettings.json
在flutter_win32_example\windows目录下,找到CMakeSettings.json文件,并添加对新插件的构建配置。
{
    "configurations": [
        {
            "name": "x86-Debug",
            "generator": "Ninja",
            "configurationType": "Debug",
            "inheritEnvironments": [ "msvc_x86_x64" ],
            "buildRoot": "${projectDir}\\..\\build\\windows\\x86-debug",
            "installRoot": "${projectDir}\\..\\install\\windows\\x86-debug",
            "cmakeCommandArgs": "",
            "buildCommandArgs": "",
            "ctestCommandArgs": "",
            "variables": [
                {
                    "name": "FLUTTER_ROOT",
                    "value": "C:\\path\\to\\flutter"
                },
                {
                    "name": "CMAKE_TOOLCHAIN_FILE",
                    "value": "${env.FLUTTER_ROOT}\\packages\\flutter_tools\\bin\\toolchain.ninja"
                },
                {
                    "name": "PLUGIN_SOURCE_DIR",
                    "value": "${projectDir}\\..\\windows_plugin"
                }
            ]
        },
        // ... other configurations ...
    ]
}
步骤4:在Dart代码中调用插件
在lib目录下,修改main.dart文件以调用插件方法。
import 'package:flutter/material.dart';
import 'package:flutter/services.dart';

void main() {
  runApp(MyApp());
}

class MyApp extends StatelessWidget {
  static const platform = const MethodChannel('com.example.windowsplugin/channel');

  @override
  Widget build(BuildContext context) {
    return MaterialApp(
      home: Scaffold(
        appBar: AppBar(
          title: const Text('Flutter Windows Plugin Example'),
        ),
        body: Center(
          child: ElevatedButton(
            onPressed: _getWindowTitle,
            child: Text('Get Window Title'),
          ),
        ),
      ),
    );
  }

  Future<void> _getWindowTitle() async {
    try {
      final String title = await platform.invokeMethod('getWindowTitle');
      ScaffoldMessenger.of(context).showSnackBar(
        SnackBar(content: Text("Window Title: $title")),
      );
    } on PlatformException catch (e) {
      ScaffoldMessenger.of(context).showSnackBar(
        SnackBar(content: Text("Failed to get window title: '${e.message}'")),
      );
    }
  }
}
步骤5:构建和运行
在Visual Studio中打开flutter_win32_example\windows目录,然后构建并运行项目。点击按钮,你应该能看到当前活动窗口的标题显示在SnackBar中。
这个示例展示了如何通过Flutter插件调用Windows API,并返回结果给Dart代码。你可以根据需要扩展这个插件以调用更多的Windows API。


