Flutter随机密码生成插件random_password_generator的使用
Flutter随机密码生成插件random_password_generator的使用
插件简介
random_password_generator 是一个适用于Android、iOS以及Web端的新Flutter包,它可以帮助用户为在线账户生成强密码,并提供密码强度评估功能。
使用方法
导入包
在使用此插件之前,请确保已经在项目的pubspec.yaml文件中添加了对random_password_generator的依赖。然后,在Dart文件顶部导入该库:
import 'package:random_password_generator/random_password_generator.dart';
生成随机密码
通过创建RandomPasswordGenerator类的一个实例来开始使用这个插件。你可以调用它的randomPassword()方法生成包含指定字符类型的密码。
final password = RandomPasswordGenerator();

// 参数含义依次为:小写字母、大写字母、数字、特殊字符、密码长度
String newPassword = password.randomPassword(true, false, true, false, 6);
检查密码强度
使用checkPassword()方法可以获取给定密码的强度评分(返回值介于0到1之间)。根据分数的不同,我们可以给出不同的提示信息。
double passwordstrength = password.checkPassword('hello');

if (passwordstrength < 0.3)
    print('This password is weak!');
else if (passwordstrength < 0.7)
    print('This password is Good');
else
    print('This passsword is Strong');

示例代码
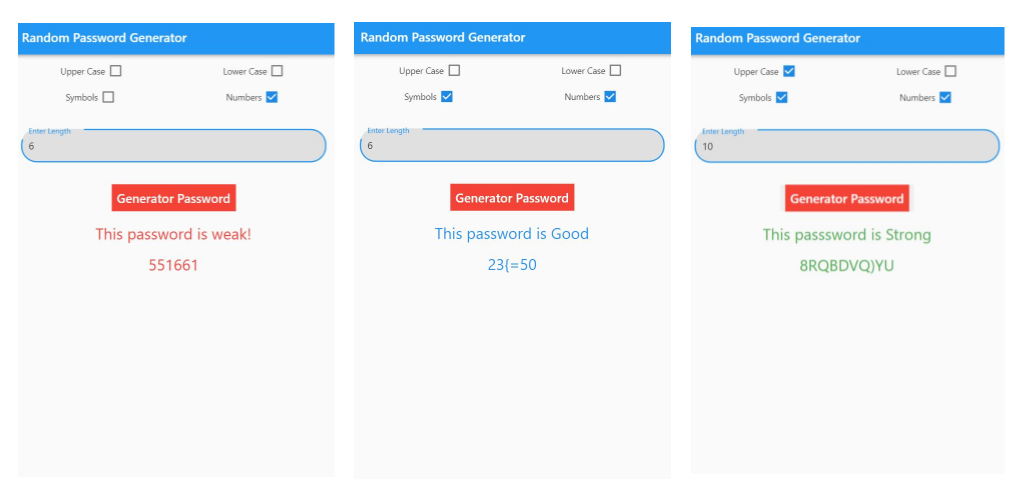
下面是一个完整的Flutter应用示例,演示了如何使用random_password_generator插件生成随机密码并显示其强度。
import 'package:flutter/material.dart';
import 'package:random_password_generator/random_password_generator.dart';

void main() {
  runApp(MyApp());
}

class MyApp extends StatefulWidget {
  @override
  _MyAppState createState() => _MyAppState();
}

class _MyAppState extends State<MyApp> {
  bool _isWithLetters = true;
  bool _isWithUppercase = false;
  bool _isWithNumbers = false;
  bool _isWithSpecial = false;
  double _numberCharPassword = 8;
  String newPassword = '';
  Color _color = Colors.blue;
  String isOk = '';
  TextEditingController _passwordLength = TextEditingController();
  final password = RandomPasswordGenerator();

  checkBox(String name, Function onTap, bool value) {
    return Row(
      mainAxisAlignment: MainAxisAlignment.center,
      children: <Widget>[
        Text(name),
        Checkbox(value: value, onChanged: onTap),
      ],
    );
  }

  @override
  Widget build(BuildContext context) {
    return MaterialApp(
      debugShowCheckedModeBanner: false,
      home: Scaffold(
        appBar: AppBar(
          title: const Text('Random Password Generator'),
        ),
        body: Center(
          child: Column(
            children: [
              SizedBox(height: 10),
              Row(
                mainAxisAlignment: MainAxisAlignment.spaceAround,
                children: [
                  checkBox('Upper Case', (bool value) {
                    _isWithUppercase = value;
                    setState(() {});
                  }, _isWithUppercase),
                  checkBox('Lower Case', (bool value) {
                    _isWithLetters = value;
                    setState(() {});
                  }, _isWithLetters)
                ],
              ),
              SizedBox(height: 10),
              Row(
                mainAxisAlignment: MainAxisAlignment.spaceAround,
                children: [
                  checkBox('Symbols', (bool value) {
                    _isWithSpecial = value;
                    setState(() {});
                  }, _isWithSpecial),
                  checkBox('Numbers', (bool value) {
                    _isWithNumbers = value;
                    setState(() {});
                  }, _isWithNumbers)
                ],
              ),
              SizedBox(height: 20),
              Padding(
                padding: const EdgeInsets.all(15.0),
                child: TextField(
                  controller: _passwordLength,
                  decoration: InputDecoration(
                    border: OutlineInputBorder(
                      borderRadius: BorderRadius.circular(25.0),
                      borderSide: BorderSide(),
                    ),
                    filled: true,
                    fillColor: Colors.grey[300],
                    labelText: 'Enter Length',
                    labelStyle: TextStyle(color: Colors.blue),
                  ),
                  keyboardType: TextInputType.number,
                ),
              ),
              SizedBox(height: 20),
              FlatButton(
                onPressed: () {
                  if (_passwordLength.text.trim().isNotEmpty)
                    _numberCharPassword = double.parse(_passwordLength.text.trim());

                  newPassword = password.randomPassword(
                    letters: _isWithLetters,
                    numbers: _isWithNumbers,
                    passwordLength: _numberCharPassword,
                    specialChar: _isWithSpecial,
                    uppercase: _isWithUppercase,
                  );

                  print(newPassword);
                  double passwordstrength = password.checkPassword(password: newPassword);
                  if (passwordstrength < 0.3) {
                    _color = Colors.red;
                    isOk = 'This password is weak!';
                  } else if (passwordstrength < 0.7) {
                    _color = Colors.blue;
                    isOk = 'This password is Good';
                  } else {
                    _color = Colors.green;
                    isOk = 'This passsword is Strong';
                  }

                  setState(() {});
                },
                child: Container(
                  color: Colors.red,
                  child: Padding(
                    padding: const EdgeInsets.all(8.0),
                    child: Text(
                      'Generate Password',
                      style: TextStyle(color: Colors.white, fontSize: 20),
                    ),
                  ),
                ),
              ),
              SizedBox(height: 10),
              if (newPassword.isNotEmpty && newPassword != null)
                Center(
                  child: SingleChildScrollView(
                    child: Padding(
                      padding: const EdgeInsets.all(8.0),
                      child: Text(
                        isOk,
                        style: TextStyle(color: _color, fontSize: 25),
                      ),
                    ),
                  ),
                ),
              if (newPassword.isNotEmpty && newPassword != null)
                Center(
                  child: SingleChildScrollView(
                    child: Padding(
                      padding: const EdgeInsets.all(8.0),
                      child: Text(
                        newPassword,
                        style: TextStyle(color: _color, fontSize: 25),
                      ),
                    ),
                  ),
                )
            ],
          ),
        ),
      ),
    );
  }
}
以上就是关于random_password_generator插件的基本介绍和使用方法,希望对你有所帮助!如果你有任何问题或需要进一步的帮助,请随时提问。
更多关于Flutter随机密码生成插件random_password_generator的使用的实战系列教程也可以访问 https://www.itying.com/category-92-b0.html
更多关于Flutter随机密码生成插件random_password_generator的使用的实战系列教程也可以访问 https://www.itying.com/category-92-b0.html
当然,以下是如何在Flutter项目中使用random_password_generator插件来生成随机密码的示例代码。这个插件允许你自定义密码的长度、字符集等参数。
1. 添加依赖
首先,你需要在pubspec.yaml文件中添加random_password_generator的依赖:
dependencies:
  flutter:
    sdk: flutter
  random_password_generator: ^latest_version  # 请替换为最新版本号
2. 安装依赖
在终端中运行以下命令来安装依赖:
flutter pub get
3. 使用插件生成随机密码
下面是一个完整的Flutter应用示例,它展示了如何使用random_password_generator插件生成随机密码。
import 'package:flutter/material.dart';
import 'package:random_password_generator/random_password_generator.dart';

void main() {
  runApp(MyApp());
}

class MyApp extends StatelessWidget {
  @override
  Widget build(BuildContext context) {
    return MaterialApp(
      title: 'Flutter Random Password Generator Demo',
      theme: ThemeData(
        primarySwatch: Colors.blue,
      ),
      home: RandomPasswordScreen(),
    );
  }
}

class RandomPasswordScreen extends StatefulWidget {
  @override
  _RandomPasswordScreenState createState() => _RandomPasswordScreenState();
}

class _RandomPasswordScreenState extends State<RandomPasswordScreen> {
  String generatedPassword = '';

  void _generatePassword() {
    final passwordGenerator = PasswordGenerator(
      length: 12,  // 密码长度
      hasLowerCase: true,  // 是否包含小写字母
      hasUpperCase: true,  // 是否包含大写字母
      hasNumbers: true,    // 是否包含数字
      hasSpecialChars: true, // 是否包含特殊字符
      specialChars: SpecialCharSets.all  // 特殊字符集
    );

    setState(() {
      generatedPassword = passwordGenerator.generate();
    });
  }

  @override
  Widget build(BuildContext context) {
    return Scaffold(
      appBar: AppBar(
        title: Text('Random Password Generator'),
      ),
      body: Padding(
        padding: const EdgeInsets.all(16.0),
        child: Column(
          mainAxisAlignment: MainAxisAlignment.center,
          children: <Widget>[
            Text(
              'Generated Password:',
              style: TextStyle(fontSize: 20, fontWeight: FontWeight.bold),
            ),
            SizedBox(height: 16),
            Text(
              generatedPassword,
              style: TextStyle(fontSize: 18, color: Colors.blue),
            ),
            SizedBox(height: 32),
            ElevatedButton(
              onPressed: _generatePassword,
              child: Text('Generate Password'),
            ),
          ],
        ),
      ),
    );
  }
}
代码说明
-
依赖导入:
import 'package:flutter/material.dart';导入Flutter核心库。import 'package:random_password_generator/random_password_generator.dart';导入random_password_generator插件。
-
应用结构:
MyApp是应用的根组件。RandomPasswordScreen是显示生成密码的页面。
-
生成密码:
- 使用
PasswordGenerator类创建一个密码生成器实例,并配置密码的长度和各种字符集。 - 调用
generate()方法生成密码,并通过setState更新UI。
- 使用
-
UI展示:
- 使用
Scaffold和AppBar创建页面布局。 - 使用
Text和ElevatedButton展示生成的密码和生成按钮。
- 使用
你可以根据需求调整密码生成器的配置,比如密码长度、字符集等。希望这个示例对你有所帮助!


