Flutter机器学习工具包基础插件google_mlkit_commons的使用
Flutter机器学习工具包基础插件google_mlkit_commons的使用
插件概述
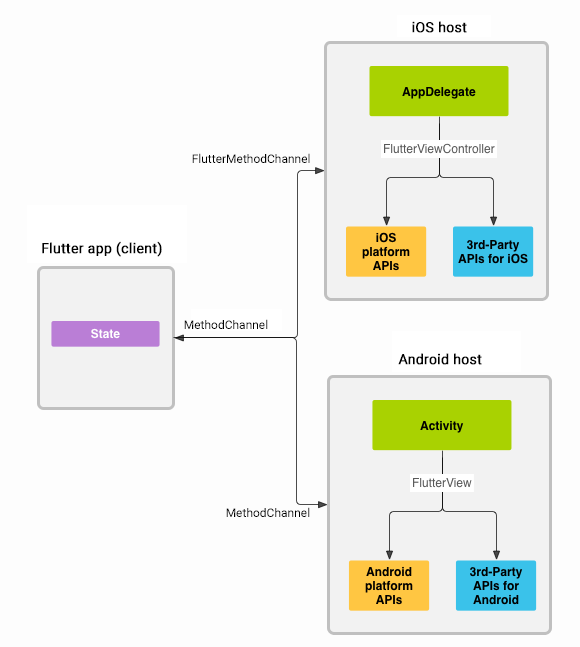
google_mlkit_commons 是一个Flutter插件,它为Google ML Kit提供了一些通用的方法。该插件适用于移动平台(iOS和Android),通过Flutter Platform Channels与原生API进行通信。这意味着所有的机器学习处理都是在原生层完成的,而不是在Flutter/Dart中直接处理。

注意事项
- Google ML Kit仅支持iOS和Android平台。
- 此插件不是由Google赞助或维护的。
- 由于使用了平台通道,所有调用都会传递给原生平台执行。
Requirements
iOS
- 最低iOS部署目标:15.5.0
- Xcode 15.3.0 或更新版本
- Swift 5
- 排除armv7架构,只支持64位架构(x86_64 和 arm64)
Podfile配置示例:
platform :ios, '15.5.0'  # or newer version

...

$iOSVersion = '15.5.0'  # or newer version

post_install do |installer|
  installer.pods_project.build_configurations.each do |config|
    config.build_settings["EXCLUDED_ARCHS[sdk=*]"] = "armv7"
    config.build_settings['IPHONEOS_DEPLOYMENT_TARGET'] = $iOSVersion
  end

  installer.pods_project.targets.each do |target|
    flutter_additional_ios_build_settings(target)
    target.build_configurations.each do |config|
      if Gem::Version.new($iOSVersion) > Gem::Version.new(config.build_settings['IPHONEOS_DEPLOYMENT_TARGET'])
        config.build_settings['IPHONEOS_DEPLOYMENT_TARGET'] = $iOSVersion
      end
    end
  end
end
Android
- minSdkVersion: 21
- targetSdkVersion: 33
- compileSdkVersion: 34
Usage
创建 InputImage
InputImage 是用于表示输入图像的对象,可以通过文件路径、文件对象或字节数组来创建。
从文件路径创建:
final inputImage = InputImage.fromFilePath(filePath);
从文件对象创建:
final inputImage = InputImage.fromFile(file);
从字节数组创建:
final inputImage = InputImage.fromBytes(bytes: bytes, metadata: metadata);
如果你使用的是Camera插件,请确保配置你的CameraController以使用以下格式:
- Android:
ImageFormatGroup.nv21 - iOS:
ImageFormatGroup.bgra8888
示例代码
以下是一个完整的示例,展示了如何从相机捕获图像并将其转换为InputImage:
import 'dart:io';
import 'package:camera/camera.dart';
import 'package:google_mlkit_commons/google_mlkit_commons.dart';
import 'package:flutter/services.dart';

class CameraService {
  final List<CameraDescription> _cameras;
  int _cameraIndex = 0;

  CameraService(this._cameras);

  final _orientations = {
    DeviceOrientation.portraitUp: 0,
    DeviceOrientation.landscapeLeft: 90,
    DeviceOrientation.portraitDown: 180,
    DeviceOrientation.landscapeRight: 270,
  };

  Future<void> initializeCamera() async {
    final camera = _cameras[_cameraIndex];
    final controller = CameraController(
      camera,
      ResolutionPreset.max,
      enableAudio: false,
      imageFormatGroup: Platform.isAndroid
          ? ImageFormatGroup.nv21 // for Android
          : ImageFormatGroup.bgra8888, // for iOS
    );
    await controller.initialize();
  }

  InputImage? _inputImageFromCameraImage(CameraImage image) {
    final camera = _cameras[_cameraIndex];
    final sensorOrientation = camera.sensorOrientation;
    InputImageRotation? rotation;

    if (Platform.isIOS) {
      rotation = InputImageRotationValue.fromRawValue(sensorOrientation);
    } else if (Platform.isAndroid) {
      var rotationCompensation =
          _orientations[MediaQuery.of(context).platformDispatcher.onMetricsChanged!.deviceOrientation];
      if (rotationCompensation == null) return null;
      if (camera.lensDirection == CameraLensDirection.front) {
        // front-facing
        rotationCompensation = (sensorOrientation + rotationCompensation) % 360;
      } else {
        // back-facing
        rotationCompensation = (sensorOrientation - rotationCompensation + 360) % 360;
      }
      rotation = InputImageRotationValue.fromRawValue(rotationCompensation);
    }
    if (rotation == null) return null;

    final format = InputImageFormatValue.fromRawValue(image.format.raw);
    if (format == null ||
        (Platform.isAndroid && format != InputImageFormat.nv21) ||
        (Platform.isIOS && format != InputImageFormat.bgra8888)) return null;

    if (image.planes.length != 1) return null;
    final plane = image.planes.first;

    return InputImage.fromBytes(
      bytes: plane.bytes,
      metadata: InputImageMetadata(
        size: Size(image.width.toDouble(), image.height.toDouble()),
        rotation: rotation,
        format: format,
        bytesPerRow: plane.bytesPerRow,
      ),
    );
  }

  void processImage(CameraImage image) {
    final inputImage = _inputImageFromCameraImage(image);
    if (inputImage != null) {
      // Process the inputImage with ML Kit
    }
  }
}
Example App
你可以在这里找到完整的示例应用程序:Example App
Contributing
欢迎贡献!如果有任何问题,请先查看现有的issue。对于非平凡的修复,请先创建一个issue。对于简单的修复,可以直接提交pull request。
希望这些信息对你有所帮助!如果你有任何其他问题,请随时提问。
更多关于Flutter机器学习工具包基础插件google_mlkit_commons的使用的实战系列教程也可以访问 https://www.itying.com/category-92-b0.html
更多关于Flutter机器学习工具包基础插件google_mlkit_commons的使用的实战系列教程也可以访问 https://www.itying.com/category-92-b0.html
当然,下面是一个关于如何在Flutter项目中使用google_mlkit_commons插件的基础示例。google_mlkit_commons是Google ML Kit的一个基础库,它提供了一些通用的类型和工具类,用于与其他ML Kit插件(如文本识别、面部检测等)协同工作。
首先,你需要在你的Flutter项目中添加google_mlkit_commons依赖。打开你的pubspec.yaml文件,并添加以下依赖:
dependencies:
  flutter:
    sdk: flutter
  google_mlkit_commons: ^0.1.0  # 请注意版本号,这里使用的是假设的版本号,实际使用时请检查最新版本
然后运行flutter pub get来安装依赖。
接下来,我们将展示如何使用google_mlkit_commons中的类型。虽然google_mlkit_commons本身不提供具体的机器学习功能,但它定义了一些数据类型,这些类型在其他ML Kit插件中会被用到。例如,InputImage类是一个通用的图像输入类型,可以被多个ML Kit插件使用。
以下是一个简单的示例,演示如何从图像文件中加载图像并使用InputImage类:
import 'package:flutter/material.dart';
import 'package:image_picker/image_picker.dart';  // 用于从设备中选择图像
import 'package:google_mlkit_commons/google_mlkit_commons.dart';

void main() {
  runApp(MyApp());
}

class MyApp extends StatelessWidget {
  @override
  Widget build(BuildContext context) {
    return MaterialApp(
      home: MyHomePage(),
    );
  }
}

class MyHomePage extends StatefulWidget {
  @override
  _MyHomePageState createState() => _MyHomePageState();
}

class _MyHomePageState extends State<MyHomePage> {
  final ImagePicker _picker = ImagePicker();
  File? _imageFile;

  Future<void> _pickImage() async {
    final pickedFile = await _picker.pickImage(source: ImageSource.camera);

    if (pickedFile != null) {
      setState(() {
        _imageFile = File(pickedFile.path);
      });

      // 加载图像并转换为InputImage
      _processImage(_imageFile!);
    }
  }

  void _processImage(File imageFile) async {
    // 创建一个InputImage对象
    final inputImage = InputImage.fromFilePath(
      image: imageFile.absolute.path,
      metadata: InputImageMetadata.create(
        size: Size(imageFile.lengthSync() ~/ 1024, 720),  // 这里假设图像大小为720p,实际应根据图像实际尺寸设置
        rotation: 0,
        rawFormat: InputImageRawFormat.unknown,  // 未知格式,因为是从文件路径加载
      ),
    );

    // 在这里,你可以将inputImage传递给其他ML Kit插件进行处理
    // 例如,文本识别、面部检测等
    // 注意:下面的代码只是示例,并不会实际执行任何ML任务
    print("InputImage created: $inputImage");
  }

  @override
  Widget build(BuildContext context) {
    return Scaffold(
      appBar: AppBar(
        title: Text('Google ML Kit Commons Example'),
      ),
      body: Center(
        child: _imageFile == null
            ? Text('No image selected.')
            : Image.file(_imageFile!),
      ),
      floatingActionButton: FloatingActionButton(
        onPressed: _pickImage,
        tooltip: 'Pick Image',
        child: Icon(Icons.add_a_photo),
      ),
    );
  }
}
在这个示例中,我们使用了image_picker插件从设备中选择图像。然后,我们将选择的图像文件路径传递给InputImage.fromFilePath方法,以创建一个InputImage对象。这个对象可以传递给其他ML Kit插件进行进一步的处理,例如文本识别或面部检测。
请注意,这个示例并没有实际调用任何ML Kit的具体功能,它只是展示了如何创建和使用InputImage对象。要实际执行ML任务,你需要集成并使用其他ML Kit插件(如google_mlkit_text_recognition、google_mlkit_face_detection等)。


