Flutter流体效果插件metaballs的使用
Flutter流体效果插件metaballs的使用
Animated Metaballs for Flutter

关于
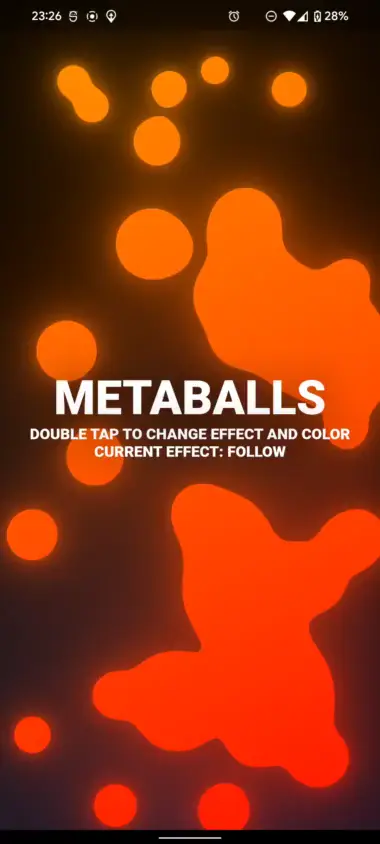
这个库让你可以轻松地在Flutter项目中添加性能优良、高度可配置的metaballs(流体效果)。Metaballs会自动适应任何屏幕大小,因此你不需要为不同的设备手动调整参数。这些metaballs是通过着色器实现的,以确保在所有设备上都有最佳性能。所有可用的效果都针对鼠标和触摸输入进行了优化,并且不会干扰任何手势检测器。
安装
在pubspec.yaml文件中添加依赖:
dependencies:
  metaballs: ^1.4.2
然后在Dart代码中导入:
import 'package:metaballs/metaballs.dart';
使用示例
下面是一个完整的示例代码,展示了如何使用metaballs插件创建一个具有不同效果的Metaballs动画。
import 'package:flutter/material.dart';
import 'package:metaballs/metaballs.dart';

class ColorsEffectPair {
  final List<Color> colors;
  final MetaballsEffect? effect;
  final String name;

  ColorsEffectPair({
    required this.colors,
    required this.name,
    required this.effect,
  });
}

List<ColorsEffectPair> colorsAndEffects = [
  ColorsEffectPair(
    colors: [
      const Color.fromARGB(255, 255, 21, 0),
      const Color.fromARGB(255, 255, 153, 0),
    ],
    effect: MetaballsEffect.follow(),
    name: 'FOLLOW'
  ),
  ColorsEffectPair(
    colors: [
      const Color.fromARGB(255, 0, 255, 106),
      const Color.fromARGB(255, 255, 251, 0),
    ],
    effect: MetaballsEffect.grow(),
    name: 'GROW'
  ),
  ColorsEffectPair(
    colors: [
      const Color.fromARGB(255, 90, 60, 255),
      const Color.fromARGB(255, 120, 255, 255),
    ],
    effect: MetaballsEffect.speedup(),
    name: 'SPEEDUP'
  ),
  ColorsEffectPair(
    colors: [
      const Color.fromARGB(255, 255, 60, 120),
      const Color.fromARGB(255, 237, 120, 255),
    ],
    effect: MetaballsEffect.ripple(),
    name: 'RIPPLE'
  ),
  ColorsEffectPair(
    colors: [
      const Color.fromARGB(255, 120, 217, 255),
      const Color.fromARGB(255, 255, 234, 214),
    ],
    effect: null,
    name: 'NONE'
  ),
];

void main() {
  // 启用dithering以平滑渐变和metaballs
  Paint.enableDithering = true;
  runApp(const MyApp());
}

class MyApp extends StatelessWidget {
  const MyApp({Key? key}) : super(key: key);

  @override
  Widget build(BuildContext context) {
    return MaterialApp(
      title: 'Metaballs Demo',
      theme: ThemeData.dark(),
      home: const HomePage(),
      debugShowCheckedModeBanner: false,
    );
  }
}

class HomePage extends StatefulWidget {
  const HomePage({Key? key}) : super(key: key);

  @override
  State<HomePage> createState() => _HomePageState();
}

class _HomePageState extends State<HomePage> {
  int colorEffectIndex = 0;

  @override
  Widget build(BuildContext context) {
    double width = MediaQuery.of(context).size.width;

    return Material(
      child: GestureDetector(
        onDoubleTap: () {
          setState(() {
            colorEffectIndex = (colorEffectIndex + 1) % colorsAndEffects.length;
          });
        },
        child: Container(
          decoration: const BoxDecoration(
            gradient: RadialGradient(
              center: Alignment.bottomCenter,
              radius: 1.5,
              colors: [
                Color.fromARGB(255, 13, 35, 61),
                Colors.black,
              ]
            )
          ),
          child: Metaballs(
            effect: colorsAndEffects[colorEffectIndex].effect,
            glowRadius: 1,
            glowIntensity: 0.6,
            maxBallRadius: 50,
            minBallRadius: 20,
            metaballs: 40,
            color: Colors.grey,
            gradient: LinearGradient(
              colors: colorsAndEffects[colorEffectIndex].colors,
              begin: Alignment.bottomRight,
              end: Alignment.topLeft
            ),
            child: Center(
              child: Column(
                mainAxisAlignment: MainAxisAlignment.center,
                crossAxisAlignment: CrossAxisAlignment.center,
                children: [
                  Text(
                    'METABALLS',
                    style: TextStyle(
                      shadows: [
                        Shadow(
                          color: Colors.black.withOpacity(0.6),
                          blurRadius: 80
                        )
                      ],
                      fontSize: 50 * width / 400,
                      fontWeight: FontWeight.w900
                    ),
                  ),
                  Text(
                    'DOUBLE TAP TO CHANGE EFFECT AND COLOR\nCURRENT EFFECT: ${colorsAndEffects[colorEffectIndex].name}',
                    style: TextStyle(
                      shadows: [
                        Shadow(
                          color: Colors.black.withOpacity(0.6),
                          blurRadius: 80
                        )
                      ],
                      fontSize: 16 * width / 400,
                      fontWeight: FontWeight.w900
                    ),
                    textAlign: TextAlign.center,
                  ),
                ],
              ),
            ),
          ),
        ),
      ),
    );
  }
}
属性说明
| Property | Default value | Accepted values | Description |
|---|---|---|---|
Color? color |
Color(0xff4285F4) |
Metaballs的颜色 | |
MetaballsEffect? effect |
- | 应用于Metaballs的动画效果 | |
Gradient? gradient |
- | 用于着色Metaballs的渐变,覆盖颜色 | |
int? metaballs |
40 |
1到128 | Metaballs的数量 |
Duration? animationDuration |
Duration(milliseconds: 200) |
颜色变化动画的持续时间 | |
double? speedMultiplier |
1 |
大于0 | 球移动速度的倍数 |
double? bounceStiffness |
3 |
大于0 | 球改变方向的速度倍数 |
double? minBallRadius |
15 |
0或更多 | 球的最小尺寸 |
double? maxBallRadius |
40 |
大于minBallRadius | 球的最大尺寸 |
double? glowRadius |
0.7 |
0到1 | 表示发光半径的倍数 |
double? glowIntensity |
0.6 |
0到1 | 发光亮度 |
Widget? child |
- | 放置在Metaballs widget之上的widget |
效果说明
MetaballsEffect.follow()
此效果会在每个光标/触摸点添加一个metaball,并跟随该光标/触摸点移动。
| Property | Default value | Accepted values | Description |
|---|---|---|---|
double? smoothing |
1 |
0或更多 | Metaballs移动的平滑度 |
double? growthFactor |
1 |
0或更多 | Metaballs相对于其移动速度的增长量 |
double? radius |
- | 0或更多 | 跟随metaball的大小,0是最小球半径,1是最大球半径 |
MetaballsEffect.speedup()
此效果使所有metaballs根据鼠标或触摸屏上的移动速度加快。
| Property | Default value | Accepted values | Description |
|---|---|---|---|
double? speedup |
1 |
大于0 | Metaballs相对于鼠标/滑动速度的加速量 |
MetaballsEffect.grow()
此效果根据光标或触摸的距离增加所有metaballs的半径。
| Property | Default value | Accepted values | Description |
|---|---|---|---|
double? radius |
0.5 |
大于0 | 光标/触摸周围影响metaballs缩放的半径 |
double? growthFactor |
0.5 |
大于0 | Metaballs增长的量 |
double? smoothing |
1 |
0或更多 | 移动的平滑度 |
MetaballsEffect.ripple()
此效果使所有metaballs从点击或鼠标点击处向外扩展并收缩。
| Property | Default value | Accepted values | Description |
|---|---|---|---|
double? speed |
1 |
大于0 | 波纹效果的速度 |
double? width |
1 |
大于0 | 波纹宽度 |
double? growthFactor |
1 |
大于0 | Metaballs增长的量 |
Duration? fade |
Duration(milliseconds: 1200) |
- | 波纹完全消失的时间 |
Web支持
在Web上,由于ShaderMask当前不被支持,渐变是手动在WebGL中实现的。因此,某些渐变特性如RadialGradient的focal和focalRadius选项以及所有渐变的转换矩阵当前未实现。这些特性的支持可能会在未来版本中添加,但目前优先级较低。如果你依赖这些特性,请在GitHub上提交功能请求或拉取请求。
更多关于Flutter流体效果插件metaballs的使用的实战系列教程也可以访问 https://www.itying.com/category-92-b0.html
更多关于Flutter流体效果插件metaballs的使用的实战系列教程也可以访问 https://www.itying.com/category-92-b0.html
当然,关于Flutter中的流体效果插件metaballs的使用,我可以为你提供一个简单的代码示例。metaballs效果通常用于创建类似细胞分裂、气泡或流体融合的视觉效果。在Flutter中,虽然没有一个官方的metaballs插件,但你可以通过自定义绘制或使用第三方库(如果存在)来实现类似效果。
下面是一个基本的示例,展示如何使用Flutter的CustomPainter来创建一个简单的metaballs效果。请注意,这个示例不会提供一个完整的、高度优化的metaballs实现,但它将为你提供一个起点。
首先,确保你的pubspec.yaml文件中已经包含了Flutter的依赖项(通常不需要额外依赖项,除非使用第三方库):
dependencies:
  flutter:
    sdk: flutter
然后,创建一个新的Dart文件,比如metaballs_painter.dart,并添加以下代码:
import 'dart:math' as math;
import 'package:flutter/material.dart';

class MetaballsPainter extends CustomPainter {
  final List<Offset> balls;
  final double radius;
  final Color color;

  MetaballsPainter({
    required this.balls,
    this.radius = 50.0,
    this.color = Colors.blue,
  });

  @override
  void paint(Canvas canvas, Size size) {
    final Paint paint = Paint()
      ..color = color
      ..style = PaintingStyle.fill;

    for (final Offset ball in balls) {
      canvas.drawCircle(ball, radius, paint);
    }

    // This is a simplified version. For a true metaballs effect,
    // you would need to implement a field function and blend circles.
    // This could involve complex math and performance considerations.
  }

  @override
  bool shouldRepaint(covariant CustomPainter oldDelegate) {
    return false; // Implement this based on your needs
  }
}
接下来,在你的主应用文件中(例如main.dart),使用这个自定义画家来绘制metaballs:
import 'package:flutter/material.dart';
import 'metaballs_painter.dart';

void main() {
  runApp(MyApp());
}

class MyApp extends StatelessWidget {
  @override
  Widget build(BuildContext context) {
    return MaterialApp(
      home: Scaffold(
        appBar: AppBar(
          title: Text('Metaballs Example'),
        ),
        body: CustomPaint(
          size: Size.infinite, // Adjust based on your layout needs
          painter: MetaballsPainter(
            balls: [
              Offset(100, 100),
              Offset(200, 200),
              Offset(300, 100),
            ],
            radius: 50.0,
            color: Colors.blue.withOpacity(0.5),
          ),
        ),
      ),
    );
  }
}
这个示例仅仅绘制了几个固定的圆,并没有实现真正的metaballs效果(即圆之间的平滑过渡和融合)。要实现真正的metaballs效果,你需要实现一个场函数来计算每个点的密度,并根据这个密度来绘制颜色渐变。这通常涉及到数值方法和高性能计算,可能需要在Shader层面进行实现。
由于这是一个复杂的图形效果,建议研究现有的图形库或Shader代码,或者考虑使用如OpenGL或WebGL这样的低级图形API来实现更高效的metaballs效果。在Flutter中,你可以通过Texture widget来嵌入这些低级API渲染的内容。


