Flutter像素对齐插件pixel_snap的使用
Flutter像素对齐插件pixel_snap的使用
PixelSnap - 任何像素缩放比例下保持清晰的应用程序
如果你曾经在具有非整数像素缩放的系统(如Windows上的150%缩放)上运行过Flutter应用程序,你可能会注意到原本漂亮的Flutter应用程序突然变得模糊。这是为什么呢?你没有使用任何位图,Flutter是通过矢量绘制一切。那么模糊是从哪里来的?
逻辑像素与物理像素
Flutter坐标系统使用逻辑像素,这意味着所有的填充、内边距、尺寸和边框宽度都是以逻辑像素为单位指定的。然而,显示器是由物理像素组成的,逻辑像素与物理像素之间的比率称为设备像素比率。如果设备像素比率是1,则一个逻辑像素正好代表一个物理像素。如果设备比率是2,则一个逻辑像素将转换为两个物理像素。
问题出现在设备像素比率不是整数时。在这种情况下,一个逻辑像素与1.5个物理像素对应。一条逻辑宽度为1像素的线将渲染为1.5个物理像素宽。由于无法点亮物理像素的分数值,这条线将被抗锯齿处理,因此看起来会模糊。

1px边框在150%像素缩放下变得模糊。
非整数像素比率在Windows上非常常见。如果你是在Mac上开发应用,且其缩放比例为2.0(这可能是最宽容的比例),你可能直到第一次在Windows机器上运行应用时才意识到存在问题。
| 2px描边对齐到像素边界 | 2px描边未对齐到像素边界 |
|---|---|
 |
 |
如何解决这个问题?
通过努力确保所有内容都落在物理像素边界上。
让我们假设你在125%的缩放下想要绘制一条恰好1个物理像素宽的边框。你不能简单地将边框宽度设置为1个逻辑像素,因为这将导致1.25个物理像素。相反,你需要将边框宽度设置为0.8个逻辑像素。这将恰好结果为1个物理像素。
你还必须确保:
- 任何自行调整大小的小部件需要将大小对齐到物理像素。
- 任何定位子小部件的小部件(如
Align、Flex)需要确保子小部件落在物理像素边界上。例如,在Flutter中居中小部件有时会导致即使在100%缩放下子小部件也变得模糊,因为子小部件可能被定位在半个物理像素处。 - 填充区域的布局小部件需要确保子小部件的大小正确对齐到物理像素,同时确保覆盖整个区域。如果一行有3个子小部件填充100个物理像素,子小部件的大小需要精确为33、33和34个物理像素。
- 每当设备像素比率变化时,你需要重新计算布局以确保上述条件得到满足。
PixelSnap来拯救
手动和临时地做这些事情会非常繁琐且容易出错。幸运的是,你不需要这样做。PixelSnap可以通过多种方式帮助你:
扩展方法进行简单的像素对齐
你可以使用pixelSnap()扩展方法对数值、Size、EdgeInsets、Rect、Offset、Decoration和其他基本Flutter类进行像素对齐。
例如:
final ps = PixelSnap.of(context);
final widget = Container(
    width: 10.pixelSnap(ps),
    padding: const EdgeInsets.all(10).pixelSnap(ps),
    decoration: BoxDecoration(
        border: Border.all(
            width: 1.pixelSnap(ps),
            color: Colors.black,
        ),
    ),
);

// 对单个值进行对齐可以使用:
final width = 10.pixelSnap(ps);

// 或者直接调用PixelSnap实例:
final width = ps(10);
像素对齐的小部件
现在这已经是一个改进,但仍然显得有些手动。那布局呢?如何帮助Align、Row或Column?当然可以做得更好。
PixelSnap提供了一些围绕许多Flutter小部件的薄包装,它们已经为你做了像素对齐。要使用这些,只需导入:
import 'package:pixel_snap/widgets.dart';
而不是标准的:
import 'package:flutter/widgets.dart';
这会替换一些基础Flutter小部件为像素对齐的替代品,并重新导出其他所有Flutter小部件。
如果你使用的是Material或Cupertino,请改为导入:
import 'package:pixel_snap/material.dart';
import 'package:pixel_snap/cupertino.dart';
注意这将重新导出原始(未修改)的Material和Cupertino小部件以及标准小部件的像素对齐替代品。
有了这些,上面的例子可以重写为:
final widget = Container(
    width: 10,
    padding: const EdgeInsets.all(10),
    decoration: const BoxDecoration(
        border: Border.all(
            width: 1,
            color: Colors.black,
        ),
    ),
);
这个导入还将给你提供修改过的Flex、Row和Column小部件,确保所有子小部件都被正确像素对齐。
以下是一些自动像素对齐的小部件列表:
- Column
- Text
- RichText
- Center
- FractionallySizedBox
- Align
- Baseline
- ConstrainedBox
- DecoratedBox
- Container
- FittedBox
- IntrinsicWidth
- LimitedBox
- OverflowBox
- Padding
- SizedBox
- SizedOverflowBox
- Positioned
- PhysicalModel
- CustomPaint
- Icon
- Image
- ImageIcon
- AnimatedAlign
- AnimatedContainer
- AnimatedCrossFade
- AnimatedPositioned
- AnimatedPhysicalModel
- AnimatedSize
如果你坚持使用这些小部件,你的应用程序应该能够以很少的额外工作实现像素完美。
- 如果你需要使用自定义大小的小部件,可以将其包裹在
PixelSnapSize小部件中。这将扩展小部件的大小到最近的物理像素,从而确保该小部件在像素对齐的小部件层次结构中不会干扰整体布局。 - 如果你正在使用不支持物理像素感知的外部小部件,但它们足够可定制,允许你指定填充、内边距或边框,你可以使用
.pixelSnap()扩展方法对其进行像素对齐。 - 对于滚动视图,你可以使用
PixelSnapScrollController或在导入pixel_snap/widgets.dart或pixel_snap/material.dart后简单地使用ScrollController。滚动控制器将确保滚动偏移始终对齐到物理像素。
模拟不同的设备像素比率
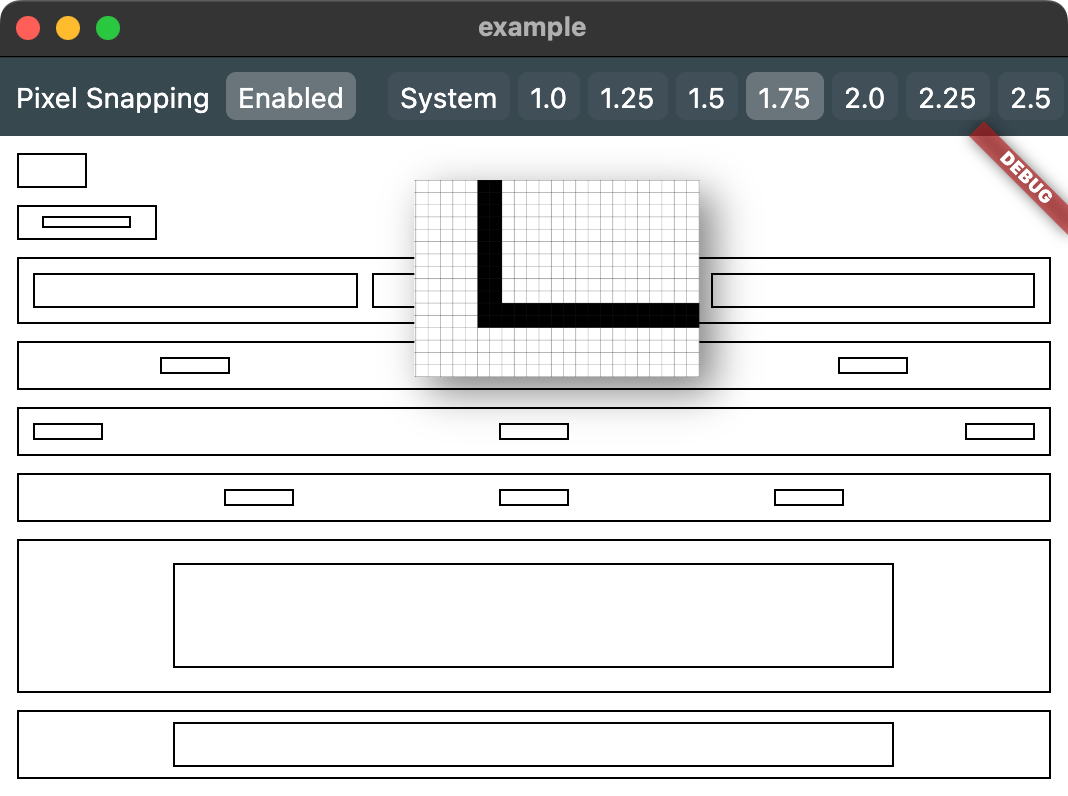
PixelSnap带有PixelSnapDebugBar小部件。你可以将其放在应用程序小部件之上(它应该是顶级小部件),它将提供一个用于切换模拟设备像素比率和开关像素对齐的栏。

PixelSnapDebugBar的实际应用图像可能显示模糊,但实际应用程序在模拟1.75x设备像素比率下具有完美的2px宽黑色边框线。

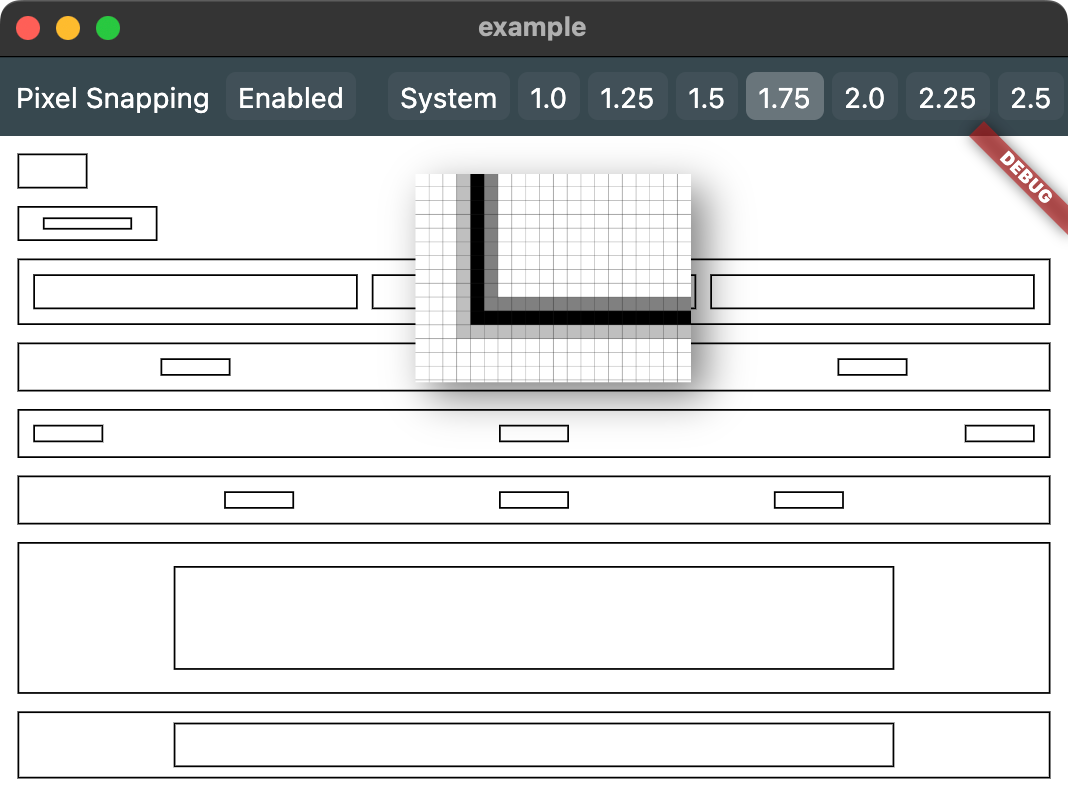
同一应用程序在禁用像素对齐的情况下。放大后可以看到,大多数线条为3px宽,颜色为灰色(由于抗锯齿)。
像素对齐函数
默认的像素对齐函数选择如下结果:
| 逻辑像素 | 缩放因子 | 物理像素 |
|---|---|---|
| 1 | 1 | 1 |
| 1 | 1.25 | 1 |
| 1 | 1.5 | 1 |
| 1 | 1.75 | 2 |
| 1 | 2.0 | 2 |
| 1 | 2.25 | 2 |
| 1 | 2.5 | 2 |
| 1 | 2.75 | 3 |
| … | … | … |
其他注意事项
像素对齐和任意变换
在Flutter中,渲染对象通常在布局期间不知道其屏幕上的位置。为了使像素对齐正常工作,渲染对象不能在其祖先中有任意的缩放/旋转变换。所有平移变换必须正确像素对齐。
这在实践中不应该成为问题。桌面应用程序通常不使用任意的缩放/旋转变换,如果使用,它们通常是局部的,并且仅在临时事件(如过渡)期间使用。
使用像素对齐与任意变换将产生“稍微错误”的结果,但由于变换可能会使事物超出像素边界,这种失真应该很难察觉。
禁用部分应用程序的像素对齐
可以使用PixelSnapOverride小部件禁用任意子视图的像素对齐:
PixelSnapOverride(
    pixelSnapFunction: (value, _, __) => value, // 禁用像素对齐
    child: ...
)
请注意,这可能导致小部件的大小未正确像素对齐,并可能影响周围的其他小部件。为了避免这种情况,可以将小部件包裹在PixelSnapSize小部件中:
PixelSnapSize( // 确保子小部件大小正确像素对齐
    child: PixelSnapOverride(
    pixelSnapFunction: (value, _, __) => value,
    child: ...
)
示例代码
下面是一个完整的示例代码,展示了如何使用PixelSnap来创建一个像素对齐的应用程序:
import 'package:pixel_snap/material.dart';

void main() {
  runApp(const MainApp());
}

const _simpleDecoration = BoxDecoration(
  border: Border.fromBorderSide(BorderSide(color: Colors.black, width: 1)),
);

class MainApp extends StatelessWidget {
  const MainApp({super.key});

  @override
  Widget build(BuildContext context) {
    return PixelSnapDebugBar(
      child: MaterialApp(
        home: Scaffold(
          backgroundColor: Colors.white,
          body: Column(
            mainAxisSize: MainAxisSize.max,
            crossAxisAlignment: CrossAxisAlignment.stretch,
            children: [
              Align(
                alignment: Alignment.topLeft,
                child: Container(
                  margin: const EdgeInsets.all(10),
                  decoration: _simpleDecoration,
                  width: 40,
                  height: 20,
                ),
              ),
              Align(
                alignment: Alignment.topLeft,
                child: Container(
                  margin: const EdgeInsets.all(10).copyWith(top: 0),
                  decoration: _simpleDecoration,
                  width: 80,
                  height: 20,
                  alignment: Alignment.center,
                  child: Container(
                    decoration: _simpleDecoration,
                    width: 51,
                    height: 7,
                  ),
                ),
              ),
              Container(
                margin: const EdgeInsets.all(10).copyWith(top: 0),
                decoration: _simpleDecoration,
                padding: const EdgeInsets.symmetric(vertical: 4, horizontal: 4),
                child: Row(
                  children: List.generate(
                    3,
                    (index) => Expanded(
                      child: Container(
                        margin: const EdgeInsets.all(4),
                        decoration: _simpleDecoration,
                        height: 20,
                      ),
                    ),
                  ),
                ),
              ),
              PixelSnapSize(
                child: PixelSnapOverride(
                  pixelSnapFunction: (value, _, __) => value,
                  child: Container(
                    margin: const EdgeInsets.all(10).copyWith(top: 0),
                    decoration: _simpleDecoration,
                    padding:
                        const EdgeInsets.symmetric(vertical: 4, horizontal: 4),
                    child: Row(
                      mainAxisAlignment: MainAxisAlignment.spaceAround,
                      children: List.generate(
                        3,
                        (index) => Container(
                          margin: const EdgeInsets.all(4),
                          decoration: _simpleDecoration,
                          width: 40,
                          height: 10,
                        ),
                      ),
                    ),
                  ),
                ),
              ),
              Container(
                margin: const EdgeInsets.all(10).copyWith(top: 0),
                decoration: _simpleDecoration,
                padding: const EdgeInsets.symmetric(vertical: 4, horizontal: 4),
                child: Row(
                  mainAxisAlignment: MainAxisAlignment.spaceBetween,
                  children: List.generate(
                    3,
                    (index) => Container(
                      margin: const EdgeInsets.all(4),
                      decoration: _simpleDecoration,
                      width: 40,
                      height: 10,
                    ),
                  ),
                ),
              ),
              Container(
                margin: const EdgeInsets.all(10).copyWith(top: 0),
                decoration: _simpleDecoration,
                padding: const EdgeInsets.symmetric(vertical: 4, horizontal: 4),
                child: Row(
                  mainAxisAlignment: MainAxisAlignment.spaceEvenly,
                  children: List.generate(
                    3,
                    (index) => Container(
                      margin: const EdgeInsets.all(4),
                      decoration: _simpleDecoration,
                      width: 40,
                      height: 10,
                    ),
                  ),
                ),
              ),
              Flexible(
                flex: 2,
                child: Container(
                  margin: const EdgeInsets.all(10).copyWith(top: 0),
                  decoration: _simpleDecoration,
                  alignment: Alignment.center,
                  child: FractionallySizedBox(
                    alignment: Alignment.center,
                    widthFactor: 0.7,
                    heightFactor: 0.7,
                    child: Container(
                      decoration: _simpleDecoration,
                    ),
                  ),
                ),
              ),
              Flexible(
                flex: 1,
                child: Container(
                  margin: const EdgeInsets.all(10).copyWith(top: 0),
                  decoration: _simpleDecoration,
                  alignment: Alignment.center,
                  child: FractionallySizedBox(
                    alignment: Alignment.center,
                    widthFactor: 0.7,
                    heightFactor: 0.7,
                    child: Container(
                      decoration: _simpleDecoration,
                    ),
                  ),
                ),
              ),
            ],
          ),
        ),
      ),
    );
  }
}
通过以上内容,你应该能够理解并使用PixelSnap插件来确保你的Flutter应用程序在不同缩放下都能保持清晰。
更多关于Flutter像素对齐插件pixel_snap的使用的实战系列教程也可以访问 https://www.itying.com/category-92-b0.html
更多关于Flutter像素对齐插件pixel_snap的使用的实战系列教程也可以访问 https://www.itying.com/category-92-b0.html
当然,以下是如何在Flutter项目中使用pixel_snap插件来进行像素对齐的示例代码。pixel_snap插件主要用于确保渲染的UI元素在物理像素上对齐,从而避免在某些设备上可能出现的模糊现象。
首先,你需要在pubspec.yaml文件中添加pixel_snap依赖:
dependencies:
  flutter:
    sdk: flutter
  pixel_snap: ^0.x.x  # 请替换为最新版本号
然后运行flutter pub get来安装依赖。
接下来,在你的Flutter项目中,你可以使用PixelSnap widget来包裹你想要进行像素对齐的组件。以下是一个简单的示例:
import 'package:flutter/material.dart';
import 'package:pixel_snap/pixel_snap.dart';

void main() {
  runApp(MyApp());
}

class MyApp extends StatelessWidget {
  @override
  Widget build(BuildContext context) {
    return MaterialApp(
      title: 'Pixel Snap Example',
      theme: ThemeData(
        primarySwatch: Colors.blue,
      ),
      home: Scaffold(
        appBar: AppBar(
          title: Text('Pixel Snap Example'),
        ),
        body: PixelSnap(
          child: Center(
            child: Container(
              width: 200.0,
              height: 200.0,
              color: Colors.blue,
              child: Center(
                child: Text(
                  'Pixel Snapped',
                  style: TextStyle(color: Colors.white, fontSize: 24),
                ),
              ),
            ),
          ),
        ),
      ),
    );
  }
}
在这个例子中,PixelSnap widget被用来包裹一个Center widget,Center widget里面包含一个Container,Container有固定的宽度和高度,并显示一些文本。通过包裹在PixelSnap中,这个Container及其子组件将会在物理像素上对齐。
pixel_snap插件的工作原理是在渲染树中插入一个层,该层会对其子元素进行像素对齐调整。这种方式对性能的影响通常是可以接受的,但在性能敏感的应用中,你可能需要仔细测试以确保没有引入不可接受的性能开销。
请注意,pixel_snap插件的使用可能依赖于具体的设备和屏幕密度,因此在不同的设备上测试你的应用是非常重要的,以确保像素对齐的效果符合预期。


