Flutter舞台动画插件stager的使用
Flutter舞台动画插件stager的使用
Stager简介
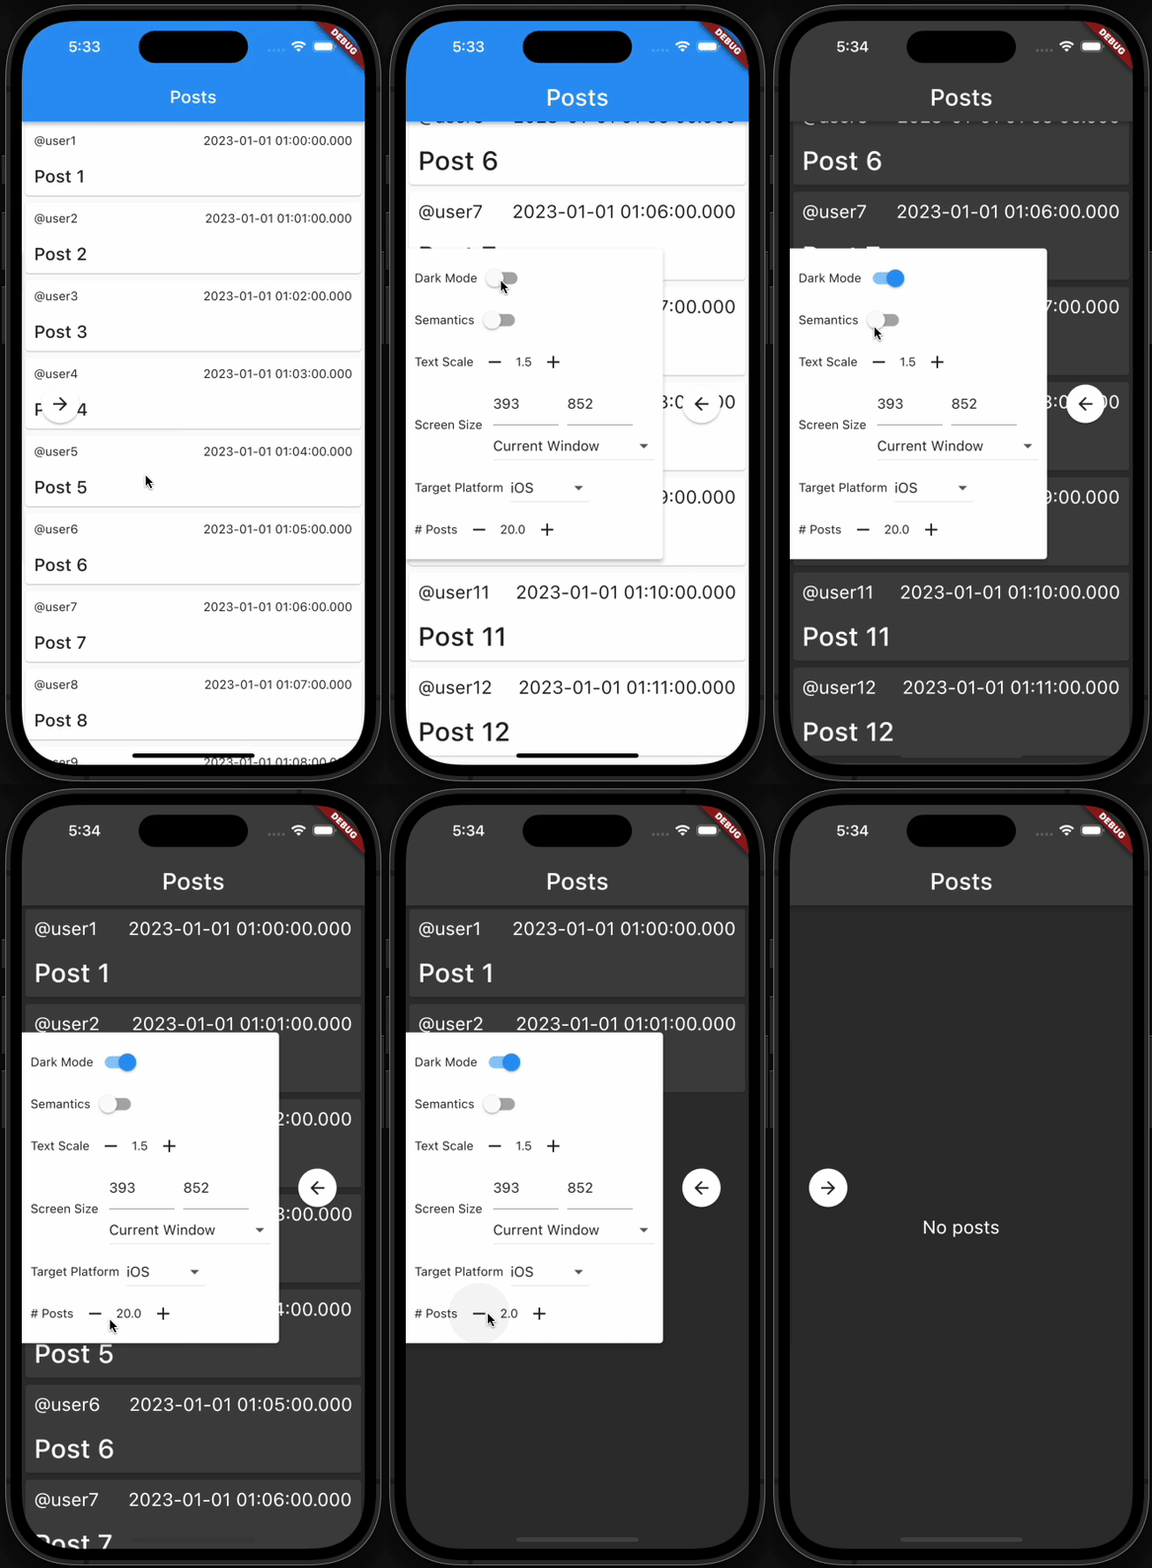
Stager 是一个Flutter开发工具,允许你将应用程序的小部分作为独立的Flutter应用程序运行。这使得你可以:
- 专注于单个组件或流程的开发——不再需要通过多个屏幕点击或设置外部功能标志来达到你正在工作的页面。
- 确保你的UI在多种情况下都能正常工作,包括:
- 明亮模式和黑暗模式
- 小文本或大文本尺寸
- 不同的视口大小
- 不同的设备类型
- 加载、空、错误和正常状态
- 向设计师展示所有这些情况以确保应用的像素完美。
Demo

这个例子展示了如何在简单的Twitter风格的应用程序中使用Stager,该应用程序显示帖子的feed,并包含帖子和用户的详情页。
Concepts概念
Scene场景
Scene是UI的一个简单、自包含单元,是Stager中最重要概念。它使你能够专注于单个组件或页面,从而大大提高开发速度。通过隔离其他应用部分,可以更容易地为UI提供各种输入并替换依赖项的模拟或替代实现。
要创建自己的Scene,只需创建Scene子类并实现title(场景名称)和build()(构造场景主体)。还可以覆盖以下方法和属性:
setUp: 在Scene显示之前调用一次的函数,通常在这里配置小部件的依赖项。environmentControls: 可选的EnvironmentControl列表,允许你向Stager控制面板添加自定义小部件。EnvironmentControl提供了一个让用户改变呈现Scene时使用的值的小部件。当相同的控件在多个场景中使用时,状态会被保留。
StagerApp
StagerApp显示Scenes列表,允许用户选择所有可用的Scenes。由于Scenes可以包含自己的Navigators,因此StagerApp会在Scenes上叠加一个返回按钮。
通常不需要直接与这个类交互——Stager会为你生成。一旦编写了Scene类,只需从项目根目录运行flutter run build_runner来生成包含main()入口点的文件,该文件创建带有你的Scenes的StagerApp。
使用示例
假设你有如下深埋于应用中的组件:
/// A [ListView] of [PostCard]s
class PostsList extends StatefulWidget {
  /// Creates a [PostsList] displaying [posts].
  ///
  /// [postsFuture] will be set to the value of [posts].
  PostsList({
    Key? key,
    required List<Post> posts,
  }) : this.fromFuture(key: key, Future<List<Post>>.value(posts));

  /// Creates a [PostsList] with a Future that resolves to a list of [Post]s.
  const PostsList.fromFuture(this.postsFuture, {super.key});

  /// The Future that resolves to the list of [Post]s this widget will display.
  final Future<List<Post>> postsFuture;

  @override
  State<PostsList> createState() => _PostsListState();
}

class _PostsListState extends State<PostsList> {
  @override
  Widget build(BuildContext context) {
    return FutureBuilder<List<Post>>(
      future: widget.postsFuture,
      builder: (BuildContext context, AsyncSnapshot<List<Post>> snapshot) {
        if (snapshot.connectionState == ConnectionState.waiting) {
          return const Center(
            child: CircularProgressIndicator(),
          );
        }

        if (snapshot.hasError) {
          return const Center(
            child: Text('Error'),
          );
        }

        final List<Post>? posts = snapshot.data;
        if (posts == null || posts.isEmpty) {
          return const Center(
            child: Text('No posts'),
          );
        }

        return ListView.builder(
          itemBuilder: (BuildContext context, int index) => PostCard(
            post: posts[index],
            onTap: () {
              Navigator.of(context).push(
                MaterialPageRoute<void>(
                  builder: (BuildContext context) => PostDetailPage(
                    post: posts[index],
                  ),
                ),
              );
            },
          ),
          itemCount: posts.length,
        );
      },
    );
  }
}
为了测试上述组件的各种状态,我们可以通过创建不同的Scene来简化这个过程。
创建一个Scene
例如,一个展示PostsListPage为空状态的Scene可能如下所示:
@GenerateMocks([Api])
import 'posts_list_page_scenes.mocks.dart';

/// Defines a shared build method used by subclasses and a [MockApi] subclasses
/// can use to control the behavior of the [PostsListPage].
abstract class BasePostsListScene extends Scene {
  /// A mock dependency of [PostsListPage]. Mock the value of [Api.fetchPosts]
  /// to put the staged [PostsListPage] into different states.
  late MockApi mockApi;

  @override
  Widget build() {
    return EnvironmentAwareApp(
      home: Provider<Api>.value(
        value: mockApi,
        child: const PostsListPage(),
      ),
    );
  }

  @override
  Future<void> setUp() async {
    mockApi = MockApi();
  }
}

/// A Scene showing the [PostsListPage] with no [Post]s.
class EmptyListScene extends BasePostsListScene {
  @override
  String get title => 'Empty List';

  @override
  Future<void> setUp() async {
    await super.setUp();
    when(mockApi.fetchPosts()).thenAnswer((_) async => <Post>[]);
  }
}
运行StagerApp
创建Scene子类后,生成你的StagerApp:
flutter pub run build_runner build --delete-conflicting-outputs
这将生成一个my_scenes.stager_app.g.dart文件(如果你将包含Scenes的文件命名为my_scenes.dart),其中包含创建Scenes并启动StagerApp的main函数。对于上面定义的EmptyListScene,它看起来像这样:
// GENERATED CODE - DO NOT MODIFY BY HAND

// **************************************************************************
// StagerAppGenerator
// **************************************************************************

import 'package:stager/stager.dart';

import 'posts_list_page_scenes.dart';

void main() {
  final List<Scene> scenes = <Scene>[
    EmptyListScene(),
  ];

  if (const String.fromEnvironment('Scene').isNotEmpty) {
    const String sceneName = String.fromEnvironment('Scene');
    final Scene scene =
        scenes.firstWhere((Scene scene) => scene.title == sceneName);
    runStagerApp(scenes: <Scene>[scene]);
  } else {
    runStagerApp(scenes: scenes);
  }
}
你可以直接从VS Code中启动这个app,或者通过命令行运行:
flutter run -t path/to/my_scenes.stager_app.g.dart
如果Stager app包含多个Scenes,可以通过提供场景名称作为参数启动特定场景:
flutter run -t path/to/my_scenes.stager_app.g.dart --dart-define='Scene=No Posts'
添加自定义环境控件
Stager的控制面板附带了一些通用控件,如切换暗模式、调整文本缩放等。但是,你的应用程序可能有一些独特的环境属性,在运行时调整这些属性会很有用。为此,Scenes有一个可重写environmentControls属性,允许你向默认的环境操作控件集添加自定义小部件。
例如:
class CounterScene extends Scene {
  // A [StepperControl] allows the user to increment and decrement a value using "-" and
  // "+" buttons. [EnvironmentControl]s will trigger a Scene rebuild when they update
  // their values.
  final StepperControl<int> stepperControl = StepperControl<int>(
    title: 'My Control',
    stateKey: 'MyControl.Key',
    defaultValue: 0,
    onDecrementPressed: (int currentValue) => currentValue + 1,
    onIncrementPressed: (int currentValue) => currentValue - 1,
  );

  @override
  String get title => 'Counter';

  @override
  final List<EnvironmentControl<Object?>> environmentControls =
      <EnvironmentControl<Object?>>[
        stepperControl,
  ];

  @override
  Widget build() {
    return EnvironmentAwareApp(
      home: Scaffold(
        body: Center(
          child: Text(stepperControl.currentValue.toString()),
        ),
      ),
    );
 }
}
更多复杂示例可以在example/lib/pages/posts_list/posts_list_page_scenes.dart中的WithPostsScene和example/lib/pages/post_detail/post_detail_page_scenes.dart中的PostDetailPageScene找到。
测试
这些名字与Flutter测试函数非常相似,这是有意为之——Scenes很容易在测试中重用。为小部件编写Scenes是开始编写小部件测试或扩展小部件测试覆盖率的好方法。使用Scene编写的简单小部件测试如下:
testWidgets('shows an empty state', (WidgetTester tester) async {
  final Scene scene = EmptyListScene();
  await scene.setUp();
  await tester.pumpWidget(scene.build());
  await tester.pump();
  expect(find.text('No posts'), findsOneWidget);
});
通过这种方式,你可以利用Stager快速迭代和测试应用的不同部分,提高开发效率和质量。
更多关于Flutter舞台动画插件stager的使用的实战系列教程也可以访问 https://www.itying.com/category-92-b0.html
更多关于Flutter舞台动画插件stager的使用的实战系列教程也可以访问 https://www.itying.com/category-92-b0.html
当然,以下是一个关于如何在Flutter中使用stager插件来实现舞台动画的示例代码。stager是一个强大的Flutter动画库,它允许你以声明式的方式创建复杂的动画序列。
首先,确保你已经在pubspec.yaml文件中添加了stager依赖:
dependencies:
  flutter:
    sdk: flutter
  stager: ^x.y.z  # 请替换为最新版本号
然后,运行flutter pub get来安装依赖。
接下来,是一个简单的示例,展示如何使用stager来创建一个舞台动画。
import 'package:flutter/material.dart';
import 'package:stager/stager.dart';

void main() {
  runApp(MyApp());
}

class MyApp extends StatelessWidget {
  @override
  Widget build(BuildContext context) {
    return MaterialApp(
      home: Scaffold(
        appBar: AppBar(
          title: Text('Stager Animation Example'),
        ),
        body: Center(
          child: Stager(
            animationController: AnimationController(
              duration: const Duration(seconds: 2),
              vsync: const Vsynchronizer(),
            )..repeat(reverse: true),
            child: StagerAnimatedBuilder(
              animationController: Stager.of(context).animationController,
              builder: (context, child, animation) {
                return Stack(
                  alignment: Alignment.center,
                  children: <Widget>[
                    // 第一个动画元素:一个从屏幕顶部移动到底部的矩形
                    Positioned(
                      top: animation.value * MediaQuery.of(context).size.height,
                      left: (MediaQuery.of(context).size.width - 100) / 2,
                      child: Container(
                        width: 100,
                        height: 100,
                        color: Colors.blue,
                      ),
                    ),

                    // 第二个动画元素:一个从屏幕左侧移动到右侧的圆形
                    Positioned(
                      top: (MediaQuery.of(context).size.height - 100) / 2,
                      left: animation.value * MediaQuery.of(context).size.width,
                      child: Container(
                        width: 100,
                        height: 100,
                        decoration: BoxDecoration(
                          shape: BoxShape.circle,
                          color: Colors.red,
                        ),
                      ),
                    ),
                  ],
                );
              },
            ),
          ),
        ),
      ),
    );
  }
}
在这个示例中,我们创建了一个Stager小部件,并使用AnimationController来控制动画的时长和循环方式。StagerAnimatedBuilder用于构建动画内容,它接收一个动画控制器和一个构建函数。在构建函数中,我们创建了两个动画元素:一个从屏幕顶部到底部的矩形和一个从屏幕左侧到右侧的圆形。
animation.value用于获取当前动画的进度值(范围从0到1),并根据这个值来计算元素的位置。这样,随着动画的进行,元素的位置会随之改变,从而产生动画效果。
请注意,这个示例仅展示了stager的基本用法。stager库提供了许多高级功能,如动画序列、动画组、时间线动画等,你可以根据需求进一步探索和利用这些功能。


