Flutter菜单栏插件pluto_menu_bar的使用
Flutter菜单栏插件pluto_menu_bar的使用
PlutoMenuBar for flutter - v3.0.1
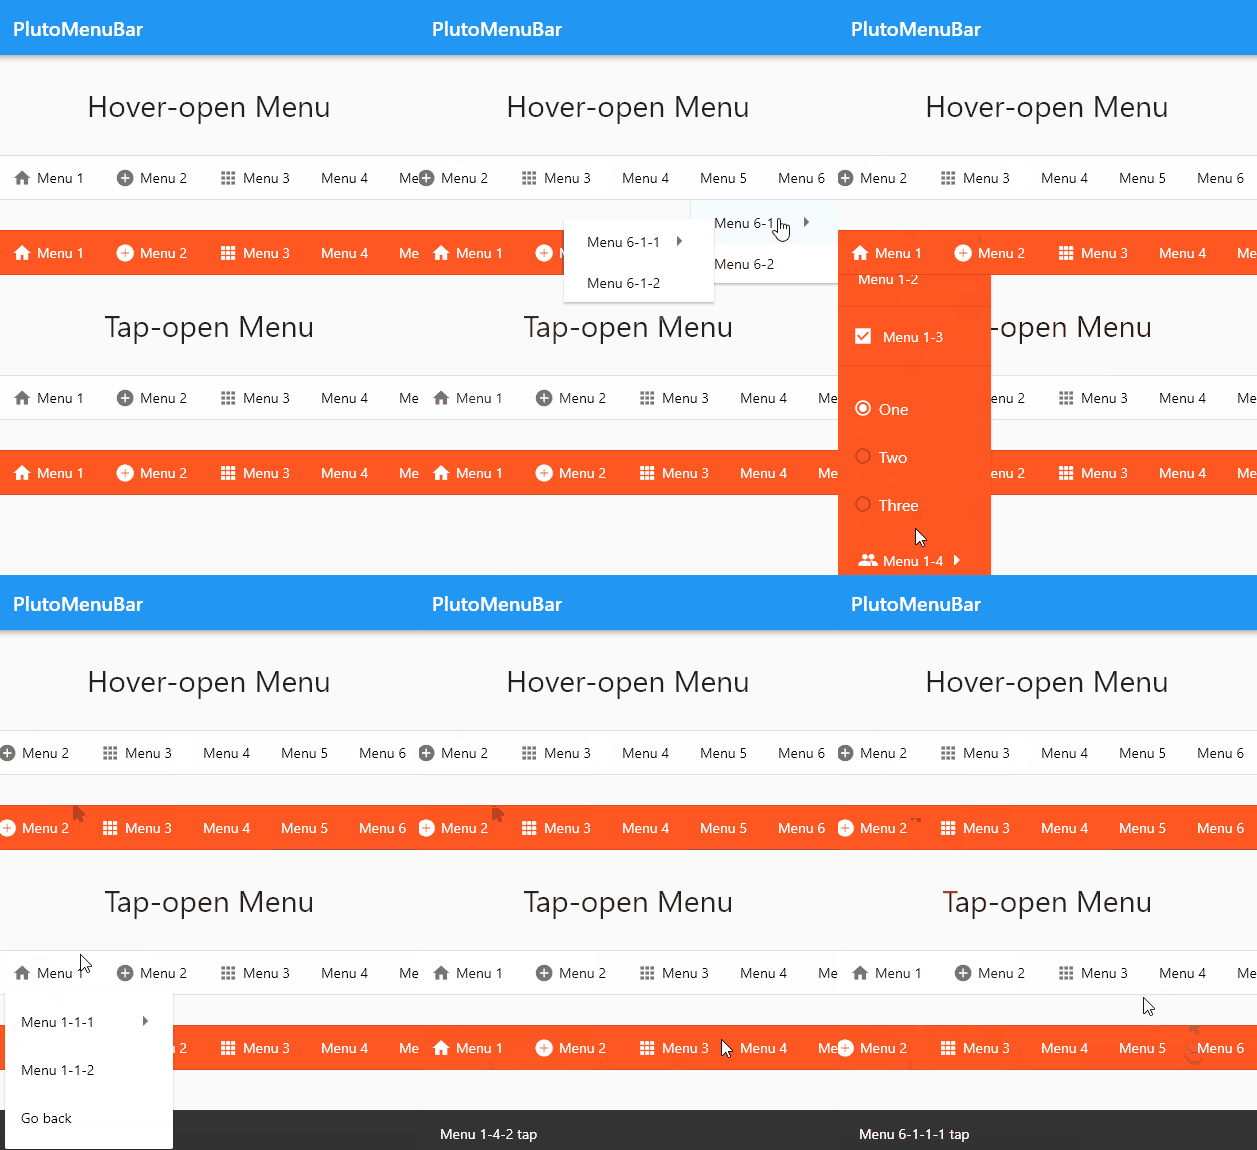
PlutoMenuBar 是一个为Flutter设计的水平菜单栏,它具有以下特性:
- 多级子菜单:可以添加任意数量的子菜单。
- 复选框和单选按钮菜单项:支持Checkbox和Radio类型的菜单项。
- 自定义样式:可以更改背景、字体和边框等默认样式。
- 悬停展开子菜单:在鼠标环境下支持悬停展开子菜单。
示例Demo
安装与文档
截图

使用方法
完整示例代码
import 'package:flutter/material.dart';
import 'package:pluto_menu_bar/pluto_menu_bar.dart';

void main() {
  runApp(const MyApp());
}

class MyApp extends StatelessWidget {
  const MyApp({Key? key}) : super(key: key);

  @override
  Widget build(BuildContext context) {
    return MaterialApp(
      debugShowCheckedModeBanner: false,
      home: Scaffold(
        appBar: AppBar(
          title: const Text('PlutoMenuBar'),
        ),
        body: const PlutoMenuBarDemo(),
      ),
    );
  }
}

class PlutoMenuBarDemo extends StatefulWidget {
  const PlutoMenuBarDemo({
    super.key,
  });

  @override
  State<PlutoMenuBarDemo> createState() => _PlutoMenuBarDemoState();
}

class _PlutoMenuBarDemoState extends State<PlutoMenuBarDemo> {
  late final List<PlutoMenuItem> whiteHoverMenus;
  late final List<PlutoMenuItem> orangeHoverMenus;
  late final List<PlutoMenuItem> whiteTapMenus;
  late final List<PlutoMenuItem> orangeTapMenus;

  @override
  void initState() {
    super.initState();

    whiteHoverMenus = _makeMenus(context);
    orangeHoverMenus = _makeMenus(context);
    whiteTapMenus = _makeMenus(context);
    orangeTapMenus = _makeMenus(context);
  }

  void message(BuildContext context, String text) {
    ScaffoldMessenger.of(context).hideCurrentSnackBar();

    final snackBar = SnackBar(
      content: Text(text),
    );

    ScaffoldMessenger.of(context).showSnackBar(snackBar);
  }

  List<PlutoMenuItem> _makeMenus(BuildContext context) {
    return [
      PlutoMenuItem(
        title: 'Menu 1',
        icon: Icons.home,
        children: [
          PlutoMenuItem(
            title: 'Menu 1-1',
            icon: Icons.group,
            onTap: () => message(context, 'Menu 1-1 tap'),
            children: [
              PlutoMenuItem(
                title: 'Menu 1-1-1',
                onTap: () => message(context, 'Menu 1-1-1 tap'),
                children: [
                  PlutoMenuItem(
                    title: 'Menu 1-1-1-1',
                    onTap: () => message(context, 'Menu 1-1-1-1 tap'),
                  ),
                  PlutoMenuItem(
                    title: 'Menu 1-1-1-2',
                    onTap: () => message(context, 'Menu 1-1-1-2 tap'),
                  ),
                ],
              ),
              PlutoMenuItem(
                title: 'Menu 1-1-2',
                onTap: () => message(context, 'Menu 1-1-2 tap'),
              ),
            ],
          ),
          PlutoMenuItem(
            title: 'Menu 1-2',
            onTap: () => message(context, 'Menu 1-2 tap'),
          ),
          PlutoMenuItem.divider(height: 10),
          PlutoMenuItem.checkbox(
            title: 'Menu 1-3',
            initialCheckValue: true,
            onChanged: (flag) => print(flag),
          ),
          PlutoMenuItem.divider(height: 10),
          PlutoMenuItem.radio(
            title: 'Menu 1-3',
            initialRadioValue: _RadioItems.one,
            radioItems: _RadioItems.values,
            onChanged: (item) => print(item),
            getTitle: (item) {
              switch (item as _RadioItems) {
                case _RadioItems.one:
                  return 'One';
                case _RadioItems.two:
                  return 'Two';
                case _RadioItems.three:
                  return 'Three';
              }
            },
          ),
          PlutoMenuItem(
            title: 'Menu 1-4',
            icon: Icons.group,
            onTap: () => message(context, 'Menu 1-4 tap'),
            children: [
              PlutoMenuItem(
                title: 'Menu 1-4-1',
                onTap: () => message(context, 'Menu 1-4-1 tap'),
                children: [
                  PlutoMenuItem(
                    title: 'Menu 1-4-1-1',
                    onTap: () => message(context, 'Menu 1-4-1-1 tap'),
                  ),
                  PlutoMenuItem(
                    title: 'Menu 1-4-1-2',
                    onTap: () => message(context, 'Menu 1-4-1-2 tap'),
                  ),
                ],
              ),
              PlutoMenuItem(
                title: 'Menu 1-4-2',
                onTap: () => message(context, 'Menu 1-4-2 tap'),
              ),
            ],
          ),
        ],
      ),
      // 其他菜单项...
    ];
  }

  @override
  Widget build(BuildContext context) {
    return SingleChildScrollView(
      child: Column(
        children: [
          const SizedBox(height: 30),
          const Text('Hover-open Menu', style: TextStyle(fontSize: 30)),
          const Text('Works normally in an environment with a mouse.'),
          const SizedBox(height: 30),
          PlutoMenuBar(
            mode: PlutoMenuBarMode.hover,
            menus: whiteHoverMenus,
          ),
          const SizedBox(height: 30),
          PlutoMenuBar(
            mode: PlutoMenuBarMode.hover,
            backgroundColor: Colors.deepOrange,
            itemStyle: const PlutoMenuItemStyle(
              activatedColor: Colors.white,
              indicatorColor: Colors.deepOrange,
              textStyle: TextStyle(color: Colors.white),
              iconColor: Colors.white,
              moreIconColor: Colors.white,
            ),
            menus: orangeHoverMenus,
          ),
          const SizedBox(height: 30),
          const Text('Tap-open Menu', style: TextStyle(fontSize: 30)),
          const SizedBox(height: 30),
          PlutoMenuBar(
            mode: PlutoMenuBarMode.tap,
            menus: whiteTapMenus,
          ),
          const SizedBox(height: 30),
          PlutoMenuBar(
            backgroundColor: Colors.deepOrange,
            itemStyle: const PlutoMenuItemStyle(
              activatedColor: Colors.white,
              indicatorColor: Colors.deepOrange,
              textStyle: TextStyle(color: Colors.white),
              iconColor: Colors.white,
              moreIconColor: Colors.white,
            ),
            menus: orangeTapMenus,
          ),
          const SizedBox(height: 30),
          const Text('Selected top menu', style: TextStyle(fontSize: 30)),
          const SizedBox(height: 30),
          PlutoMenuBar(
            mode: PlutoMenuBarMode.tap,
            itemStyle: const PlutoMenuItemStyle(
              enableSelectedTopMenu: true,
            ),
            menus: [
              PlutoMenuItem(
                title: 'Select1',
                id: 'Select1',
                onTap: () => message(context, 'Select1'),
              ),
              // 更多菜单项...
            ],
          ),
          const SizedBox(height: 30),
          const Text('Toggled top menu', style: TextStyle(fontSize: 30)),
          const SizedBox(height: 30),
          PlutoMenuBar(
            mode: PlutoMenuBarMode.tap,
            itemStyle: PlutoMenuItemStyle(
              enableSelectedTopMenu: true,
              selectedTopMenuResolver: (menu, enabled) {
                final description = enabled == true ? 'disabled' : 'enabled';
                message(context, '${menu.title} $description');
                return enabled == true ? null : true;
              },
            ),
            menus: [
              PlutoMenuItem(
                title: 'Toggle1',
                id: 'Toggle1',
              ),
              // 更多菜单项...
            ],
          ),
          const SizedBox(height: 50),
        ],
      ),
    );
  }
}

enum _RadioItems {
  one,
  two,
  three,
}
Pluto系列
该插件是Pluto系列的一部分,旨在简化使用Flutter开发管理员页面或CMS的过程。相关项目包括:
捐赠和支持
如果您觉得这个项目对您有帮助,可以通过 Buy me a coffee 支持开发者。
JetBrains开源支持
感谢JetBrains提供的免费IDE许可证支持,详情请见 JetBrains开源支持。
希望以上内容能帮助您更好地理解和使用 pluto_menu_bar 插件!如果有任何问题,欢迎继续提问。
更多关于Flutter菜单栏插件pluto_menu_bar的使用的实战系列教程也可以访问 https://www.itying.com/category-92-b0.html
更多关于Flutter菜单栏插件pluto_menu_bar的使用的实战系列教程也可以访问 https://www.itying.com/category-92-b0.html
当然,以下是如何在Flutter项目中使用pluto_menu_bar插件的示例代码。pluto_menu_bar是一个用于创建菜单栏的Flutter插件,非常适合在桌面应用中使用。
1. 添加依赖
首先,你需要在pubspec.yaml文件中添加pluto_menu_bar依赖:
dependencies:
  flutter:
    sdk: flutter
  pluto_menu_bar: ^最新版本号  # 请确保使用最新版本号
然后运行flutter pub get来安装依赖。
2. 导入包
在你的Flutter项目的Dart文件中导入pluto_menu_bar包:
import 'package:pluto_menu_bar/pluto_menu_bar.dart';
3. 使用PlutoMenuBar
以下是一个使用PlutoMenuBar的简单示例:
import 'package:flutter/material.dart';
import 'package:pluto_menu_bar/pluto_menu_bar.dart';

void main() {
  runApp(MyApp());
}

class MyApp extends StatelessWidget {
  @override
  Widget build(BuildContext context) {
    return MaterialApp(
      title: 'PlutoMenuBar Demo',
      theme: ThemeData(
        primarySwatch: Colors.blue,
      ),
      home: Scaffold(
        appBar: AppBar(
          title: Text('PlutoMenuBar Demo'),
        ),
        body: PlutoMenuBarDemo(),
      ),
    );
  }
}

class PlutoMenuBarDemo extends StatefulWidget {
  @override
  _PlutoMenuBarDemoState createState() => _PlutoMenuBarDemoState();
}

class _PlutoMenuBarDemoState extends State<PlutoMenuBarDemo> {
  @override
  Widget build(BuildContext context) {
    return PlutoMenuBar(
      menuItems: [
        PlutoMenuItem(
          title: 'File',
          submenuItems: [
            PlutoSubMenuItem(
              title: 'Open',
              onPressed: () {
                print('Open selected');
              },
            ),
            PlutoSubMenuItem(
              title: 'Save',
              onPressed: () {
                print('Save selected');
              },
            ),
            PlutoSubMenuItem(
              title: 'Exit',
              onPressed: () {
                print('Exit selected');
                // 你可以在这里添加退出应用的逻辑
              },
            ),
          ],
        ),
        PlutoMenuItem(
          title: 'Edit',
          submenuItems: [
            PlutoSubMenuItem(
              title: 'Cut',
              onPressed: () {
                print('Cut selected');
              },
            ),
            PlutoSubMenuItem(
              title: 'Copy',
              onPressed: () {
                print('Copy selected');
              },
            ),
            PlutoSubMenuItem(
              title: 'Paste',
              onPressed: () {
                print('Paste selected');
              },
            ),
          ],
        ),
        // 添加更多的菜单项
      ],
      // 你可以根据需要自定义菜单的样式
      menuBarStyle: PlutoMenuBarStyle(
        backgroundColor: Colors.grey[800],
        textColor: Colors.white,
        hoverColor: Colors.grey[600],
      ),
    );
  }
}
4. 运行应用
完成上述步骤后,你可以运行你的Flutter应用,应该能够看到一个带有菜单栏的界面,点击菜单项时会打印出相应的信息。
注意事项
- 确保你使用的是支持桌面平台的Flutter版本(例如Flutter 2.0及以上)。
- 你可以根据需要自定义
PlutoMenuBar的样式和功能。 - 在桌面平台上测试你的应用,以确保菜单栏的行为符合预期。
希望这个示例能帮助你顺利地在Flutter项目中使用pluto_menu_bar插件!


