Flutter事件总线插件event_bus_plus的使用
Flutter事件总线插件event_bus_plus的使用
EventBus: Events for Dart/Flutter
描述
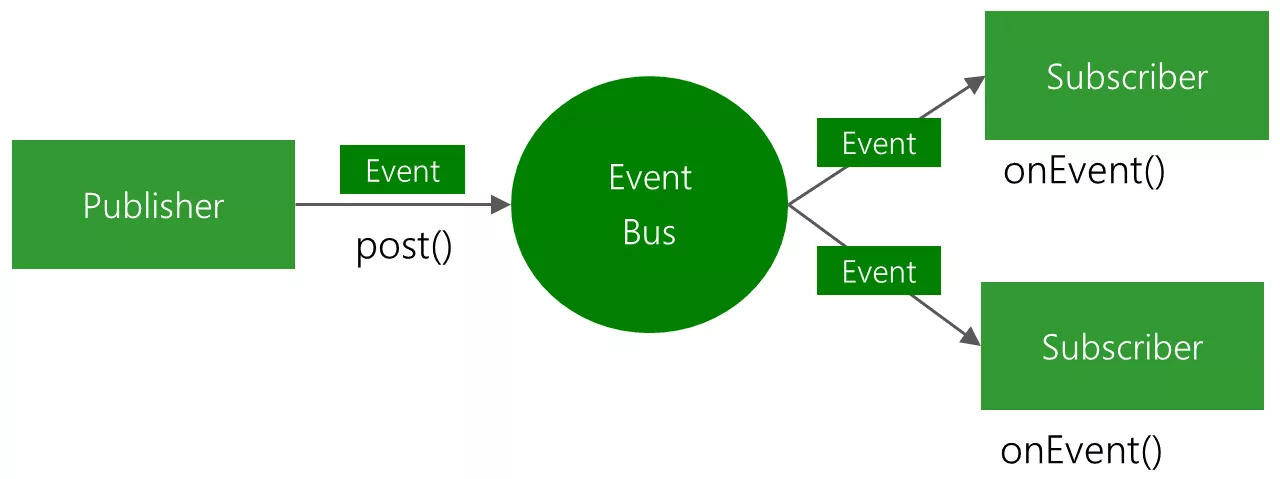
EventBus 是一个开源库,它为Dart和Flutter提供了基于发布/订阅模式的松耦合通信。通过EventBus,你可以用几行代码实现组件之间的集中式通信,简化代码结构,减少依赖关系,并加速应用程序开发。

使用EventBus的好处
- 简化组件间的通信;
- 解耦事件发送者和接收者;
- 在UI组件(如Widgets, Controllers)中表现良好;
- 避免复杂的、容易出错的依赖关系和生命周期问题。

定义应用事件
// 初始化服务总线
IAppEventBus eventBus = AppEventBus();

// 定义应用事件
final followEvent = FollowEvent('@devcraft.ninja');
final commentEvent = CommentEvent('Awesome package 😎');
订阅事件
// 监听最新事件
final sub = eventBus.last$.listen((AppEvent event) {
  // do something
});

// 监听特定类型的事件
final sub2 = eventBus.on<FollowAppEvent>().listen((e) {
  // do something
});
发布事件
// 触发事件
eventBus.fire(followEvent);
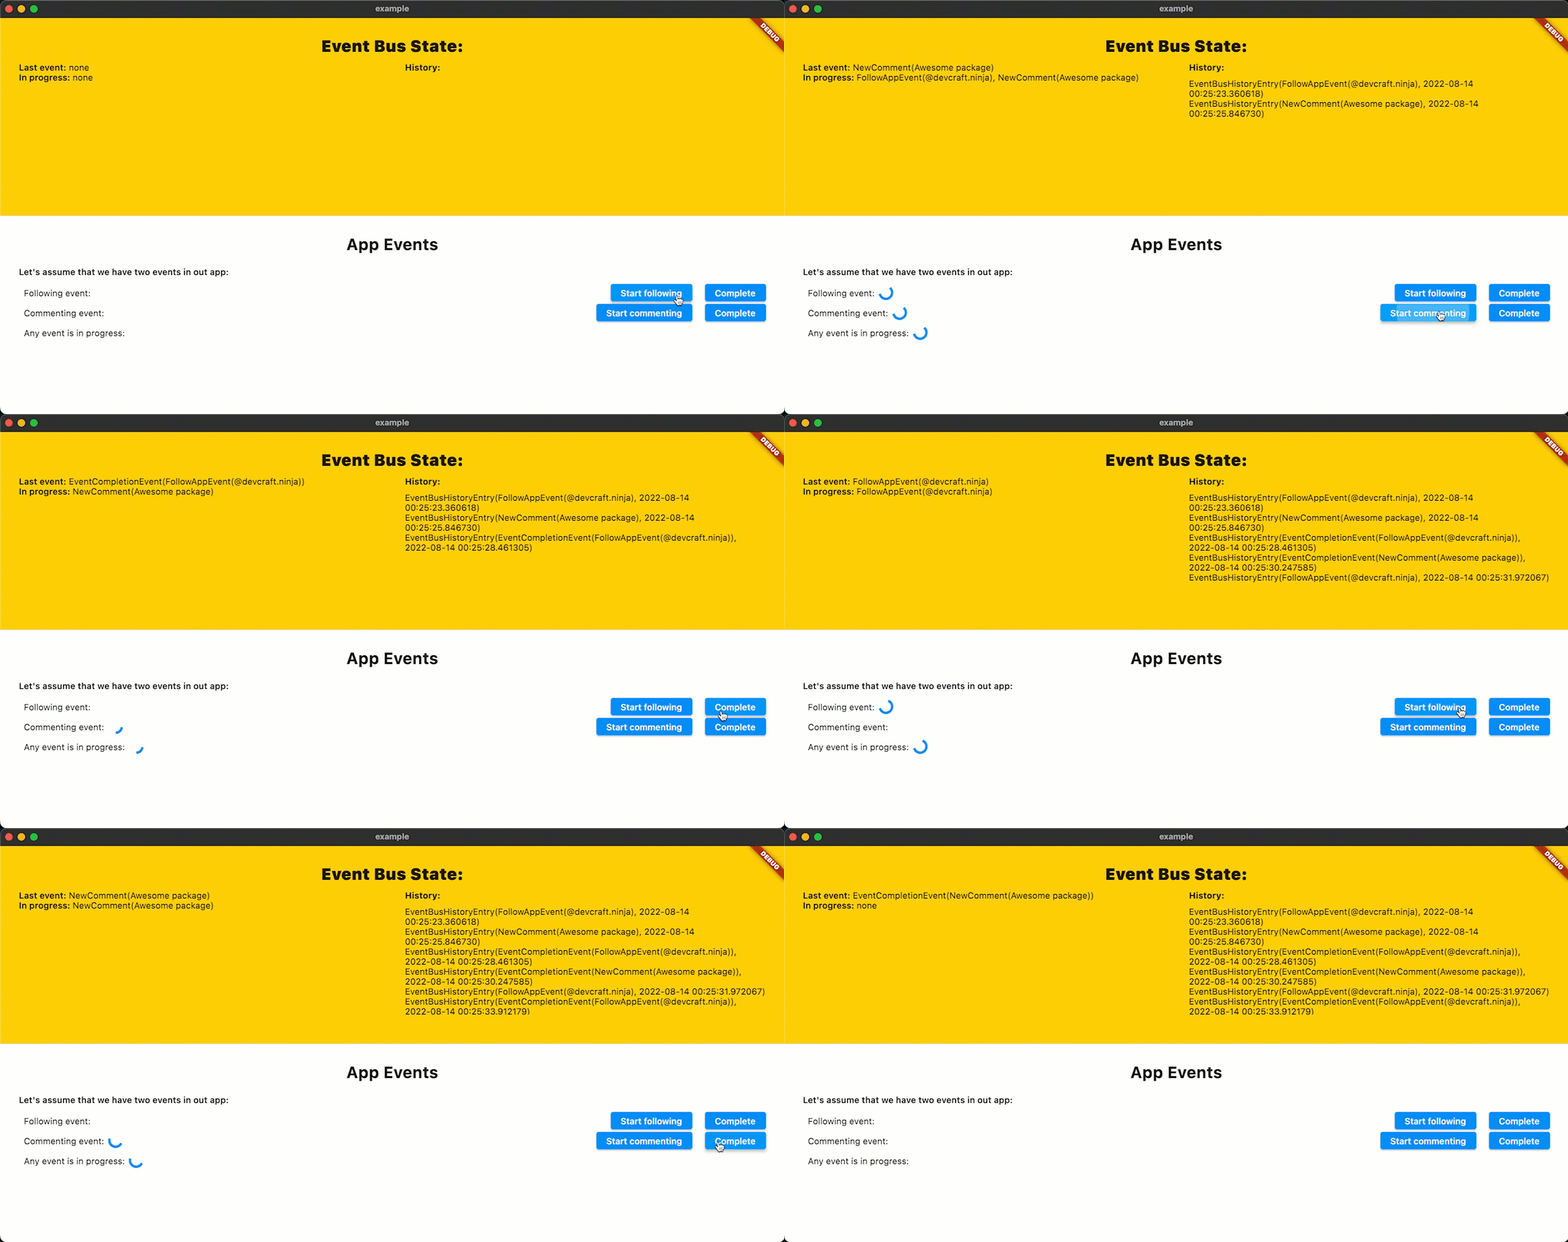
监视进行中的事件
// 开始监视事件直到完成
eventBus.watch(followEvent);

// 检查进度
eventBus.isInProgress<FollowAppEvent>();

// 或监听流以检查处理状态
eventBus.inProgress$.map((List<AppEvent> events) =>
    events.whereType<FollowAppEvent>().isNotEmpty);

// 完成事件
eventBus.complete(followEvent);

// 或使用完成事件完成
eventBus.complete(followEvent, nextEvent: SomeAnotherEvent());
查看历史记录
final events = eventBus.history;
映射
final eventBus = bus = EventBus(
  map: {
    SomeEvent: [
      (e) => SomeAnotherEvent(),
    ],
  },
);
示例代码
以下是event_bus_plus的一个完整示例demo:
import 'package:event_bus_plus/event_bus_plus.dart';
import 'package:flutter/material.dart';

// 初始化服务总线
IEventBus eventBus = EventBus();

void main() {
  // 监听所有事件
  eventBus.on().listen((event) {
    print('${DateTime.now()} Event: $event');
  });

  runApp(MyApp());
}

class MyApp extends StatelessWidget {
  const MyApp({Key? key}) : super(key: key);

  @override
  Widget build(BuildContext context) {
    return MaterialApp(
      title: 'EventBus Demo',
      theme: ThemeData(
        primarySwatch: Colors.blue,
      ),
      home: MyHomePage(title: 'EventBus Demo Home Page'),
    );
  }
}

class MyHomePage extends StatefulWidget {
  const MyHomePage({Key? key, required this.title}) : super(key: key);

  final String title;

  @override
  State<MyHomePage> createState() => _MyHomePageState();
}

class _MyHomePageState extends State<MyHomePage> {
  int _counter = 0;

  void _incrementCounter() {
    setState(() {
      _counter++;
    });

    // 发布一个计数器增加的事件
    eventBus.fire(CounterIncreasedEvent(_counter));
  }

  @override
  Widget build(BuildContext context) {
    return Scaffold(
      appBar: AppBar(
        title: Text(widget.title),
      ),
      body: Center(
        child: Column(
          mainAxisAlignment: MainAxisAlignment.center,
          children: <Widget>[
            const Text(
              'You have pushed the button this many times:',
            ),
            Text(
              '$_counter',
              style: Theme.of(context).textTheme.headline4,
            ),
          ],
        ),
      ),
      floatingActionButton: FloatingActionButton(
        onPressed: _incrementCounter,
        tooltip: 'Increment',
        child: const Icon(Icons.add),
      ),
    );
  }
}

// 定义一个简单的计数器增加事件
class CounterIncreasedEvent {
  final int count;

  CounterIncreasedEvent(this.count);

  @override
  String toString() {
    return 'CounterIncreasedEvent{count: $count}';
  }
}
在上面的例子中,我们创建了一个简单的Flutter应用,当用户点击FloatingActionButton时,会触发计数器增加的事件。这个事件会被eventBus捕获并打印出来。
希望这些信息对您有帮助!如果您有任何疑问或需要进一步的帮助,请随时提问。
更多关于Flutter事件总线插件event_bus_plus的使用的实战教程也可以访问 https://www.itying.com/category-92-b0.html
更多关于Flutter事件总线插件event_bus_plus的使用的实战系列教程也可以访问 https://www.itying.com/category-92-b0.html
当然,以下是如何在Flutter项目中使用event_bus_plus插件的一个简单示例。event_bus_plus是一个事件总线库,允许你在应用的不同部分之间发送和接收事件。这对于实现状态管理非常有用,尤其是在不需要复杂状态管理库(如Provider、Riverpod或Bloc)的简单场景下。
1. 添加依赖
首先,在你的pubspec.yaml文件中添加event_bus_plus依赖:
dependencies:
  flutter:
    sdk: flutter
  event_bus_plus: ^2.0.0  # 请检查最新版本号
然后运行flutter pub get来获取依赖。
2. 定义事件类
创建一个简单的事件类。这个类可以是任何实现了Event接口的类,但在event_bus_plus中,你通常不需要显式实现任何接口。
class CounterEvent {
  final int count;

  CounterEvent({required this.count});
}
3. 初始化EventBus
在你的应用中的某个地方(比如main.dart或者一个全局的provider文件中)初始化EventBus实例。
import 'package:event_bus_plus/event_bus_plus.dart';
import 'counter_event.dart';  // 假设你的事件类定义在这个文件中

final EventBus eventBus = EventBus();
4. 发送事件
在你想发送事件的地方使用eventBus.fire方法。
import 'package:flutter/material.dart';
import 'counter_event.dart';
import 'main.dart';  // 导入eventBus实例

void _incrementCounter() {
  // 这里我们假设有一个计数器状态,我们增加它并发送一个事件
  int count = 0;  // 假设这是你的计数器状态
  count++;
  eventBus.fire(CounterEvent(count: count));
}
5. 订阅事件
在你想监听事件的地方使用eventBus.on<EventType>().listen方法。
import 'package:flutter/material.dart';
import 'counter_event.dart';
import 'main.dart';  // 导入eventBus实例

class CounterScreen extends StatefulWidget {
  @override
  _CounterScreenState createState() => _CounterScreenState();
}

class _CounterScreenState extends State<CounterScreen> {
  int _count = 0;

  @override
  void initState() {
    super.initState();
    // 订阅CounterEvent事件
    eventBus.on<CounterEvent>().listen((event) {
      setState(() {
        _count = event.count;
      });
    });
  }

  @override
  void dispose() {
    // 取消订阅以避免内存泄漏
    eventBus.off<CounterEvent>();
    super.dispose();
  }

  @override
  Widget build(BuildContext context) {
    return Scaffold(
      appBar: AppBar(
        title: Text('Counter'),
      ),
      body: Center(
        child: Column(
          mainAxisAlignment: MainAxisAlignment.center,
          children: <Widget>[
            Text(
              'You have pushed the button this many times:',
            ),
            Text(
              '$_count',
              style: Theme.of(context).textTheme.headline4,
            ),
          ],
        ),
      ),
      floatingActionButton: FloatingActionButton(
        onPressed: _incrementCounter,
        tooltip: 'Increment',
        child: Icon(Icons.add),
      ), // This trailing comma makes auto-formatting nicer for build methods.
    );
  }
}
总结
以上代码展示了如何在Flutter项目中使用event_bus_plus插件来实现事件总线机制。通过定义事件类、初始化EventBus、发送事件和订阅事件,你可以轻松地在应用的不同部分之间传递数据。这种方法对于简单的状态管理非常有效,但在处理更复杂的状态管理需求时,可能需要考虑使用更强大的状态管理库。


