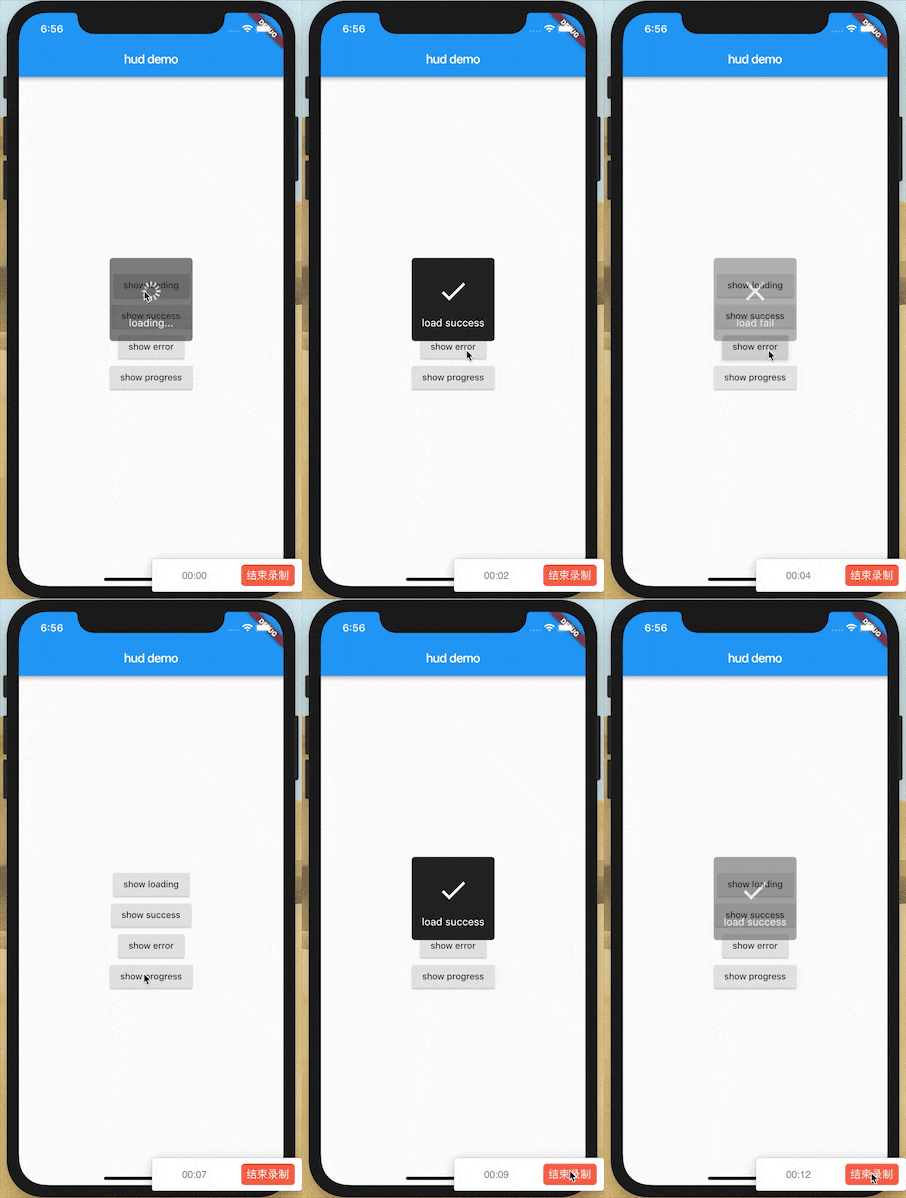
Flutter进度提示插件bmprogresshud的使用
Flutter进度提示插件bmprogresshud的使用
插件简介
bmprogresshud 是一个轻量级的Flutter进度提示HUD,灵感来源于SVProgressHUD。它为你的Flutter应用提供了加载HUD、成功/失败HUD、进度HUD和Toast等功能。

安装
在pubspec.yaml文件中添加依赖:
dependencies:
  bmprogresshud: ^最新版本号
使用方法
Local HUD
你可以将ProgressHud放置在你的容器中,并通过ProgressHud.of(context)来获取HUD实例。
示例代码
import 'package:bmprogresshud/bmprogresshud.dart';
import 'package:flutter/material.dart';

void main() => runApp(MyApp());

class MyApp extends StatelessWidget {
  @override
  Widget build(BuildContext context) {
    return ProgressHud(
      isGlobalHud: true,
      child: MaterialApp(home: HomePage()),
    );
  }
}

class HomePage extends StatefulWidget {
  @override
  _HomePageState createState() => _HomePageState();
}

class _HomePageState extends State<HomePage> {
  GlobalKey<ProgressHudState> _hudKey = GlobalKey();

  @override
  Widget build(BuildContext context) {
    return Scaffold(
      appBar: AppBar(
        title: Text("hud demo"),
      ),
      body: ProgressHud(
        key: _hudKey,
        maximumDismissDuration: Duration(seconds: 2),
        child: Center(
          child: Builder(builder: (context) {
            return Column(
              mainAxisSize: MainAxisSize.min,
              mainAxisAlignment: MainAxisAlignment.center,
              children: <Widget>[
                ElevatedButton(
                  onPressed: () {
                    _showLoadingHud(context);
                  },
                  child: Text("显示加载"),
                ),
                ElevatedButton(
                  onPressed: () {
                    _showToast(context);
                  },
                  child: Text("显示消息"),
                ),
                ElevatedButton(
                  onPressed: () {
                    _showSuccessHud(context);
                  },
                  child: Text("显示成功"),
                ),
                ElevatedButton(
                  onPressed: () {
                    _showErrorHud(context);
                  },
                  child: Text("显示错误"),
                ),
                ElevatedButton(
                  onPressed: () {
                    _showProgressHud(context);
                  },
                  child: Text("显示进度"),
                ),
                Divider(height: 50),
                ElevatedButton(
                  onPressed: () async {
                    ProgressHud.showLoading();
                    await Future.delayed(const Duration(seconds: 1));
                    ProgressHud.dismiss();
                  },
                  child: Text("显示全局加载"),
                ),
                ElevatedButton(
                  onPressed: () {
                    ProgressHud.showAndDismiss(
                        ProgressHudType.success, "加载成功");
                  },
                  child: Text("显示全局成功"),
                ),
                ElevatedButton(
                  onPressed: () {
                    ProgressHud.showAndDismiss(
                        ProgressHudType.error, "加载失败");
                  },
                  child: Text("显示全局错误"),
                ),
                ElevatedButton(
                  onPressed: () {
                    _showProgressHudGlobal();
                  },
                  child: Text("显示全局进度"),
                ),
              ],
            );
          }),
        ),
      ),
    );
  }

  _showLoadingHud(BuildContext context) async {
    ProgressHud.of(context)?.show(ProgressHudType.loading, "正在加载...");
    await Future.delayed(const Duration(seconds: 1));
    _hudKey.currentState?.dismiss();
  }

  _showToast(BuildContext context) async {
    ProgressHud.of(context)?.showToast(text: "${DateTime.now()}");
  }

  _showSuccessHud(BuildContext context) {
    ProgressHud.of(context)
        ?.showAndDismiss(ProgressHudType.success, "加载成功");
  }

  _showErrorHud(BuildContext context) {
    ProgressHud.of(context)?.showAndDismiss(ProgressHudType.error, "加载失败");
  }

  _showProgressHud(BuildContext context) {
    var hud = ProgressHud.of(context);
    hud?.show(ProgressHudType.progress, "正在加载");

    double current = 0;
    Timer.periodic(Duration(milliseconds: 1000.0 ~/ 60), (timer) {
      current += 1;
      var progress = current / 100;
      hud?.updateProgress(progress, "正在加载 $current%");
      if (progress == 1) {
        hud?.showAndDismiss(ProgressHudType.success, "加载成功");
        timer.cancel();
      }
    });
  }

  _showProgressHudGlobal() {
    ProgressHud.show(ProgressHudType.progress, "正在加载");

    double current = 0;
    Timer.periodic(Duration(milliseconds: 1000.0 ~/ 60), (timer) {
      current += 1;
      var progress = current / 100;
      ProgressHud.updateProgress(progress, "正在加载 $current%");
      if (progress == 1) {
        ProgressHud.showAndDismiss(ProgressHudType.success, "加载成功");
        timer.cancel();
      }
    });
  }
}
Global HUD
要创建一个全局的HUD,你需要标记isGlobalHud属性,并且确保在整个应用程序中只有一个全局HUD。它通常定义在MaterialApp之前。
示例代码
class MyApp extends StatelessWidget {
  @override
  Widget build(BuildContext context) {
    return ProgressHud(
      // 标记HUD为全局
      isGlobalHud: true,
      child: MaterialApp(
        home: HomePage(),
      ),
    );
  }
}
然后你可以通过静态方法来使用全局HUD:
ProgressHud.showLoading(); // 显示加载HUD
ProgressHud.dismiss(); // 隐藏HUD

ProgressHud.showAndDismiss(ProgressHudType.success, "加载成功"); // 显示并自动隐藏成功HUD
ProgressHud.showAndDismiss(ProgressHudType.error, "加载失败"); // 显示并自动隐藏错误HUD

ProgressHud.show(ProgressHudType.progress, "正在加载"); // 显示进度HUD
ProgressHud.updateProgress(progress, "正在加载 20%"); // 更新进度
ProgressHud.showAndDismiss(ProgressHudType.success, "加载成功"); // 完成后显示成功HUD
总结
通过上述内容,你可以轻松地在Flutter项目中集成和使用bmprogresshud插件,为用户提供更好的交互体验。无论是局部HUD还是全局HUD,都能根据需求灵活配置和使用。希望这些示例代码能帮助你快速上手!
更多关于Flutter进度提示插件bmprogresshud的使用的实战系列教程也可以访问 https://www.itying.com/category-92-b0.html
更多关于Flutter进度提示插件bmprogresshud的使用的实战系列教程也可以访问 https://www.itying.com/category-92-b0.html
当然,以下是如何在Flutter应用中使用bmprogresshud插件来显示进度提示的示例代码。bmprogresshud是一个用于显示加载或进度提示的Flutter插件。
首先,确保你已经在pubspec.yaml文件中添加了bmprogresshud依赖:
dependencies:
  flutter:
    sdk: flutter
  bmprogresshud: ^x.y.z  # 替换为最新版本号
然后运行flutter pub get来获取依赖。
接下来,在你的Flutter应用中导入bmprogresshud并创建一个简单的示例。以下是一个完整的示例代码,展示了如何在按钮点击时显示和隐藏进度提示。
import 'package:flutter/material.dart';
import 'package:bmprogresshud/bmprogresshud.dart';

void main() {
  runApp(MyApp());
}

class MyApp extends StatelessWidget {
  @override
  Widget build(BuildContext context) {
    return MaterialApp(
      home: Scaffold(
        appBar: AppBar(
          title: Text('BMProgressHUD Example'),
        ),
        body: Center(
          child: MyHomePage(),
        ),
      ),
    );
  }
}

class MyHomePage extends StatefulWidget {
  @override
  _MyHomePageState createState() => _MyHomePageState();
}

class _MyHomePageState extends State<MyHomePage> {
  final BMProgressHUD _hud = BMProgressHUD();

  @override
  Widget build(BuildContext context) {
    return Column(
      mainAxisAlignment: MainAxisAlignment.center,
      children: <Widget>[
        ElevatedButton(
          onPressed: () async {
            // 显示进度提示
            _hud.show(context);

            // 模拟长时间运行的任务
            await Future.delayed(Duration(seconds: 3));

            // 隐藏进度提示
            _hud.dismiss();
          },
          child: Text('Show Progress'),
        ),
      ],
    );
  }

  @override
  void dispose() {
    // 释放资源
    _hud.dispose();
    super.dispose();
  }
}
在这个示例中,我们创建了一个简单的Flutter应用,其中包含一个按钮。当点击按钮时,会显示进度提示,并在3秒后隐藏它。
关键点:
-
导入BMProgressHUD:
import 'package:bmprogresshud/bmprogresshud.dart'; -
创建BMProgressHUD实例:
final BMProgressHUD _hud = BMProgressHUD(); -
显示进度提示:
_hud.show(context); -
隐藏进度提示:
_hud.dismiss(); -
释放资源: 在
dispose方法中调用_hud.dispose()以释放资源。
你可以根据需要进一步自定义BMProgressHUD,比如设置加载消息、背景颜色、动画效果等。bmprogresshud插件通常提供丰富的配置选项,你可以参考其官方文档来获取更多信息。


