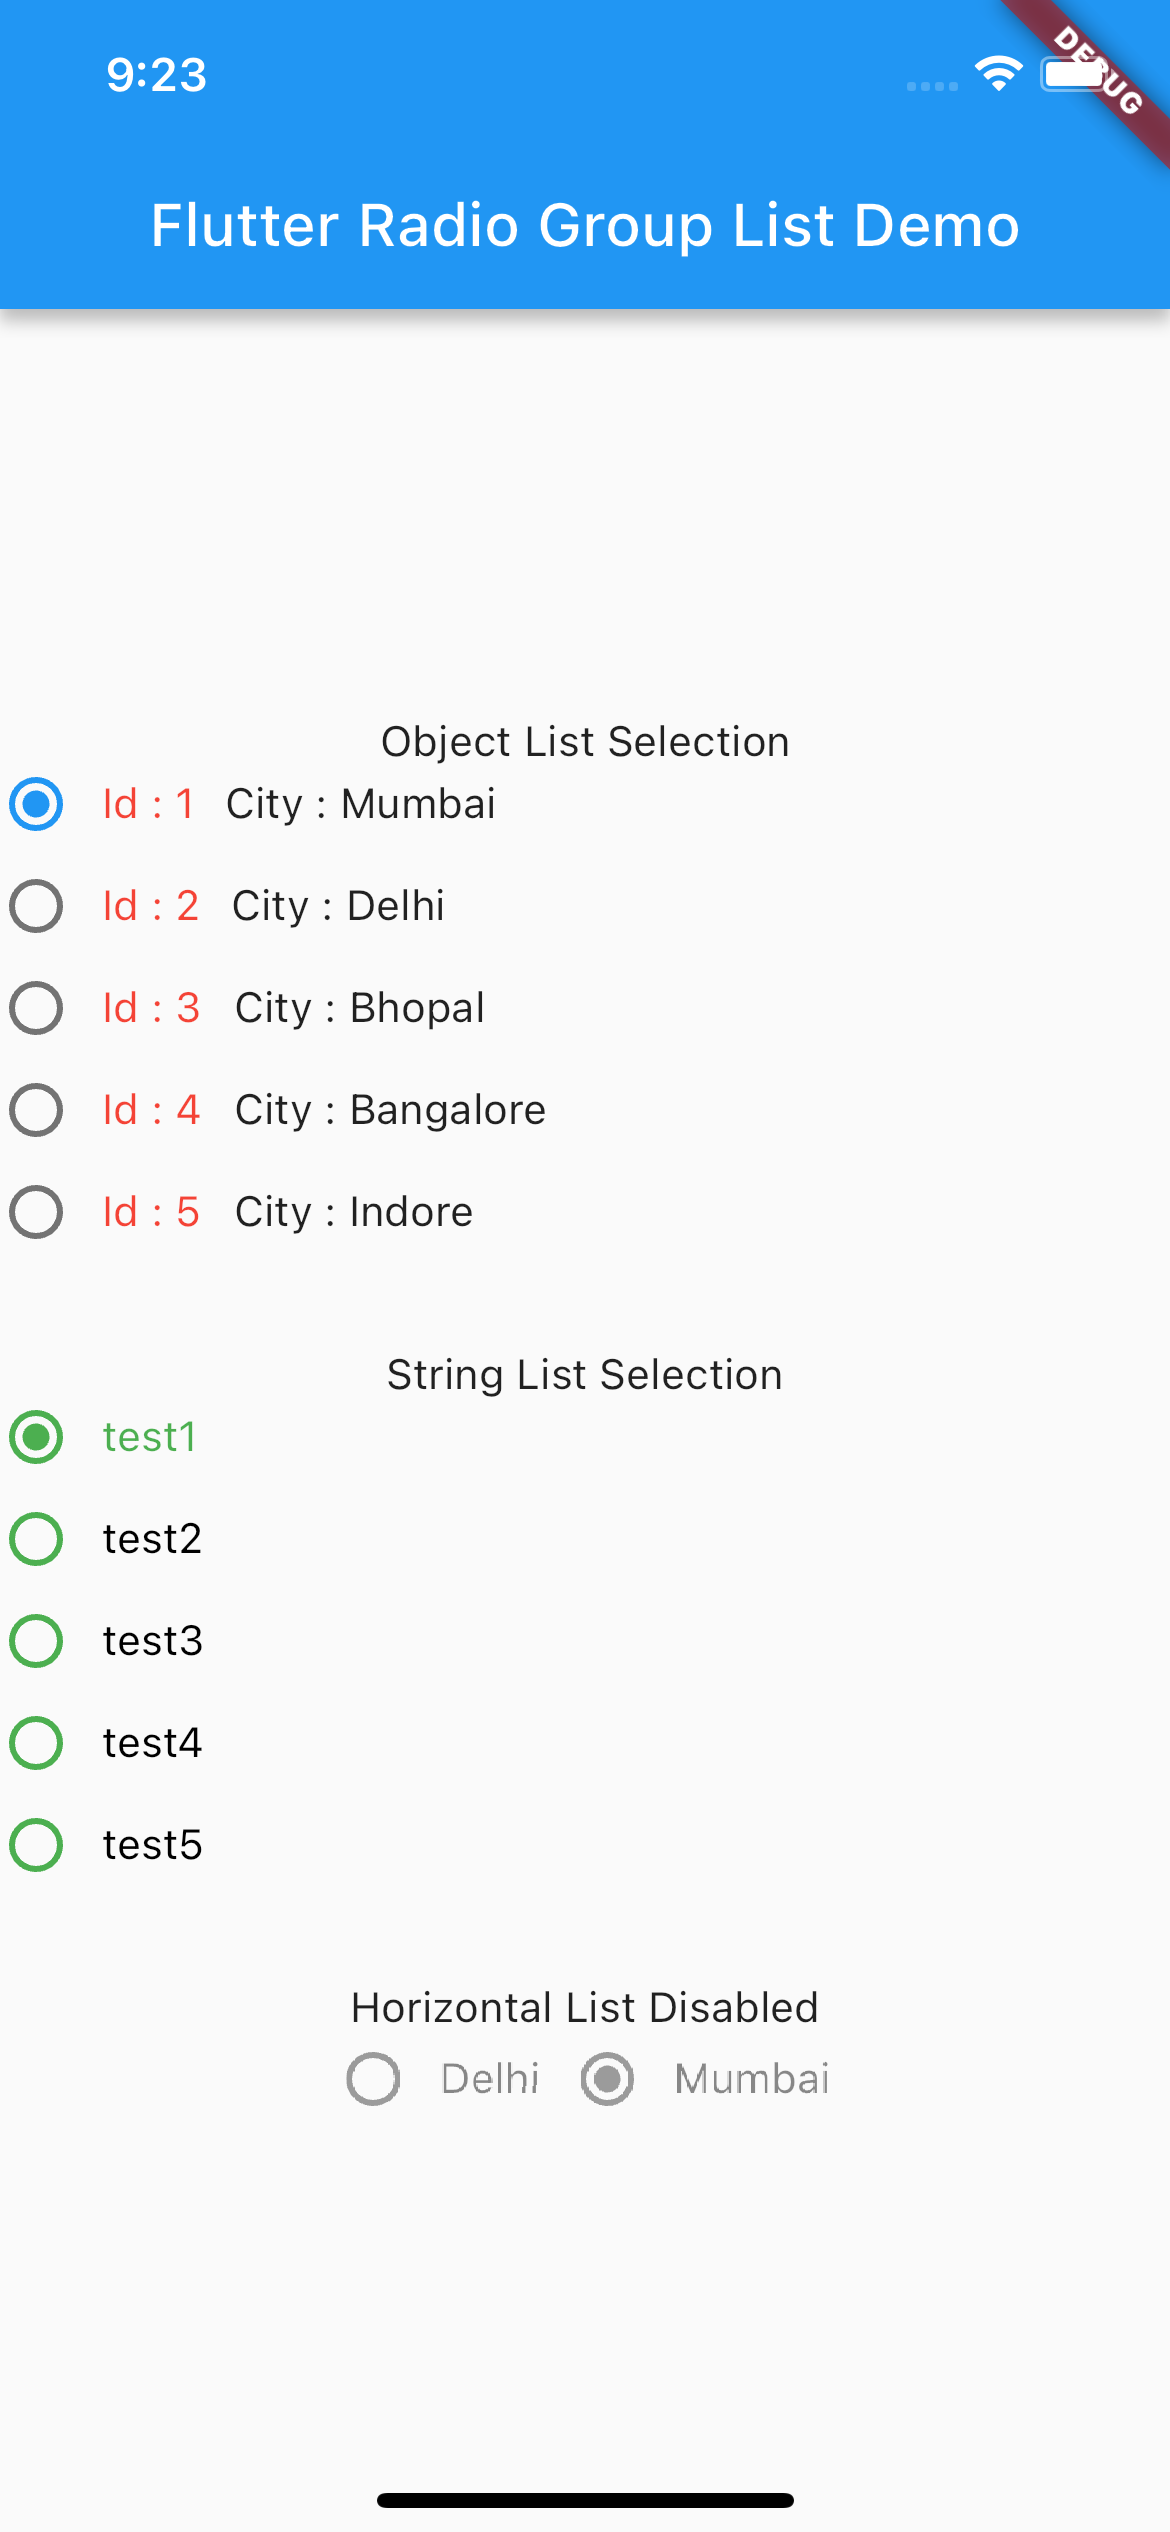
Flutter自定义单选组列表插件custom_radio_group_list的使用
Flutter自定义单选组列表插件custom_radio_group_list的使用
custom_radio_group_list 是一个Flutter包,用于创建单选按钮列表。通过提供对象列表(可以是字符串列表或对象列表),你可以轻松生成单选按钮列表,并根据需要自定义其样式和行为。
功能特性
- 支持从字符串列表或对象列表生成单选按钮列表。
- 可以标记选定项(字符串/对象)为已选中状态。
- 支持禁用整个列表,使用户无法更改值。
- 支持设置水平或垂直滚动方向。
- 支持自定义单选按钮的颜色。
- 支持自定义标签样式。

开始使用
添加依赖
在你的 pubspec.yaml 文件中添加以下依赖:
dependencies:
  custom_radio_group_list: ^1.1.1
导入包
在需要使用的Dart文件中导入包:
import 'package:custom_radio_group_list/custom_radio_group_list.dart';
使用示例
以下是几个完整的示例代码,展示了如何使用 custom_radio_group_list 插件。
示例1:使用对象列表
RadioGroup(
  items: sampleList,
  selectedItem: selectedItemNew,
  onChanged: (value) {
    selectedItemNew = value;
    final snackBar = SnackBar(content: Text("$value"));
    ScaffoldMessenger.of(context).showSnackBar(snackBar);
  },
  labelBuilder: (ctx, index) {
    return Row(
      children: [
        Text(
          'Id : ${sampleList[index].id}',
          style: const TextStyle(color: Colors.red),
        ),
        const SizedBox(width: 10),
        Text('City : ${sampleList[index].title}'),
      ],
    );
  },
  shrinkWrap: true,
  disabled: false,
)
示例2:使用字符串列表
RadioGroup(
  items: stringList,
  onChanged: (value) {
    print('Value : $value');
    selectedItem = value;
    final snackBar = SnackBar(content: Text("$value"));
    ScaffoldMessenger.of(context).showSnackBar(snackBar);
  },
  selectedItem: selectedItem,
  disabled: true,
  shrinkWrap: true,
  fillColor: Colors.green,
  labelBuilder: (ctx, index) {
    return Text(
      stringList[index],
      style: TextStyle(
        color: selectedItem == stringList[index] ? Colors.green : Colors.black,
      ),
    );
  },
)
示例3:禁用的水平列表
SizedBox(
  height: 30,
  child: RadioGroup(
    items: hLisItem,
    disabled: true,
    scrollDirection: Axis.horizontal,
    onChanged: (value) {
      print('Value : $value');
      hSelectedItem = value;
      final snackBar = SnackBar(content: Text("$value"));
      ScaffoldMessenger.of(context).showSnackBar(snackBar);
    },
    selectedItem: hSelectedItem,
    shrinkWrap: true,
    labelBuilder: (ctx, index) {
      return Text(hLisItem[index]);
    },
  ),
)
完整示例代码
下面是一个完整的示例代码,展示了如何在一个Flutter应用中使用 custom_radio_group_list 插件:
import 'package:custom_radio_group_list/custom_radio_group_list.dart';
import 'package:flutter/material.dart';

void main() {
  runApp(const MyApp());
}

List<SampleData> sampleList = [];

List<String> stringList = [
  'test1',
  'test2',
  'test3',
  'test4',
  'test5',
];

List<String> hLisItem = [
  'Delhi',
  'Mumbai',
];

class MyApp extends StatelessWidget {
  const MyApp({Key? key}) : super(key: key);

  @override
  Widget build(BuildContext context) {
    return MaterialApp(
      title: 'Radio Group List Demo',
      theme: ThemeData(
        primarySwatch: Colors.blue,
      ),
      home: const MyHomePage(title: 'Flutter Radio Group List Demo'),
    );
  }
}

class MyHomePage extends StatefulWidget {
  const MyHomePage({Key? key, required this.title}) : super(key: key);

  final String title;

  @override
  State<MyHomePage> createState() => _MyHomePageState();
}

class _MyHomePageState extends State<MyHomePage> {
  String? selectedItem;
  SampleData? selectedItemNew;
  String? hSelectedItem;

  @override
  void initState() {
    super.initState();
    sampleList.add(SampleData(title: 'Mumbai', id: '1'));
    sampleList.add(SampleData(title: 'Delhi', id: '2'));
    sampleList.add(SampleData(title: 'Bhopal', id: '3'));
    sampleList.add(SampleData(title: 'Bangalore', id: '4'));
    sampleList.add(SampleData(title: 'Indore', id: '5'));

    selectedItem = stringList.first;
    selectedItemNew = sampleList.first;
  }

  @override
  Widget build(BuildContext context) {
    return Scaffold(
      appBar: AppBar(
        title: Text(widget.title),
      ),
      body: Center(
        child: SingleChildScrollView(
          child: Column(
            mainAxisAlignment: MainAxisAlignment.center,
            children: <Widget>[
              const Text('Object List Selection'),
              RadioGroup(
                items: sampleList,
                selectedItem: selectedItemNew,
                onChanged: (value) {
                  selectedItemNew = value;
                  final snackBar = SnackBar(content: Text("$value"));
                  ScaffoldMessenger.of(context).showSnackBar(snackBar);
                },
                labelBuilder: (ctx, index) {
                  return Row(
                    children: [
                      Text(
                        'Id : ${sampleList[index].id}',
                        style: const TextStyle(color: Colors.red),
                      ),
                      const SizedBox(width: 10),
                      Text('City : ${sampleList[index].title}'),
                    ],
                  );
                },
                shrinkWrap: true,
                disabled: false,
              ),
              const Text('String List Selection'),
              RadioGroup(
                items: stringList,
                onChanged: (value) {
                  print('Value : $value');
                  selectedItem = value;
                  final snackBar = SnackBar(content: Text("$value"));
                  ScaffoldMessenger.of(context).showSnackBar(snackBar);
                },
                selectedItem: selectedItem,
                shrinkWrap: true,
                fillColor: Colors.green,
                labelBuilder: (ctx, index) {
                  return Text(
                    stringList[index],
                    style: TextStyle(
                      color: selectedItem == stringList[index]
                          ? Colors.green
                          : Colors.black,
                    ),
                  );
                },
              ),
              const Text('Horizontal List Disabled'),
              SizedBox(
                height: 30,
                child: RadioGroup(
                  items: hLisItem,
                  disabled: true,
                  scrollDirection: Axis.horizontal,
                  onChanged: (value) {
                    print('Value : $value');
                    hSelectedItem = value;
                    final snackBar = SnackBar(content: Text("$value"));
                    ScaffoldMessenger.of(context).showSnackBar(snackBar);
                  },
                  selectedItem: hSelectedItem,
                  shrinkWrap: true,
                  labelBuilder: (ctx, index) {
                    return Text(hLisItem[index]);
                  },
                ),
              ),
            ],
          ),
        ),
      ),
    );
  }
}

class SampleData {
  String id;
  String title;

  SampleData({required this.id, required this.title});

  Map<String, dynamic> toJson() {
    final Map<String, dynamic> data = {};
    data['id'] = id;
    data['title'] = title;
    return data;
  }

  @override
  String toString() {
    return toJson().toString();
  }
}
更多信息
更多详细信息和示例实现,请访问 GitHub仓库,并在 example 文件夹中查看示例代码。
如果你有任何问题或建议,欢迎提交Issue或Pull Request。
更多关于Flutter自定义单选组列表插件custom_radio_group_list的使用的实战系列教程也可以访问 https://www.itying.com/category-92-b0.html
更多关于Flutter自定义单选组列表插件custom_radio_group_list的使用的实战系列教程也可以访问 https://www.itying.com/category-92-b0.html
当然,以下是如何在Flutter项目中使用自定义单选组列表插件custom_radio_group_list的一个示例。为了演示这个插件的使用,我们假设你已经在pubspec.yaml文件中添加了该插件的依赖,并且已经运行了flutter pub get来安装它。
首先,确保你的pubspec.yaml文件中包含以下依赖项:
dependencies:
  flutter:
    sdk: flutter
  custom_radio_group_list: ^最新版本号  # 请替换为实际最新版本号
接下来,在你的Dart文件中,你可以按照以下方式使用custom_radio_group_list插件来创建一个自定义单选组列表。
import 'package:flutter/material.dart';
import 'package:custom_radio_group_list/custom_radio_group_list.dart';

void main() {
  runApp(MyApp());
}

class MyApp extends StatelessWidget {
  @override
  Widget build(BuildContext context) {
    return MaterialApp(
      title: 'Custom Radio Group List Demo',
      theme: ThemeData(
        primarySwatch: Colors.blue,
      ),
      home: MyHomePage(),
    );
  }
}

class MyHomePage extends StatefulWidget {
  @override
  _MyHomePageState createState() => _MyHomePageState();
}

class _MyHomePageState extends State<MyHomePage> {
  String selectedValue;

  @override
  Widget build(BuildContext context) {
    return Scaffold(
      appBar: AppBar(
        title: Text('Custom Radio Group List Demo'),
      ),
      body: Padding(
        padding: const EdgeInsets.all(16.0),
        child: Column(
          crossAxisAlignment: CrossAxisAlignment.start,
          children: <Widget>[
            Text(
              'Select an option:',
              style: TextStyle(fontSize: 20),
            ),
            SizedBox(height: 16),
            CustomRadioGroupList<String>(
              values: ['Option 1', 'Option 2', 'Option 3'],
              onChanged: (value) {
                setState(() {
                  selectedValue = value;
                });
              },
              selectedValue: selectedValue,
              itemBuilder: (context, value) {
                return ListTile(
                  title: Text(value),
                );
              },
            ),
            SizedBox(height: 24),
            Text(
              'Selected Value: $selectedValue',
              style: TextStyle(fontSize: 20),
            ),
          ],
        ),
      ),
    );
  }
}
在这个示例中,我们做了以下几件事:
-
导入必要的包:我们导入了
flutter/material.dart和custom_radio_group_list包。 -
创建主应用:
MyApp是一个无状态组件,它设置了应用的主题和主页。 -
创建主页:
MyHomePage是一个有状态组件,它包含了一个Scaffold,其中包含一个AppBar和一个包含单选组列表的Column。 -
使用
CustomRadioGroupList:values:一个包含所有选项的列表。onChanged:当用户选择一个选项时调用的回调函数。在这里,我们使用setState来更新selectedValue。selectedValue:当前选中的值。itemBuilder:一个用于构建每个选项列表项的回调函数。在这里,我们为每个选项返回一个ListTile。
-
显示选中的值:在页面底部,我们显示当前选中的值。
这个示例展示了如何使用custom_radio_group_list插件来创建一个简单的单选组列表,并处理用户的选择。根据你的需求,你可以进一步自定义每个选项的显示方式和行为。


