Flutter表单选择字段插件select_form_field的使用
Flutter表单选择字段插件select_form_field的使用
简介
select_form_field 是一个 Flutter 插件,用于在表单中创建选择字段。它显示一个下拉菜单或对话框中的选项列表。该插件扩展了 TextField,并具有与 TextFormField 类似的功能。
版本和赞助
使用方法
添加依赖
在你的 Flutter 项目的 pubspec.yaml 文件中添加以下依赖:
dependencies:
  ...
  select_form_field: "^2.2.0"
导入包
在你的 Dart 文件中导入 select_form_field 包:
import 'package:select_form_field/select_form_field.dart';
示例代码
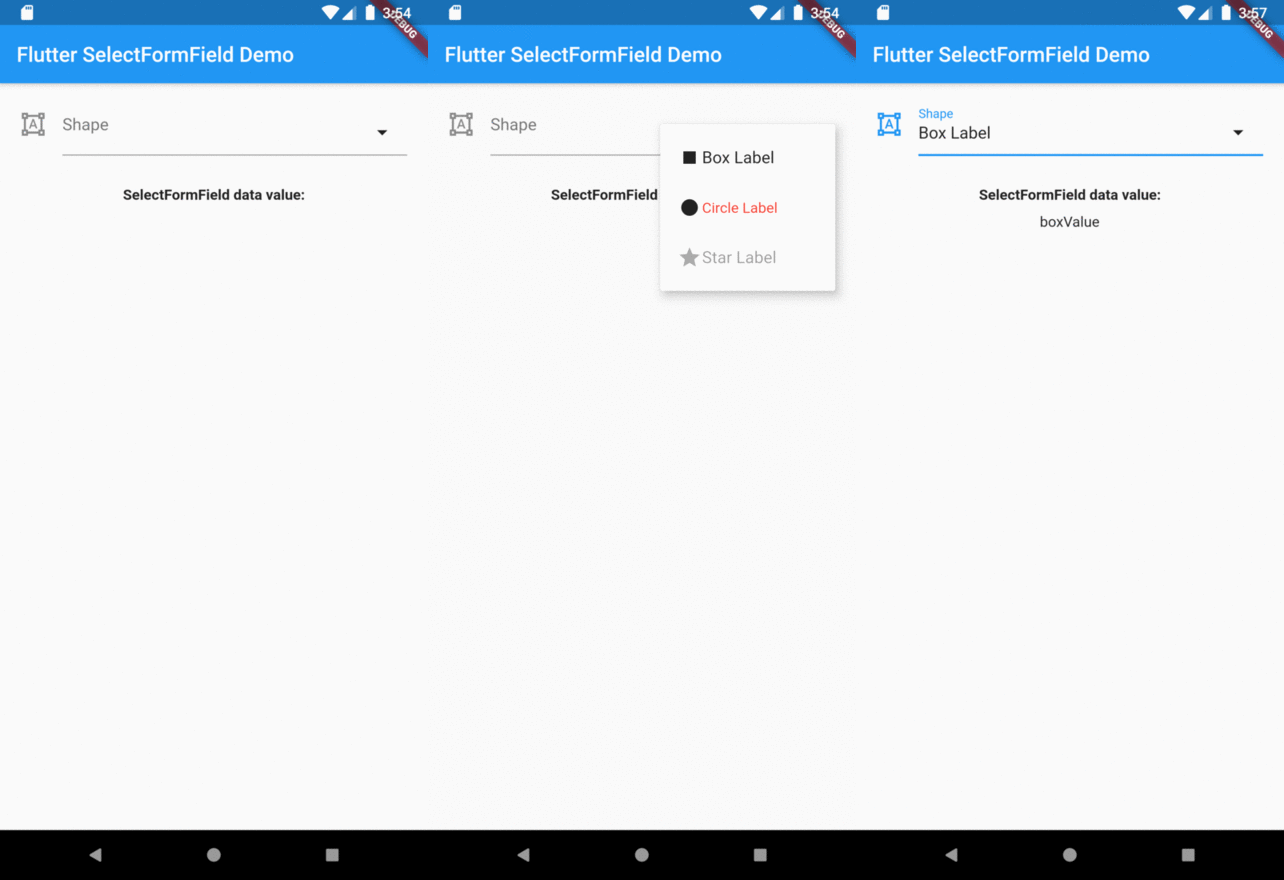
以下是一个完整的示例代码,展示了如何使用 SelectFormField 创建一个带有下拉菜单的选择字段。
import 'package:flutter/material.dart';
import 'package:select_form_field/select_form_field.dart';

void main() => runApp(MyApp());

class MyApp extends StatelessWidget {
  @override
  Widget build(BuildContext context) {
    return MaterialApp(
      title: 'Flutter SelectFormField Demo',
      home: MyHomePage(),
    );
  }
}

class MyHomePage extends StatefulWidget {
  MyHomePage({Key? key}) : super(key: key);

  @override
  _MyHomePageState createState() => _MyHomePageState();
}

class _MyHomePageState extends State<MyHomePage> {
  GlobalKey<FormState> _oFormKey = GlobalKey<FormState>();
  TextEditingController? _controller;
  String _valueChanged = '';
  String _valueToValidate = '';
  String _valueSaved = '';

  final List<Map<String, dynamic>> _items = [
    {
      'value': 'boxValue',
      'label': 'Box Label',
      'icon': Icon(Icons.stop),
    },
    {
      'value': 'circleValue',
      'label': 'Circle Label Loooooooooooooooooooong text',
      'icon': Icon(Icons.fiber_manual_record),
      'textStyle': TextStyle(color: Colors.red),
    },
    {
      'value': 'starValue',
      'label': 'Star Label',
      'enable': false,
      'icon': Icon(Icons.grade),
    },
  ];

  @override
  void initState() {
    super.initState();
    _controller = TextEditingController(text: '2');
    _getValue();
  }

  /// 模拟从数据库或API加载数据的行为
  Future<void> _getValue() async {
    await Future.delayed(const Duration(seconds: 3), () {
      setState(() {
        _controller?.text = 'circleValue';
      });
    });
  }

  @override
  Widget build(BuildContext context) {
    return Scaffold(
      appBar: AppBar(
        title: Text('Flutter SelectFormField Demo'),
      ),
      body: SingleChildScrollView(
        padding: EdgeInsets.only(left: 20, right: 20, top: 10),
        child: Form(
          key: _oFormKey,
          child: Column(
            children: <Widget>[
              SelectFormField(
                type: SelectFormFieldType.dialog,
                controller: _controller,
                icon: Icon(Icons.format_shapes),
                labelText: 'Shape',
                changeIcon: true,
                dialogTitle: 'Pick a item',
                dialogCancelBtn: 'CANCEL',
                enableSearch: true,
                dialogSearchHint: 'Search item',
                items: _items,
                onChanged: (val) => setState(() => _valueChanged = val),
                validator: (val) {
                  setState(() => _valueToValidate = val ?? '');
                  return null;
                },
                onSaved: (val) => setState(() => _valueSaved = val ?? ''),
              ),
              SizedBox(height: 30),
              Text(
                'SelectFormField data value onChanged:',
                style: TextStyle(fontWeight: FontWeight.bold),
              ),
              SizedBox(height: 10),
              SelectableText(_valueChanged),
              SizedBox(height: 30),
              ElevatedButton(
                onPressed: () {
                  final loForm = _oFormKey.currentState;

                  if (loForm?.validate() == true) {
                    loForm?.save();
                  }
                },
                child: Text('Submit'),
              ),
              SizedBox(height: 30),
              Text(
                'SelectFormField data value validator:',
                style: TextStyle(fontWeight: FontWeight.bold),
              ),
              SizedBox(height: 10),
              SelectableText(_valueToValidate),
              SizedBox(height: 30),
              Text(
                'SelectFormField data value onSaved:',
                style: TextStyle(fontWeight: FontWeight.bold),
              ),
              SizedBox(height: 10),
              SelectableText(_valueSaved),
              SizedBox(height: 30),
              ElevatedButton(
                onPressed: () {
                  final loForm = _oFormKey.currentState;
                  loForm?.reset();

                  setState(() {
                    _valueChanged = '';
                    _valueToValidate = '';
                    _valueSaved = '';
                    _controller?.clear();
                  });
                },
                child: Text('Reset'),
              ),
            ],
          ),
        ),
      ),
    );
  }
}
预览
以下是 SelectFormField 的预览图:

总结
通过以上示例,你可以看到如何在 Flutter 应用中使用 select_form_field 插件来创建一个带有下拉菜单或对话框的选择字段。希望这个示例对你有所帮助!如果你有任何问题或建议,请随时在评论区留言。
更多关于Flutter表单选择字段插件select_form_field的使用的实战系列教程也可以访问 https://www.itying.com/category-92-b0.html
更多关于Flutter表单选择字段插件select_form_field的使用的实战系列教程也可以访问 https://www.itying.com/category-92-b0.html
当然,以下是如何在Flutter中使用select_form_field插件来创建一个表单选择字段的示例代码。select_form_field是一个用于Flutter的表单选择字段插件,它提供了灵活的选项来创建下拉选择框。
首先,确保你已经在pubspec.yaml文件中添加了select_form_field依赖:
dependencies:
  flutter:
    sdk: flutter
  select_form_field: ^x.y.z  # 请替换为最新版本号
然后,运行flutter pub get来安装依赖。
接下来,你可以在你的Flutter项目中使用SelectFormField来创建一个表单选择字段。以下是一个完整的示例:
import 'package:flutter/material.dart';
import 'package:select_form_field/select_form_field.dart';

void main() {
  runApp(MyApp());
}

class MyApp extends StatelessWidget {
  @override
  Widget build(BuildContext context) {
    return MaterialApp(
      title: 'Flutter Demo',
      theme: ThemeData(
        primarySwatch: Colors.blue,
      ),
      home: MyHomePage(),
    );
  }
}

class MyHomePage extends StatefulWidget {
  @override
  _MyHomePageState createState() => _MyHomePageState();
}

class _MyHomePageState extends State<MyHomePage> {
  final List<Map<String, dynamic>> _options = [
    {'value': 'option1', 'display': 'Option 1'},
    {'value': 'option2', 'display': 'Option 2'},
    {'value': 'option3', 'display': 'Option 3'},
  ];

  String? _selectedValue;

  @override
  Widget build(BuildContext context) {
    return Scaffold(
      appBar: AppBar(
        title: Text('Select Form Field Example'),
      ),
      body: Padding(
        padding: const EdgeInsets.all(16.0),
        child: Column(
          crossAxisAlignment: CrossAxisAlignment.start,
          children: <Widget>[
            SelectFormField<String>(
              label: 'Choose an option',
              value: _selectedValue,
              options: _options,
              onChanged: (value) {
                setState(() {
                  _selectedValue = value;
                });
              },
            ),
            SizedBox(height: 20),
            Text('Selected Value: $_selectedValue'),
          ],
        ),
      ),
    );
  }
}
代码解释
-
导入依赖:
import 'package:flutter/material.dart'; import 'package:select_form_field/select_form_field.dart'; -
定义选项:
final List<Map<String, dynamic>> _options = [ {'value': 'option1', 'display': 'Option 1'}, {'value': 'option2', 'display': 'Option 2'}, {'value': 'option3', 'display': 'Option 3'}, ]; -
创建选择字段:
SelectFormField<String>( label: 'Choose an option', value: _selectedValue, options: _options, onChanged: (value) { setState(() { _selectedValue = value; }); }, ), -
显示选择的值:
Text('Selected Value: $_selectedValue'),
这个示例展示了如何使用select_form_field插件来创建一个简单的下拉选择字段,并处理用户选择的值。你可以根据需要自定义选项和样式。


