Flutter浮动气泡插件float_bubble的使用

发布于 1周前 作者 caililin 来自 Flutter

Flutter浮动气泡插件float_bubble的使用

float_bubble 是一个受 Tokopedia 应用程序启发的浮动按钮插件。通过将页面包裹在 FloatBubble 小部件中,可以实现类似的效果。
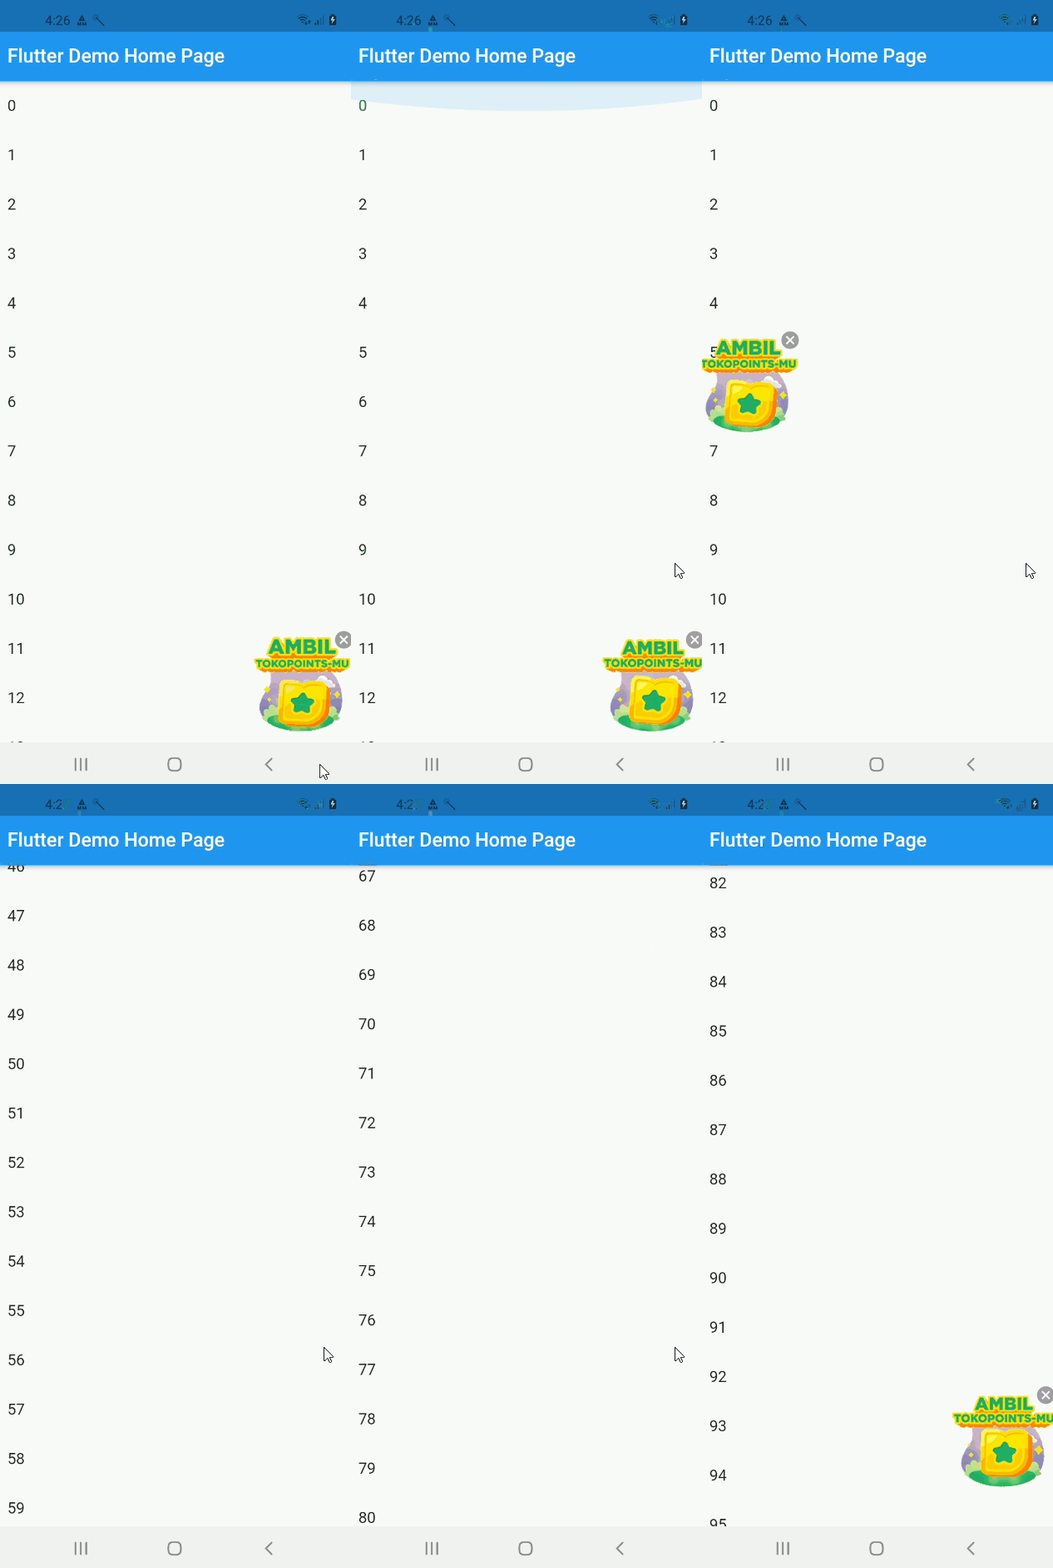
float_bubble

支持我

如果您喜欢这个插件,可以通过 Saweria 支持我。

saweria

示例代码

以下是一个完整的示例代码,展示了如何在 Flutter 应用中使用 float_bubble 插件。

依赖项

首先,在 pubspec.yaml 文件中添加 float_bubble 依赖:

dependencies:
  flutter:
    sdk: flutter
  float_bubble: ^1.0.0

主要代码

import 'package:float_bubble/float_bubble.dart';
import 'package:flutter/material.dart';

void main() {
  runApp(MyApp());
}

class MyApp extends StatelessWidget {
  @override
  Widget build(BuildContext context) {
    return MaterialApp(
      title: 'Flutter Demo',
      theme: ThemeData(
        primarySwatch: Colors.blue,
      ),
      home: MyHomePage(title: 'Flutter Demo Home Page'),
    );
  }
}

class MyHomePage extends StatefulWidget {
  MyHomePage({Key key, this.title}) : super(key: key);

  final String title;

  @override
  _MyHomePageState createState() => _MyHomePageState();
}

class _MyHomePageState extends State<MyHomePage> {
  bool isShow = true;

  @override
  Widget build(BuildContext context) {
    return Scaffold(
      appBar: AppBar(
        title: Text(widget.title),
      ),
      body: Stack(
        children: [
          NotificationListener<ScrollNotification>(
            child: ListView.builder(
              itemCount: 100,
              itemBuilder: (context, index) {
                return ListTile(
                  title: Text('$index'),
                );
              },
            ),
            onNotification: (notificationInfo) {
              setState(() {
                if (notificationInfo is ScrollStartNotification) {
                  isShow = false;
                }
                if (notificationInfo is ScrollEndNotification) {
                  isShow = true;
                }
              });
              return true;
            },
          ),
          FloatBubble(
            show: isShow,
            child: Container(
              height: 120,
              width: 120,
              child: Stack(
                children: [
                  Container(
                    width: 120,
                    height: 120,
                    child: Align(
                      alignment: Alignment.topRight,
                      child: InkWell(
                        onTap: () {
                          setState(() {
                            isShow = !isShow;
                          });
                        },
                        child: Icon(
                          Icons.cancel,
                          color: Colors.grey,
                        ),
                      ),
                    ),
                  ),
                  Image.network(
                    'https://images.tokopedia.net/img/blog/promo/2021/04/FLOATING-ICON-TOKOPOINTS-150x150-50KB.gif?ect=4g',
                  ),
                ],
              ),
            ),
          ),
        ],
      ),
    );
  }
}

代码说明

  1. 依赖项:在 pubspec.yaml 文件中添加 float_bubble 依赖。
  2. 主应用:创建一个 MyApp 类,作为应用的入口点。
  3. 主页:创建一个 MyHomePage 类,作为主页。
  4. 状态管理:在 _MyHomePageState 中管理 isShow 状态,用于控制浮动气泡的显示和隐藏。
  5. 滚动监听:使用 NotificationListener 监听列表的滚动事件,根据滚动事件更新 isShow 状态。
  6. 浮动气泡:使用 FloatBubble 小部件创建浮动气泡,并设置其显示状态和子组件。

通过以上步骤,您可以轻松地在 Flutter 应用中实现类似 Tokopedia 的浮动气泡效果。


更多关于Flutter浮动气泡插件float_bubble的使用的实战系列教程也可以访问 https://www.itying.com/category-92-b0.html

1 回复

更多关于Flutter浮动气泡插件float_bubble的使用的实战系列教程也可以访问 https://www.itying.com/category-92-b0.html


当然,下面是一个关于如何在Flutter中使用float_bubble插件的示例代码。float_bubble插件允许你在应用中显示浮动气泡,这可以用于各种UI提示或导航目的。

首先,确保你的Flutter项目中已经添加了float_bubble依赖。你可以在pubspec.yaml文件中添加以下依赖:

dependencies:
  flutter:
    sdk: flutter
  float_bubble: ^x.y.z  # 请将x.y.z替换为当前最新版本号

然后运行flutter pub get来安装依赖。

接下来,在你的Dart文件中,你可以按照以下步骤使用FloatBubble组件:

import 'package:flutter/material.dart';
import 'package:float_bubble/float_bubble.dart';

void main() {
  runApp(MyApp());
}

class MyApp extends StatelessWidget {
  @override
  Widget build(BuildContext context) {
    return MaterialApp(
      title: 'Float Bubble Demo',
      theme: ThemeData(
        primarySwatch: Colors.blue,
      ),
      home: Scaffold(
        appBar: AppBar(
          title: Text('Float Bubble Demo'),
        ),
        body: Center(
          child: BubbleDemo(),
        ),
      ),
    );
  }
}

class BubbleDemo extends StatefulWidget {
  @override
  _BubbleDemoState createState() => _BubbleDemoState();
}

class _BubbleDemoState extends State<BubbleDemo> {
  FloatBubbleController _bubbleController;

  @override
  void initState() {
    super.initState();
    _bubbleController = FloatBubbleController();

    // 显示浮动气泡
    Future.delayed(Duration(seconds: 2), () {
      _bubbleController.showBubble(
        context: context,
        position: BubblePosition.topRight,
        child: BubbleWidget(
          title: 'Hello, Bubble!',
          message: 'This is a floating bubble demo.',
          onTap: () {
            // 点击气泡时的回调
            print('Bubble tapped!');
            _bubbleController.hideBubble();
          },
        ),
      );
    });
  }

  @override
  void dispose() {
    _bubbleController.dispose();
    super.dispose();
  }

  @override
  Widget build(BuildContext context) {
    return Container(
      // 其他UI组件
    );
  }
}

class BubbleWidget extends StatelessWidget {
  final String title;
  final String message;
  final VoidCallback onTap;

  const BubbleWidget({
    Key key,
    this.title,
    this.message,
    this.onTap,
  }) : super(key: key);

  @override
  Widget build(BuildContext context) {
    return GestureDetector(
      onTap: onTap,
      child: Card(
        shape: RoundedRectangleBorder(
          borderRadius: BorderRadius.circular(16),
        ),
        elevation: 8,
        child: Padding(
          padding: const EdgeInsets.all(16.0),
          child: Column(
            mainAxisSize: MainAxisSize.min,
            crossAxisAlignment: CrossAxisAlignment.start,
            children: <Widget>[
              Text(
                title,
                style: TextStyle(fontSize: 18, fontWeight: FontWeight.bold),
              ),
              SizedBox(height: 8),
              Text(message),
            ],
          ),
        ),
      ),
    );
  }
}

在这个示例中,我们创建了一个简单的Flutter应用,该应用在启动2秒后显示一个浮动气泡。气泡包含标题、消息和一个点击回调。当用户点击气泡时,会打印一条消息并隐藏气泡。

注意

  • FloatBubbleController 用于控制气泡的显示和隐藏。
  • BubblePosition 枚举用于指定气泡显示的位置(例如topRight)。
  • BubbleWidget 是一个自定义的气泡小部件,你可以根据需要自定义它的样式和内容。

确保在实际项目中根据float_bubble插件的最新文档调整代码,因为插件的API可能会随时间变化。

回到顶部