Flutter数字键盘插件simple_numpad的使用
Flutter数字键盘插件simple_numpad的使用
Features
simple_numpad 是一个简单的数字键盘插件,允许用户轻松进行设计修改。
How to use
Installation
在 pubspec.yaml 文件中添加以下依赖:
dependencies:
  simple_numpad: ^1.0.2
Import
在 Dart 文件中导入插件:
import 'package:simple_numpad/simple_numpad.dart';
Example
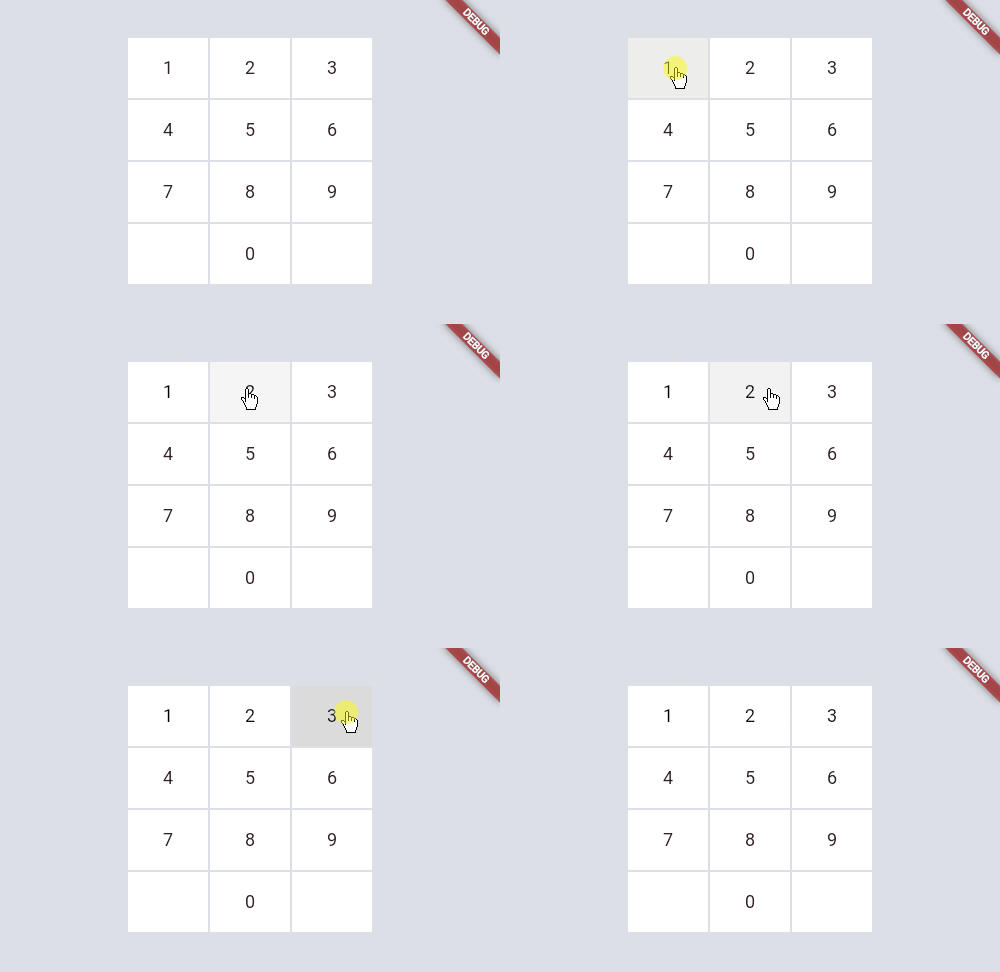
Basic
基本用法:
SimpleNumpad(
    buttonWidth: 80,
    buttonHeight: 60,
    onPressed: (str) {
        print(str);
    },
);
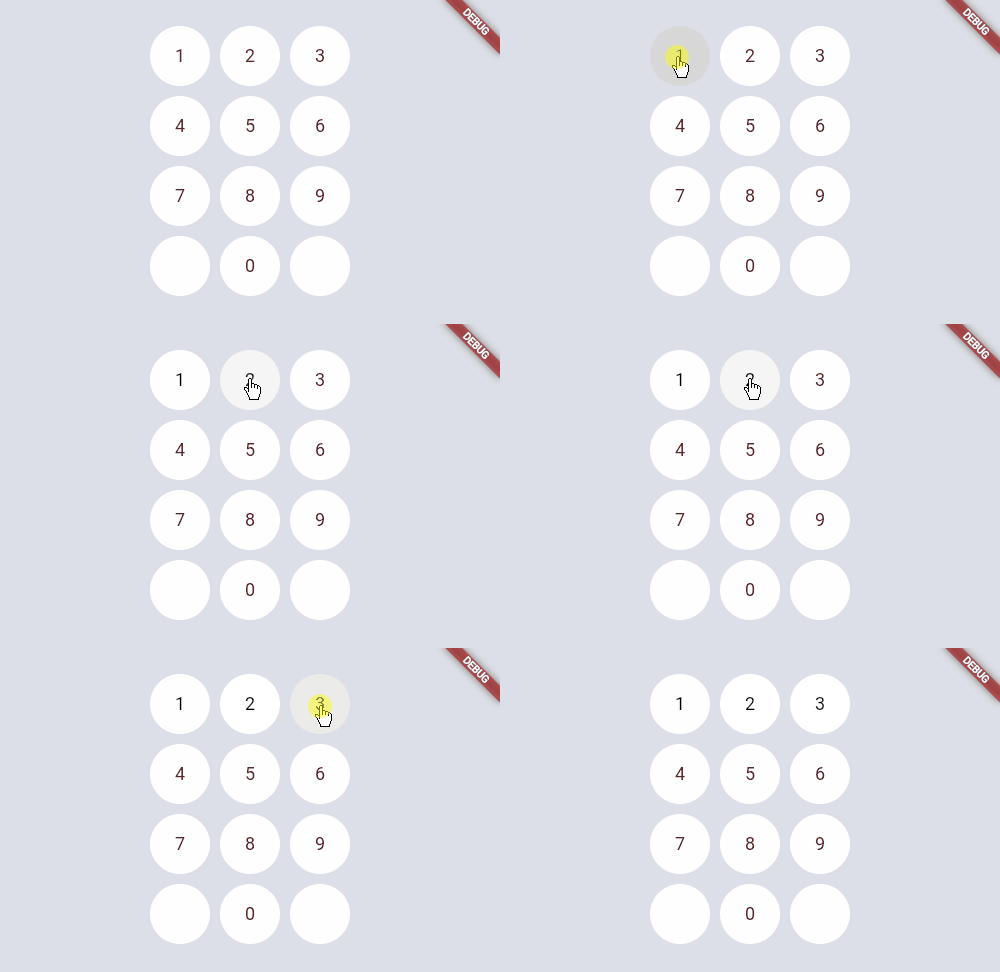
Circular
圆形按钮:
SimpleNumpad(
    buttonWidth: 60,
    buttonHeight: 60,
    gridSpacing: 10,
    buttonBorderRadius: 30,
    onPressed: (str) {
        print(str);
    },
);
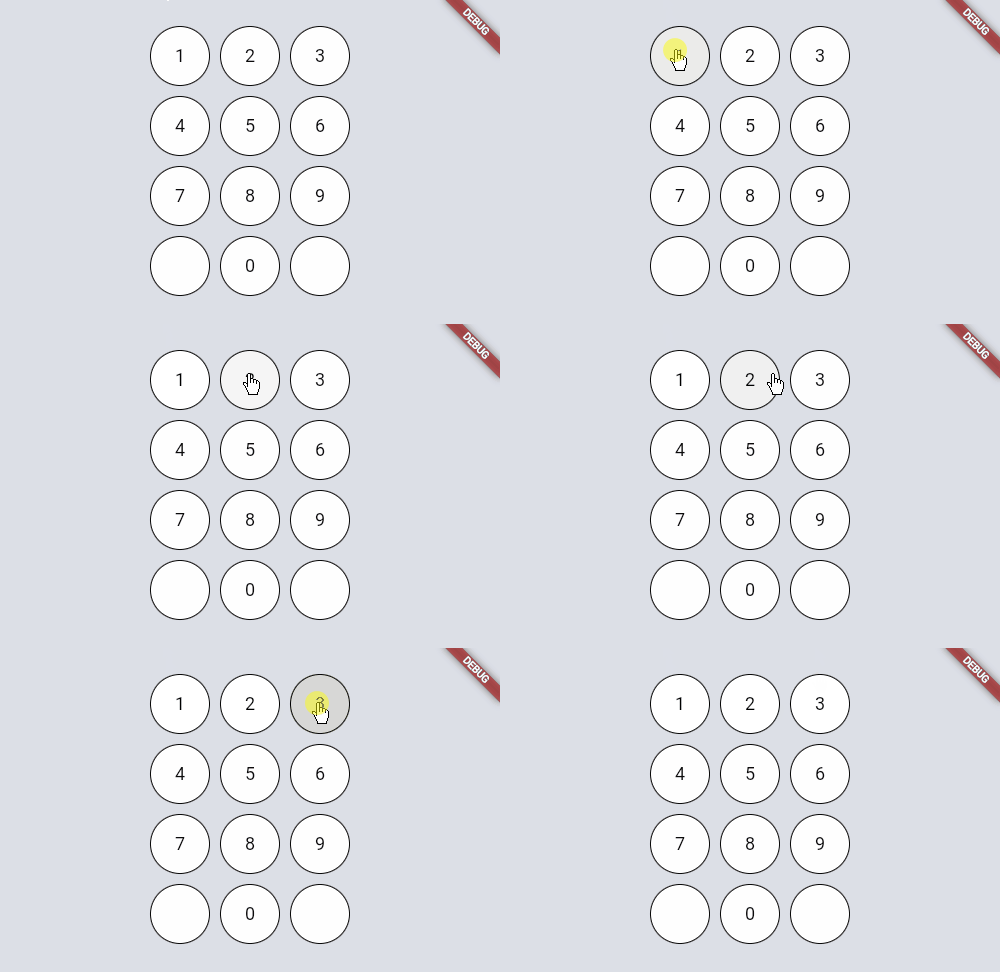
Bordered
带边框的按钮:
SimpleNumpad(
    buttonWidth: 60,
    buttonHeight: 60,
    gridSpacing: 10,
    buttonBorderRadius: 30,
    buttonBorderSide: const BorderSide(
        color: Colors.black,
        width: 1,
    ),
    onPressed: (str) {
        print(str);
    },
);
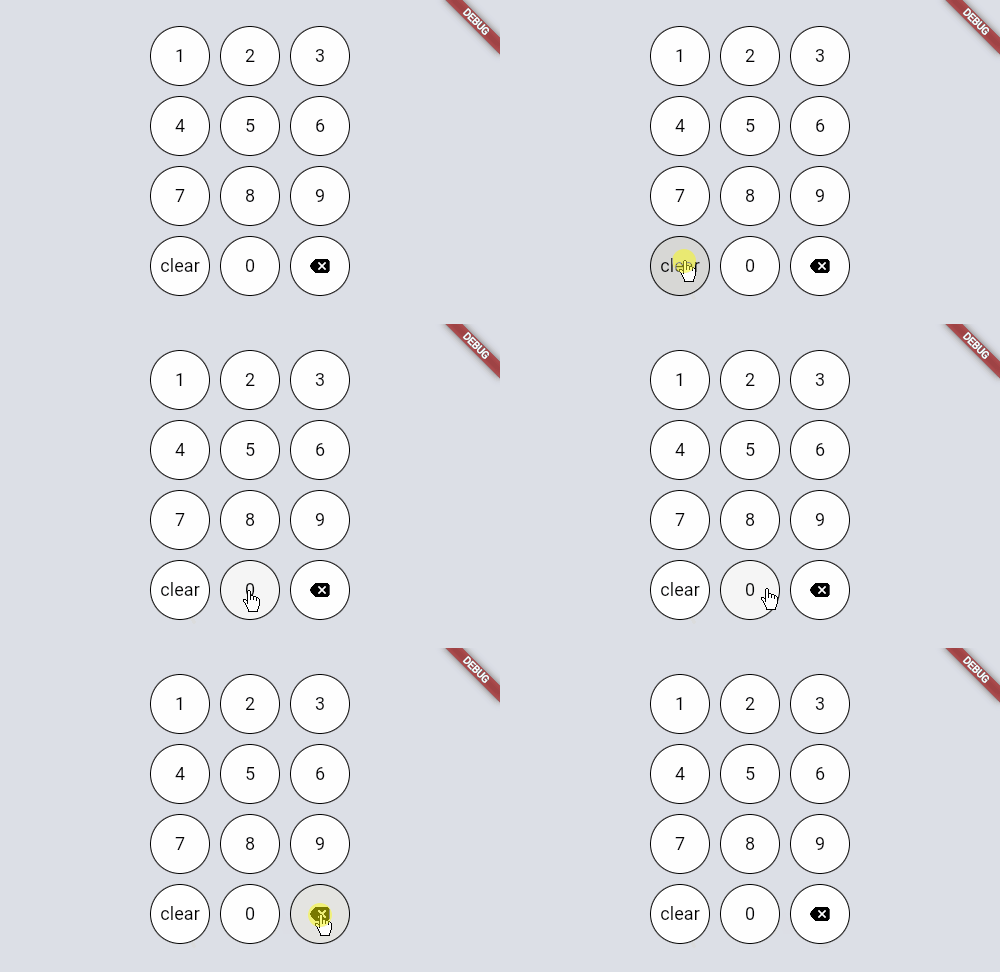
Backspace & Option
带有退格键和选项按钮:
SimpleNumpad(
    buttonWidth: 60,
    buttonHeight: 60,
    gridSpacing: 10,
    buttonBorderRadius: 30,
    buttonBorderSide: const BorderSide(
        color: Colors.black,
        width: 1,
    ),
    useBackspace: true,
    optionText: 'clear',
    onPressed: (str) {
        print(str);
    },
);
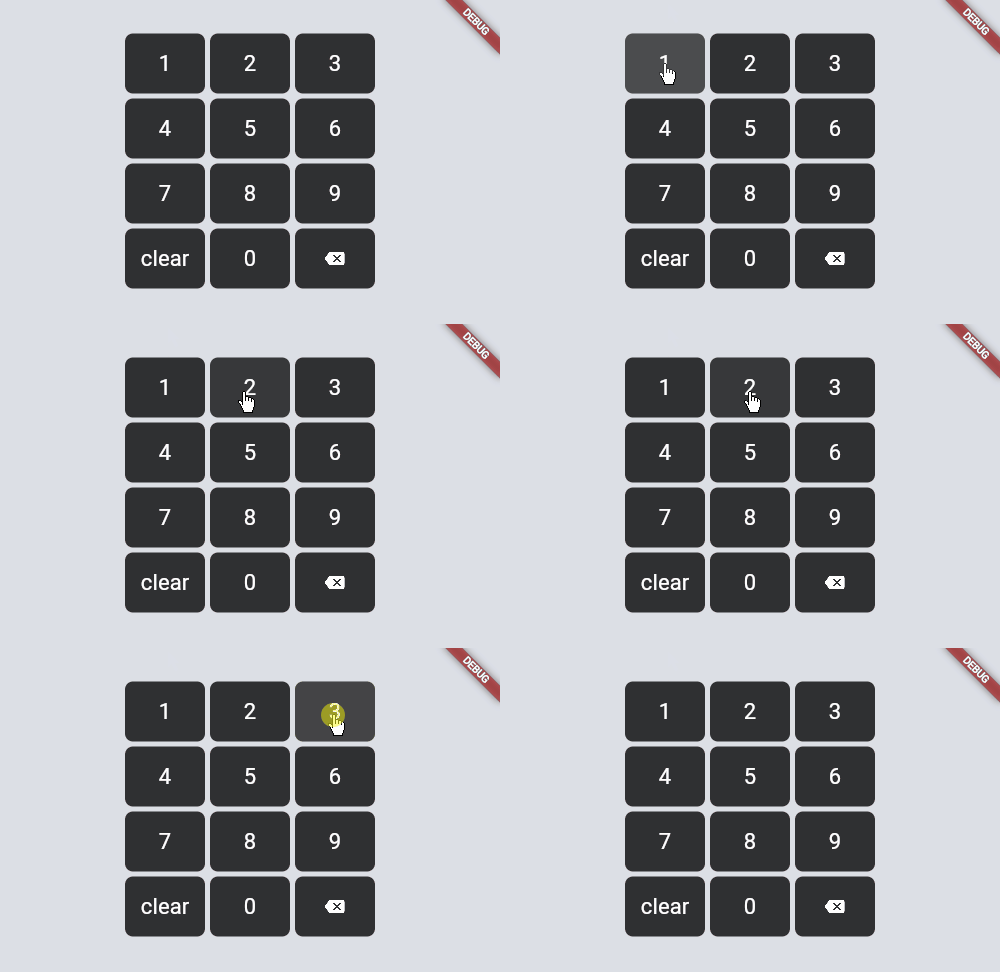
Custom1
自定义样式1:
SimpleNumpad(
    buttonWidth: 80,
    buttonHeight: 60,
    gridSpacing: 5,
    buttonBorderRadius: 8,
    foregroundColor: Colors.white,
    backgroundColor: Colors.black.withAlpha(200),
    textStyle: const TextStyle(
        color: Colors.white,
        fontSize: 22,
        fontWeight: FontWeight.w400,
    ),
    useBackspace: true,
    optionText: 'clear',
    onPressed: (str) {
        print(str);
    },
);
Custom2
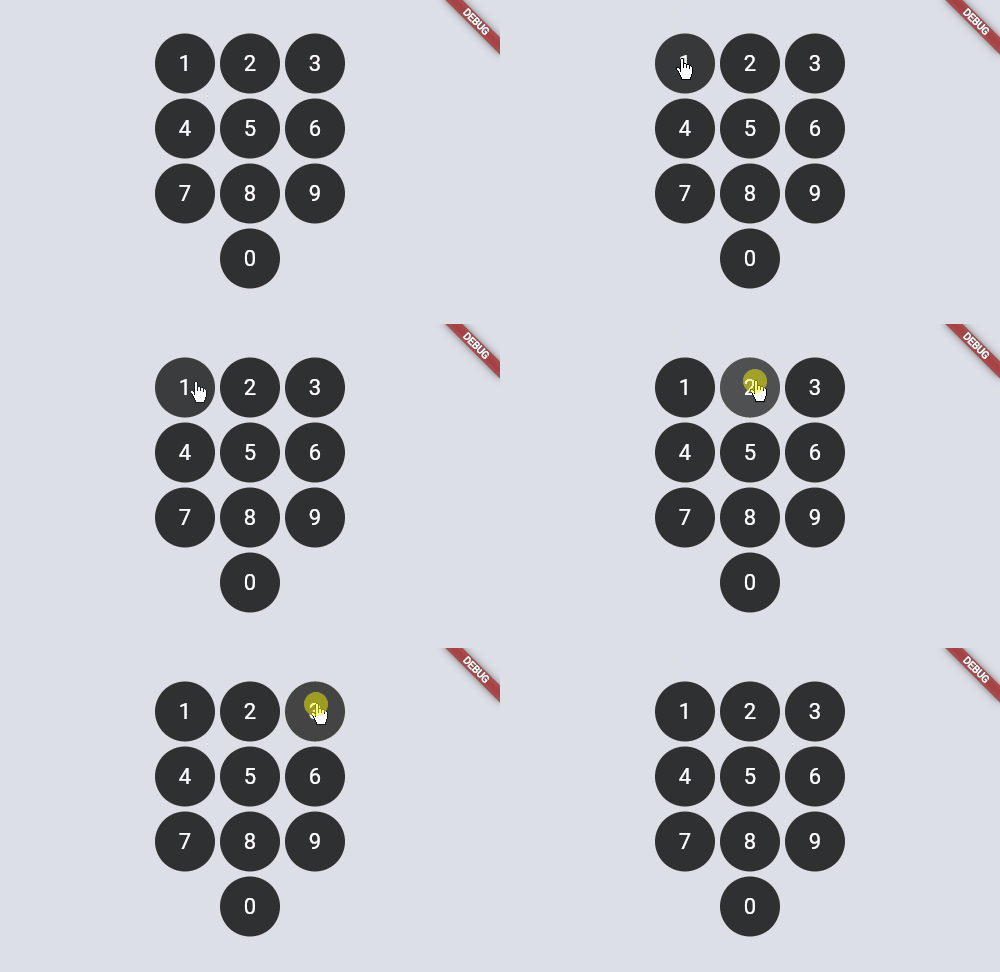
自定义样式2:
SimpleNumpad(
    buttonWidth: 60,
    buttonHeight: 60,
    gridSpacing: 5,
    buttonBorderRadius: 30,
    foregroundColor: Colors.white,
    backgroundColor: Colors.black.withAlpha(200),
    textStyle: const TextStyle(
        color: Colors.white,
        fontSize: 22,
        fontWeight: FontWeight.w400,
    ),
    useBackspace: false,
    removeBlankButton: true,
    onPressed: (str) {
        print(str);
    },
);
Custom3
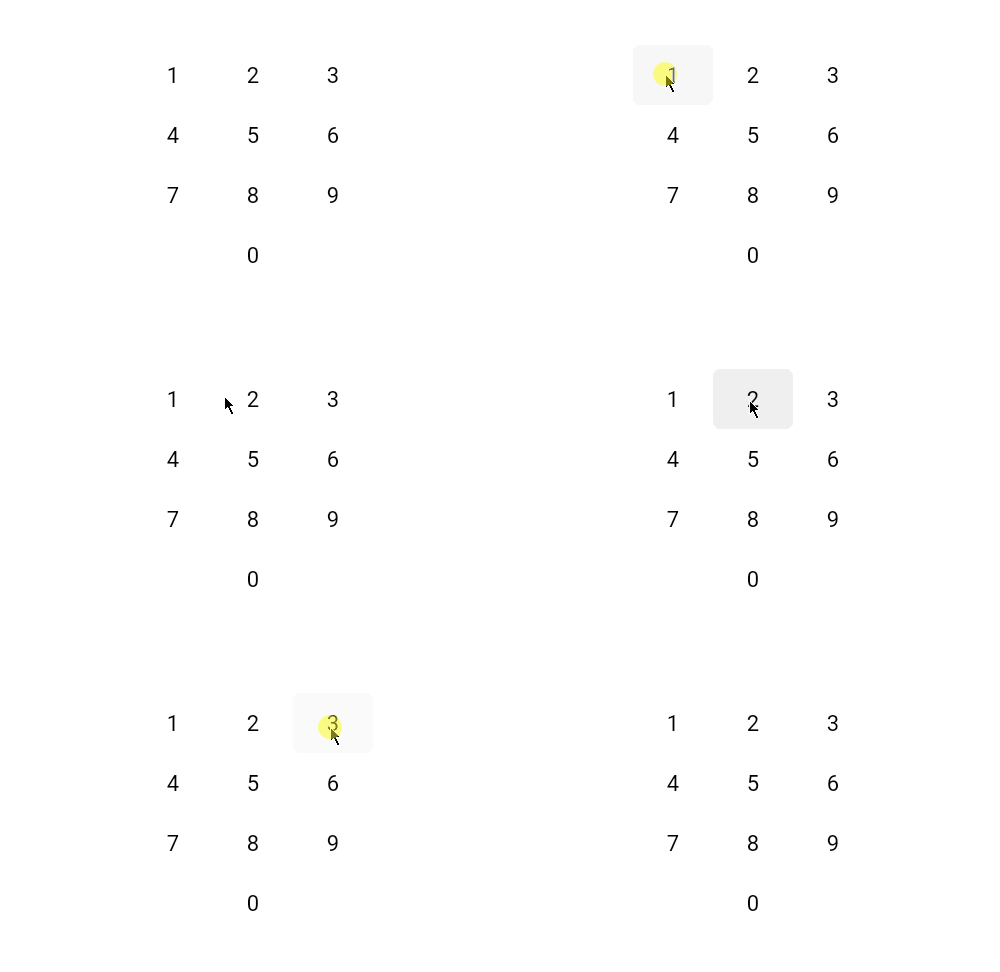
自定义样式3:
SimpleNumpad(
    buttonWidth: 80,
    buttonHeight: 60,
    gridSpacing: 0,
    buttonBorderRadius: 8,
    foregroundColor: Colors.black,
    backgroundColor: Colors.transparent,
    textStyle: const TextStyle(
        color: Colors.black,
        fontSize: 22,
        fontWeight: FontWeight.w400,
    ),
    useBackspace: false,
    removeBlankButton: true,
    onPressed: (str) {
        print(str);
    },
);
onPressed function example
onPressed 函数接收数字键盘上显示的字符串输入。
默认值:
- ‘1’, ‘2’, ‘3’, ‘4’, ‘5’, ‘6’, ‘7’, ‘8’, ‘9’, ‘0’
可选值:
- ‘BACKSPACE’(当设置
useBackspace: true时可用) ${optionText}(你注入到optionText的字符串)
示例代码:
void onPressed(String str) {
    switch(str) {
        case 'BACKSPACE':
            // 当设置 "useBackspace: true" 时可用
            removeLast();
            break;
        case 'clear':
            // 这是你注入到 "optionText" 的字符串
            removeAll();
            break;
        default:
            // '1', '2', '3', '4', '5', '6', '7', '8', '9', '0'
            append(str);
            break;
    }
}

void removeLast() {
    if (text.isEmpty) return;
    setState(() {
        text = text.substring(0, text.length - 1);
    });
}

void removeAll() {
    setState(() {
        text = '';
    });
}

void append(String value) {
    setState(() {
        text = text + value;
    });
}
完整示例代码
import 'package:flutter/material.dart';
import 'package:simple_numpad/simple_numpad.dart';

void main() {
  runApp(const MyApp());
}

class MyApp extends StatelessWidget {
  const MyApp({super.key});

  @override
  Widget build(BuildContext context) {
    return MaterialApp(
      title: 'Simple Numpad Example',
      theme: ThemeData(
        colorScheme: ColorScheme.fromSeed(seedColor: Colors.deepPurple),
        useMaterial3: true,
      ),
      home: const Scaffold(
        body: Center(
          child: SimpleNumpadExample(),
        ),
      ),
    );
  }
}

class SimpleNumpadExample extends StatefulWidget {
  const SimpleNumpadExample({super.key});

  @override
  State<StatefulWidget> createState() => SimpleNumpadExampleState();
}

class SimpleNumpadExampleState extends State<SimpleNumpadExample> {
  String text = '';

  @override
  Widget build(BuildContext context) {
    return Column(
      mainAxisAlignment: MainAxisAlignment.center,
      crossAxisAlignment: CrossAxisAlignment.center,
      children: [
        Text(
          text,
          style: const TextStyle(
            color: Colors.black,
            fontSize: 27,
            fontWeight: FontWeight.w600,
          ),
        ),
        const SizedBox(height: 45),
        SimpleNumpad(
          buttonWidth: 100,
          buttonHeight: 80,
          gridSpacing: 0,
          buttonBorderRadius: 8,
          foregroundColor: Colors.black,
          backgroundColor: Colors.transparent,
          textStyle: const TextStyle(
            color: Colors.black,
            fontSize: 22,
            fontWeight: FontWeight.w400,
          ),
          useBackspace: true,
          removeBlankButton: false,
          optionText: 'clear',
          onPressed: onPressed,
        ),
      ],
    );
  }

  void onPressed(String str) {
    switch (str) {
      case 'BACKSPACE':
        // 当设置 "useBackspace: true" 时可用
        removeLast();
        break;
      case 'clear':
        // 这是你注入到 "optionText" 的字符串
        removeAll();
        break;
      default:
        // '1', '2', '3', '4', '5', '6', '7', '8', '9', '0'
        append(str);
        break;
    }
  }

  void removeLast() {
    if (text.isEmpty) return;
    setState(() {
      text = text.substring(0, text.length - 1);
    });
  }

  void removeAll() {
    setState(() {
      text = '';
    });
  }

  void append(String value) {
    setState(() {
      text = text + value;
    });
  }
}
希望这些内容能帮助你更好地理解和使用 simple_numpad 插件。如果有任何问题或需要进一步的帮助,请随时提问!
更多关于Flutter数字键盘插件simple_numpad的使用的实战系列教程也可以访问 https://www.itying.com/category-92-b0.html
更多关于Flutter数字键盘插件simple_numpad的使用的实战系列教程也可以访问 https://www.itying.com/category-92-b0.html
当然,以下是如何在Flutter项目中使用simple_numpad插件的详细代码案例。这个插件提供了一个简单且可自定义的数字键盘,非常适合需要用户输入数字的场景。
步骤 1: 添加依赖
首先,在你的pubspec.yaml文件中添加simple_numpad的依赖:
dependencies:
  flutter:
    sdk: flutter
  simple_numpad: ^2.0.0  # 请检查最新版本号
然后运行flutter pub get来安装依赖。
步骤 2: 导入包
在你的Dart文件中导入simple_numpad包:
import 'package:simple_numpad/simple_numpad.dart';
步骤 3: 使用SimpleNumpad
下面是一个完整的示例,展示了如何在Flutter应用中使用SimpleNumpad:
import 'package:flutter/material.dart';
import 'package:simple_numpad/simple_numpad.dart';

void main() {
  runApp(MyApp());
}

class MyApp extends StatelessWidget {
  @override
  Widget build(BuildContext context) {
    return MaterialApp(
      title: 'Flutter SimpleNumpad Demo',
      theme: ThemeData(
        primarySwatch: Colors.blue,
      ),
      home: MyHomePage(),
    );
  }
}

class MyHomePage extends StatefulWidget {
  @override
  _MyHomePageState createState() => _MyHomePageState();
}

class _MyHomePageState extends State<MyHomePage> {
  String _inputText = '';

  void _onNumberPressed(String number) {
    setState(() {
      _inputText += number;
    });
  }

  void _onBackspacePressed() {
    setState(() {
      if (_inputText.isNotEmpty) {
        _inputText = _inputText.substring(0, _inputText.length - 1);
      }
    });
  }

  void _onClearPressed() {
    setState(() {
      _inputText = '';
    });
  }

  void _onSubmitPressed() {
    // 在这里处理提交逻辑,例如显示输入的数字
    print('Submitted text: $_inputText');
  }

  @override
  Widget build(BuildContext context) {
    return Scaffold(
      appBar: AppBar(
        title: Text('Simple Numpad Demo'),
      ),
      body: Padding(
        padding: const EdgeInsets.all(16.0),
        child: Column(
          crossAxisAlignment: CrossAxisAlignment.start,
          children: <Widget>[
            Text(
              'Input:',
              style: TextStyle(fontSize: 18),
            ),
            SizedBox(height: 8),
            TextField(
              controller: TextEditingController(text: _inputText),
              decoration: InputDecoration(
                border: InputBorder.none,
                focusedBorder: InputBorder.none,
                enabledBorder: InputBorder.none,
                disabledBorder: InputBorder.none,
                contentPadding: EdgeInsets.zero,
              ),
              readOnly: true,
              cursorColor: Colors.transparent,
              style: TextStyle(fontSize: 24),
            ),
            SizedBox(height: 24),
            Expanded(
              child: SimpleNumpad(
                onNumberPressed: _onNumberPressed,
                onBackspacePressed: _onBackspacePressed,
                onClearPressed: _onClearPressed,
                onSubmitPressed: _onSubmitPressed,
                // 可选参数,用于自定义键盘样式
                numpadTextStyle: TextStyle(fontSize: 24),
                decoration: BoxDecoration(
                  color: Colors.white,
                  borderRadius: BorderRadius.circular(8),
                ),
                numpadButtonDecoration: BoxDecoration(
                  borderRadius: BorderRadius.circular(8),
                ),
                submitButtonText: 'Submit',
                clearButtonText: 'Clear',
              ),
            ),
          ],
        ),
      ),
    );
  }
}
解释
- 添加依赖:在
pubspec.yaml中添加simple_numpad依赖。 - 导入包:在Dart文件中导入
simple_numpad包。 - 创建UI:
- 使用
TextField显示输入的数字,设置为只读以确保用户不能直接通过键盘输入。 - 使用
SimpleNumpad小部件创建数字键盘。
- 使用
- 处理回调:
_onNumberPressed:当用户按下数字键时更新输入文本。_onBackspacePressed:当用户按下退格键时删除输入文本的最后一个字符。_onClearPressed:当用户按下清除键时清空输入文本。_onSubmitPressed:当用户按下提交键时处理提交逻辑(例如打印输入文本)。
这个示例展示了如何使用simple_numpad插件创建一个基本的数字输入界面,你可以根据需要进行进一步的自定义和扩展。


