Flutter信用卡输入插件flutterme_credit_card的使用
Flutter信用卡输入插件flutterme_credit_card的使用
Credit Card Flutterme

flutterme_credit_card 是由 Flutterme 提供的一个信用卡自定义小部件和验证包。该插件支持大多数信用卡,具有自动检测和验证功能。如果不需要这些功能,也可以禁用它们。以下是支持的卡验证列表:
| No. | Card Type | Support |
|---|---|---|
| 1 | American Express | true |
| 2 | Diners Club | true |
| 3 | Discover | true |
| 4 | Elo | true |
| 5 | Hiper/Hipercard | true |
| 6 | JCB | true |
| 7 | Maestro | true |
| 8 | Mastercard | true |
| 9 | Mir | true |
| 10 | Union Pay | true |
| 11 | Visa | true |
| 12 | Verve | false |
注意: 支持的卡片类型会定期更新,并在未来的版本中添加更多支持。
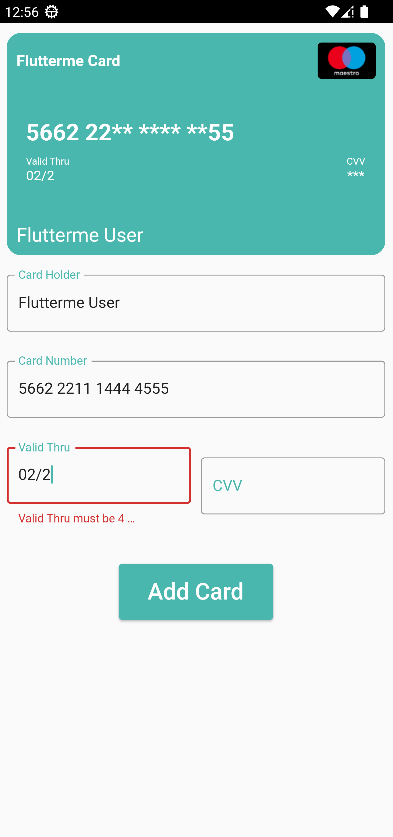
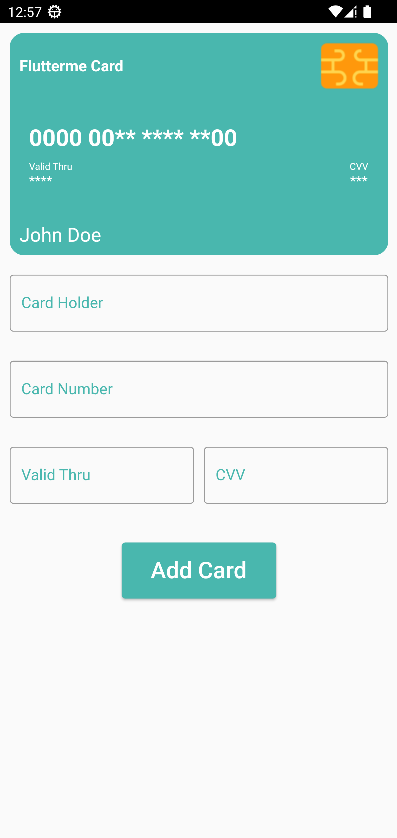
样例图片
| Screenshot 1 | Screenshot 2 |
|---|---|
 |
 |
特性
FMCreditCard() 的 UI 自定义
- Width (width): 控制信用卡的宽度。宽度可以在设备宽度范围内设置,但限制在 [300]-[430] 之间。
- Height (height): 控制信用卡的高度。高度可以在设备高度范围内设置,但限制在 [200]-[250] 之间。
- Padding (padding): 创建信用卡边框与内部小部件之间的内边距。
- Margin (margin): 创建信用卡边框与外部布局之间的外边距。
- Color (color): 设置卡片背景颜色。不能是渐变色。若要设置渐变背景颜色,请使用
backgroundGradient。backgroundColor和backgroundGradient不能同时设置。 - Image (image): 设置卡片的背景图片。当设置了背景图片时,
backgroundColor和backgroundGradient将无效。 - Border (border): 调整卡片边框。
- Border Radius (borderRadius): 调整卡片圆角。
- Box Shadow (boxShadow): 控制卡片阴影和方向。
- Gradient (gradient): 设置卡片背景渐变色。
backgroundColor和backgroundGradient不能同时设置。 - Title (title): 卡片标题区域。
- Title Style (titleStyle): 样式化卡片标题名称区域。
- Number (number): 卡片号区域。
- Number Style (numberStyle): 样式化卡片号区域。
- Number Mask Type (numberMaskType): 为安全原因遮盖卡片号。接受所有遮罩类型。
- Valid Thur (validThur): 卡片有效期区域。
- Valid Thur Style (validThurStyle): 样式化卡片有效期区域。
- Valid Thur Mask Type (validThurMaskType): 为安全原因遮盖有效期。仅接受
full和none类型。其他类型将返回 “****”。 - CVV (cvv): CVV 区域。
- CVV Style (cvvStyle): 样式化 CVV 区域。
- CVV Mask Type (cvvMaskType): 为安全原因遮盖 CVV。仅接受
full和none类型。其他类型将返回 “***”。 - Holder (holder): 持卡人姓名区域。
- Holder Style (holderStyle): 样式化持卡人姓名区域。
FMCreditCard() 的验证自定义
-
Number Mask (FMMaskType): 选择如何遮盖卡号:
full: 显示所有字符为星号。例如:**** **** **** ****first4Last4: 显示前4位和后4位字符。例如:1234 **** **** 5678first6last2: 显示前6位和后2位字符。例如:1234 56** **** **76first2last6: 显示前2位和后6位字符。例如:12** **** **68 9876none: 显示所有字符。例如:1234 5678 9876 5633
-
Valid Thur Mask (FMMaskType): 选择如何遮盖有效期:
full: 显示所有字符为星号。例如:****none: 显示所有字符。例如:1234
-
CVV Mask (FMMaskType): 选择如何遮盖 CVV:
full: 显示所有字符为星号。例如:***none: 显示所有字符。例如:123
使用方法
使用 FMCreditCard()
FMCreditCard(
  number: number.text,
  numberMaskType: FMMaskType.first6last2,
  cvv: cvv.text,
  cvvMaskType: FMMaskType.full,
  validThru: validThru.text,
  validThruMaskType: FMMaskType.none,
  holder: holder.text,
)
使用 Form 和字段
Form(
  key: formKey,
  child: Column(
    children: [
      FMHolderField(
        controller: holder,
        cursorColor: const Color(0xFF49B7AE),
        decoration: inputDecoration(
          labelText: "Card Holder",
          hintText: "John Doe",
        ),
      ),
      const SizedBox(height: 30),
      FMNumberField(
        controller: number,
        cursorColor: const Color(0xFF49B7AE),
        decoration: inputDecoration(
          labelText: "Card Number",
          hintText: "0000 0000 0000 0000",
        ),
      ),
      const SizedBox(height: 30),
      Row(
        mainAxisAlignment: MainAxisAlignment.spaceBetween,
        children: [
          Flexible(
            child: FMValidThruField(
              controller: validThru,
              cursorColor: const Color(0xFF49B7AE),
              decoration: const InputDecoration(
                border: OutlineInputBorder(),
                focusedBorder: OutlineInputBorder(
                  borderSide: BorderSide(
                    color: Color(0xFF49B7AE),
                  ),
                ),
                labelStyle: TextStyle(color: Color(0xFF49B7AE)),
                labelText: "Valid Thru",
                hintText: "****",
              ),
            ),
          ),
          const SizedBox(width: 10),
          Flexible(
            child: FMCvvField(
              controller: cvv,
              cursorColor: const Color(0xFF49B7AE),
              decoration: inputDecoration(
                labelText: "CVV",
                hintText: "***",
              ),
            ),
          ),
        ],
      )
    ],
  ),
)
完整示例代码
import 'package:flutter/material.dart';
import 'package:flutterme_credit_card/flutterme_credit_card.dart';

void main() {
  WidgetsFlutterBinding.ensureInitialized();
  runApp(const App());
}

class App extends StatelessWidget {
  const App({super.key});

  @override
  Widget build(BuildContext context) {
    return const MaterialApp(
      debugShowCheckedModeBanner: false,
      title: 'Flutterme',
      home: CardScreen(),
    );
  }
}

class CardScreen extends StatefulWidget {
  const CardScreen({super.key});

  @override
  State<CardScreen> createState() => _CardScreenState();
}

class _CardScreenState extends State<CardScreen> {
  final formKey = GlobalKey<FormState>();
  late TextEditingController number = TextEditingController();
  late TextEditingController validThru = TextEditingController();
  late TextEditingController cvv = TextEditingController();
  late TextEditingController holder = TextEditingController();

  @override
  void initState() {
    super.initState();

    // 监听表单字段控制器的状态变化
    number.addListener(() => setState(() {}));
    validThru.addListener(() => setState(() {}));
    cvv.addListener(() => setState(() {}));
    holder.addListener(() => setState(() {}));
  }

  @override
  Widget build(BuildContext context) {
    return SafeArea(
      child: Scaffold(
        body: SingleChildScrollView(
          child: Column(
            children: [
              FMCreditCard(
                number: number.text,
                numberMaskType: FMMaskType.first6last2,
                cvv: cvv.text,
                cvvMaskType: FMMaskType.full,
                validThru: validThru.text,
                validThruMaskType: FMMaskType.none,
                holder: holder.text,
              ),
              Container(
                margin: const EdgeInsets.all(10),
                child: Form(
                  key: formKey,
                  child: Column(
                    children: [
                      FMHolderField(
                        controller: holder,
                        cursorColor: const Color(0xFF49B7AE),
                        decoration: inputDecoration(
                          labelText: "Card Holder",
                          hintText: "John Doe",
                        ),
                      ),
                      const SizedBox(height: 30),
                      FMNumberField(
                        controller: number,
                        cursorColor: const Color(0xFF49B7AE),
                        decoration: inputDecoration(
                          labelText: "Card Number",
                          hintText: "0000 0000 0000 0000",
                        ),
                      ),
                      const SizedBox(height: 30),
                      Row(
                        mainAxisAlignment: MainAxisAlignment.spaceBetween,
                        children: [
                          Flexible(
                            child: FMValidThruField(
                              controller: validThru,
                              cursorColor: const Color(0xFF49B7AE),
                              decoration: const InputDecoration(
                                border: OutlineInputBorder(),
                                focusedBorder: OutlineInputBorder(
                                  borderSide: BorderSide(
                                    color: Color(0xFF49B7AE),
                                  ),
                                ),
                                labelStyle: TextStyle(color: Color(0xFF49B7AE)),
                                labelText: "Valid Thru",
                                hintText: "****",
                              ),
                            ),
                          ),
                          const SizedBox(width: 10),
                          Flexible(
                            child: FMCvvField(
                              controller: cvv,
                              cursorColor: const Color(0xFF49B7AE),
                              decoration: inputDecoration(
                                labelText: "CVV",
                                hintText: "***",
                              ),
                            ),
                          ),
                        ],
                      )
                    ],
                  ),
                ),
              ),
              const SizedBox(height: 30),
              ElevatedButton(
                style: ElevatedButton.styleFrom(
                  foregroundColor: Colors.white,
                  backgroundColor: const Color(0xFF49B7AE),
                  padding: const EdgeInsets.symmetric(
                    vertical: 15,
                    horizontal: 30,
                  ),
                ),
                onPressed: () {
                  // 验证表单是否有效
                  if (formKey.currentState!.validate()) {
                    /* 执行操作 */
                  }
                },
                child: const Text("Add Card", style: TextStyle(fontSize: 24)),
              )
            ],
          ),
        ),
      ),
    );
  }

  // 输入装饰样式
  InputDecoration inputDecoration({
    required String labelText,
    required String hintText,
  }) {
    return InputDecoration(
      border: const OutlineInputBorder(),
      focusedBorder: const OutlineInputBorder(
        borderSide: BorderSide(
          color: Color(0xFF49B7AE),
        ),
      ),
      labelStyle: const TextStyle(color: Color(0xFF49B7AE)),
      labelText: labelText,
      hintText: hintText,
    );
  }
}
此代码展示了如何使用 flutterme_credit_card 插件创建一个完整的信用卡输入界面,并包括了表单验证和提交按钮的功能。
更多关于Flutter信用卡输入插件flutterme_credit_card的使用的实战系列教程也可以访问 https://www.itying.com/category-92-b0.html
更多关于Flutter信用卡输入插件flutterme_credit_card的使用的实战系列教程也可以访问 https://www.itying.com/category-92-b0.html
当然,以下是如何在Flutter项目中使用flutterme_credit_card插件来实现信用卡输入功能的示例代码。
首先,确保你的Flutter环境已经配置好,并且在pubspec.yaml文件中添加flutterme_credit_card依赖:
dependencies:
  flutter:
    sdk: flutter
  flutterme_credit_card: ^latest_version  # 请替换为最新版本号
然后运行flutter pub get来获取依赖。
接下来,在你的Flutter项目中创建一个页面来使用这个插件。以下是一个完整的示例:
import 'package:flutter/material.dart';
import 'package:flutterme_credit_card/flutterme_credit_card.dart';

void main() {
  runApp(MyApp());
}

class MyApp extends StatelessWidget {
  @override
  Widget build(BuildContext context) {
    return MaterialApp(
      title: 'Flutter Credit Card Input Demo',
      theme: ThemeData(
        primarySwatch: Colors.blue,
      ),
      home: CreditCardInputPage(),
    );
  }
}

class CreditCardInputPage extends StatefulWidget {
  @override
  _CreditCardInputPageState createState() => _CreditCardInputPageState();
}

class _CreditCardInputPageState extends State<CreditCardInputPage> {
  CreditCardModel? creditCardModel;

  @override
  Widget build(BuildContext context) {
    return Scaffold(
      appBar: AppBar(
        title: Text('Credit Card Input Demo'),
      ),
      body: Padding(
        padding: const EdgeInsets.all(16.0),
        child: Column(
          mainAxisAlignment: MainAxisAlignment.center,
          children: <Widget>[
            CreditCardForm(
              cardNumber: TextEditingController(),
              expiryDate: TextEditingController(),
              cvv: TextEditingController(),
              cardHolderName: TextEditingController(),
              onCreditCardModelChange: (CreditCardModel cardModel) {
                setState(() {
                  creditCardModel = cardModel;
                });
              },
              decoration: InputDecoration(
                prefixIcon: Icon(Icons.credit_card),
                filled: true,
                fillColor: Colors.white,
                border: OutlineInputBorder(
                  borderRadius: BorderRadius.circular(10.0),
                ),
                labelText: 'Enter Credit Card Details',
              ),
            ),
            SizedBox(height: 20),
            if (creditCardModel != null)
              Card(
                elevation: 4,
                shape: RoundedRectangleBorder(
                  borderRadius: BorderRadius.circular(10),
                ),
                child: Padding(
                  padding: const EdgeInsets.all(16.0),
                  child: Column(
                    crossAxisAlignment: CrossAxisAlignment.start,
                    children: <Widget>[
                      Text('Card Number: ${creditCardModel!.cardNumber}'),
                      SizedBox(height: 10),
                      Text('Expiry Date: ${creditCardModel!.expiryDate}'),
                      SizedBox(height: 10),
                      Text('CVV: ${creditCardModel!.cvv}'),
                      SizedBox(height: 10),
                      Text('Card Holder Name: ${creditCardModel!.cardHolderName}'),
                    ],
                  ),
                ),
              ),
          ],
        ),
      ),
    );
  }
}
在这个示例中,我们创建了一个简单的Flutter应用,其中包含一个使用flutterme_credit_card插件的信用卡输入表单。用户输入信用卡详情后,这些信息会被收集到一个CreditCardModel对象中,并在页面上显示出来。
注意,flutterme_credit_card插件可能提供了更多的自定义选项和验证功能,你可以查阅其官方文档来获取更多信息和高级用法。
确保你已经正确导入了所需的包,并且插件版本是最新的,以避免兼容性问题。


