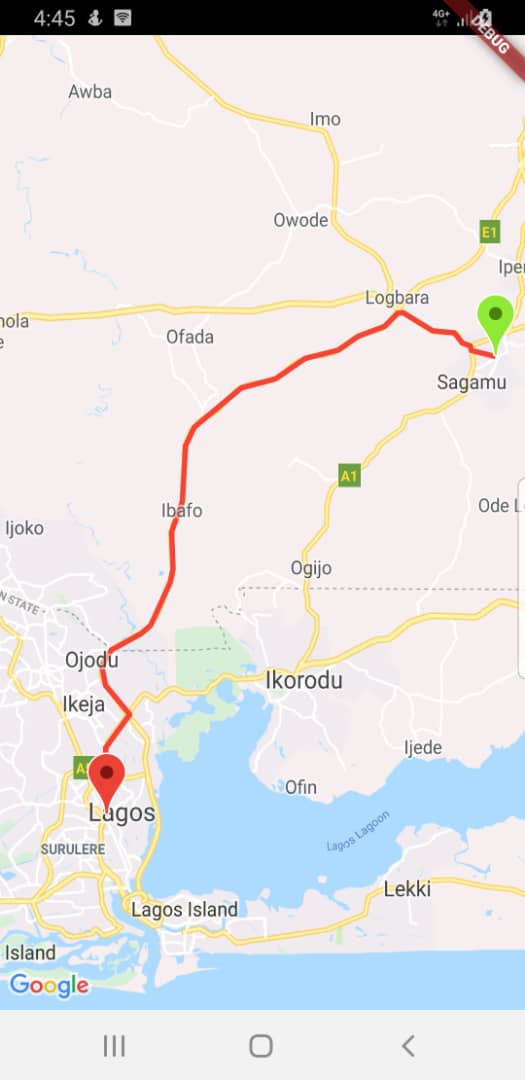
Flutter地图路径绘制插件flutter_polyline_points_plus的使用
Flutter地图路径绘制插件flutter_polyline_points_plus的使用
描述
flutter_polyline_points_plus是flutter_polyline_points的一个分支,它提供了将Google Polyline编码字符串解码为地理坐标列表的功能。此分支的目的是确保插件保持更新,因为原始作者不再维护该插件。
感谢@shkvoretz对Flutter SDK的升级。

开始使用
添加依赖
要使用这个包,在您的pubspec.yaml文件中添加flutter_polyline_points_plus作为依赖项。
dependencies:
  flutter_polyline_points_plus: ^latest_version
导入包
在您的Dart文件中导入flutter_polyline_points_plus:
import 'package:flutter_polyline_points_plus/flutter_polyline_points_plus.dart';
使用方法
第一种方法:通过地理坐标获取路径点
可以通过给定的起点和终点坐标来获取路径点。这会返回一个PolylineResult实例,其中包含API的状态、错误信息以及解码后的点列表。
PolylinePoints polylinePoints = PolylinePoints();
PolylineResult result = await polylinePoints.getRouteBetweenCoordinates(
    googleAPiKey,
    _originLatitude,
    _originLongitude,
    _destLatitude,
    _destLongitude);
print(result.points);
第二种方法:解码Google Polyline编码字符串
可以解码Google提供的Polyline编码字符串(如_p~iF~ps|U_ulLnnqC_mqNvxq@)以获得路径点列表。
List<PointLatLng> result = polylinePoints.decodePolyline("_p~iF~ps|U_ulLnnqC_mqNvxq`@");
print(result);
提示
请确保使用有效的Google API密钥。如果您需要帮助生成项目所需的API密钥,请点击此链接
示例代码
以下是一个完整的示例应用程序,展示了如何在地图上显示路径。
import 'package:flutter/material.dart';
import 'package:google_maps_flutter/google_maps_flutter.dart';
import 'package:flutter_polyline_points_plus/flutter_polyline_points_plus.dart';
import 'package:flutter_dotenv/flutter_dotenv.dart';

void main() async {
  await dotenv.load(fileName: "env/.env");
  runApp(const MyApp());
}

class MyApp extends StatelessWidget {
  const MyApp({super.key});

  @override
  Widget build(BuildContext context) {
    return MaterialApp(
      title: 'Polyline example',
      theme: ThemeData(
        primarySwatch: Colors.orange,
      ),
      home: const MapScreen(),
    );
  }
}

class MapScreen extends StatefulWidget {
  const MapScreen({super.key});

  @override
  State<MapScreen> createState() => _MapScreenState();
}

class _MapScreenState extends State<MapScreen> {
  late GoogleMapController mapController;
  final double _originLatitude = 26.48424, _originLongitude = 50.04551;
  final double _destLatitude = 26.46423, _destLongitude = 50.06358;
  Map<MarkerId, Marker> markers = {};
  Map<PolylineId, Polyline> polylines = {};
  List<LatLng> polylineCoordinates = [];
  PolylinePoints polylinePoints = PolylinePoints();

  @override
  void initState() {
    super.initState();

    // 添加起点标记
    _addMarker(LatLng(_originLatitude, _originLongitude), "origin", BitmapDescriptor.defaultMarker);

    // 添加终点标记
    _addMarker(LatLng(_destLatitude, _destLongitude), "destination", BitmapDescriptor.defaultMarkerWithHue(90));
    _getPolyline();
  }

  @override
  Widget build(BuildContext context) {
    return SafeArea(
      child: Scaffold(
          body: GoogleMap(
        initialCameraPosition: CameraPosition(target: LatLng(_originLatitude, _originLongitude), zoom: 15),
        myLocationEnabled: true,
        tiltGesturesEnabled: true,
        compassEnabled: true,
        scrollGesturesEnabled: true,
        zoomGesturesEnabled: true,
        onMapCreated: _onMapCreated,
        markers: Set<Marker>.of(markers.values),
        polylines: Set<Polyline>.of(polylines.values),
      )),
    );
  }

  void _onMapCreated(GoogleMapController controller) async {
    mapController = controller;
  }

  void _addMarker(LatLng position, String id, BitmapDescriptor descriptor) {
    MarkerId markerId = MarkerId(id);
    Marker marker = Marker(markerId: markerId, icon: descriptor, position: position);
    markers[markerId] = marker;
  }

  void _addPolyLine() {
    PolylineId id = const PolylineId("poly");
    Polyline polyline = Polyline(polylineId: id, color: Colors.red, points: polylineCoordinates);
    polylines[id] = polyline;
    setState(() {});
  }

  Future<void> _getPolyline() async {
    final googleAPiKey = dotenv.get("GOOGLE_API_KEY");
    assert(googleAPiKey.isNotEmpty, "Please add your google api key on .env");

    PolylineResult result = await polylinePoints.getRouteBetweenCoordinates(
        googleAPiKey,
        PointLatLng(_originLatitude, _originLongitude),
        PointLatLng(_destLatitude, _destLongitude),
        travelMode: TravelMode.driving,
        wayPoints: [PolylineWayPoint(location: "Sabo, Yaba Lagos Nigeria")]);

    if (result.points.isNotEmpty) {
      for (var point in result.points) {
        polylineCoordinates.add(LatLng(point.latitude, point.longitude));
      }
    }
    _addPolyLine();
  }
}
这个例子展示了如何在地图上绘制从起点到终点的路径,并且包含了必要的设置和配置。您可以根据自己的需求调整经纬度和其他参数。
更多关于Flutter地图路径绘制插件flutter_polyline_points_plus的使用的实战系列教程也可以访问 https://www.itying.com/category-92-b0.html
更多关于Flutter地图路径绘制插件flutter_polyline_points_plus的使用的实战系列教程也可以访问 https://www.itying.com/category-92-b0.html
当然,下面是一个关于如何使用 flutter_polyline_points_plus 插件在 Flutter 中绘制地图路径的示例代码。这个插件允许你根据一组经纬度点绘制多段线(polyline)在 Google Maps 或其他地图服务上。
首先,确保你的 pubspec.yaml 文件中已经添加了 flutter_polyline_points_plus 和 google_maps_flutter 依赖:
dependencies:
  flutter:
    sdk: flutter
  google_maps_flutter: ^2.1.1
  flutter_polyline_points_plus: ^2.0.0
然后运行 flutter pub get 来获取这些依赖。
接下来,在你的 Flutter 项目中,你可以按照以下步骤来绘制地图路径:
- 导入必要的包:
import 'package:flutter/material.dart';
import 'package:google_maps_flutter/google_maps_flutter.dart';
import 'package:flutter_polyline_points_plus/flutter_polyline_points_plus.dart';
import 'package:geolocator/geolocator.dart';
import 'package:geocoding/geocoding.dart';
- 定义你的地图和路径绘制逻辑:
void main() => runApp(MyApp());

class MyApp extends StatelessWidget {
  @override
  Widget build(BuildContext context) {
    return MaterialApp(
      home: Scaffold(
        appBar: AppBar(
          title: Text('Polyline Drawing'),
        ),
        body: MapScreen(),
      ),
    );
  }
}

class MapScreen extends StatefulWidget {
  @override
  _MapScreenState createState() => _MapScreenState();
}

class _MapScreenState extends State<MapScreen> {
  Completer<GoogleMapController> _controller = Completer();
  Set<Polyline> _polylines = {};
  LatLng _initialPosition = LatLng(37.7749, -122.4194); // Default position

  @override
  Widget build(BuildContext context) {
    return GoogleMap(
      mapType: MapType.normal,
      initialCameraPosition: CameraPosition(
        target: _initialPosition,
        zoom: 14.0,
      ),
      polylines: _polylines,
      onMapCreated: (GoogleMapController controller) {
        _controller.complete(controller);
        _getPolylinePoints();
      },
      myLocationEnabled: true,
    );
  }

  Future<void> _getPolylinePoints() async {
    final GoogleMapController controller = await _controller.future;

    List<LatLng> polylineCoordinates = [
      LatLng(37.7749, -122.4194), // San Francisco
      LatLng(34.0522, -118.2437), // Los Angeles
    ];

    PolylinePoints polylinePoints = PolylinePoints();
    List<PointLatLng> results = polylinePoints.decodePolyline(
      await polylinePoints.getRouteBetweenCoordinates(
        'YOUR_GOOGLE_MAPS_API_KEY', // Replace with your API key
        polylineCoordinates,
        true,
      ),
    );

    if (results.isNotEmpty) {
      List<LatLng> decodedPoints = results.map((PointLatLng point) => LatLng(point.latitude, point.longitude)).toList();

      Polyline polyline = Polyline(
        polylineId: PolylineId('polyline_id'),
        color: Colors.blue.withOpacity(0.8),
        width: 4,
        points: decodedPoints,
      );

      setState(() {
        _polylines.add(polyline);
      });
    }
  }
}
注意:
- 替换
'YOUR_GOOGLE_MAPS_API_KEY'为你的实际 Google Maps API 密钥。 - 在实际项目中,你可能需要处理更多错误情况,例如 API 请求失败、用户位置权限被拒绝等。
geolocator和geocoding包在这个示例中未使用,但它们在处理用户位置和地址解析时非常有用。
这个示例展示了如何使用 flutter_polyline_points_plus 插件获取路径点并在 Google Maps 上绘制它们。你可以根据需要调整路径点或添加更多功能。


