HarmonyOS 鸿蒙Next 时钟demo 鸿蒙场景化代码
HarmonyOS 鸿蒙Next 时钟demo 鸿蒙场景化代码
<markdown _ngcontent-sjw-c147="" class="markdownPreContainer">
介绍
通过app.json5中bundleName里的城市名称,匹配对应城市时区,并把对应时间显示在界面
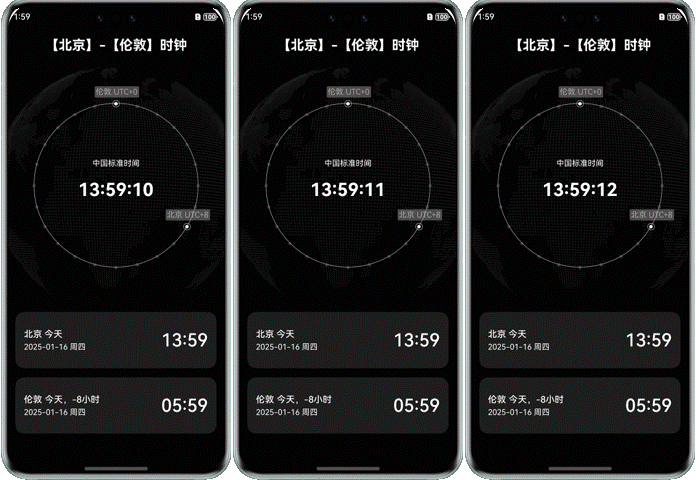
效果图

使用说明
进入应用后,直接显示伦敦(UTC+0)、北京(UTC+8)的时间,并将两点在圆圈的相对位置表示出来,中间展示中国标准时间,即北京时间。
实现思路
构造城市时区映射数据表
创建一个名为TIMEZONE_MAP的哈希映表(HashMap)。用于存储城市与其对应时区的映射关系。 TIMEZONE_MAP是一个键值对组合,其中key时城市名称,value是这些城市所属的时区ID。
export const TIMEZONE_MAP = new HashMap<string, string>();
TIMEZONE_MAP.set(‘beijing’, ‘Asia/Shanghai’);
TIMEZONE_MAP.set(‘london’, ‘Europe/London’);
实现世界时钟
- 构造时区点的数据结构TimezonePoint,设置向上中心点坐标、外圆坐标、文本坐标。
class TimezonePoint {
  city1?: Resource;
  city2?: Resource;
  timezoneNum?: string;
  point_x: number = 0
  point_y: number = 0
  out_circle_x: number = 0
  out_circle_y: number = 0
  text_x: number = 0
  text1_y: number = 0
  text2_y: number = 0
}
- 使用Circle()函数,画出世界时钟的形状。
Circle()
  .position({ x: px2vp(this.point.point_x), y: px2vp(this.point.point_y) })
  .width(6)
  .height(6)
  .fill(this.point.timezoneNum ? $r('app.color.start_window_background') : $r('app.color.border_color'))
  .fillOpacity(this.point.timezoneNum ? 1 : 0.3)
- 构造timezoneCircle()函数,根据获取的圆中心点坐标、中心点坐标等参数,实现时区圆。
timezoneCircle() {
  let mDisplay = display.getDefaultDisplaySync();
  this.rad = px2vp(mDisplay.width) * 0.75;
let interval = setInterval(() => {
let modePosition: componentUtils.ComponentInfo = componentUtils.getRectangleById(“circle”);
}, <span class="hljs-number">100</span>)
}
- 构造getUtcTime()函数,调用getTime()获取UTC的时间。
getUtcTime() {
  let currentDate = new Date();
  return currentDate.getTime() + currentDate.getTimezoneOffset() * 60 * 1000
}
- 构造getDateStr()函数,调用getFullYear()/getMonth()/getDate()获取年、月、日数据。
getDateStr(date: Date): string {
  let year = date.getFullYear().toString();
  let month = date.getMonth() < 10 ? '0' + date.getMonth().toString() : date.getMonth().toString();
  let day = date.getDate() < 10 ? '0' + date.getDate().toString() : date.getDate().toString();
  return year + month + day;
}
- 构造compareCityTimezone()函数,比较两个时区的时间差值,返回两个时区所差的小时数。
compareCityTimezone() {
  let offset1 = this.timezone1!.getOffset();
  let offset2 = this.timezone2!.getOffset()
  if (offset1 > offset2) {
    this.compareTimezone = 1
  } else if (offset1 < offset2) {
    this.compareTimezone = -1
  }
  this.diffHours = Math.abs(offset1 - offset2) / 60 / 60 / 1000
}
- 构造compareCityDate()函数,比较两个时区的时间差值,返回两个时区的天数区别。
compareCityDate() {
  let date1Num = parseInt(this.getDateStr(this.city1Date))
  let date2Num = parseInt(this.getDateStr(this.city2Date))
  if (date1Num == date2Num) {
    this.city2TimeDesc = $r('app.string.today')
  } else if (date1Num > date2Num) {
    this.city2TimeDesc = $r('app.string.yesterday')
  } else {
    this.city2TimeDesc = $r('app.string.tomorrow')
  }
}
工程目录
entry
    src/main/ets/
    |---entryability
    |   |---EntryAbility.ets
    |---pages
    |   |---Index.ets                   // 入口页面
    |---constant
    |   |---Constant.ets                // 常量类
    |---database
    |   |---AppDate.ets                 // 城市时区映射数据表。可以继续往里面填充世界城市及时区
约束与限制
运行环境
IDE:DevEco Studio 5.0.3.900
更多关于HarmonyOS 鸿蒙Next 时钟demo 鸿蒙场景化代码的实战系列教程也可以访问 https://www.itying.com/category-93-b0.html
更多关于HarmonyOS 鸿蒙Next 时钟demo 鸿蒙场景化代码的实战系列教程也可以访问 https://www.itying.com/category-93-b0.html
在HarmonyOS鸿蒙Next中,时钟demo的场景化代码主要利用ArkUI框架来实现。以下是一个简化的示例代码,展示了如何在鸿蒙系统中创建一个时钟应用的基本场景。
index.ets
@Entry
@Component
struct ClockDemo {
    @State time: string = new Date().toLocaleTimeString();

    @Effect
    updateTime() {
        setInterval(() => {
            this.time = new Date().toLocaleTimeString();
        }, 1000);
    }

    build() {
        Column() {
            Text(this.time)
                .fontSize(50)
                .fontWeight('bold')
                .textAlign(TextAlign.Center);
        }.justifyContent(FlexAlign.Center)
         .alignItems(HorizontalAlign.Center);
    }
}
上述代码定义了一个ClockDemo组件,它包含一个Text元素用于显示当前时间。通过@Effect装饰的updateTime方法,每秒更新一次时间,确保时钟显示的是实时时间。
config.json
{
    "app": {
        "bundleName": "com.example.clockdemo",
        "applicationType": "normal",
        "reqPermissions": []
    },
    "module": {
        "package": "com.example.clockdemo",
        "type": "entry",
        "distro": {
            "moduleName": "entry",
            "moduleType": "entry",
            "deliveryWithInstall": true
        }
    }
}
config.json文件配置了应用的基本信息,包括包名和模块类型。
如果问题依旧没法解决请联系官网客服,官网地址是:https://www.itying.com/category-93-b0.html


