Flutter交互反馈插件reaction_button的使用
Flutter交互反馈插件 reaction_button 的使用
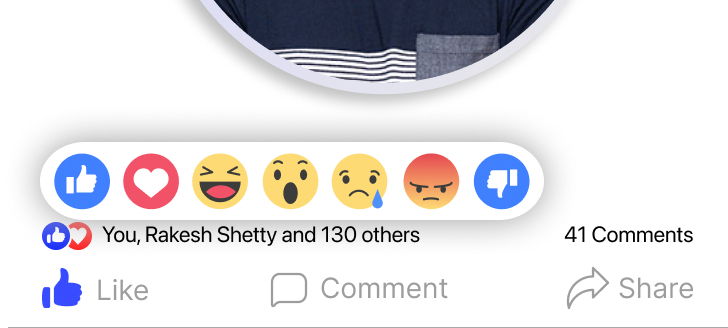
reaction_button 是一个用于构建社交媒体应用程序的可定制反应按钮插件。它允许用户对内容进行点赞、评论等操作,并提供视觉反馈。
Features 特性
- 可定制的反应按钮,适用于构建社交媒体应用。
- 支持多种反应类型(如点赞、赞、笑等)。
- 提供了默认的图标和文本显示,也可以自定义。

Usage 使用方法
基本用法
在你的 Flutter 项目中引入 reaction_button 插件后,可以通过以下代码创建一个反应按钮:
ReactionButton(
    selectedReaction: postModel.selectedReaction,
    onChangedReaction: (reaction) {
        setState(() {
            postModel.selectedReaction = reaction;
        });
    },
    placeHolder: ReactionModel(
        value: 'like',
        initialView: const Image(
            width: 32,
            image: AssetImage(AppAssets.LIKE_ACTION_ICON),
        ),
        selectedView: const Row(
            children: [
                Image(
                    width: 32,
                    image: AssetImage(AppAssets.LIKE_ICON),
                ),
                Text('Like'),
            ],
        ),
    ),
    reactions: reactions,
)
完整示例 Demo
下面是一个完整的示例代码,展示了如何在 Flutter 应用中使用 reaction_button 插件:
import 'package:flutter/material.dart';
import 'package:reaction_button/reaction_button.dart';

// 假设 AppAssets 和 FeedData 已经定义好
import 'app_assets.dart'; // 包含 LIKE_ACTION_ICON 和 LIKE_ICON 路径
import 'feed_data.dart';   // 包含 posts 列表
import 'post_model.dart';  // 包含 PostModel 类
import 'reaction_data.dart'; // 包含 reactions 列表

void main() {
  runApp(const MyApp());
}

class MyApp extends StatelessWidget {
  const MyApp({super.key});

  @override
  Widget build(BuildContext context) {
    return MaterialApp(
      title: 'Reaction Button Demo',
      theme: ThemeData(
        colorScheme: ColorScheme.fromSeed(seedColor: Colors.deepPurple),
        useMaterial3: true,
      ),
      home: const MyHomePage(title: 'Home Page'),
    );
  }
}

class MyHomePage extends StatefulWidget {
  const MyHomePage({
    super.key,
    required this.title,
  });

  final String title;

  @override
  State<MyHomePage> createState() => _MyHomePageState();
}

class _MyHomePageState extends State<MyHomePage> {
  @override
  Widget build(BuildContext context) {
    return Scaffold(
      appBar: AppBar(
        backgroundColor: Theme.of(context).colorScheme.inversePrimary,
        title: Text(widget.title),
      ),
      body: Center(
        child: Column(
          mainAxisAlignment: MainAxisAlignment.center,
          children: <Widget>[
            Expanded(
              child: ListView.builder(
                itemCount: posts.length,
                itemBuilder: (BuildContext context, int index) {
                  PostModel postModel = posts[index];
                  return Card(
                    child: Padding(
                      padding: const EdgeInsets.all(10),
                      child: Row(
                        children: [
                          Text('${postModel.id}'),
                          ReactionButton(
                            selectedReaction: postModel.selectedReaction,
                            onChangedReaction: (reaction) {
                              setState(() {
                                postModel.selectedReaction = reaction;
                              });
                            },
                            placeHolder: ReactionModel(
                              value: 'like',
                              initialView: const Image(
                                width: 32,
                                image: AssetImage(AppAssets.LIKE_ACTION_ICON),
                              ),
                              selectedView: const Row(
                                children: [
                                  Image(
                                    width: 32,
                                    image: AssetImage(AppAssets.LIKE_ICON),
                                  ),
                                  Text('Like'),
                                ],
                              ),
                            ),
                            reactions: reactions,
                          ),
                          Text('${postModel.id}'),
                        ],
                      ),
                    ),
                  );
                },
              ),
            ),
          ],
        ),
      ),
    );
  }
}
注意事项
- 依赖管理:确保在
pubspec.yaml文件中添加reaction_button依赖:dependencies: flutter: sdk: flutter reaction_button: ^latest_version # 替换为最新版本号
更多关于Flutter交互反馈插件reaction_button的使用的实战系列教程也可以访问 https://www.itying.com/category-92-b0.html
1 回复
更多关于Flutter交互反馈插件reaction_button的使用的实战系列教程也可以访问 https://www.itying.com/category-92-b0.html
当然,下面是一个关于如何在Flutter中使用reaction_button插件来实现交互反馈的示例代码。reaction_button插件通常用于创建具有视觉和触觉反馈的按钮,以增强用户体验。
首先,确保你已经在pubspec.yaml文件中添加了reaction_button依赖:
dependencies:
  flutter:
    sdk: flutter
  reaction_button: ^x.y.z  # 请替换为最新版本号
然后,运行flutter pub get来安装依赖。
接下来是一个完整的示例代码,展示了如何使用reaction_button:
import 'package:flutter/material.dart';
import 'package:reaction_button/reaction_button.dart';

void main() {
  runApp(MyApp());
}

class MyApp extends StatelessWidget {
  @override
  Widget build(BuildContext context) {
    return MaterialApp(
      title: 'Reaction Button Demo',
      theme: ThemeData(
        primarySwatch: Colors.blue,
      ),
      home: Scaffold(
        appBar: AppBar(
          title: Text('Reaction Button Demo'),
        ),
        body: Center(
          child: ReactionButtonExample(),
        ),
      ),
    );
  }
}

class ReactionButtonExample extends StatefulWidget {
  @override
  _ReactionButtonExampleState createState() => _ReactionButtonExampleState();
}

class _ReactionButtonExampleState extends State<ReactionButtonExample> {
  ReactionType reactionType = ReactionType.like;

  void handleReaction(ReactionType type) {
    setState(() {
      reactionType = type;
    });
    // 这里可以添加你的逻辑,比如更新UI或发送数据到服务器
    print("Reaction type: $reactionType");
  }

  @override
  Widget build(BuildContext context) {
    return Column(
      mainAxisAlignment: MainAxisAlignment.center,
      children: <Widget>[
        Text(
          'Tap the button below to give feedback',
          style: TextStyle(fontSize: 20),
        ),
        SizedBox(height: 20),
        ReactionButton(
          onReaction: handleReaction,
          initialReaction: reactionType,
          buttonColor: Colors.blue,
          iconColor: Colors.white,
          size: 80.0,
          borderRadius: 20.0,
          reactions: [
            Reaction(
              type: ReactionType.like,
              icon: Icons.thumb_up,
            ),
            Reaction(
              type: ReactionType.dislike,
              icon: Icons.thumb_down,
            ),
            Reaction(
              type: ReactionType.wow,
              icon: Icons.sentiment_very_satisfied,
            ),
            Reaction(
              type: ReactionType.sad,
              icon: Icons.sentiment_dissatisfied,
            ),
            Reaction(
              type: ReactionType.laugh,
              icon: Icons.laugh,
            ),
            Reaction(
              type: ReactionType.heart,
              icon: Icons.favorite,
            ),
          ],
        ),
      ],
    );
  }
}
在这个示例中:
- 我们创建了一个名为
MyApp的应用,其中包含一个Scaffold,Scaffold中有一个AppBar和一个居中的ReactionButtonExample组件。 ReactionButtonExample是一个有状态的组件,它维护了一个reactionType状态,用于跟踪用户选择的反馈类型。handleReaction方法在用户点击按钮时被调用,并更新reactionType状态。ReactionButton组件配置了多种反馈类型(如点赞、不喜欢、惊叹、悲伤、大笑和心形),并设置了按钮颜色、图标颜色、大小、边框半径等属性。
运行这个示例,你将看到一个具有多种反馈选项的按钮。每次点击按钮时,按钮上的图标会根据用户的选择进行更新,并且会在控制台中打印出用户选择的反馈类型。


