HarmonyOS 鸿蒙Next 第9篇:自定义可左右滑动的日历控件
HarmonyOS 鸿蒙Next 第9篇:自定义可左右滑动的日历控件 第9篇:自定义可左右滑动的日历控件
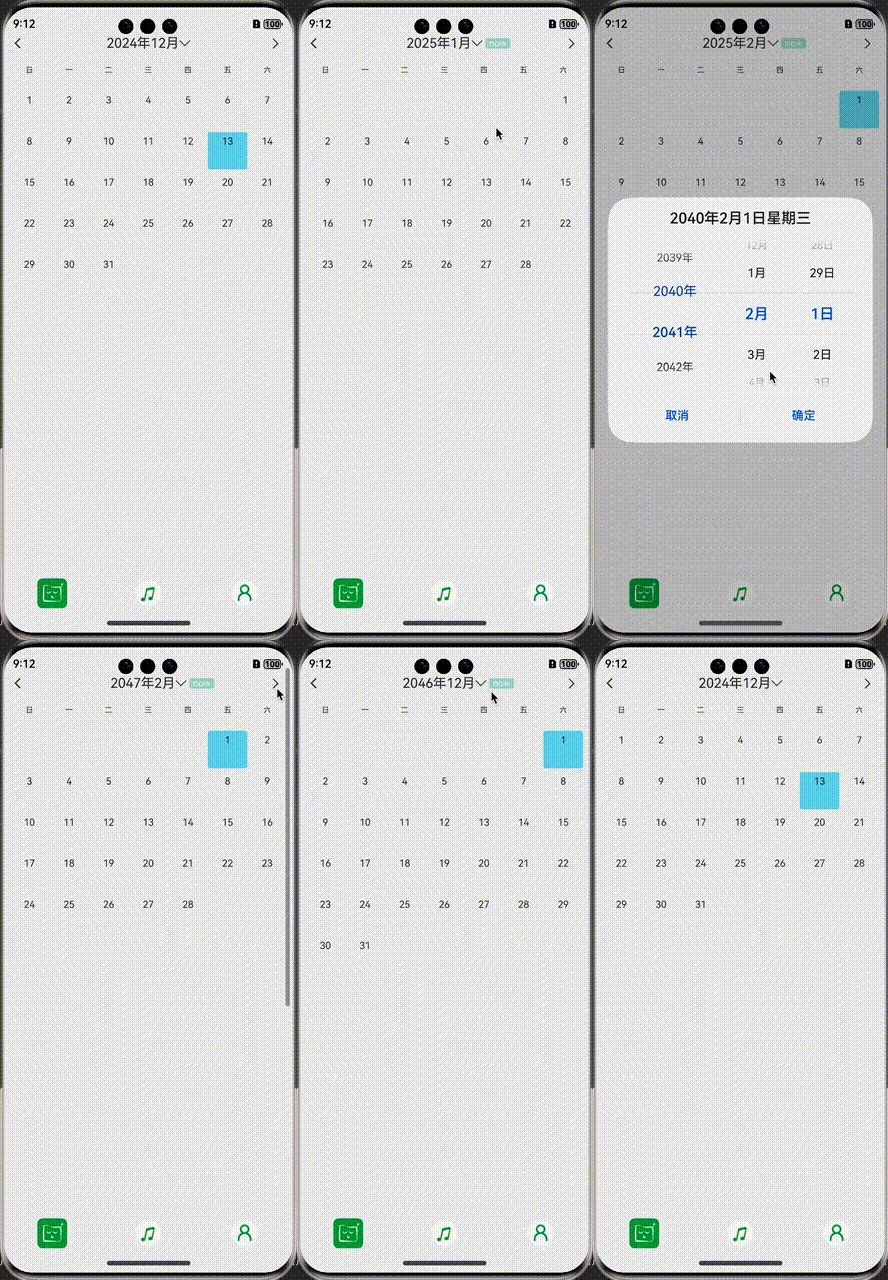
效果图如下

1. 关键点
- 使用Swiper加载 3 个月的日历,即showDates数据。
- 初始显示中间一条,即.index(1),并且循环显示.loop(true)。
- 滑动结束后(即.onChange),滑动后显示的数据不变(否则会重新刷新 UI),其左右重新计算上个月和下个月,见changeCalender。
看代码:
@Local showDates: Date[] = [dateHelper.lastMoth(), new Date(), dateHelper.nextMoth()]; //上月/今月/下月
@Local selectData: Date = new Date(); //当前选中的日期
private showIndex: number = 1; //默认显示的swipe 下标

Swiper() {
    ForEach(this.showDates, (item: Date) => {
      this.monthView(item)
    })
  }
  .index(1)
  .loop(true)
  .indicator(false) //关闭指示器
  .onChange((index: number) => { //不显示下表
    let cur = this.showDates[index];
    this.showIndex = index;
    this.changeCalender(cur);
  })

private changeCalender(newDate: Date) {
    this.showDates[this.showIndex] = newDate;
    if (this.showIndex === 0) {
        this.showDates[1] = dateHelper.nextMoth(newDate);
        this.showDates[2] = dateHelper.lastMoth(newDate);
    } else if (this.showIndex === 1) {
        this.showDates[0] = dateHelper.lastMoth(newDate);
        this.showDates[2] = dateHelper.nextMoth(newDate);
    } else { //this.showIndex === 2
        this.showDates[1] = dateHelper.lastMoth(newDate);
        this.showDates[0] = dateHelper.nextMoth(newDate);
    }
    this.onSelected?.(newDate, this.selectData);
    this.selectData = newDate;
}
2. 完整代码
import { dateHelper } from './DateHelper';

@ComponentV2
export struct CalendarView {
  @Event onSelected?: (newDate: Date, oldDate?: Date) => void; //点击时发生改变
  @Local showDates: Date[] = [dateHelper.lastMoth(), new Date(), dateHelper.nextMoth()]; //上月/今月/下月
  @Local selectData: Date = new Date(); //当前选中的日期
  private showIndex: number = 1; //默认显示的swipe 下标

  aboutToAppear(): void {
    this.onSelected?.(this.selectData);
  }

  build() {
    Column({ space: 10 }) {
      // 年月选择部分
      RelativeContainer() {
        Image($r("app.media.ic_back"))
          .height(40)
          .padding(10)
          .aspectRatio(1)
          .id('last')
          .alignRules({ left: { 'anchor': '__container__', 'align': HorizontalAlign.Start } })
          .onClick(() => {
            this.changeCalender(dateHelper.lastMoth(this.selectData));
          });

        Row() {
          Text(`${this.selectData.getFullYear()}年${this.selectData.getMonth() + 1}月`)
            .fontSize(18)
            .textAlign(TextAlign.Center)
          Image($r("app.media.ic_down"))
            .width(15)
            .aspectRatio(1)
        }
        .id('select')
        .alignRules({
          middle: { 'anchor': '__container__', 'align': HorizontalAlign.Center },
          center: { 'anchor': '__container__', 'align': VerticalAlign.Center }
        })
        .onClick(() => {
          this.getUIContext().showDatePickerDialog({
            selected: this.selectData,
            onDateAccept: (value: Date) => {
              this.changeCalender(value);
            },
          })
        });

        if (!this.isCurMonth()) { //不是本月才显示跳回去本月
          Text('now')
            .fontSize(12)
            .fontColor(Color.White)
            .backgroundColor($r('app.color.theme_2'))
            .borderRadius(2)
            .padding({ left: 5, right: 5 })
            .margin({ left: 4 })
            .id('now')
            .alignRules({
              left: { 'anchor': 'select', 'align': HorizontalAlign.End },
              center: { 'anchor': '__container__', 'align': VerticalAlign.Center }
            })
            .onClick(() => {
              this.changeCalender(new Date());
            });
        }

        Image($r("app.media.ic_arrow"))
          .width(40)
          .aspectRatio(1)
          .padding(10)
          .id('next')
          .alignRules({ right: { 'anchor': '__container__', 'align': HorizontalAlign.End } })
          .onClick(() => {
            this.changeCalender(dateHelper.nextMoth(this.selectData));
          });
      }
      .height(40)
      .width('100%')


      // 日历表头
      Row() {
        ForEach(["日", "一", "二", "三", "四", "五", "六"], (day: string) => {
          Text(day)
            .width('14%')
            .fontColor('#333333')
            .fontSize(10)
            .textAlign(TextAlign.Center);
        });
      }
      .margin({ bottom: 12 })
      .justifyContent(FlexAlign.SpaceBetween)

      // 日历内容
      Swiper() {
        ForEach(this.showDates, (item: Date) => {
          this.monthView(item)
        })
      }
      .width('100%')
      .height('auto')
      .cachedCount(3)
      .index(1)
      .autoPlay(false)
      .loop(true)
      .itemSpace(0)
      .vertical(false)
      .displayArrow(false, false)
      .indicator(false) //关闭指示器
      .onChange((index: number) => { //不显示下表
        let cur = this.showDates[index];
        this.showIndex = index;
        this.changeCalender(cur);
      })
    }
    .padding({ left: '1%', right: '1%' }) // 1% + 14%x7 + 1% = 100%
  }

  private changeCalender(newDate: Date) {
    this.showDates[this.showIndex] = newDate;
    if (this.showIndex === 0) {
      this.showDates[1] = dateHelper.nextMoth(newDate);
      this.showDates[2] = dateHelper.lastMoth(newDate);
    } else if (this.showIndex === 1) {
      this.showDates[0] = dateHelper.lastMoth(newDate);
      this.showDates[2] = dateHelper.nextMoth(newDate);
    } else { //this.showIndex === 2
      this.showDates[1] = dateHelper.lastMoth(newDate);
      this.showDates[0] = dateHelper.nextMoth(newDate);
    }
    this.onSelected?.(newDate, this.selectData);
    this.selectData = newDate;
  }

  @Builder
  monthView(date: Date) {
    Column({ space: 5 }) {
      ForEach(dateHelper.buildCalendar(date), (week: number[]) => {
        Row() {
          ForEach(week, (day: number) => {
            Column() {
              Text(`${day}`)// 空字符串用于补位
                .width('14%')
                .fontColor('#333333')
                .fontSize(13)
                .textAlign(TextAlign.Center)
                .margin({ top: 5 })
            }
            .height('100%')
            .backgroundColor(this.selectDayColor(date, day))
            .borderRadius(3)
            .onClick(() => {
              const newData = new Date(date.getFullYear(), date.getMonth(), day);
              this.changeCalender(newData);
            })
          })
        }
        .height(50)
        .justifyContent(FlexAlign.SpaceBetween)
      });
    }
  }

  isCurMonth(): boolean {
    const cur = new Date();
    if (cur.getFullYear() !== this.selectData.getFullYear()) {
      return false;
    }
    if (cur.getMonth() !== this.selectData.getMonth()) {
      return false;
    }
    return true;
  }

  selectDayColor(date: Date, day: number) {
    return dateHelper.isOneDay(this.selectData, new Date(date.getFullYear(), date.getMonth(), day))
      ? '#ff8cdaf1' : Color.Transparent
  }
}

export namespace dateHelper {

    /**
     * 生成该月的月历,日历是一个二维数组,每一行代表一周。
     * 如:周日 ~ 周六
     [
     ["", "", "", "", "1", "2", "3"],
     ["4", "5", "6", "7", "8", "9", "10"],
     ["11", "12", "13", "14", "15", "16", "17"],
     ["18", "19", "20", "21", "22", "23", "24"],
     ["25", "26", "27", "28", "29", "30", "31"]
     ]
     */
    export function buildCalendar(date: Date): number[][] {
        //首先计算出该月的第一天是星期几,从 0(周日) ~ 6(周六)
        const firstDay = new Date(date.getFullYear(), date.getMonth(), 1).getDay();
        // //然后计算该月的总天数
        const days = new Date(date.getFullYear(), date.getMonth() + 1, 0).getDate();
        const calendar: number[][] = [];
        let week: number[] = Array(firstDay).fill(''); // 填充空白

        for (let day = 1; day <= days; day++) {
            week.push(day);
            if (week.length === 7) {
                calendar.push(week);
                week = [];
            }
        }
        if (week.length > 0) {
            calendar.push([...week, ...Array(7 - week.length).fill('')]); // 填充末尾空白
        }
        return calendar;
    }

    /**
     * 判断是否是同一天
     */
    export function isOneDay(date1: Date, date2: Date): boolean {
        if (date1.getFullYear() !== date2.getFullYear()) {
            return false;
        }
        if (date1.getMonth() !== date2.getMonth()) {
            return false;
        }
        if (date1.getDate() !== date2.getDate()) {
            return false;
        }
        return true;
    }

    /**
     * 获取上一个月(1号)
     */
    export function lastMoth(date: Date = new Date()): Date {
        return new Date(date.getFullYear(), date.getMonth() - 1, 1)
    }

    /**
     * 获取下一个月(1号)
     */
    export function nextMoth(date: Date = new Date()): Date {
        return new Date(date.getFullYear(), date.getMonth() + 1, 1)
    }
}到这里,所有的内容已经结束了!本章的完整源码已经上传到gitee了:https://gitee.com/qincji/ZeroOneApp。
更多关于HarmonyOS 鸿蒙Next 第9篇:自定义可左右滑动的日历控件的实战系列教程也可以访问 https://www.itying.com/category-93-b0.html
更多关于HarmonyOS 鸿蒙Next 第9篇:自定义可左右滑动的日历控件的实战系列教程也可以访问 https://www.itying.com/category-93-b0.html
针对帖子标题“HarmonyOS 鸿蒙Next 第9篇:自定义可左右滑动的日历控件”的问题,以下回答专注于鸿蒙系统(HarmonyOS)相关的技术内容:
在HarmonyOS中,自定义可左右滑动的日历控件通常涉及UI组件的自定义与事件处理。你可以利用ArkUI(eTS或JS框架)来实现这一功能。具体步骤如下:
-
定义组件:使用ArkUI的组件定义语言,创建一个自定义的日历组件。该组件应包含显示日期的视图以及用于滑动的容器。
-
实现滑动逻辑:利用ArkUI提供的滑动事件监听机制,为日历组件添加左右滑动的事件处理。这通常涉及监听滑动开始、进行中、结束等事件,并据此更新日历的显示内容。
-
日期更新:根据滑动的方向,更新日历组件中显示的日期。这可能需要维护一个当前日期的状态,并在滑动事件触发时更新该状态。
-
样式与布局:为日历组件设计合适的样式与布局,以确保其具有良好的用户体验。
请注意,实现过程中可能需要深入了解ArkUI的组件库、事件机制以及状态管理。若在实现过程中遇到具体问题,建议查阅HarmonyOS的官方文档或相关开发资源。
如果问题依旧没法解决请联系官网客服,官网地址是:https://www.itying.com/category-93-b0.html,


