Flutter应用安装与跳转管理插件openinstall_flutter_plugin的使用
Flutter应用安装与跳转管理插件openinstall_flutter_plugin的使用
openinstall flutter plugin
openinstall插件封装了openinstall平台原生SDK,集成了渠道统计,携带参数安装,快速安装与一键拉起功能,目前渠道支持H5渠道,广告平台渠道 以及 Apple Search Ads (ASA) 渠道。
使用openinstall可实现以下多种场景:

一、安装
1. 添加依赖
在项目的 pubspec.yaml 文件中添加以下内容:
dependencies:
  openinstall_flutter_plugin: ^2.5.2
2. 安装插件
使用命令行获取
$ flutter pub get
或者使用开发工具的 flutter pub get
3. 导入
在 Dart 代码中使用以下代码导入:
import 'package:openinstall_flutter_plugin/openinstall_flutter_plugin.dart';
二、配置
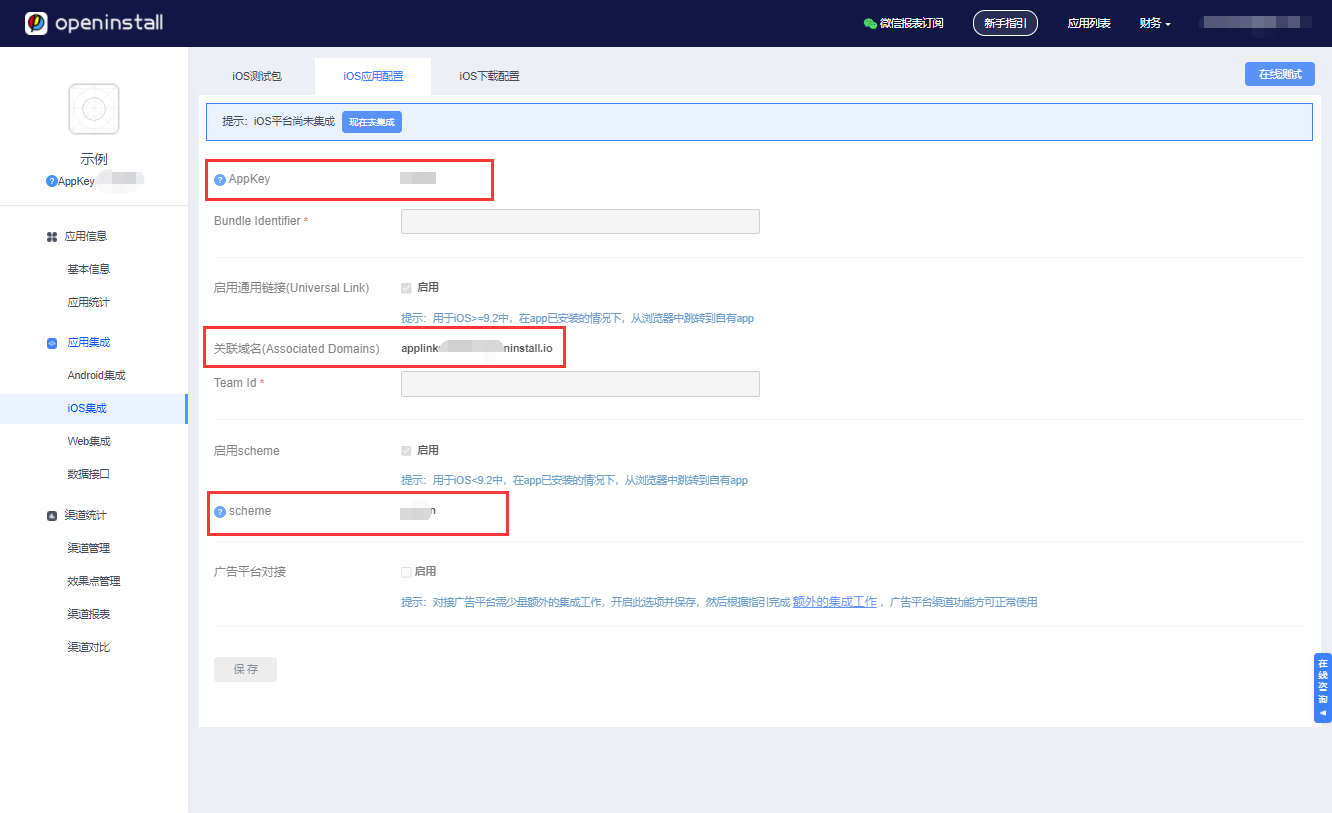
前往 openinstall控制台 创建应用并获取 openinstall 为应用分配的appkey 和 scheme 以及 iOS的关联域名(Associated Domains)
Android 平台配置
配置 appkey
在 /android/app/build.gradle 中添加代码设置appkey:
android: {
  ....
  defaultConfig {
    ...
    manifestPlaceholders += [
        OPENINSTALL_APPKEY : "openinstall为应用分配的appkey",
    ]
  }
}
配置 scheme
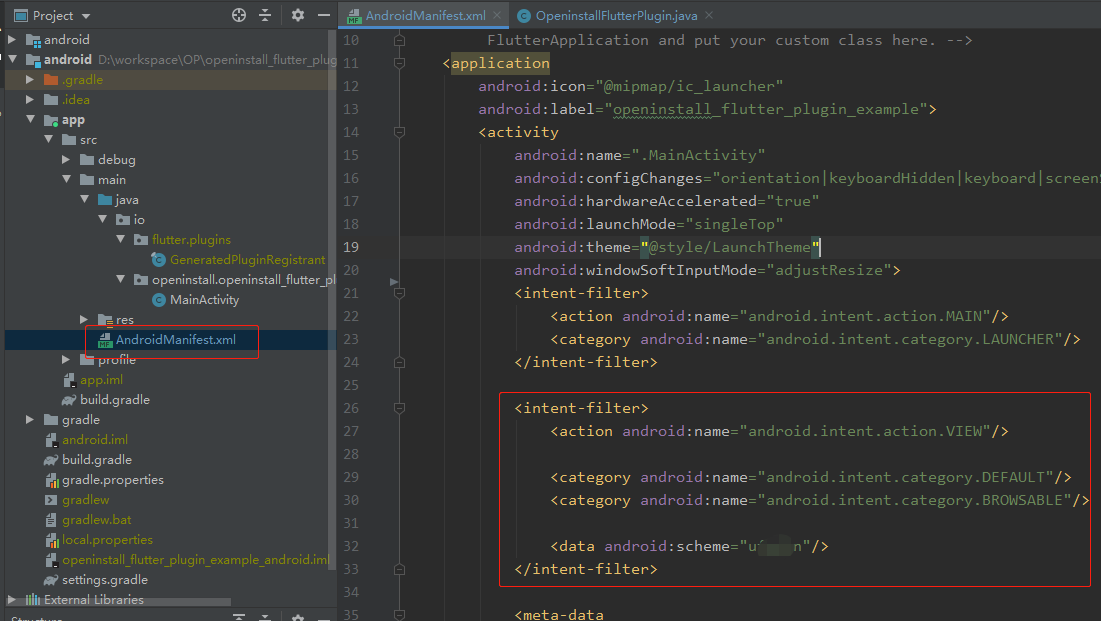
修改 /android/app/src/main/AndroidMenifest.xml 文件,在跳转 Activity 标签内添加 intent-filter
<intent-filter>
    <action android:name="android.intent.action.VIEW"/>

    <category android:name="android.intent.category.DEFAULT"/>
    <category android:name="android.intent.category.BROWSABLE"/>

    <data android:scheme="openinstall为应用分配的scheme"/>
</intent-filter>
如果跳转与启动页面是同一 Activity ,则配置示例如图:
iOS 平台配置
配置 appkey
在Flutter工程下的 ios/Runner/Info.plist 文件中配置 appKey 键值对,如下:
<key>com.openinstall.APP_KEY</key>
<string>openinstall 分配给应用的 appkey</string>
一键拉起配置
universal links 相关配置
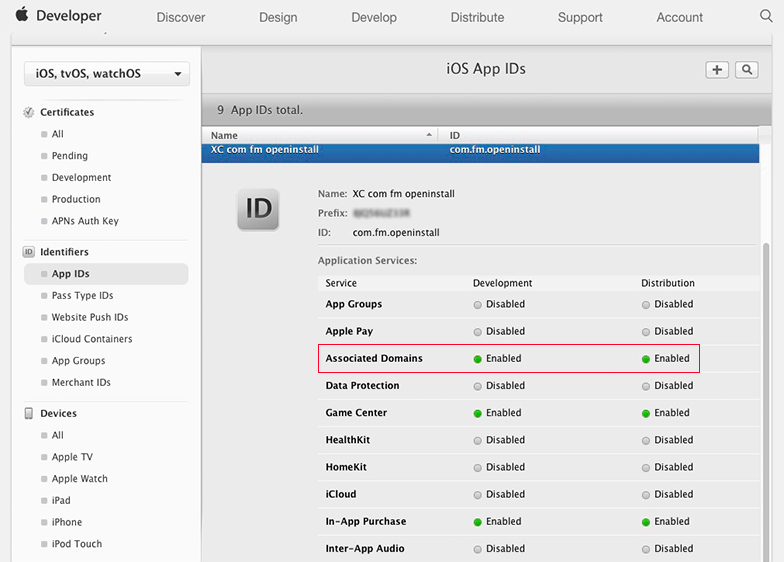
- 开启Associated Domains服务
对于iOS,为确保能正常跳转,AppID必须开启Associated Domains功能,请到苹果开发者网站,选择Certificate, Identifiers & Profiles,选择相应的AppID,开启Associated Domains。
注意:当AppID重新编辑过之后,需要更新相应的mobileprovision证书。
- 配置universal links关联域名(iOS 9以后推荐使用)
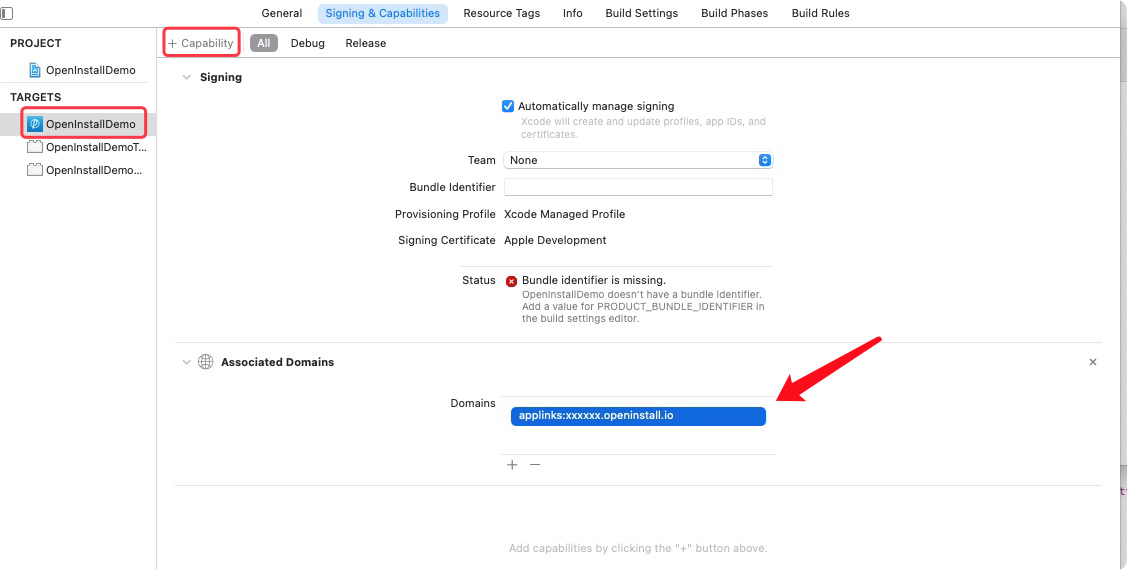
关联域名(Associated Domains) 的值请在openinstall控制台获取(openinstall应用控制台->iOS集成->iOS应用配置)
该文件是给iOS平台配置的文件,在 ios/Runner 目录下创建文件名为 Runner.entitlements 的文件,Runner.entitlements 内容如下:
<?xml version="1.0" encoding="UTF-8"?>
<!DOCTYPE plist PUBLIC "-//Apple//DTD PLIST 1.0//EN" "http://www.apple.com/DTDs/PropertyList-1.0.dtd">
<plist version="1.0">
<dict>
    <key>com.apple.developer.associated-domains</key><!--固定key值-->
    <array>
        <!--这里换成你在openinstall后台的关联域名(Associated Domains)-->
        <string>applinks:xxxxxx.openinstall.io</string>
    </array>
</dict>
</plist>
Xcode中快速添加:
注意:插件版本>=1.3.1开始,iOS通用链接原生代码已在插件内部完成
如果拉起无法获取到参数,可能是因为方法被其它插件覆盖导致(openinstall插件不会覆盖其它插件),可以修改其它插件通用链接delegate回调..userActivity..方法return NO;来解决,可参考OpeninstallFlutterPlugin.m文件相关内容。
scheme 配置
添加应用对应的 scheme,可在工程“TARGETS -> Info -> URL Types” 里快速添加,图文请看
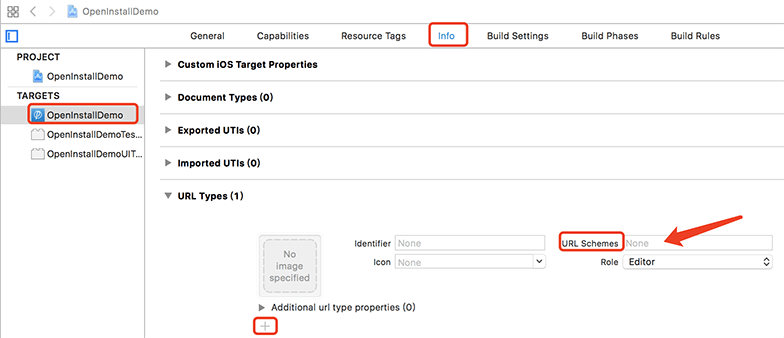
注意:插件版本>=1.3.1开始,iOS通用链接原生代码已在插件内部完成
如果拉起无法获取到参数,可能是因为方法被其它插件覆盖导致(openinstall插件不会覆盖其它插件),可以修改其它插件通用链接delegate回调..hanldeOpenURL..方法return NO;来解决,可参考OpeninstallFlutterPlugin.m文件相关内容。
三、使用
初始化
init(EventHandler wakeupHandler)
初始化时,需要传入拉起回调 获取 web 端传过来的动态参数
示例:
Future wakeupHandler(Map<String, Object> data) async {
    setState(() {
        debugLog = "wakeup result : channel=" +
            data['channelCode'] +
            ", data=" +
            data['bindData'];
    });
}

_openinstallFlutterPlugin.init(wakeupHandler);
获取安装参数
install(EventHandler installHandler, [int seconds = 10])
在 APP 需要安装参数时(由 web 网页中传递过来的,如邀请码、游戏房间号等动态参数),调用此接口,在回调中获取参数
示例:
Future installHandler(Map<String, Object> data) async {
    setState(() {
        debugLog = "install result : channel=" +
            data['channelCode'] +
            ", data=" +
            data['bindData'] +
            ", shouldRetry" +
            data['shouldRetry'];
    });
}

_openinstallFlutterPlugin.install(installHandler);
注册统计
reportRegister()
如需统计每个渠道的注册量(对评估渠道质量很重要),可根据自身的业务规则,在确保用户完成 APP 注册的情况下调用此接口
示例:
_openinstallFlutterPlugin.reportRegister();
效果点统计
reportEffectPoint(String pointId, int pointValue)
效果点建立在渠道基础之上,主要用来统计终端用户对某些特殊业务的使用效果。调用此接口时,请使用后台创建的 “效果点ID” 作为 pointId
示例:
_openinstallFlutterPlugin.reportEffectPoint("effect_test", 1);
效果点明细统计
reportEffectPoint(String pointId, int pointValue, Map<String, String> extraMap)
效果点建立在渠道基础之上,主要用来统计终端用户对某些特殊业务的使用效果。调用此接口时,请使用后台创建的 “效果点ID” 作为 pointId
示例:
Map<String, String> extraMap = {
    "key1": "value1",
    "key2": "value2"
};
_openinstallFlutterPlugin.reportEffectPoint("effect_detail", 1, extraMap);
备注:效果点明细统计需要原生iOS SDK >=2.6.0,请从CocoaPods拉取、更新、确认版本。
裂变分享上报
reportShare(String shareCode, String platform)
分享上报主要是统计某个具体用户在某次分享中,分享给了哪个平台,再通过JS端绑定被分享的用户信息,进一步统计到被分享用户的激活回流等情况
示例:
_openinstallFlutterPlugin.reportShare("123456", "WechatSession")
    .then((data) => print("reportShare : " + data.toString()));
可以通过返回的data中的shouldRetry决定是否需要重试,以及message查看失败的原因
四、导出apk/ipa包并上传
集成完毕后,导出iOS/Android安装包上传openinstall控制台,openinstal会检查应用的集成配置
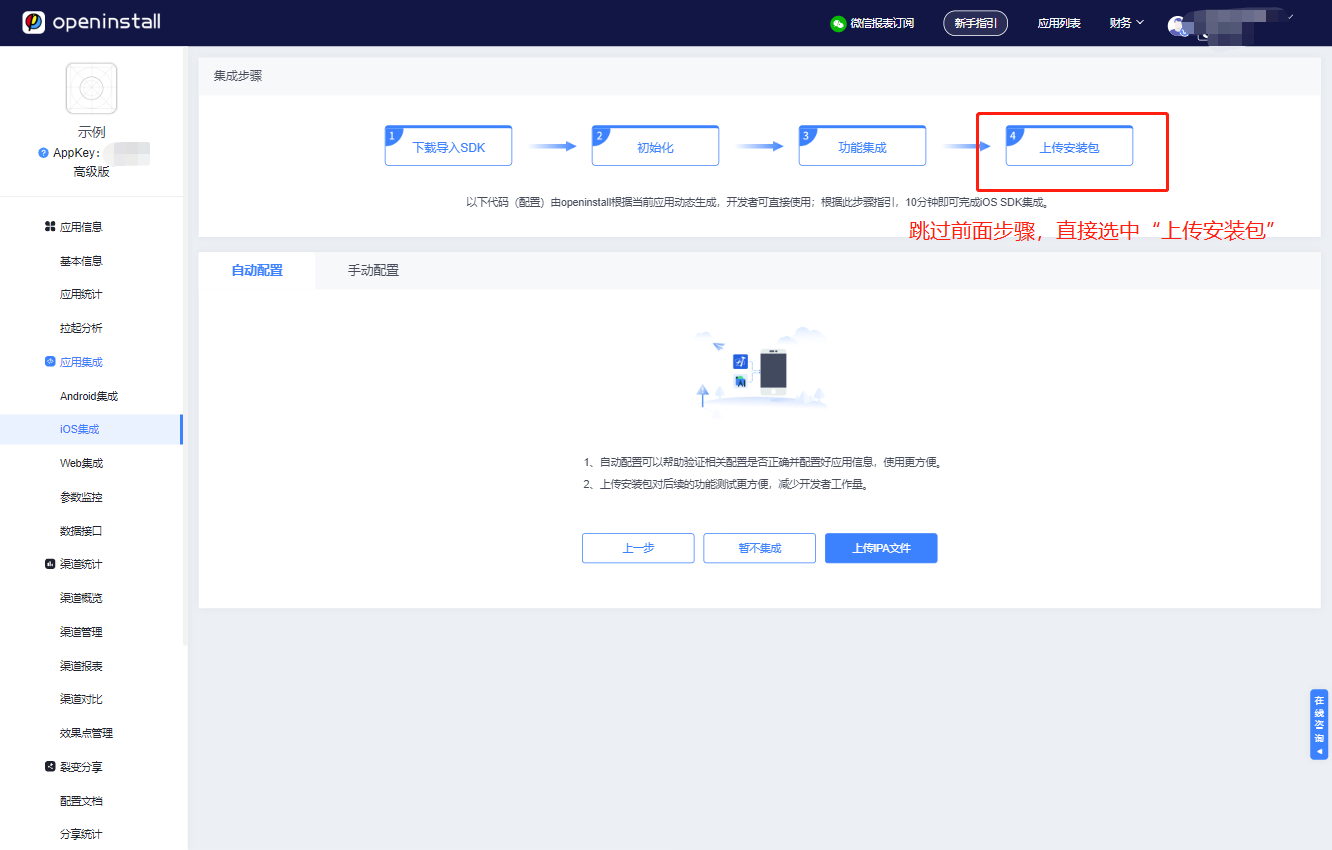
上传完成后即可开始在线模拟测试,体验完整的App安装/跳转流程
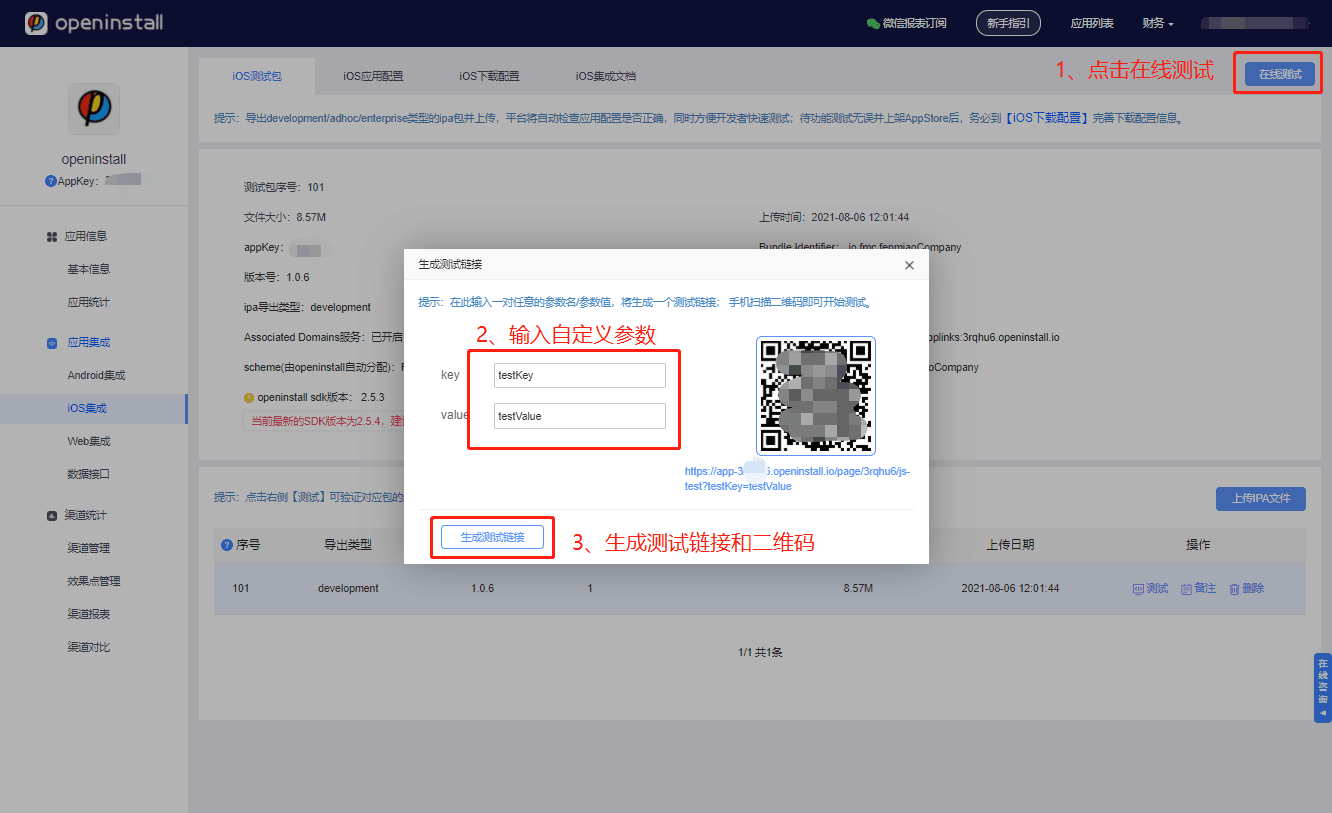
五、广告接入补充文档
Android平台
1、针对广告平台接入,新增配置接口,在调用 init 之前调用。
var adConfig = new Map();
adConfig["adEnabled"] = true;
_openinstallFlutterPlugin.configAndroid(adConfig);
注意: _openinstallFlutterPlugin.config(adEnabled, oaid, gaid) 接口已废弃,请使用新的配置接口
可选参数说明:
| 参数名 | 参数类型 | 描述 |
|---|---|---|
| androidId | string | android_id 原值 |
| serialNumber | string | serialNumber原值 |
| adEnabled | bool | 接入移动广告效果监测时需要开启 |
| macDisabled | bool | 是否禁止 SDK 获取 mac 地址 |
| imeiDisabled | bool | 是否禁止 SDK 获取 imei |
| gaid | string | 通过 google api 获取到的 advertisingId,SDK 将不再获取gaid |
| oaid | string | 通过移动安全联盟获取到的 oaid,SDK 将不再获取oaid |
| imei | string | imei 原值 |
| mac | string | mac address 原值 |
2、针对广告平台,为了精准地匹配到渠道,需要获取设备唯一标识码(IMEI),因此需要在 AndroidManifest.xml 中添加权限声明
<uses-permission android:name="android.permission.READ_PHONE_STATE"/>
3、在权限申请成功后,再进行openinstall初始化。无论终端用户是否同意,都要调用初始化
代码示例如下:
// 使用 permission_handler
if (await Permission.phone.request().isGranted) {
  // 获取到了权限
}
_openinstallFlutterPlugin.init(wakeupHandler);
注意: _openinstallFlutterPlugin.init(wakeupHandler, permission); 接口已废弃,请自行处理权限请求
iOS平台
广告平台渠道和ASA渠道的配置
1、针对广告平台接入,新增配置接口,在调用init之前调用。
var adConfig = new Map();
adConfig["adEnable"] = true;//必要,开启广告平台渠道
adConfig["ASAEnable"] = true;//必要,开启苹果ASA功能
//adConfig["idfaStr"] = "";//可选,通过其它插件获取的idfa字符串一般格式为xxxx-xxxx-xxxx-xxxx
//adConfig["ASADebug"] = true;//可选,ASA测试debug模式,注意:正式环境中请务必关闭(不配置或配置为false)
_openinstallFlutterPlugin.configIos(adConfig);
可选参数说明:
| 参数名 | 参数类型 | 描述 | 要求 |
|---|---|---|---|
| adEnable | bool | 必要,默认为false,是否开启广告平台统计功能 | 无 |
| idfaStr | string | 可选,默认为空,用户传入的idfa字符串,用于广告平台统计功能 | adEnable为true时才生效,不配置则由插件内部去获取隐私权限和idfa字符串 |
| ASAEnable | bool | 必要,默认为false,是否开启苹果ASA功能 | 无 |
| ASADebug | bool | 可选,默认为false,使用ASA功能时是否开启debug模式 | ASAEnable为true时才生效,正式环境中请务必关闭(不配置或配置为false) |
备注:adEnable为false时,插件内部不会去请求隐私权限和idfa字符串,idfaStr配置也会失效;
adEnable为true时,如果idfaStr有值且不为空,则使用idfaStr的值,如果未配置idfaStr或为空,则插件内部去获取隐私权限和idfa字符串;
2、需要在 ios/Runner/Info.plist 文件中配置权限
<key>NSUserTrackingUsageDescription</key>
<string>为了您可以精准获取到优质推荐内容,需要您允许使用该权限</string>
**注意:**广告平台统计里面,如果出现权限弹窗无法正常弹出的情况,考虑把configIos和init方法放在 App生命周期的“应用进入前台resumed” 的时候调用。
备注: 2021年iOS14.5苹果公司将正式启用idfa新隐私政策,详情可参考:广告平台对接iOS集成指引
ASA渠道相关详细文档参考:ASA渠道使用指南
示例代码
import 'dart:async';
import 'dart:io';

import 'package:flutter/material.dart';
import 'package:openinstall_flutter_plugin/openinstall_flutter_plugin.dart';

void main() => runApp(MyApp());

class MyApp extends StatefulWidget {
  [@override](/user/override)
  _MyAppState createState() => _MyAppState();
}

class _MyAppState extends State<MyApp> {
  String wakeUpLog = "";
  String installLog = "";
  late OpeninstallFlutterPlugin _openinstallFlutterPlugin;

  [@override](/user/override)
  void initState() {
    super.initState();
    initPlatformState();
  }

  // Platform messages are asynchronous, so we initialize in an async method.
  Future<void> initPlatformState() async {
    // If the widget was removed from the tree while the asynchronous platform
    // message was in flight, we want to discard the reply rather than calling
    // setState to update our non-existent appearance.
    if (!mounted) return;

    _openinstallFlutterPlugin = OpeninstallFlutterPlugin();
    // _openinstallFlutterPlugin.setDebug(false);
    _openinstallFlutterPlugin.init(wakeupHandler);
    // 错误:应该在业务需要时再调用 install 获取参数
    // _openinstallFlutterPlugin.install(installHandler);

    setState(() {});
  }

  [@override](/user/override)
  void activate() {
    // TODO: implement activate
    super.activate();
  }

  [@override](/user/override)
  Widget build(BuildContext context) {
    return MaterialApp(
      home: Scaffold(
        appBar: AppBar(
          title: const Text('openinstall plugin demo'),
        ),
        body: Center(
          child: Column(
            mainAxisSize: MainAxisSize.min,
            children: <Widget>[
              Text(installLog, style: TextStyle(fontSize: 18)),
              Text(wakeUpLog, style: TextStyle(fontSize: 18)),
              const SizedBox(height: 12),
              ElevatedButton(
                onPressed: () {
                  _openinstallFlutterPlugin.install(installHandler, 10);
                },
                child: Text('getInstall', style: TextStyle(fontSize: 16)),
              ),
              const SizedBox(height: 12),
              ElevatedButton(
                onPressed: () {
                  _openinstallFlutterPlugin.reportRegister();
                },
                child: const Text('reportRegister',
                    style: TextStyle(fontSize: 16)),
              ),
              const SizedBox(height: 12),
              ElevatedButton(
                onPressed: () {
                  _openinstallFlutterPlugin.reportEffectPoint("effect_test", 1);
                },
                child: const Text('reportEffectPoint',
                    style: TextStyle(fontSize: 16)),
              ),
              const SizedBox(height: 12),
              ElevatedButton(
                onPressed: () {
                  Map<String, String> extraMap = {
                    "systemVersion": Platform.operatingSystemVersion,
                    "flutterVersion": Platform.version
                  };
                  _openinstallFlutterPlugin.reportEffectPoint(
                      "effect_detail", 1, extraMap);
                },
                child: const Text('reportEffectDetail',
                    style: TextStyle(fontSize: 16)),
              ),
              const SizedBox(height: 12),
              ElevatedButton(
                  onPressed: () {
                    _openinstallFlutterPlugin
                        .reportShare("123456", "WechatSession")
                        .then((data) =>
                            print("reportShare : " + data.toString()));
                  },
                  child: const Text('reportShare',
                      style: TextStyle(fontSize: 16))),
            ],
          ),
        ),
      ),
    );
  }

  Future installHandler(Map<String, Object> data) async {
    print("installHandler : " + data.toString());
    setState(() {
      installLog = "install result : channel=" + data['channelCode'].toString()
          + ", data=" + data['bindData'].toString()
          + ", shouldRetry=" + data['shouldRetry'].toString() + "\n";
    });
  }

  Future wakeupHandler(Map<String, Object> data) async {
    print("wakeupHandler : " + data.toString());
    setState(() {
      wakeUpLog = "wakeup result : channel=" + data['channelCode'].toString()
          + ", data=" + data['bindData'].toString() + "\n";
    });
  }
}
更多关于Flutter应用安装与跳转管理插件openinstall_flutter_plugin的使用的实战系列教程也可以访问 https://www.itying.com/category-92-b0.html
更多关于Flutter应用安装与跳转管理插件openinstall_flutter_plugin的使用的实战系列教程也可以访问 https://www.itying.com/category-92-b0.html
当然,下面是一个关于如何在Flutter应用中使用openinstall_flutter_plugin插件来实现安装与跳转管理的代码示例。请注意,实际使用中你可能需要根据具体的插件版本和项目需求进行调整。
首先,确保你已经在pubspec.yaml文件中添加了openinstall_flutter_plugin依赖:
dependencies:
  flutter:
    sdk: flutter
  openinstall_flutter_plugin: ^最新版本号  # 请替换为实际最新版本号
然后,运行flutter pub get来安装插件。
接下来,在Flutter应用中初始化并使用该插件。以下是一个基本的示例代码:
import 'package:flutter/material.dart';
import 'package:openinstall_flutter_plugin/openinstall_flutter_plugin.dart';

void main() {
  runApp(MyApp());
}

class MyApp extends StatefulWidget {
  @override
  _MyAppState createState() => _MyAppState();
}

class _MyAppState extends State<MyApp> {
  OpenInstallFlutterPlugin _openInstall;

  @override
  void initState() {
    super.initState();
    _openInstall = OpenInstallFlutterPlugin();
    _initOpenInstall();
  }

  Future<void> _initOpenInstall() async {
    try {
      // 初始化OpenInstall插件,通常在应用启动时调用一次
      await _openInstall.init();

      // 获取安装参数,例如从点击链接跳转到应用时传递的参数
      Map<String, dynamic> installData = await _openInstall.getInstallData();
      print("Install Data: $installData");

      // 如果需要处理跳转,可以在这里根据installData进行处理
      if (installData.isNotEmpty) {
        // 示例:处理跳转逻辑,这里可以根据你的需求进行跳转
        _handleDeepLink(installData);
      }
    } catch (e) {
      print("OpenInstall initialization error: $e");
    }
  }

  void _handleDeepLink(Map<String, dynamic> data) {
    // 根据传递的数据执行跳转逻辑
    // 例如,如果data中包含一个特定的路由参数,则执行跳转
    String route = data['route'] as String ?? '/';
    Navigator.pushNamed(context, route);
  }

  @override
  Widget build(BuildContext context) {
    return MaterialApp(
      title: 'Flutter Demo',
      theme: ThemeData(
        primarySwatch: Colors.blue,
      ),
      routes: {
        '/': (context) => HomeScreen(),
        '/detail': (context) => DetailScreen(), // 示例路由
        // 可以添加更多路由
      },
      home: HomeScreen(),
    );
  }
}

class HomeScreen extends StatelessWidget {
  @override
  Widget build(BuildContext context) {
    return Scaffold(
      appBar: AppBar(
        title: Text('Home Screen'),
      ),
      body: Center(
        child: Text('Welcome to Flutter Demo!'),
      ),
      floatingActionButton: FloatingActionButton(
        onPressed: () {
          // 示例:跳转到DetailScreen
          Navigator.pushNamed(context, '/detail');
        },
        tooltip: 'Go to Detail',
        child: Icon(Icons.navigate_next),
      ),
    );
  }
}

class DetailScreen extends StatelessWidget {
  @override
  Widget build(BuildContext context) {
    return Scaffold(
      appBar: AppBar(
        title: Text('Detail Screen'),
      ),
      body: Center(
        child: Text('This is the detail screen!'),
      ),
    );
  }
}
在这个示例中,我们完成了以下步骤:
- 在
pubspec.yaml中添加openinstall_flutter_plugin依赖。 - 在应用启动时初始化
OpenInstallFlutterPlugin。 - 获取安装参数(例如从链接跳转传递的参数)。
- 根据获取的安装参数执行相应的跳转逻辑。
请确保你已经按照openinstall_flutter_plugin插件的官方文档配置了相关的SDK和后台设置,以便正确接收和处理安装参数。此外,根据你的具体需求,你可能需要调整代码中的逻辑,例如处理更多的路由或参数。


