Flutter增强现实功能插件flutter_glass的使用
Flutter Glass插件的使用
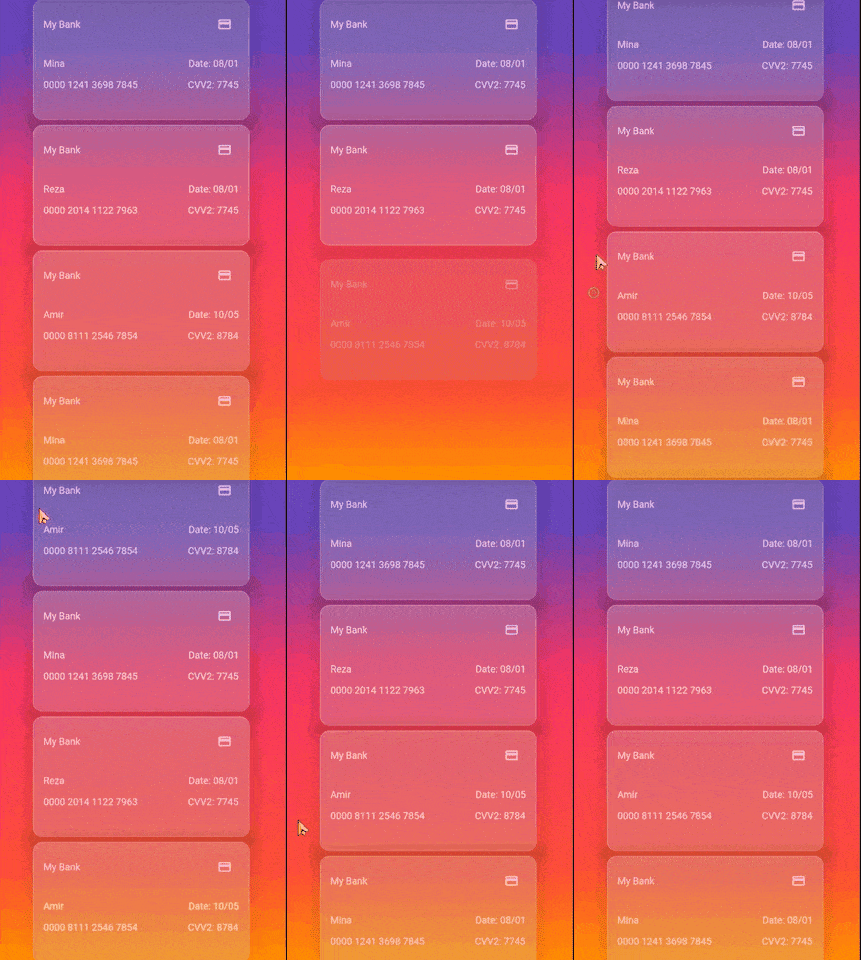
Flutter Glass插件为您的应用程序添加了制作玻璃容器的功能。下面是关于如何使用该插件的详细说明和示例代码。
插件介绍
Flutter Glass插件允许您在应用中创建玻璃效果的容器,提供现代且美观的用户界面组件。


安装步骤
要使用此插件,请在pubspec.yaml文件中添加flutter_glass:
dependencies:
  flutter_glass: ^0.0.8
或者,您可以使用以下命令自动安装:
$ flutter pub add flutter_glass
使用方法
使用Flutter Glass非常简单。下面是一个基本的例子,展示如何使用GlassContainer:
import 'package:flutter/material.dart';
import 'package:flutter_glass/flutter_glass.dart';

void main() {
  runApp(MyApp());
}

class MyApp extends StatelessWidget {
  [@override](/user/override)
  Widget build(BuildContext context) {
    return MaterialApp(
      home: Scaffold(
        appBar: AppBar(title: Text('Flutter Glass Example')),
        body: Center(
          child: GlassContainer( // 创建一个玻璃容器
            children: [
              Padding(
                padding: const EdgeInsets.all(48.0),
                child: Text("Sample Text"), // 在玻璃容器内放置文本
              ),
            ],
          ),
        ),
      ),
    );
  }
}
额外的部件(Bonus Widget)
此外,插件还提供了GradiantContainer,用于创建带有渐变背景的容器:
import 'package:flutter/material.dart';
import 'package:flutter_glass/flutter_glass.dart';

void main() {
  runApp(MyApp());
}

class MyApp extends StatelessWidget {
  [@override](/user/override)
  Widget build(BuildContext context) {
    return MaterialApp(
      home: Scaffold(
        appBar: AppBar(title: Text('Gradient Container Example')),
        body: GradiantContainer( // 创建一个渐变背景的容器
          child: Center(
            child: Text('Hello, Gradient!'), // 在渐变容器内放置文本
          ),
        ),
      ),
    );
  }
}
示例代码
以下是来自官方示例的一个更复杂的例子,展示了如何结合使用GlassContainer和GradiantContainer:
import 'package:flutter/material.dart';
import 'package:flutter_glass/flutter_glass.dart';
// 假设其他必要的导入已存在

void main() {
  runApp(const MyApp());
}

class MyApp extends StatelessWidget {
  const MyApp({Key? key}) : super(key: key);

  [@override](/user/override)
  Widget build(BuildContext context) {
    return MaterialApp(
      debugShowCheckedModeBanner: false,
      title: 'Flutter Glass',
      theme: ThemeData(
        primarySwatch: Colors.blue,
      ),
      home: const Homepage(),
    );
  }
}

class Homepage extends StatelessWidget {
  const Homepage({Key? key}) : super(key: key);

  [@override](/user/override)
  Widget build(BuildContext context) {
    return Scaffold(
      backgroundColor: Colors.black,
      body: SafeArea(
        child: SizedBox(
          child: GradiantContainer(
            // 设置渐变背景
            child: ListViewBody(
              children: [
                for (var i = 9; i > 0; --i)
                  GlassContainer(
                    sigmaX: 0, // 设置模糊程度
                    sigmaY: 0,
                    decorationImage: const DecorationImage(
                      image: NetworkImage("http://via.placeholder.com/200x150"),
                      fit: BoxFit.fill,
                      opacity: 0.2, // 设置背景图片的透明度
                    ),
                    children: [
                      CardContent(
                        cardModel: CardModel(
                          cNumber: "6${i}00 1241 3698 7845",
                          name: "User $i",
                          cvv2: "$i" "45",
                          date: "2022/0$i",
                        ),
                      ),
                    ],
                  ),
              ],
            ),
          ),
        ),
      ),
    );
  }
}
更多关于Flutter增强现实功能插件flutter_glass的使用的实战系列教程也可以访问 https://www.itying.com/category-92-b0.html
更多关于Flutter增强现实功能插件flutter_glass的使用的实战系列教程也可以访问 https://www.itying.com/category-92-b0.html
当然,以下是一个关于如何使用Flutter增强现实功能插件flutter_glass的示例代码。这个插件可以帮助你在Flutter应用中集成增强现实(AR)功能。
首先,确保你的Flutter项目已经创建,并且在pubspec.yaml文件中添加了flutter_glass依赖:
dependencies:
  flutter:
    sdk: flutter
  flutter_glass: ^最新版本号  # 请替换为当前可用的最新版本号
然后运行flutter pub get来获取依赖。
接下来,我们编写一个简单的示例代码来展示如何使用flutter_glass。这个示例将展示如何在AR场景中添加一个3D模型。
main.dart
import 'package:flutter/material.dart';
import 'package:flutter_glass/flutter_glass.dart';
import 'package:arcore_flutter_plugin/models/arcore_result.dart';
import 'package:arcore_flutter_plugin/arcore_flutter_plugin.dart';

void main() {
  runApp(MyApp());
}

class MyApp extends StatelessWidget {
  @override
  Widget build(BuildContext context) {
    return MaterialApp(
      home: Scaffold(
        appBar: AppBar(
          title: Text('Flutter Glass AR Example'),
        ),
        body: ARScaffold(
          builder: (context, arController) {
            return Stack(
              children: [
                // ARSceneView will render the AR content
                ARSceneView(
                  arController: arController,
                ),
                // You can add UI elements on top of the AR view
                Center(
                  child: ElevatedButton(
                    onPressed: () {
                      // Add a 3D model to the AR scene
                      add3DModelToScene(arController);
                    },
                    child: Text('Add 3D Model'),
                  ),
                ),
              ],
            );
          },
        ),
      ),
    );
  }

  void add3DModelToScene(ARController arController) {
    // Assuming you have a 3D model file (e.g., .glb, .gltf) in your assets
    final modelPath = 'assets/models/sample.glb'; // Replace with your model path

    // Create an anchor at the center of the screen (or any desired location)
    final anchorPosition = arController.arCamera.pose!.translation;

    // Load and add the 3D model to the AR scene
    arController.addModel(
      modelPath: modelPath,
      position: anchorPosition,
      scale: Vector3(0.5, 0.5, 0.5), // Adjust the scale as needed
    );
  }
}
Note:
-
ARCore Integration: The
flutter_glassplugin often works in conjunction with ARCore (for Android) or ARKit (for iOS). In this example, I mentionedarcore_flutter_pluginbut note that actual integration might vary depending on the specific requirements and the latest updates toflutter_glass. -
Assets: Ensure your 3D model files (
.glb,.gltf, etc.) are placed correctly in theassets/models/directory and referenced properly in yourpubspec.yamlfile. -
Permissions: Your app will need camera and storage permissions to function correctly with AR features. Make sure to handle these permissions in your app.
-
Platform-Specific Setup: You might need to set up some platform-specific configurations, such as enabling ARCore in your AndroidManifest.xml or setting up ARKit capabilities in your iOS project.
This is a basic example to get you started. Depending on your specific use case, you might need to add more features, handle more edge cases, and integrate additional plugins or services. Always refer to the latest documentation of flutter_glass for the most accurate and up-to-date information.


