Flutter霓虹灯效果文本插件text_neon_widget的使用
Flutter霓虹灯效果文本插件text_neon_widget的使用
文本霓虹灯小部件 (1.0.6)
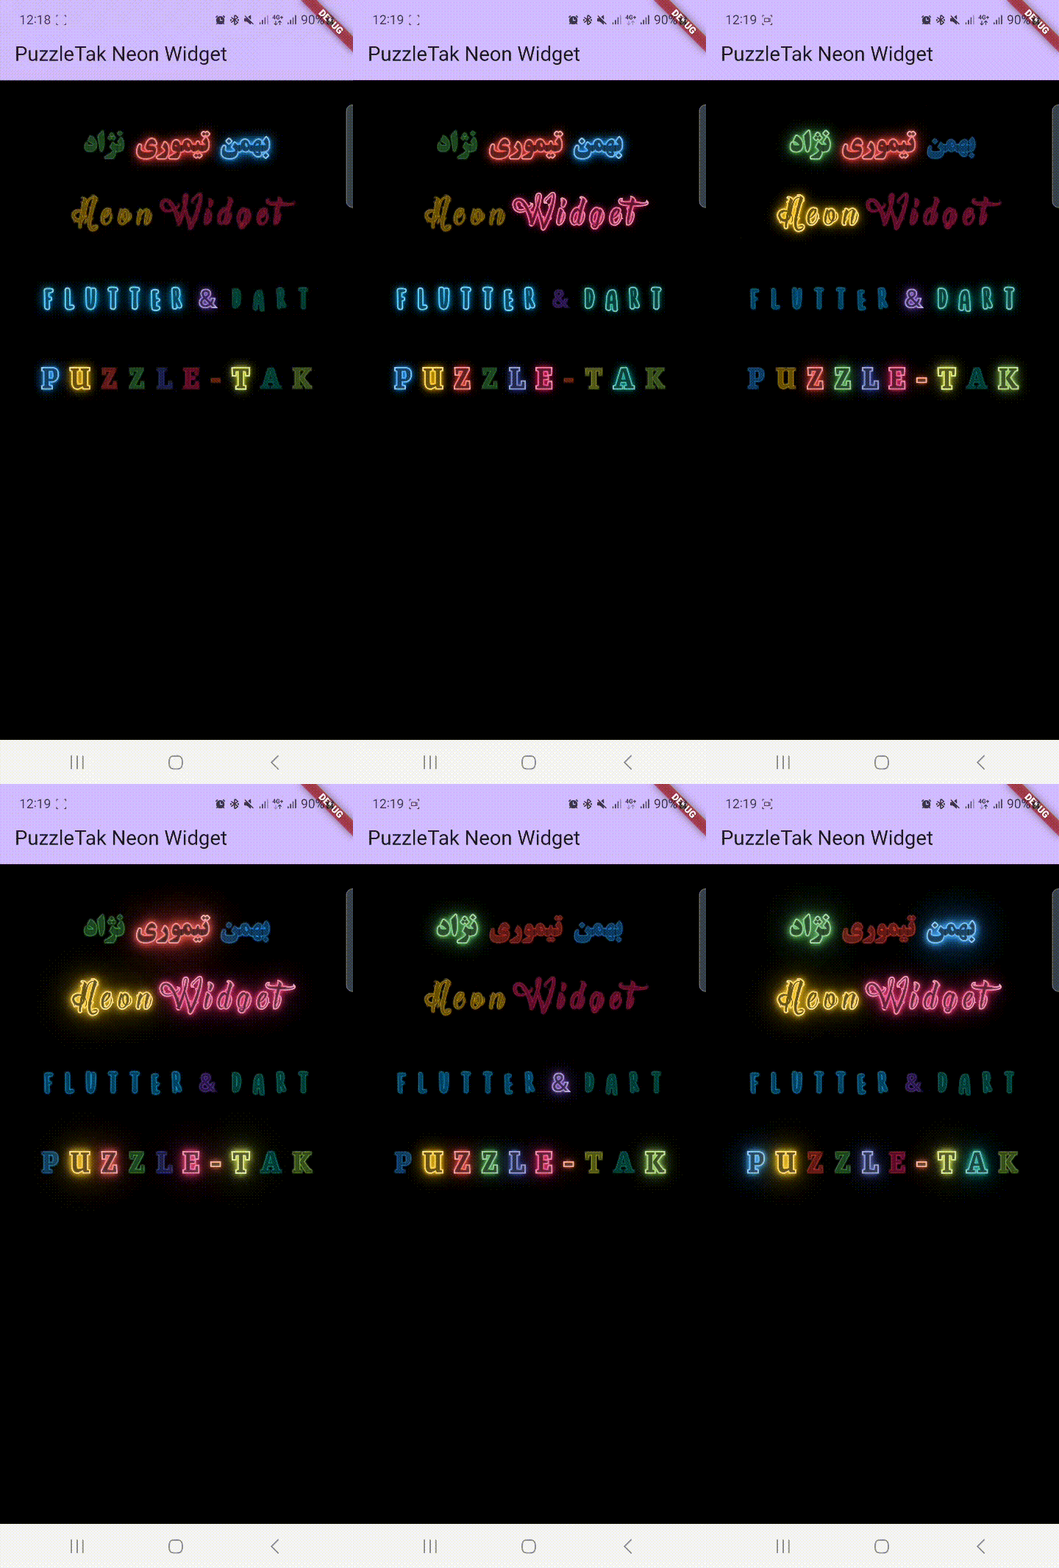
这是一个用于Flutter的霓虹灯小部件。使用此小部件,您可以为所有文本添加霓虹动画效果,并且所有元素都是可自定义的,允许您根据喜好个性化它们。如需支持,请关注我。
新演示


安装 ☺
要使用 text_neon_widget 包,请在您的 pubspec.yaml 文件中添加以下依赖项:
dependencies:
  text_neon_widget: ^1.0.6
然后运行 flutter pub get 以获取包。
使用
在您的 Dart 文件中导入包:
import 'package:text_neon_widget/text_neon_widget.dart';
创建一个 PTTextNeon 小部件并提供必要的参数:
Row(
  mainAxisAlignment: MainAxisAlignment.center,
  children: [
    PTTextNeon(
      text: 'F l u t t e r ',
      color: Colors.lightBlue,
      font: "five",
      shine: true,
      fontSize: 40,
      strokeWidthTextHigh: 3,
      blurRadius: 25,
      strokeWidthTextLow: 1,
      backgroundColor: Colors.black,
    ),

    PTTextNeon(
      text: ' & ',
      color: Colors.deepPurple,
      font: "five",
      shine: true,
      fontSize: 25,
      strokeWidthTextHigh: 3,
      blurRadius: 25,
      strokeWidthTextLow: 1,
      backgroundColor: Colors.black,
    ),

    PTTextNeon(
      text: ' D a r t',
      color: Colors.teal,
      shine: true,
      fontSize: 40,
      font: "five",
      strokeWidthTextHigh: 3,
      blurRadius: 20,
      strokeWidthTextLow: 1,
      backgroundColor: Colors.black,
    ),
  ],
)
在上述代码中,text 参数指定要显示的文本。color 参数设置霓虹发光效果的颜色。font 参数允许您指定文本的字体。
您可以使用 shine 参数启用或禁用发光效果。fontSize 参数控制文本的大小。strokeWidthTextHigh 和 strokeWidthTextLow 参数分别定义高和低强度区域中文本的描边宽度。
blurRadius 参数设置霓虹发光效果的模糊半径。backgroundColor 参数设置文本的背景颜色。
请随意尝试不同的参数值以达到所需的霓虹文本效果。
PTTextNeon PTTextNeon({
  required String text,
  required MaterialColor color,
  String? font,
  double? fontSize,
  NeonLevel? levelNeon,
  Color? backgroundColor,
  int? highAlpha,
  int? lowAlpha,
  Duration? animatedChangeDuration,
  double? strokeWidthTextLow,
  double? strokeWidthTextHigh,
  double? blurRadius,
  bool? shine,
  Duration? shineDuration,
  TextStyle? textStyle,
})
示例
以下是使用 text_neon_widget 的完整示例:
import 'package:flutter/material.dart';
import 'package:text_neon_widget/text_neon_widget.dart';
void main() {
runApp(const MyApp());
}
class MyApp extends StatelessWidget {
const MyApp({super.key});
// 这个小部件是你的应用的根。
[@override](/user/override)
Widget build(BuildContext context) {
return MaterialApp(
title: 'PuzzleTak Neon Widget',
theme: ThemeData(
colorScheme: ColorScheme.fromSeed(seedColor: Colors.deepPurple),
useMaterial3: true,
),
home: const MyHomePage(),
);
}
}
class MyHomePage extends StatefulWidget {
const MyHomePage({super.key});
[@override](/user/override)
State<MyHomePage> createState() => _MyHomePageState();
}
class _MyHomePageState extends State<MyHomePage> {
List<ItemColor> list = [
ItemColor(text: "P", color: Colors.blue),
ItemColor(text: "U", color: Colors.amber),
ItemColor(text: "Z", color: Colors.red),
ItemColor(text: "Z", color: Colors.green),
ItemColor(text: "L", color: Colors.indigo),
ItemColor(text: "E", color: Colors.pink),
ItemColor(text: "-", color: Colors.deepOrange),
ItemColor(text: "T", color: Colors.lime),
ItemColor(text: "A", color: Colors.teal),
ItemColor(text: "K", color: Colors.lightGreen),
];
[@override](/user/override)
Widget build(BuildContext context) {
return Scaffold(
appBar: AppBar(
title: const Text('PuzzleTak Neon Widget'),
backgroundColor: Theme.of(context).colorScheme.inversePrimary,
),
backgroundColor: Colors.black,
body: SingleChildScrollView(
child: Column(
children: [
const SizedBox(height: 50,),
_simpleOne(),
const SizedBox(height: 30,),
_simpleTow(),
const SizedBox(height: 30,),
_simpleTree(),
const SizedBox(height: 30,),
_simpleFour(),
],
),
),
);
}
Widget _simpleOne() {
return const Row(
textDirection: TextDirection.rtl,
mainAxisAlignment: MainAxisAlignment.center,
children: [
PTTextNeon(
text: 'بهمن',
color: Colors.blue,
font: "one",
shine: true,
fontSize: 30,
strokeWidthTextHigh: 3,
blurRadius: 30,
strokeWidthTextLow: 1,
backgroundColor: Colors.black,
),
PTTextNeon(
text: ' تیموری ',
color: Colors.red,
shine: true,
font: "one",
fontSize: 30,
strokeWidthTextHigh: 3,
blurRadius: 30,
strokeWidthTextLow: 1,
backgroundColor: Colors.black,
),
PTTextNeon(
text: 'نژاد',
color: Colors.green,
shine: true,
fontSize: 30,
font: "one",
strokeWidthTextHigh: 3,
blurRadius: 30,
strokeWidthTextLow: 1,
backgroundColor: Colors.black,
),
],
);
}
Widget _simpleTow() {
return const Row(
mainAxisAlignment: MainAxisAlignment.center,
children: [
PTTextNeon(
text: 'N e o n ',
color: Colors.amber,
font: "four",
shine: true,
fontSize: 40,
strokeWidthTextHigh: 3,
blurRadius: 25,
strokeWidthTextLow: 1,
backgroundColor: Colors.black,
),
PTTextNeon(
text: 'W i d g e t',
color: Colors.pink,
shine: true,
fontSize: 40,
font: "four",
strokeWidthTextHigh: 3,
blurRadius: 20,
strokeWidthTextLow: 1,
backgroundColor: Colors.black,
),
],
);
}
Widget _simpleTree() {
return const Row(
mainAxisAlignment: MainAxisAlignment.center,
children: [
PTTextNeon(
text: 'F l u t t e r ',
color: Colors.lightBlue,
font: "five",
shine: true,
fontSize: 40,
strokeWidthTextHigh: 3,
blurRadius: 25,
strokeWidthTextLow: 1,
backgroundColor: Colors.black,
),
PTTextNeon(
text: ' & ',
color: Colors.deepPurple,
font: "five",
shine: true,
fontSize: 25,
strokeWidthTextHigh: 3,
blurRadius: 25,
strokeWidthTextLow: 1,
backgroundColor: Colors.black,
),
PTTextNeon(
text: ' D a r t',
color: Colors.teal,
shine: true,
fontSize: 40,
font: "five",
strokeWidthTextHigh: 3,
blurRadius: 20,
strokeWidthTextLow: 1,
backgroundColor: Colors.black,
),
],
);
}
Widget _simpleFour() {
return Row(
mainAxisAlignment: MainAxisAlignment.center,
children: list.map((e) => PTTextNeon(
text: " ${e.text!} ",
color: e.color!,
font: "tree",
shine: true,
fontSize: 35,
strokeWidthTextHigh: 3,
blurRadius: 25,
strokeWidthTextLow: 1,
backgroundColor: Colors.black,
),).toList(),
);
}
}
class ItemColor {
String? text;
MaterialColor? color;
ItemColor({this.color, this.text});
}
更多关于Flutter霓虹灯效果文本插件text_neon_widget的使用的实战系列教程也可以访问 https://www.itying.com/category-92-b0.html
更多关于Flutter霓虹灯效果文本插件text_neon_widget的使用的实战系列教程也可以访问 https://www.itying.com/category-92-b0.html
当然,以下是如何在Flutter中使用text_neon_widget插件来实现霓虹灯效果文本的示例代码。
首先,确保你已经在pubspec.yaml文件中添加了text_neon_widget依赖:
dependencies:
  flutter:
    sdk: flutter
  text_neon_widget: ^最新版本号 # 请替换为实际的最新版本号
然后,运行flutter pub get来获取依赖。
接下来,你可以在你的Flutter应用中导入并使用TextNeonWidget。以下是一个完整的示例代码:
import 'package:flutter/material.dart';
import 'package:text_neon_widget/text_neon_widget.dart';

void main() {
  runApp(MyApp());
}

class MyApp extends StatelessWidget {
  @override
  Widget build(BuildContext context) {
    return MaterialApp(
      title: 'Flutter Neon Text Demo',
      theme: ThemeData(
        primarySwatch: Colors.blue,
      ),
      home: NeonTextScreen(),
    );
  }
}

class NeonTextScreen extends StatelessWidget {
  @override
  Widget build(BuildContext context) {
    return Scaffold(
      appBar: AppBar(
        title: Text('Neon Text Effect Demo'),
      ),
      body: Center(
        child: TextNeonWidget(
          text: 'Hello, Neon!',
          color: Colors.blue,
          textStyle: TextStyle(
            fontSize: 48,
            fontWeight: FontWeight.bold,
          ),
          blurRadius: 10,
          spreadRadius: 5,
          neonColor: Colors.lightBlueAccent,
          animationDuration: Duration(milliseconds: 1500),
        ),
      ),
    );
  }
}
在这个示例中,我们创建了一个简单的Flutter应用,其中包含一个带有霓虹灯效果文本的页面。TextNeonWidget的参数说明如下:
text: 要显示的文本。color: 文本的基础颜色。textStyle: 文本的样式,例如字体大小和字体粗细。blurRadius: 模糊半径,控制霓虹效果的模糊程度。spreadRadius: 扩散半径,控制霓虹效果的扩散程度。neonColor: 霓虹灯的颜色。animationDuration: 动画持续时间,控制霓虹效果的动画周期。
你可以根据需要调整这些参数以实现不同的霓虹灯效果。
确保在实际开发中检查text_neon_widget的最新文档,因为插件的API可能会随着版本更新而有所变化。


