


Flutter交互式组件插件quds_interactive的使用
Flutter交互式组件插件quds_interactive的使用
Quds Interactive
一个易于本地化(可自定义)并且支持动态主题的库!
为什么使用Quds Interactive?
每个现代应用都应该考虑两个因素:
- 用户的语言。
- 设备的亮度模式。
这个库提供了一种简单的方式来控制这些因素,并保存和恢复偏好设置。
如何使用?
初始化
void main() async {
  await QudsInteractiveApp.initialize(
    supportedLanguageCodes: ['en', 'ar_ps', 'fr'],
  );

  // 然后运行你的应用
  runApp(MyApp());
}
包裹应用
class MyApp extends StatelessWidget {
  [@override](/user/override)
  Widget build(BuildContext context) {
    return QudsInteractiveApp(
      builder: (c) => MyHomePage(title: 'Test Translation'.tr),
    );
  }
}
QudsInteractiveApp 用于应用更改到应用中。
翻译
Text('hi_message'.tr); // <- 翻译为默认选择的语言。
自定义语言翻译
Translated(langCode: 'ar', child: CustomWidget());

class CustomWidget extends StatelessWidget {
  [@override](/user/override)
  Widget build(BuildContext context) {
    var lang = QudsTranslated.of(context);
    return Text(lang.translate('hi_message'));
  }
}
如何支持额外的翻译?
在初始化时,你可以添加更多的特定翻译,
await QudsInteractiveApp.initialize(
  supportedLanguageCodes: ['en', 'ar_ps', 'fr'],
  additionalDictionaries: {'ar': arabicSupport, 'en': englishSupport},
);
ar.dart
var arabicSupport = {
  'app_title': 'عنوان التطبيق',
  'Test Translation': 'تجربة الترجمة',
  'hi_message': 'أهلًا أخي'
};
en.dart
var englishSupport = {
  'app_title': 'App title',
  'hi_message': 'Hi Bro!'
};


如何改变选择的语言和主题?
默认情况下,语言将与设备语言一致,亮度将采用设备的默认选项。要更改语言:
QudsTranslation.setLanguage('en', onChanged: () {
  // 保存语言
  // QudsInteractiveApp.appController.saveStateInSharedPreferences();
});
要切换主题:
QudsTheme.toggleTheme();
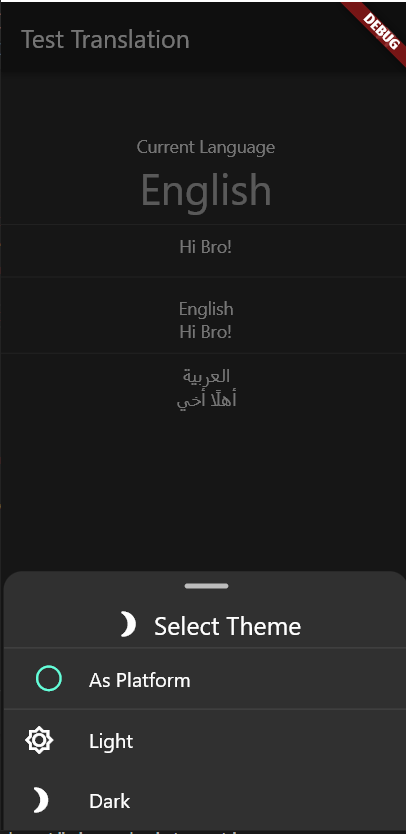
该包提供了一个简单的UI来改变当前语言和主题:
// 更改语言
QudsTranslation.showLanguagesSelectionBorderSheet(context);

// 更改主题
QudsTheme.showThemesSelectionBorderSheet(context);

完整示例Demo
import 'package:example/translations/en.dart';
import 'package:example/ui/main_app_lang.dart';
import 'package:example/ui/main_drawer.dart';
import 'package:flutter/material.dart';
import 'package:quds_interactive/quds_interactive.dart';
import 'package:quds_ui_kit/quds_ui_kit.dart';
import 'translations/ar.dart';
import 'ui/translated_as_required.dart';

void main() async {
  await QudsInteractiveApp.initialize(
    supportedLanguageCodes: ['en', 'ar_ps', 'fr', 'es'],
    additionalDictionaries: {'ar': arabicSupport, 'en': englishSupport},
    customFonts: {'ar': 'Cairo'},
    // defaultFont: 'Cairo'
  );

  runApp(MyApp());
}

class MyApp extends StatelessWidget {
  [@override](/user/override)
  Widget build(BuildContext context) {
    return QudsInteractiveApp(
      debugShowCheckedModeBanner: false,
      builder: (c) => MyHomePage(title: 'Test Translation'.tr),
    );
  }
}

class MyHomePage extends StatefulWidget {
  MyHomePage({Key? key, required this.title}) : super(key: key);
  final String title;

  [@override](/user/override)
  _MyHomePageState createState() => _MyHomePageState();
}

class _MyHomePageState extends State<MyHomePage> {
  [@override](/user/override)
  Widget build(BuildContext context) {
    return Scaffold(
      drawer: const MainDrawer(),
      appBar: AppBar(
        actions: [
          QudsSelectThemeIconButton(),
          QudsSelectLanguageIconButton(),
          IconButton(
            onPressed: () =>
                Navigator.push(
                  context,
                  QudsZoomPageRoute(
                    zoomType: ZoomType.Out,
                    builder: (c) => MyHomePage(title: 'Another Page')),
                ),
            icon: Icon(Icons.arrow_forward_rounded)
          )
        ],
        title: Text(widget.title),
      ),
      body: SingleChildScrollView(
        child: Container(
          alignment: Alignment.center,
          child: Column(
            mainAxisAlignment: MainAxisAlignment.center,
            children: <Widget>[
              SizedBox(height: 50),
              Text('Current Language'.tr),
              Text(
                currentLanguage?.langName ?? '',
                style: Theme.of(context).textTheme.headline4,
              ),
              Divider(),
              MainAppLang(),
              Divider(height: 30),
              Text('English'),
              QudsTranslated(langCode: 'en', child: TranslatedAsRequired()),
              Divider(),
              Text('العربية'),
              QudsTranslated(langCode: 'ar', child: TranslatedAsRequired()),
            ],
          ),
        ),
      ),
      floatingActionButton: _buildFloatingButton(),
    );
  }

  Widget _buildFloatingButton() =>
      Row(mainAxisAlignment: MainAxisAlignment.end, children: [
        FloatingActionButton(
          heroTag: 'btn1',
          onPressed: () =>
              QudsTranslation.showLanguagesSelectionBorderSheet(
            context,
            withCountryName: true,
            withFlagImage: false,
          ),
          tooltip: 'Change Language'.tr,
          child: Icon(Icons.language),
        ),
        SizedBox(width: 10),
        FloatingActionButton(
          heroTag: 'btn2',
          onPressed: () =>
              QudsTheme.showThemesSelectionBorderSheet(
            context,
          ),
          tooltip: 'Toggle Theme'.tr,
          child: QudsAnimatedCombinedIcons(
            startIcon: Icons.brightness_5_outlined,
            endIcon: Icons.brightness_3_rounded,
            showStartIcon: !QudsTheme.provider.isDark.value,
          ),
        ),
        SizedBox(width: 10),
        ElevatedButton(
            onPressed: () =>
                showDatePicker(
                  context: context,
                  initialDate: DateTime(2000),
                  firstDate: DateTime(1990),
                  lastDate: DateTime.now(),
                ),
            child: Text('Date'.tr))
      ]);
}
更多关于Flutter交互式组件插件quds_interactive的使用的实战系列教程也可以访问 https://www.itying.com/category-92-b0.html

1 回复

更多关于Flutter交互式组件插件quds_interactive的使用的实战系列教程也可以访问 https://www.itying.com/category-92-b0.html
当然,关于Flutter交互式组件插件quds_interactive的使用,这里提供一个简单的代码示例来展示其基本功能。请确保你已经在pubspec.yaml文件中添加了该依赖并运行了flutter pub get来安装它。
首先,在你的pubspec.yaml文件中添加依赖:
dependencies:
  flutter:
    sdk: flutter
  quds_interactive: ^最新版本号  # 替换为实际最新版本号
然后,在你的Flutter应用中,你可以这样使用quds_interactive插件。以下是一个基本的示例,展示如何使用其中的一些交互式组件。
import 'package:flutter/material.dart';
import 'package:quds_interactive/quds_interactive.dart';

void main() {
  runApp(MyApp());
}

class MyApp extends StatelessWidget {
  @override
  Widget build(BuildContext context) {
    return MaterialApp(
      title: 'Quds Interactive Demo',
      theme: ThemeData(
        primarySwatch: Colors.blue,
      ),
      home: Scaffold(
        appBar: AppBar(
          title: Text('Quds Interactive Demo'),
        ),
        body: Center(
          child: Column(
            mainAxisAlignment: MainAxisAlignment.center,
            children: <Widget>[
              // 使用 QudsRatingBar
              QudsRatingBar(
                initialRating: 3.0,
                maxRating: 5,
                stepSize: 0.5,
                onRatingChanged: (double rating) {
                  print('Rating changed to: $rating');
                },
              ),
              SizedBox(height: 20),

              // 使用 QudsStarRating
              QudsStarRating(
                rating: 4.0,
                starCount: 5,
                color: Colors.amber,
                borderColor: Colors.grey,
                size: 30.0,
                spacing: 5.0,
                onChanged: (double rating) {
                  print('Star rating changed to: $rating');
                },
              ),
              SizedBox(height: 20),

              // 使用 QudsCheckbox
              QudsCheckbox(
                value: true,
                onChanged: (bool value) {
                  print('Checkbox value changed to: $value');
                },
                label: Text('Check me!'),
              ),
              SizedBox(height: 20),

              // 使用 QudsSwitch
              QudsSwitch(
                value: true,
                onChanged: (bool value) {
                  print('Switch value changed to: $value');
                },
                activeColor: Colors.blue,
                inactiveThumbColor: Colors.grey,
                inactiveTrackColor: Colors.grey[300]!,
              ),
            ],
          ),
        ),
      ),
    );
  }
}
在这个示例中,我们展示了如何使用quds_interactive插件中的几个交互式组件:
- QudsRatingBar:一个评分条组件,允许用户选择一个介于0到5之间的评分(步长为0.5)。
- QudsStarRating:一个星形评分组件,用户可以通过点击星星来更改评分。
- QudsCheckbox:一个带有标签的复选框组件。
- QudsSwitch:一个开关组件,用于切换开关状态。
每个组件都有相应的onChanged回调,当用户交互时,会打印出新的值到控制台。
请注意,由于quds_interactive插件可能会更新并添加更多组件或更改API,因此建议查阅其官方文档以获取最新信息和详细用法。