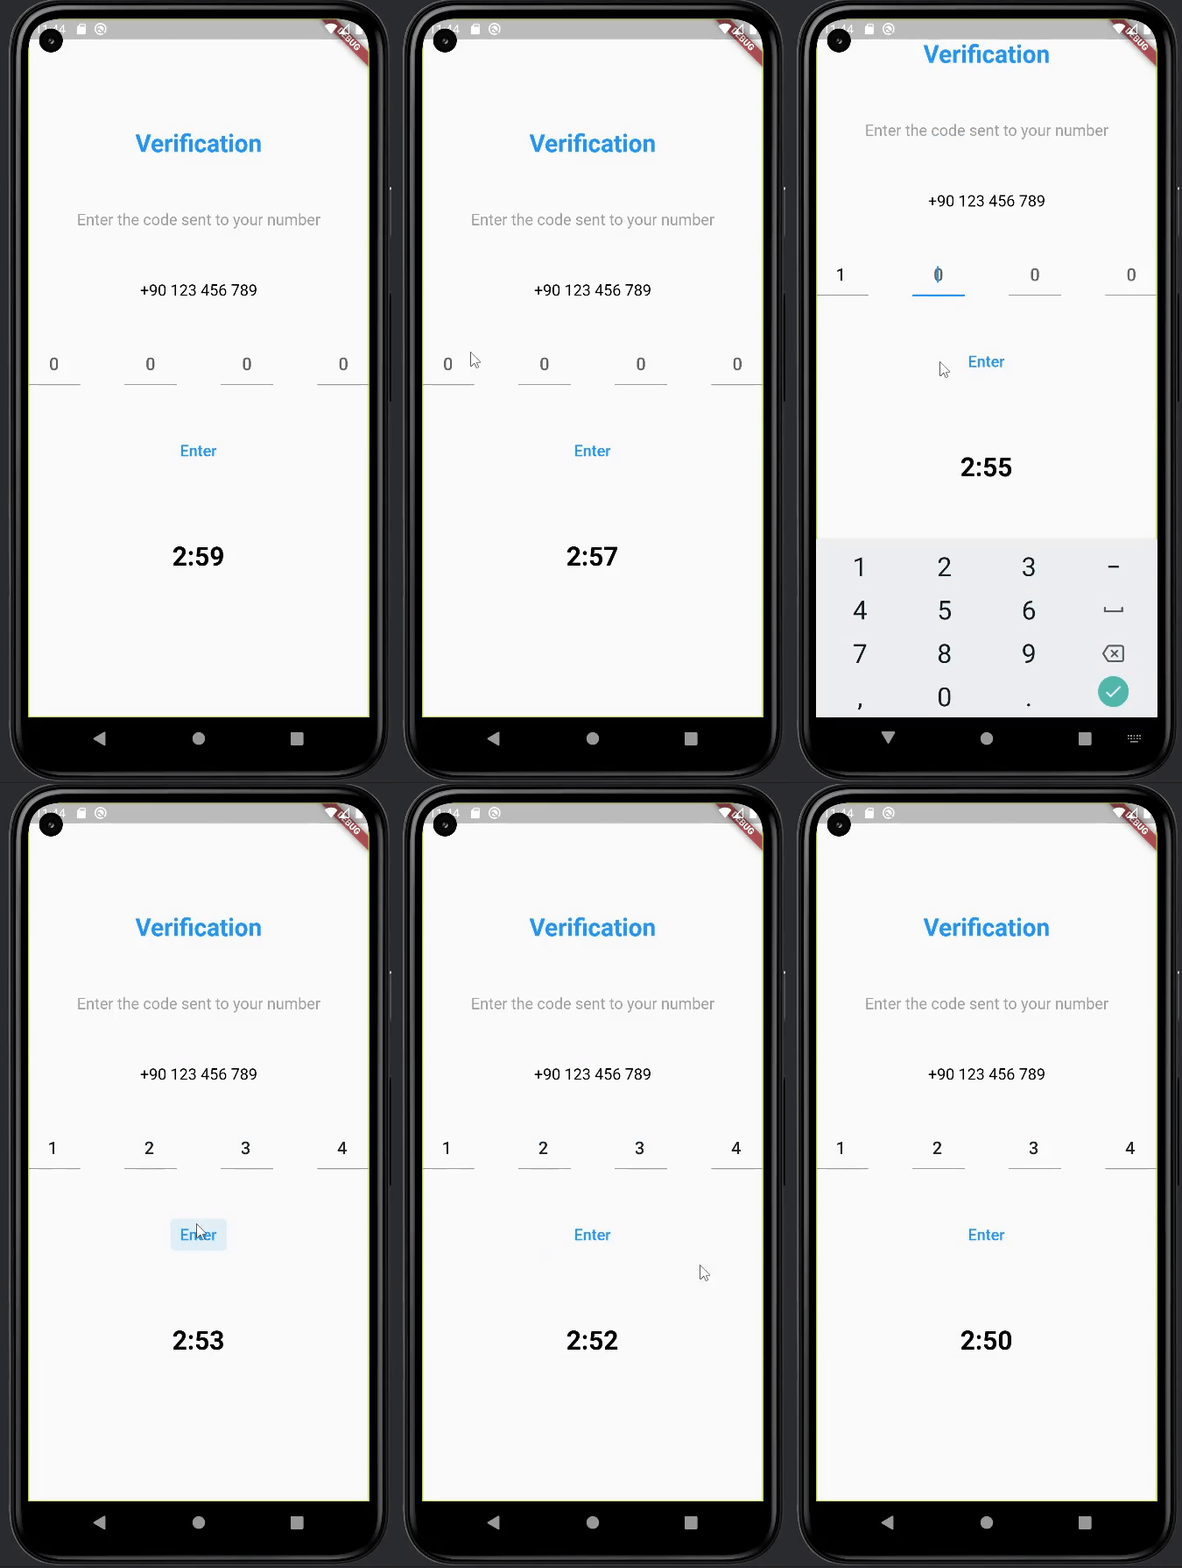
Flutter短信验证码插件sms_otp的使用
Flutter短信验证码插件sms_otp的使用
sms_otp 插件包含多个有用的容器,可以帮助你构建应用中的短信或验证码输入界面。该插件包含了用于显示标题、描述文本、电话号码和验证码输入框的容器。
特性

开始使用
首先,你需要在 pubspec.yaml 文件中添加 sms_otp 依赖项:
dependencies:
  sms_otp: ^版本号
然后,你可以创建一个简单的示例来展示如何使用 SmsOtp 组件:
import 'package:flutter/material.dart';
import 'package:sms_otp/sms_otp.dart';

void main() => runApp(MyApp());

class MyApp extends StatelessWidget {
  [@override](/user/override)
  Widget build(BuildContext context) {
    return MaterialApp(
      home: Scaffold(
        appBar: AppBar(
          title: Text('短信验证码示例'),
        ),
        body: Center(
          child: SmsOtpExample(),
        ),
      ),
    );
  }
}

class SmsOtpExample extends StatelessWidget {
  const SmsOtpExample({Key? key}) : super(key: key);

  [@override](/user/override)
  Widget build(BuildContext context) {
    // 定义按钮点击事件函数
    void btnOnPressedFunction() {
      print("按钮被点击了!");
    }

    // 定义倒计时结束事件函数
    void durationTimeOnEndFunction() {
      print("倒计时结束!");
    }

    return Scaffold(
      body: Center(
        child: SmsOtp(
          title: "验证",  // 设置标题
          textMargin: 40,  // 设置描述文本的边距
          text: "请输入发送到您手机上的验证码",  // 设置描述文本
          phoneNumberMargin: 40,  // 设置电话号码的边距
          phoneNumber: "+90 123 456 789",  // 设置电话号码
          pinHeight: 68.0,  // 设置每个验证码框的高度
          pinWidth: 64.0,  // 设置每个验证码框的宽度
          btnMargin: 40,  // 设置按钮的边距
          btnOnPressed: () => btnOnPressedFunction,  // 设置按钮点击事件
          btnText: "确认",  // 设置按钮文本
          durationTimeMargin: 40,  // 设置倒计时文本的边距
          durationTime: 3,  // 设置倒计时时间(秒)
          durationTimeOnEnd: () => durationTimeOnEndFunction,  // 设置倒计时结束事件
        ),
      ),
    );
  }
}
更多关于Flutter短信验证码插件sms_otp的使用的实战系列教程也可以访问 https://www.itying.com/category-92-b0.html
更多关于Flutter短信验证码插件sms_otp的使用的实战系列教程也可以访问 https://www.itying.com/category-92-b0.html
当然,以下是一个关于如何在Flutter项目中使用sms_otp插件来处理短信验证码的示例代码。这个插件通常用于实现短信验证码的自动读取和验证功能。
首先,确保你已经在pubspec.yaml文件中添加了sms_otp依赖:
dependencies:
  flutter:
    sdk: flutter
  sms_otp: ^x.y.z  # 请替换为最新版本号
然后运行flutter pub get来安装依赖。
接下来,在你的Flutter项目中,你可以按照以下步骤使用sms_otp插件:
- 初始化插件:
在你的主文件(通常是main.dart)或者你需要使用短信验证码功能的页面中,导入sms_otp包并初始化它。
import 'package:flutter/material.dart';
import 'package:sms_otp/sms_otp.dart';

void main() {
  runApp(MyApp());
}

class MyApp extends StatefulWidget {
  @override
  _MyAppState createState() => _MyAppState();
}

class _MyAppState extends State<MyApp> {
  SmsOtp? _smsOtp;

  @override
  void initState() {
    super.initState();
    _initSmsOtp();
  }

  Future<void> _initSmsOtp() async {
    _smsOtp = SmsOtp();
    _smsOtp!.startListeningForMessages();

    // 监听短信到达事件
    _smsOtp!.messageStream!.listen((SmsMessage message) {
      // 在这里处理接收到的短信
      print("Received message: ${message.body}");
      // 假设验证码是6位数字
      RegExp exp = RegExp(r'\d{6}');
      Iterable<Match> matches = exp.allMatches(message.body);
      if (matches.isNotEmpty) {
        String otp = matches.first.group(0)!;
        print("OTP found: $otp");
        // TODO: 使用OTP进行验证
      }
    });
  }

  @override
  Widget build(BuildContext context) {
    return MaterialApp(
      home: Scaffold(
        appBar: AppBar(
          title: Text('SMS OTP Example'),
        ),
        body: Center(
          child: Text('Waiting for OTP...'),
        ),
      ),
    );
  }

  @override
  void dispose() {
    _smsOtp?.stopListeningForMessages();
    super.dispose();
  }
}
- 发送验证码请求:
通常,你会在用户点击某个按钮后发送验证码请求到你的服务器。这里假设你已经有一个发送验证码的API,下面是一个简单的按钮点击事件示例:
// 假设你有一个发送验证码的函数
Future<void> _sendOtpRequest() async {
  // 这里调用你的API发送验证码请求
  // 例如:await sendOtpToPhoneNumber('用户的手机号');
  print("OTP sent to user's phone number");
}

// 在你的Scaffold的body中添加一个按钮来发送验证码
body: Center(
  child: Column(
    mainAxisAlignment: MainAxisAlignment.center,
    children: <Widget>[
      ElevatedButton(
        onPressed: _sendOtpRequest,
        child: Text('Send OTP'),
      ),
      Text('Waiting for OTP...'),
    ],
  ),
),
- 验证验证码:
用户收到验证码后,可能会手动输入验证码进行验证,或者你已经从短信中自动提取了验证码。以下是一个简单的验证示例:
// 假设你有一个验证验证码的函数
Future<void> _verifyOtp(String inputOtp) async {
  // 这里调用你的API进行验证码验证
  // 例如:bool isVerified = await verifyOtp(inputOtp, '用户的手机号');
  bool isVerified = true; // 这里只是模拟

  if (isVerified) {
    ScaffoldMessenger.of(context).showSnackBar(
      SnackBar(content: Text('OTP Verified Successfully')),
    );
  } else {
    ScaffoldMessenger.of(context).showSnackBar(
      SnackBar(content: Text('Invalid OTP')),
    );
  }
}

// 在你的Scaffold的body中添加一个TextField和一个按钮来验证验证码
body: Center(
  child: Column(
    mainAxisAlignment: MainAxisAlignment.center,
    children: <Widget>[
      ElevatedButton(
        onPressed: _sendOtpRequest,
        child: Text('Send OTP'),
      ),
      SizedBox(height: 20),
      TextField(
        decoration: InputDecoration(labelText: 'Enter OTP'),
        onChanged: (value) {
          // 你可以在这里实时验证输入,但这里仅作示例
        },
      ),
      SizedBox(height: 20),
      ElevatedButton(
        onPressed: () {
          final otpController = TextEditingController.fromValue(
            TextEditingValue(text: _otpController.text),
          );
          _verifyOtp(otpController.text);
        },
        child: Text('Verify OTP'),
      ),
    ],
  ),
),
注意:在实际应用中,你需要管理TextEditingController来处理TextField的输入,并且在验证码发送和验证过程中处理各种可能的错误情况。
以上代码提供了一个基本的框架,展示了如何在Flutter项目中使用sms_otp插件来处理短信验证码。根据你的具体需求,你可能需要调整和扩展这些代码。


