


Flutter重试策略插件exponential_back_off的使用
Flutter重试策略插件exponential_back_off的使用
重试失败过程,如HTTP请求,使用指数间隔进行每次重试
指数退避算法:
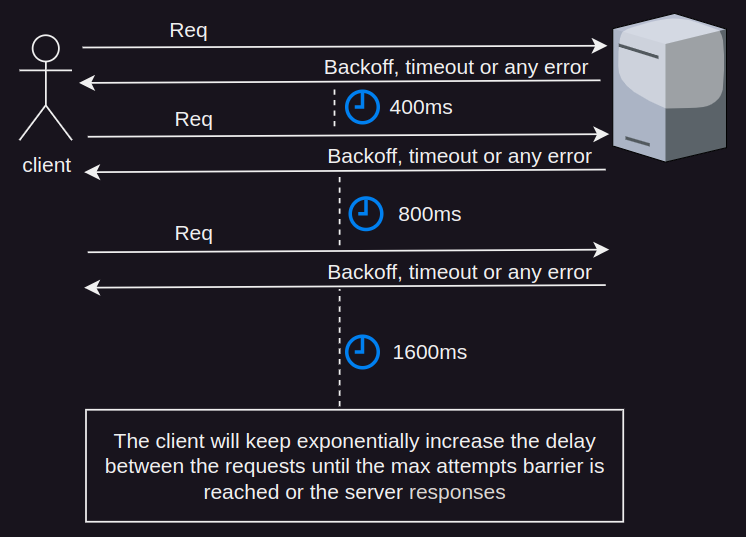
- 指数退避算法通过增加每次重试之间的等待时间来重新尝试请求,直到达到最大退避时间。
特性
- ✅ 启动进程
- ✅ 停止进程
- ✅ 重置进程
- ✅ 设置最大尝试次数
- ✅ 设置最大经过时间
- ✅ 设置最大重试延迟
- ✅ 条件重试
- ✅ 重试回调
- ✅ 调整指数延迟参数
- ✅ 指定延迟的随机性
- ✅ 自定义延迟算法(继承自基类
BackOff)
开始使用
- 将插件添加到你的
pubspec.yaml文件中:
dependencies:
exponential_back_off: ^x.y.z- 在Dart文件中导入
exponential_back_off包:
import 'package:exponential_back_off/exponential_back_off.dart';使用方法
- 创建
ExponentialBackOff对象:
final exponentialBackOff = ExponentialBackOff();- 发起请求:
final result = await exponentialBackOff.start<Response>(
  () => http.get(Uri.parse('https://www.gnu.org/')),
);- 处理结果:
你可以通过两种方式处理结果:
- 通过检查结果是否为
isLeft或isRight并相应地获取值。 - 使用
fold函数result.fold((error){},(data){})。fold函数将在结果为错误时调用第一个(Left)函数,否则在结果为数据时调用第二个(Right)函数。
使用if检查:
result.fold(
  (error) {
    // 左边(Exception):处理错误
    print(error);
  },
  (response) {
    // 右边(Response):处理结果
    print(response.body);
  },
);
使用fold:
result.fold(
  (error) {
    // 左边(Exception):处理错误
    print(error);
  },
  (response) {
    // 右边(Response):处理结果
    print(response.body);
  },
);
注意事项
默认配置下,最多将重试10次,第1次、第2次、第3次、…、第9次尝试将休眠(第10次不会休眠)。
随机百分比:>=0.0% <=15%

1.  400 ms     +/- (随机百分比的400 ms)
2.  800 ms     +/- (随机百分比的800 ms)
3.  1600 ms    +/- (随机百分比的1600 ms)
4.  3200 ms    +/- (随机百分比的3200 ms)
5.  6400 ms    +/- (随机百分比的6400 ms)
6.  12800 ms   +/- (随机百分比的12800 ms)
7.  25600 ms   +/- (随机百分比的25600 ms)
8.  51200 ms   +/- (随机百分比的51200 ms)
9.  102400 ms  +/- (随机百分比的102400 ms)
10. 204800 ms  +/- (随机百分比的204800 ms) **不会休眠**
示例
简单使用案例(默认配置):
final exponentialBackOff = ExponentialBackOff();

/// 结果类型为 [Either<Exception, Response>]
final result = await exponentialBackOff.start<Response>(
  // 发起请求
  () {
    return get(Uri.parse('https://www.gnu.org/'))
        .timeout(Duration(seconds: 10));
  },
  // 在SocketException或TimeoutException发生时重试,其他情况则停止并返回错误
  retryIf: (e) => e is SocketException || e is TimeoutException,
);

/// 你可以通过两种方式处理结果
/// * 通过检查结果 `isLeft` 或 `isRight` 并相应地获取值。
/// * 使用 `fold` 函数 `result.fold((error){},(data){})`。如果结果是错误,将调用第一个(Left)函数;如果是数据,则调用第二个(Right)函数。
///
/// 错误将始终在 `Left` 中,数据将始终在 `Right` 中

// 使用if检查
if (result.isLeft()) {
  // 左边(Exception):处理错误
  final error = result.getLeftValue();
  print(error);
} else {
  // 右边(Response):处理结果
  final response = result.getRightValue();
  print(response.body);
}

// 使用fold
result.fold(
  (error) {
    // 左边(Exception):处理错误
    print(error);
  },
  (response) {
    // 右边(Response):处理结果
    print(response.body);
  },
);
重用同一个对象(默认配置):
// 重置将调用stop()并将所有内容重置为零
await exponentialBackOff.reset();

print('间隔: ' + exponentialBackOff.interval.toString());
print('最大随机化因子: ' + exponentialBackOff.maxRandomizationFactor.toString());
print('最大尝试次数: ' + exponentialBackOff.maxAttempts.toString());
print('最大延迟: ' + exponentialBackOff.maxDelay.toString());
print('最大经过时间: ' + exponentialBackOff.maxElapsedTime.toString());
print('==================================================================');

await exponentialBackOff.start(
  () => get(Uri.parse('https://www.gnu.org/')).timeout(
    Duration.zero, // 将始终抛出TimeoutException
  ),
  retryIf: (e) => e is SocketException || e is TimeoutException,
  onRetry: (error) {
    print('尝试: ' + exponentialBackOff.attemptCounter.toString());
    print('错误: ' + error.toString());
    print('当前延迟: ' + exponentialBackOff.currentDelay.toString());
    print('经过时间: ' + exponentialBackOff.elapsedTime.toString());
    print('--------------------------------------------------------');
  },
);
调整指数延迟参数:
// 最多重试5次,
// 第1次、第2次、第3次、第4次尝试将休眠(第5次不会休眠)
//
// 随机百分比:0.0%
//
// 1. 200 ms
// 2. 400 ms
// 3. 800 ms
// 4. 1600 ms
// 5. 3200 ms   **不会休眠**

final exponentialBackOff = ExponentialBackOff(
  interval: Duration(milliseconds: 100),
  maxAttempts: 5,
  maxRandomizationFactor: 0.0,
  maxDelay: Duration(seconds: 15),
);

print('间隔: ' + exponentialBackOff.interval.toString());
print('最大随机化因子: ' + exponentialBackOff.maxRandomizationFactor.toString());
print('最大尝试次数: ' + exponentialBackOff.maxAttempts.toString());
print('最大延迟: ' + exponentialBackOff.maxDelay.toString());
print('最大经过时间: ' + exponentialBackOff.maxElapsedTime.toString());
print('==================================================================');

await exponentialBackOff.start(
  () => get(Uri.parse('https://www.gnu.org/')).timeout(
    Duration.zero, // 将始终抛出TimeoutException
  ),
  retryIf: (e) => e is SocketException || e is TimeoutException,
  onRetry: (error) {
    print('尝试: ' + exponentialBackOff.attemptCounter.toString());
    print('错误: ' + error.toString());
    print('当前延迟: ' + exponentialBackOff.currentDelay.toString());
    print('经过时间: ' + exponentialBackOff.elapsedTime.toString());
    print('--------------------------------------------------------');
  },
);
自定义延迟
- 创建一个从
Backoff基类继承的子类
/// 线性延迟:
///
/// 1. 1000 ms
/// 2. 2000 ms
/// 3. 3000 ms
/// 4. 4000 ms
/// 5. 5000 ms
class CustomDelay extends BackOff {
  CustomDelay({
    super.maxAttempts,
    super.maxDelay,
    super.maxElapsedTime,
  }) : assert(maxAttempts != null || maxElapsedTime != null,
            '不能同时为maxAttempts和maxElapsedTime设置null');

  @override
  Duration computeDelay(int attempt, Duration elapsedTime) {
    return Duration(seconds: attempt);
  }
}
- 如常使用它
// 最多重试5次,
// 第1次、第2次、第3次、第4次尝试将休眠(第5次不会休眠)
//
// 1. 1000 ms
// 2. 2000 ms
// 3. 3000 ms
// 4. 4000 ms
// 5. 5000 ms   **不会休眠**

final customDelay = CustomDelay(maxAttempts: 5);

print('最大尝试次数: ' + customDelay.maxAttempts.toString());
print('最大延迟: ' + customDelay.maxDelay.toString());
print('最大经过时间: ' + customDelay.maxElapsedTime.toString());
print('==================================================================');

await customDelay.start(
  () => get(Uri.parse('https://www.gnu.org/')).timeout(
    Duration.zero, // 将始终抛出TimeoutException
  ),
  retryIf: (e) => e is SocketException || e is TimeoutException,
  onRetry: (error) {
    print('尝试: ' + customDelay.attemptCounter.toString());
    print('错误: ' + error.toString());
    print('当前延迟: ' + customDelay.currentDelay.toString());
    print('经过时间: ' + customDelay.elapsedTime.toString());
    print('--------------------------------------------------------');
  },
);
更多关于Flutter重试策略插件exponential_back_off的使用的实战系列教程也可以访问 https://www.itying.com/category-92-b0.html

1 回复

更多关于Flutter重试策略插件exponential_back_off的使用的实战系列教程也可以访问 https://www.itying.com/category-92-b0.html
当然,exponential_back_off 是一个在 Flutter 中常用的重试策略插件,它基于指数退避算法,可以在网络请求失败时自动进行重试,并且每次重试之间的间隔时间会逐渐增加。以下是如何在 Flutter 项目中使用 exponential_back_off 插件的一个简单示例。
首先,你需要在你的 pubspec.yaml 文件中添加 exponential_back_off 依赖:
dependencies:
  flutter:
    sdk: flutter
  exponential_back_off: ^x.y.z  # 请使用最新版本号替换 x.y.z
然后运行 flutter pub get 来获取依赖。
接下来是一个使用 exponential_back_off 插件进行网络请求并应用重试策略的示例代码:
import 'package:flutter/material.dart';
import 'package:dio/dio.dart';
import 'package:exponential_back_off/exponential_back_off.dart';

void main() {
  runApp(MyApp());
}

class MyApp extends StatelessWidget {
  @override
  Widget build(BuildContext context) {
    return MaterialApp(
      home: Scaffold(
        appBar: AppBar(
          title: Text('Exponential Back-off Example'),
        ),
        body: Center(
          child: RetryButton(),
        ),
      ),
    );
  }
}

class RetryButton extends StatefulWidget {
  @override
  _RetryButtonState createState() => _RetryButtonState();
}

class _RetryButtonState extends State<RetryButton> {
  String responseText = '';

  void makeRequest() async {
    final dio = Dio();
    final backOff = ExponentialBackOff()
      ..initialInterval = Duration(seconds: 1)  // 初始间隔时间
      ..maxInterval = Duration(seconds: 10)     // 最大间隔时间
      ..maxElapsedTime = Duration(minutes: 1);  // 最大总重试时间

    bool success = await backOff.retry(
      () async {
        try {
          Response response = await dio.get('https://api.example.com/data');
          setState(() {
            responseText = response.data.toString();
          });
          return true;  // 返回 true 表示成功
        } catch (e) {
          print('Request failed: $e');
          return false;  // 返回 false 表示失败,将触发重试
        }
      },
      onRetry: (attempt) {
        print('Retry attempt $attempt');
      },
      onCompletion: () {
        print('Completed all retry attempts');
      },
    );

    if (!success) {
      setState(() {
        responseText = 'Failed to fetch data after multiple attempts.';
      });
    }
  }

  @override
  Widget build(BuildContext context) {
    return Column(
      mainAxisAlignment: MainAxisAlignment.center,
      children: <Widget>[
        Text(responseText),
        SizedBox(height: 20),
        ElevatedButton(
          onPressed: makeRequest,
          child: Text('Fetch Data'),
        ),
      ],
    );
  }
}
在这个示例中:
- 我们使用
dio库来进行网络请求。 ExponentialBackOff被配置了一个初始间隔时间、最大间隔时间和最大总重试时间。retry方法用于执行带有重试逻辑的网络请求。如果请求失败(即catch块被触发),它会返回false并触发重试。onRetry回调会在每次重试时打印当前的重试次数。onCompletion回调会在所有重试尝试完成后执行,无论成功还是失败。
这样,你就可以在 Flutter 项目中使用 exponential_back_off 插件来实现带有指数退避算法的重试策略了。