


Flutter步进器插件cool_stepper_plus的使用
Flutter步进器插件cool_stepper_plus的使用
Cool Stepper Plus 是一个用于展示步骤序列的操作组件。它对于表单向导或引导页面非常有用。
该项目是从 Cool Stepper 派生出来的,因为我需要一个支持空安全的包,并且希望对这个伟大的组件进行持续开发。感谢 emrade 和所有帮助构建这个令人惊叹组件的开发者们。
截图
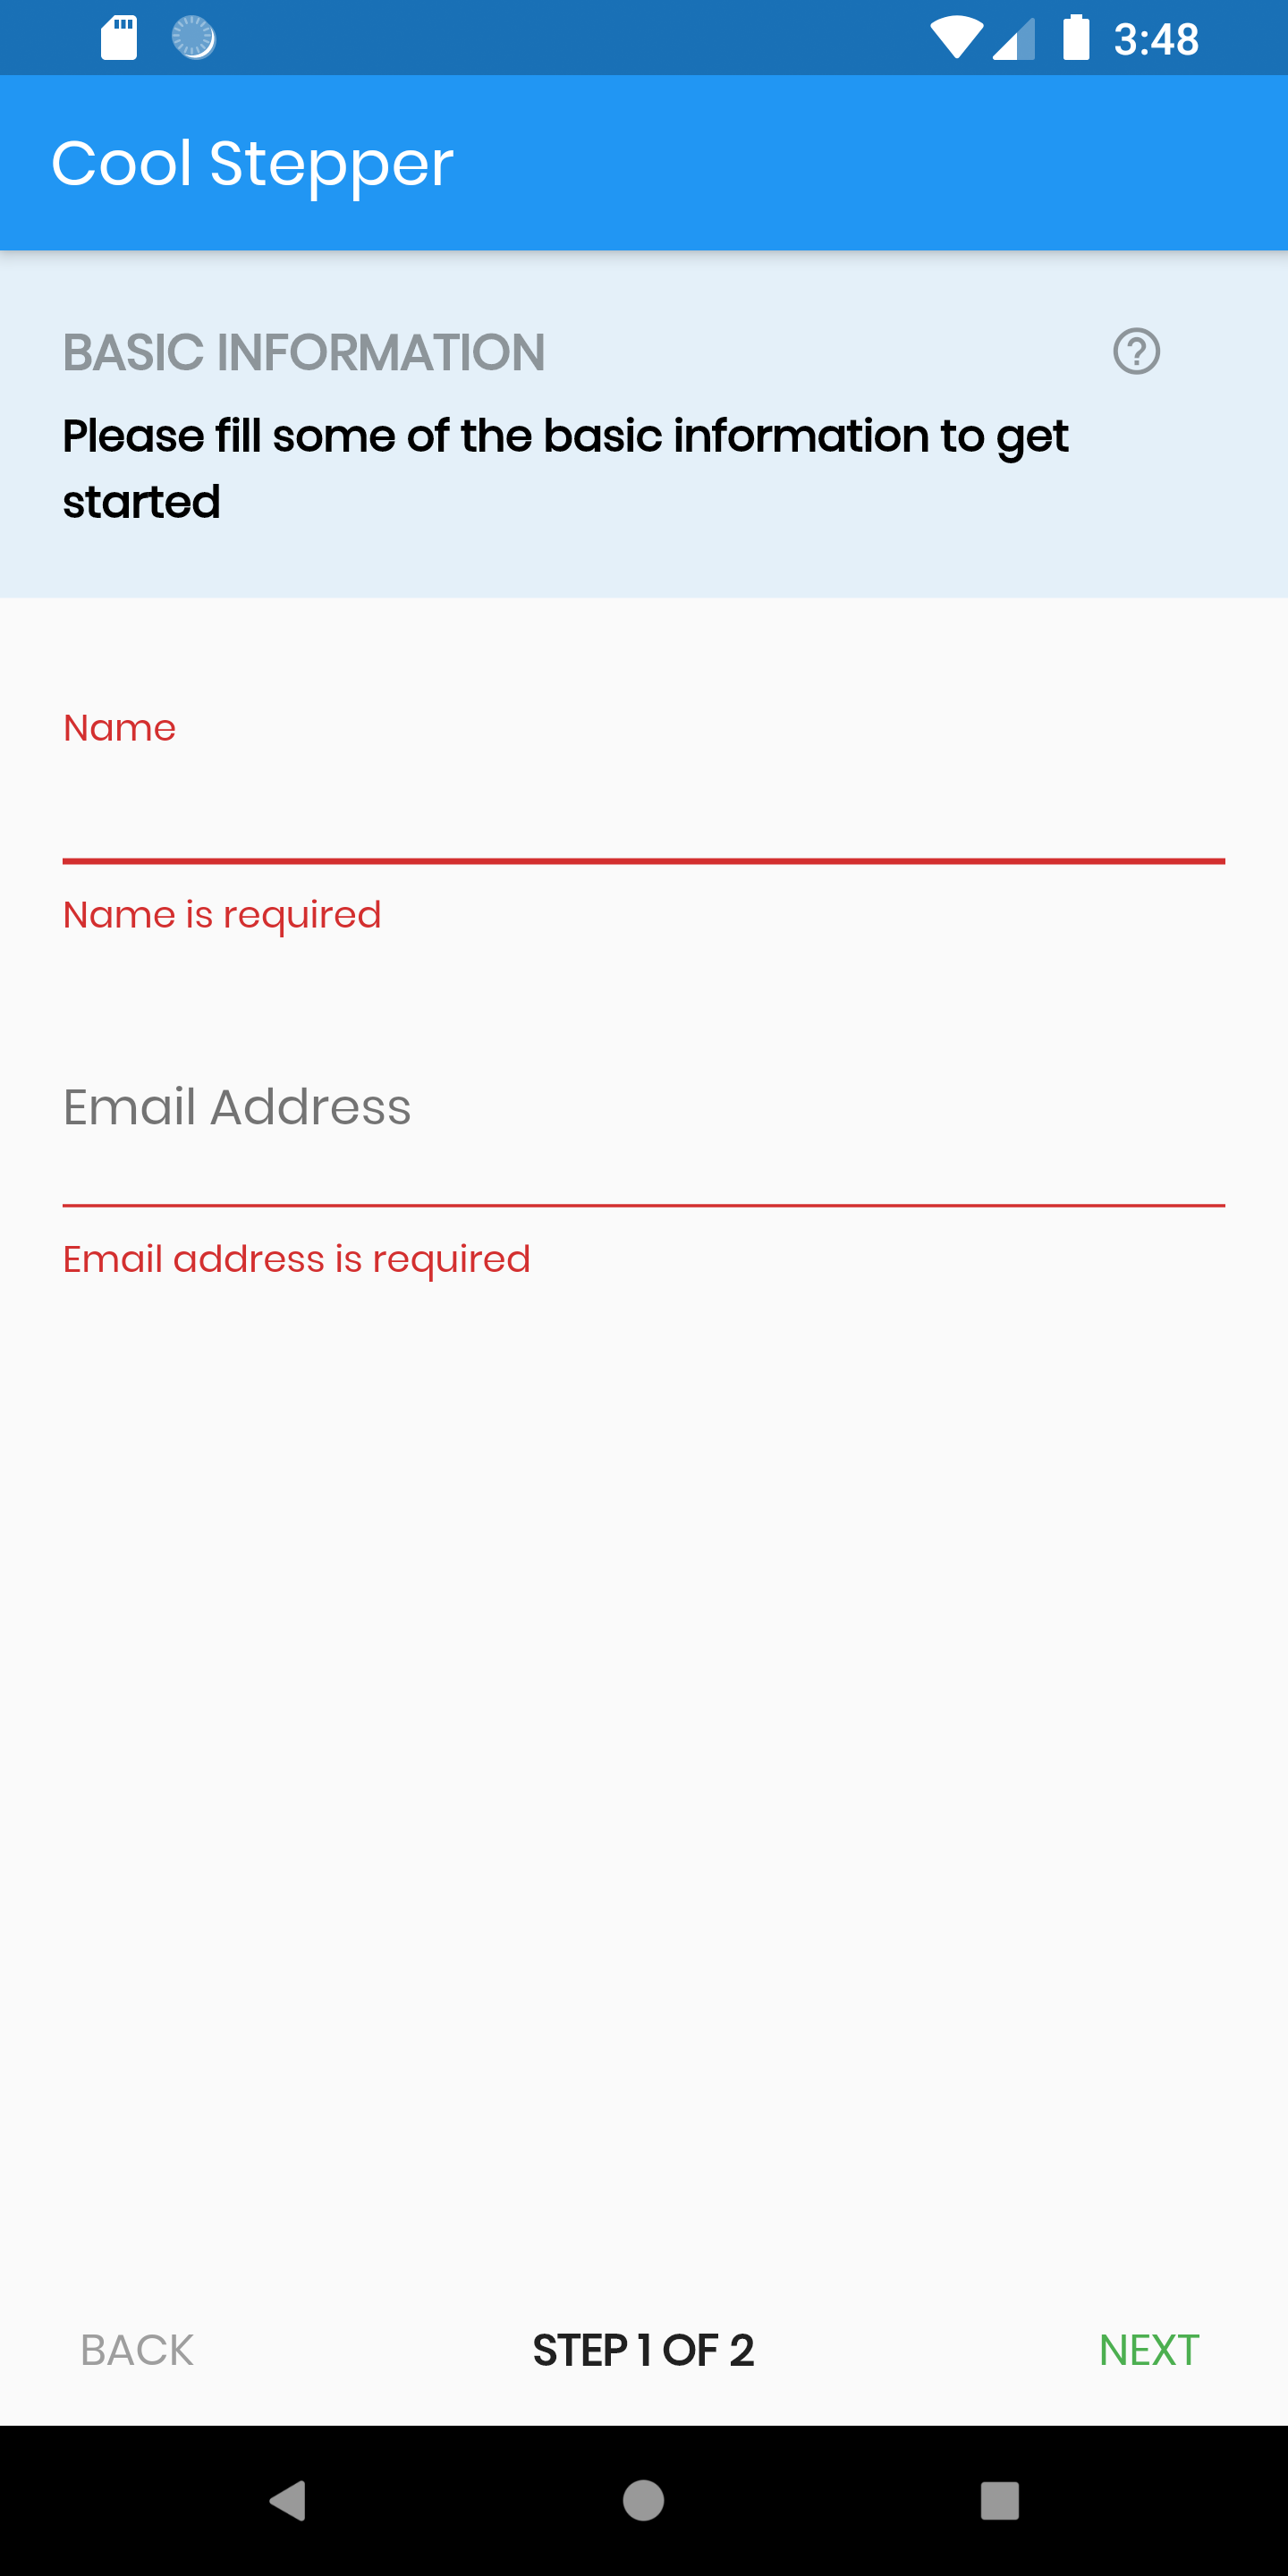
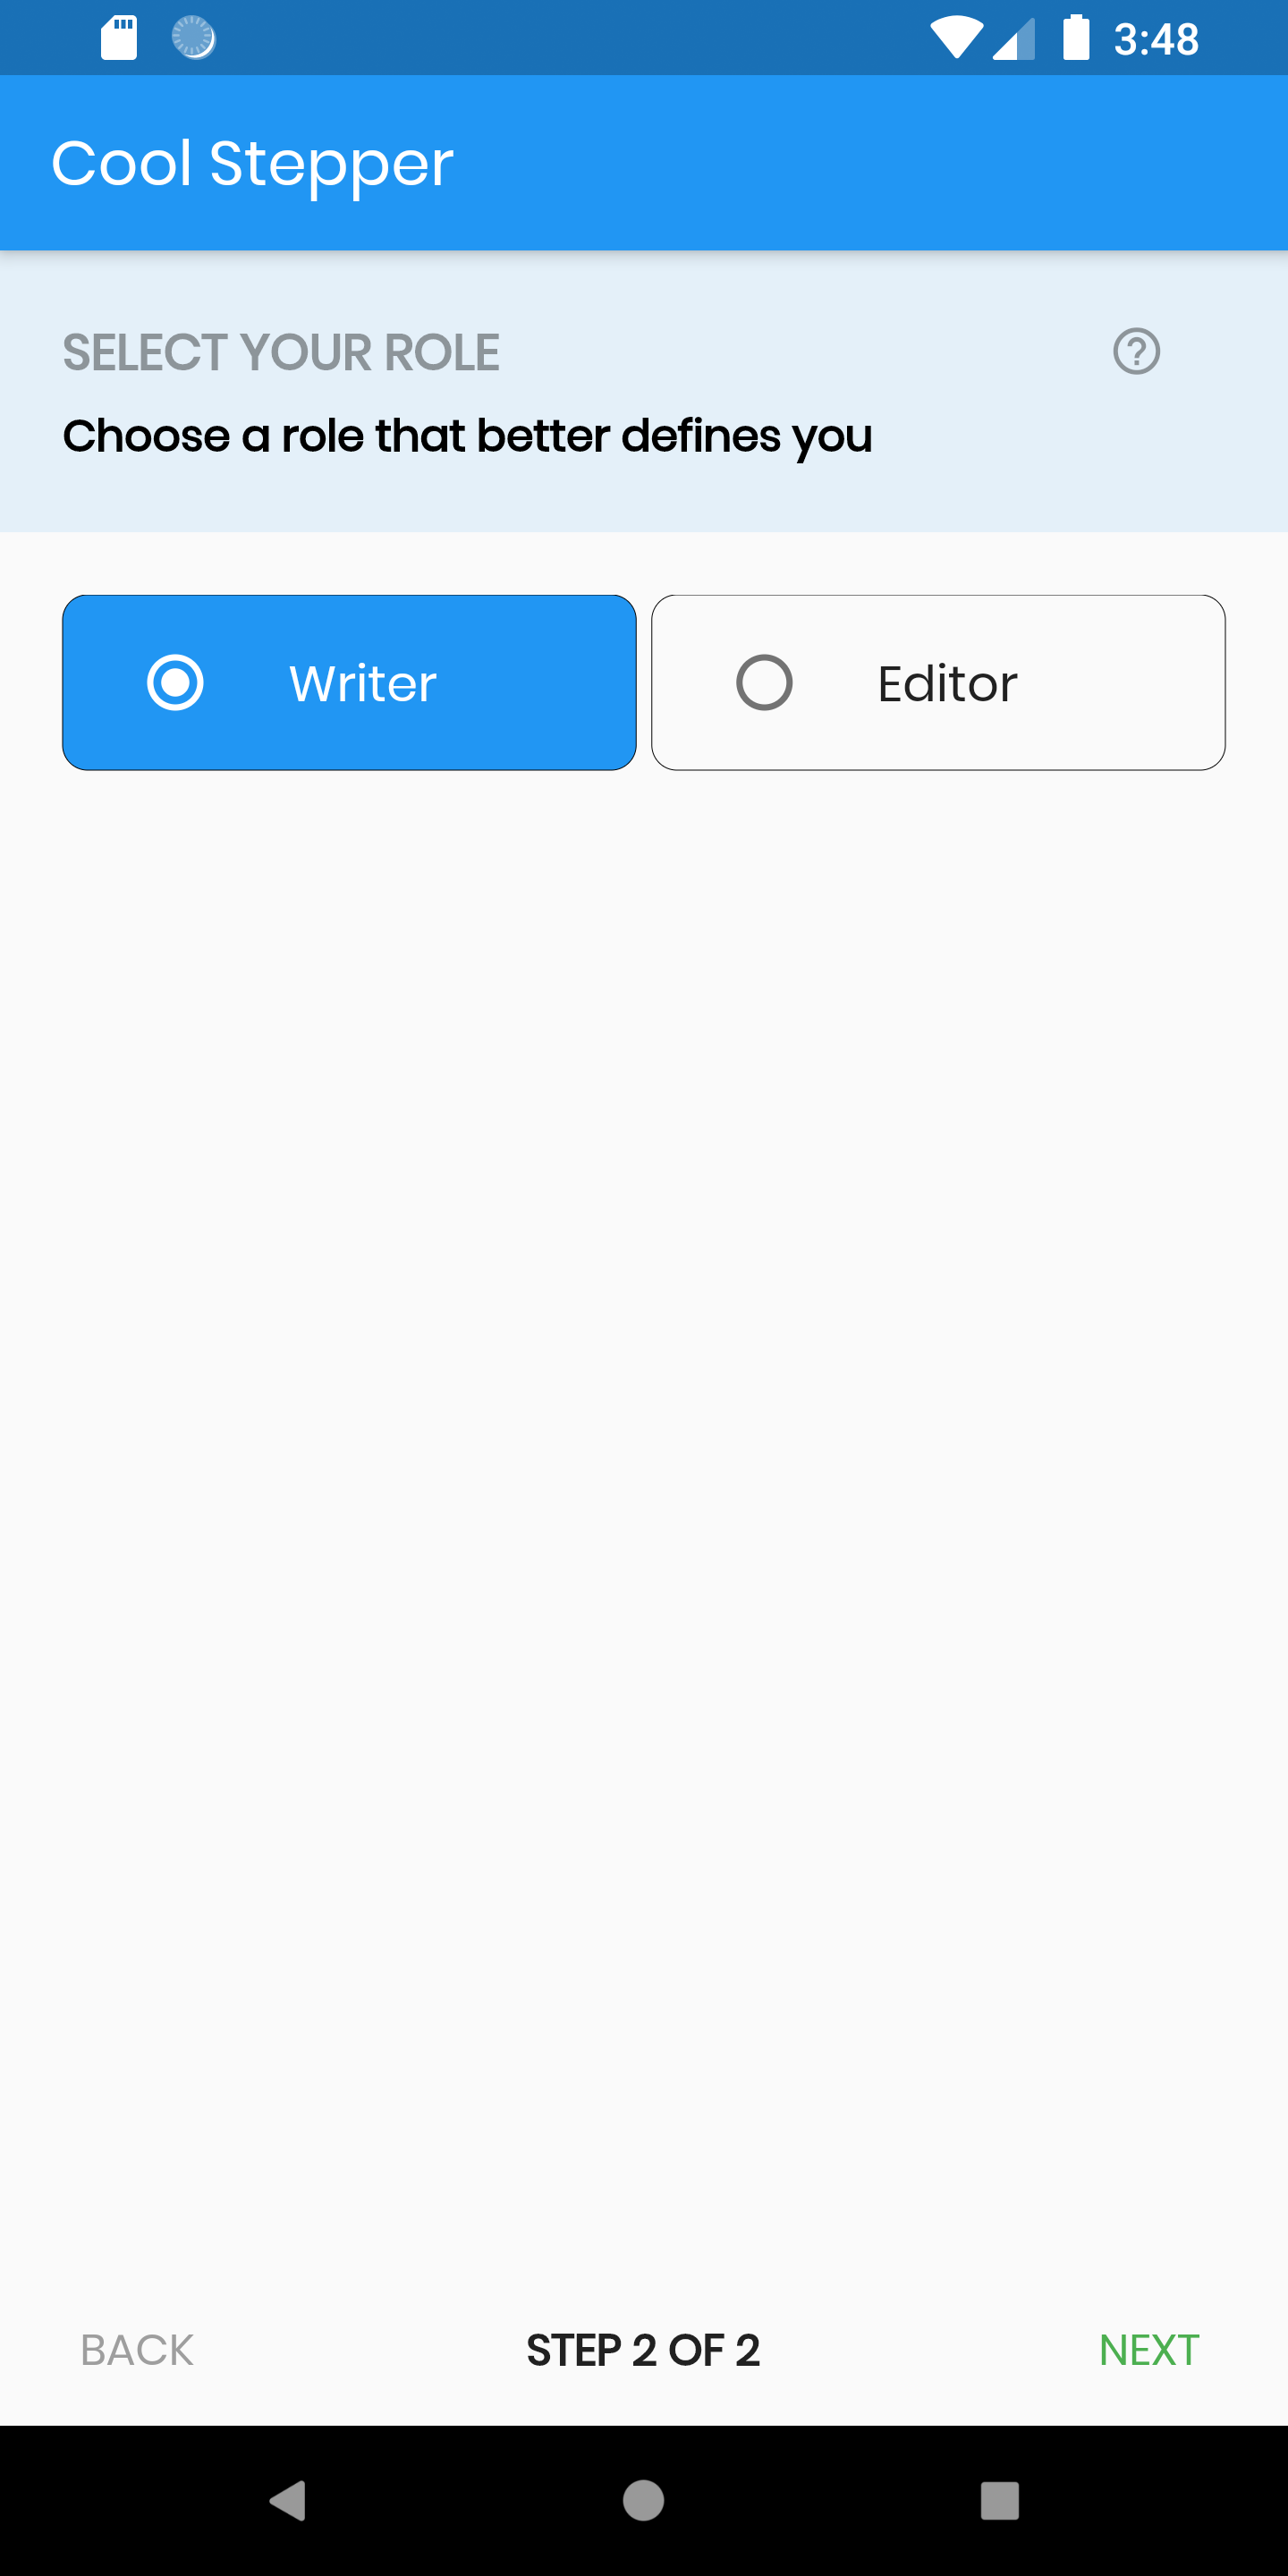
Header 启用并带有默认按钮
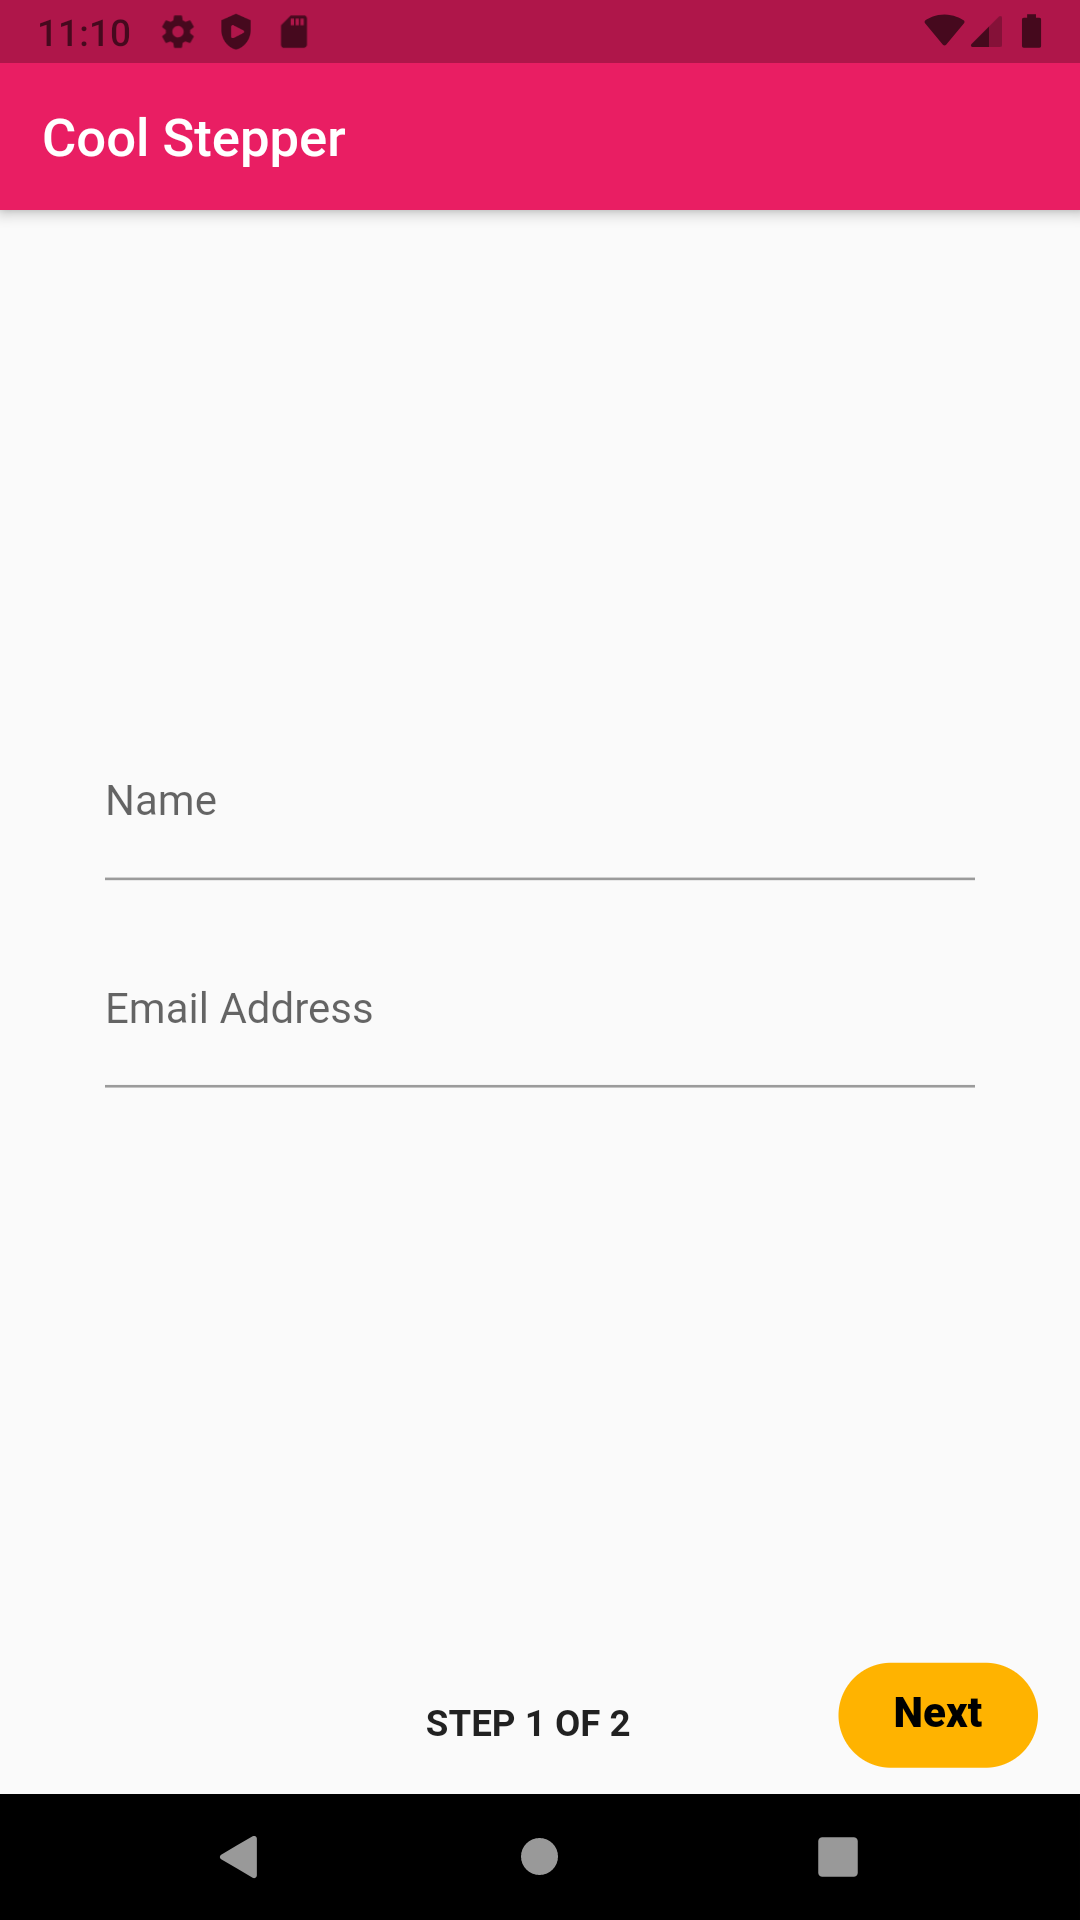
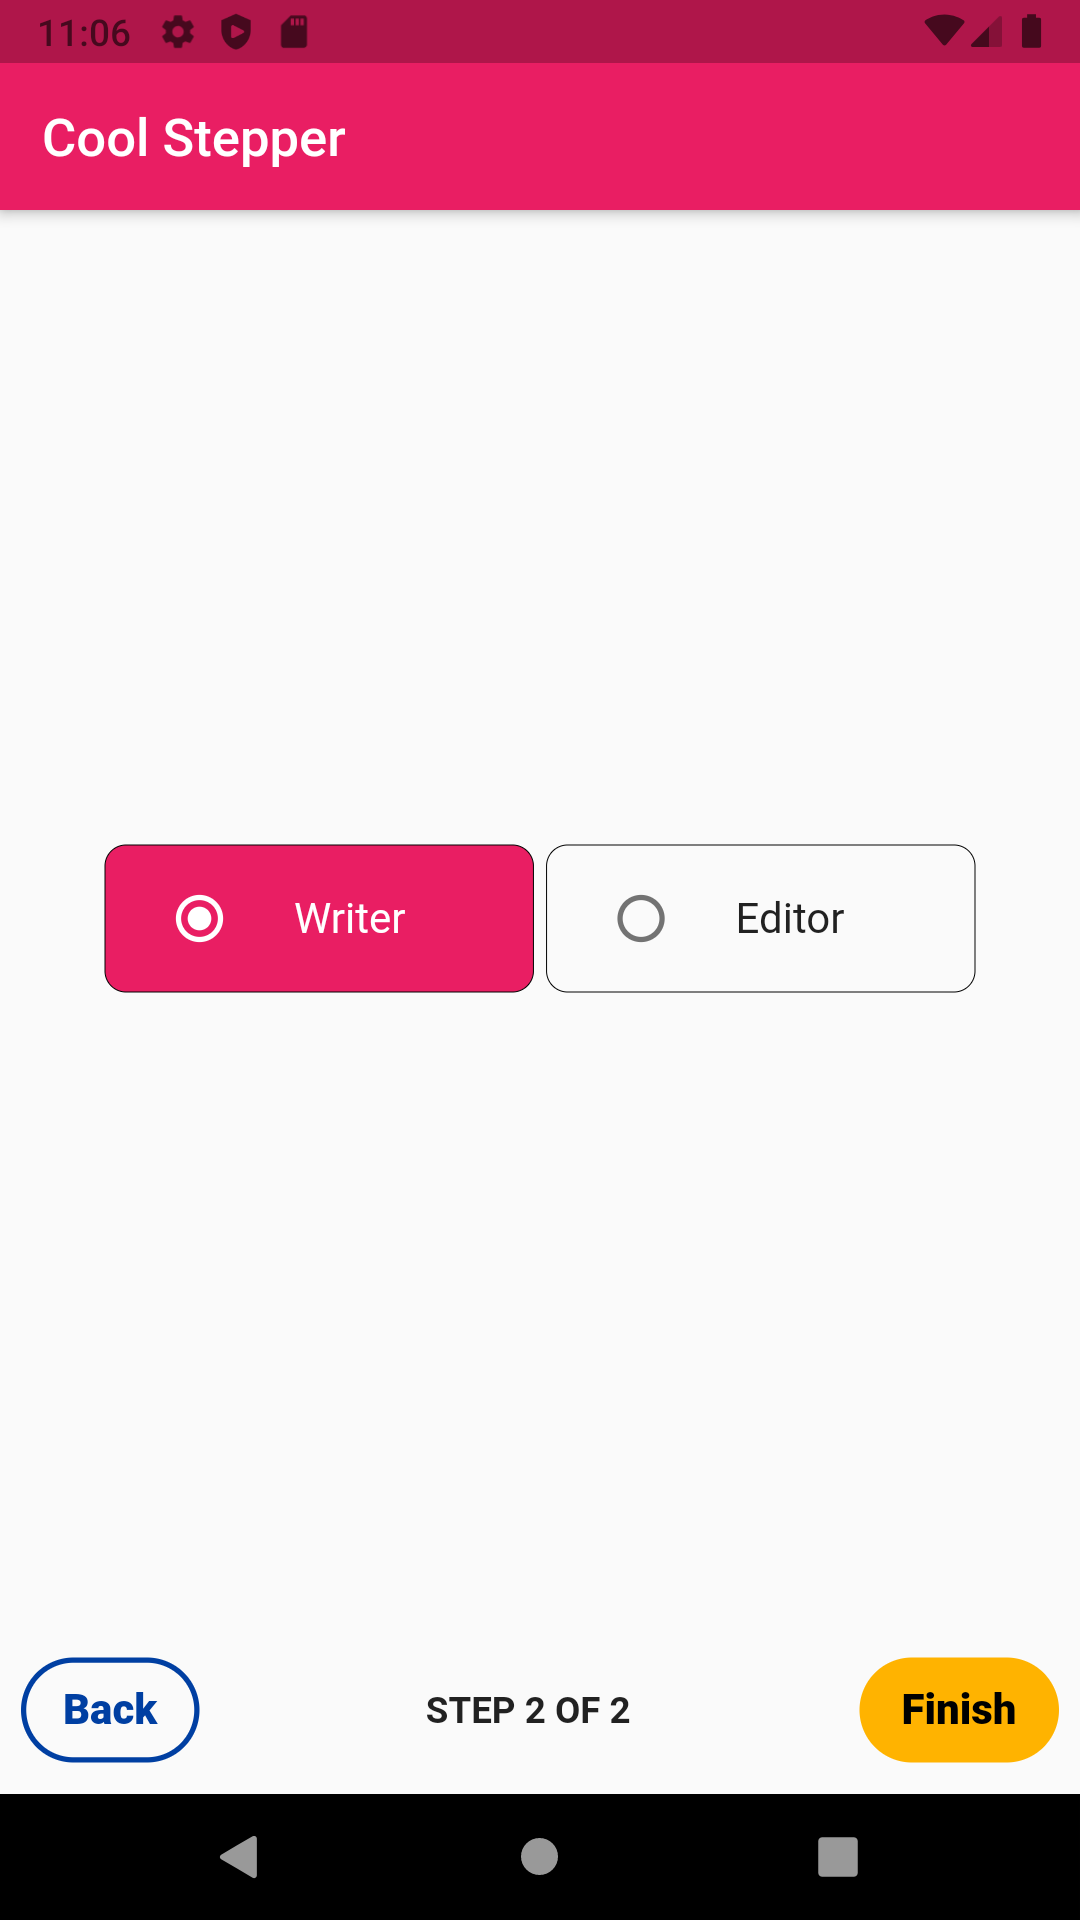
Header 禁用并带有自定义按钮(Ripple Button)
示例
CoolStepper(
  showErrorSnackbar: false,   // 如果为true,则如果表单验证失败,会显示snackbar。如果为false,则不会显示snackbar
  isHeaderEnabled: false,     // 如果为true,则显示header。如果为false,则禁用header
  onCompleted: () => {        // 提交信息到服务器
    // 提交逻辑
  },
  steps: [
    CoolStep(
      title: "基本信息",
      subtitle: "请填写一些基本信息以开始",
      content:  // 在这里添加获取基本信息的widget
    ),
    CoolStep(
      title: "添加地址",
      subtitle: "请填写您的地址",
      content: // 在这里添加获取地址信息的widget
    ),
    CoolStep(
      title: "添加个人照片",
      subtitle: "如果您愿意,请添加一张个人照片",
      content: // 在这里添加获取个人照片的widget
    ),
  ],
);
这是一个验证的例子。验证期望一个函数来验证整个表单。如果一切正常,返回null;否则返回错误字符串。
validation: () {
  if (!_formKey.currentState!.validate()) {
    return '请正确填写表单';   // 显示的错误消息
  }
  return null;
},
CoolStepper 类
| 属性 | 数据类型 | 描述 | 默认值 |
|---|---|---|---|
| onCompleted | Void Function() | @required - 所有步骤完成后触发的函数 | Null |
| steps | List | @required | Null |
| config | CoolStepperConfig | 帮助自定义您的步进器 | CoolStepperConfig(backText: “BACK”, nextText: “NEXT”, stepText: “STEP”, ofText: “OF”) |
| alignment | Alignment | 改变内容对齐方式,位于header(如果启用)和按钮之间 | Alignment.topCenter |
| isHeaderEnabled | bool | 构建每个步骤的header,默认值为true | true |
| showErrorSnackbar | bool | 验证失败时显示错误snackbar。错误来自验证函数的返回值 | false |
CoolStepperConfig 属性
| 属性 | 数据类型 | 描述 | 默认值 |
|---|---|---|---|
| backText | String | 应该显示在后退按钮上的文本 | BACK |
| nextText | String | 应该显示在下一步按钮上的文本 | NEXT |
| finalText | String | 应该显示在最后一步的下一步按钮上的文本 | FINISH |
| stepText | String | 描述进度的文本 | STEP |
| ofText | String | 描述进度的文本 | OF |
| headerColor | Color | header的背景颜色 | Theme.of(context).primaryColor.withOpacity(0.1) |
| iconColor | Color | 此为图标的颜色。警告: 将很快移除,请使用icon属性代替 | Color.black38 |
| icon | Icon | 此图标替换默认图标 | Icon(Icons.help_outline,size: 18,Colors.black38) |
| titleTextStyle | TextStyle | 标题文字的样式 | TextStyle(fontSize: 16.0,fontWeight: FontWeight.bold,color: Colors.black38) |
| titleTextAlign | TextAlign? | 标题文字的水平对齐方式 | null |
| subtitleTextStyle | TextStyle | 副标题文字的样式 | TextStyle(fontSize: 14.0,fontWeight: FontWeight.w600,color: Colors.black) |
| subtitleTextAlign | Alignment | 副标题文字的水平对齐方式 | Alignment.centerLeft |
| backTextList | List | 当提供时将覆盖backText。必须比步骤数量少一个,因为第一个步骤不会显示backText | null |
| nextTextList | List | 当提供时将覆盖nextText。必须比步骤数量少一个,因为finalText属性可以设置最后一步的下一步按钮值 | null |
待办事项
- 已添加 TextStyle 参数以自定义下一步按钮(2.2.0)
- 已添加 TextStyle 参数以自定义后退按钮(2.2.0)
- 未添加 TextStyle 参数以自定义步骤x of N
- 未添加选项以更改下一步按钮的背景颜色
如果有任何问题或不清楚的地方,请打开一个问题。
许可证
请参阅 LICENSE.md
完整示例代码
import 'package:cool_stepper_plus/cool_stepper_plus.dart';
import 'package:flutter/material.dart';
import 'package:another_flushbar/flushbar.dart';
import 'package:ripple_button/ripple_button.dart';

void main() {
  runApp(MyApp());
}

class MyApp extends StatelessWidget {
  [@override](/user/override)
  Widget build(BuildContext context) {
    return MaterialApp(
      title: 'Cool Stepper',
      theme: ThemeData(
        primarySwatch: Colors.pink,
        visualDensity: VisualDensity.adaptivePlatformDensity,
      ),
      debugShowCheckedModeBanner: false,
      home: MyHomePage(title: 'Cool Stepper'),
    );
  }
}

class MyHomePage extends StatefulWidget {
  MyHomePage({Key? key, this.title}) : super(key: key);

  final String? title;

  [@override](/user/override)
  _MyHomePageState createState() => _MyHomePageState();
}

class _MyHomePageState extends State<MyHomePage> {
  final _formKey = GlobalKey<FormState>();
  String? selectedRole = 'Writer';
  final TextEditingController _nameCtrl = TextEditingController();
  final TextEditingController _emailCtrl = TextEditingController();

  [@override](/user/override)
  Widget build(BuildContext context) {
    final steps = [
      CoolStep(
        title: '基本信息',
        subtitle: '请填写一些基本信息以开始',
        alignment: Alignment.center,
        content: Form(
          key: _formKey,
          child: Column(
            children: [
              _buildTextField(
                labelText: '姓名',
                validator: (value) {
                  if (value!.isEmpty) {
                    return '姓名是必填项';
                  }
                  return null;
                },
                controller: _nameCtrl,
              ),
              _buildTextField(
                labelText: '电子邮件地址',
                validator: (value) {
                  if (value!.isEmpty) {
                    return '电子邮件地址是必填项';
                  }
                  return null;
                },
                controller: _emailCtrl,
              ),
            ],
          ),
        ),
        validation: () {
          if (!_formKey.currentState!.validate()) {
            return '请正确填写表单';
          }
          return null;
        },
      ),
      CoolStep(
        title: '选择您的角色',
        subtitle: '选择一个能更好地定义您的角色',
        alignment: Alignment.center,
        content: Container(
          child: Row(
            children: [
              _buildSelector(
                context: context,
                name: '作家',
              ),
              SizedBox(width: 5.0),
              _buildSelector(
                context: context,
                name: '编辑者',
              ),
            ],
          ),
        ),
      ),
    ];

    void _onFinish() {
      final flush = Flushbar(
        message: '步骤完成!',
        flushbarStyle: FlushbarStyle.FLOATING,
        margin: EdgeInsets.all(8.0),
        borderRadius: BorderRadius.all(Radius.circular(8.0)),
        icon: Icon(
          Icons.check_circle_outline_outlined,
          size: 28.0,
          color: Colors.green,
        ),
        duration: Duration(seconds: 2),
        leftBarIndicatorColor: Colors.green,
      );
      flush.show(context);
    }

    final stepper = CoolStepper(
      showErrorSnackbar: true,
      hasRoundedCorner: true,
      onCompleted: _onFinish,
      contentPadding: EdgeInsets.only(left: 40, right: 40),
      config: CoolStepperConfig(
        finishButton: Container(
          child: RippleButton(
            text: '完成',
            type: RippleButtonType.AMBER,
            padding: EdgeInsets.only(right: 16, bottom: 6),
            style: RippleButtonStyle(
              width: 20,
            ),
            onPressed: () {},
          ),
        ),
        backButton: RippleButton(
          text: '后退',
          type: RippleButtonType.BLUE_TRANSLUCENT,
          padding: EdgeInsets.only(left: 16, bottom: 6),
          style: RippleButtonStyle(
            width: 24,
          ),
          onPressed: () {},
        ),
        nextButton: RippleButton(
          text: '下一步',
          type: RippleButtonType.AMBER,
          padding: EdgeInsets.only(right: 16, bottom: 6),
          style: RippleButtonStyle(
            width: 20,
          ),
          onPressed: () {},
        ),
      ),
      steps: steps,
    );

    return Scaffold(
      appBar: AppBar(
        title: Text(widget.title!),
      ),
      body: Container(
        child: stepper,
      ),
    );
  }

  Widget _buildTextField({
    String? labelText,
    FormFieldValidator<String>? validator,
    TextEditingController? controller,
  }) {
    return Padding(
      padding: const EdgeInsets.only(bottom: 20.0),
      child: TextFormField(
        decoration: InputDecoration(
          labelText: labelText,
        ),
        validator: validator,
        controller: controller,
      ),
    );
  }

  Widget _buildSelector({
    BuildContext? context,
    required String name,
  }) {
    final isActive = name == selectedRole;

    return Expanded(
      child: AnimatedContainer(
        duration: Duration(milliseconds: 200),
        curve: Curves.easeInOut,
        decoration: BoxDecoration(
          color: isActive ? Theme.of(context!).primaryColor : null,
          border: Border.all(
            width: 0,
          ),
          borderRadius: BorderRadius.circular(8.0),
        ),
        child: RadioListTile(
          value: name,
          activeColor: Colors.white,
          groupValue: selectedRole,
          onChanged: (String? v) {
            setState(() {
              selectedRole = v;
            });
          },
          title: Text(
            name,
            style: TextStyle(
              color: isActive ? Colors.white : null,
            ),
          ),
        ),
      ),
    );
  }
}
更多关于Flutter步进器插件cool_stepper_plus的使用的实战系列教程也可以访问 https://www.itying.com/category-92-b0.html


更多关于Flutter步进器插件cool_stepper_plus的使用的实战系列教程也可以访问 https://www.itying.com/category-92-b0.html
当然,以下是如何在Flutter项目中使用cool_stepper_plus插件的一个代码示例。cool_stepper_plus是一个增强版的步进器(Stepper)插件,它提供了更多自定义选项和更好的用户体验。
首先,确保你已经在pubspec.yaml文件中添加了cool_stepper_plus依赖:
dependencies:
  flutter:
    sdk: flutter
  cool_stepper_plus: ^最新版本号  # 请替换为实际最新版本号
然后运行flutter pub get来安装依赖。
接下来,在你的Flutter项目中,你可以按照以下方式使用CoolStepper:
import 'package:flutter/material.dart';
import 'package:cool_stepper_plus/cool_stepper_plus.dart';

void main() {
  runApp(MyApp());
}

class MyApp extends StatelessWidget {
  @override
  Widget build(BuildContext context) {
    return MaterialApp(
      title: 'Cool Stepper Plus Demo',
      theme: ThemeData(
        primarySwatch: Colors.blue,
      ),
      home: MyHomePage(),
    );
  }
}

class MyHomePage extends StatefulWidget {
  @override
  _MyHomePageState createState() => _MyHomePageState();
}

class _MyHomePageState extends State<MyHomePage> {
  int currentStep = 0;

  @override
  Widget build(BuildContext context) {
    return Scaffold(
      appBar: AppBar(
        title: Text('Cool Stepper Plus Demo'),
      ),
      body: Padding(
        padding: const EdgeInsets.all(16.0),
        child: CoolStepper(
          currentStep: currentStep,
          onStepTapped: (int step) {
            setState(() {
              currentStep = step;
            });
          },
          onStepContinue: () {
            if (currentStep < 2) {
              setState(() {
                currentStep += 1;
              });
            } else {
              // Handle the final step completion
              print('Completed all steps');
            }
          },
          onStepCancel: () {
            if (currentStep > 0) {
              setState(() {
                currentStep -= 1;
              });
            }
          },
          steps: [
            CoolStep(
              title: Text('Step 1: Introduction'),
              content: Text('This is the introduction step.'),
            ),
            CoolStep(
              title: Text('Step 2: User Information'),
              content: Column(
                crossAxisAlignment: CrossAxisAlignment.start,
                children: [
                  TextField(
                    decoration: InputDecoration(labelText: 'Name'),
                  ),
                  TextField(
                    decoration: InputDecoration(labelText: 'Email'),
                  ),
                ],
              ),
            ),
            CoolStep(
              title: Text('Step 3: Confirmation'),
              content: Text('Please confirm your details.'),
              isLastStep: true,
            ),
          ],
        ),
      ),
    );
  }
}
代码解释:
-
依赖导入:首先,在
pubspec.yaml文件中添加cool_stepper_plus依赖。 -
创建应用:
MyApp是一个简单的Flutter应用,它使用了Material主题。 -
主页面:
MyHomePage是一个有状态的Widget,它包含了一个CoolStepper组件。 -
CoolStepper:
currentStep:当前显示的步骤索引。onStepTapped:当用户点击某个步骤时调用的回调。onStepContinue:当用户点击继续按钮时调用的回调,通常用于前进到下一步。onStepCancel:当用户点击取消按钮时调用的回调,通常用于返回上一步。steps:一个CoolStep对象的列表,每个对象代表一个步骤。
-
CoolStep:每个步骤包括一个标题(
title),内容(content),以及一个标志位(isLastStep),用于指示这是否是最后一步。
这段代码展示了如何使用cool_stepper_plus插件来创建一个包含三个步骤的步进器。你可以根据需要自定义每个步骤的内容和逻辑。