Flutter UI组件库插件extrawest_ui_kit的使用
Flutter UI组件库插件extrawest_ui_kit的使用
插件简介
Extrawest UI Kit 是一个基于 Material 3 的 Flutter 包,提供了一套可定制的 UI 组件和布局。


DEMO

特性
-
基于 Material 3 的 Extrawest UI 组件
- 按钮(
Elevated、Filled、Text、Outlined、Icon) - 文本字段(Email、Password、Custom)
- 具有不同 Material 3 风格的文本小部件
- 按钮(
-
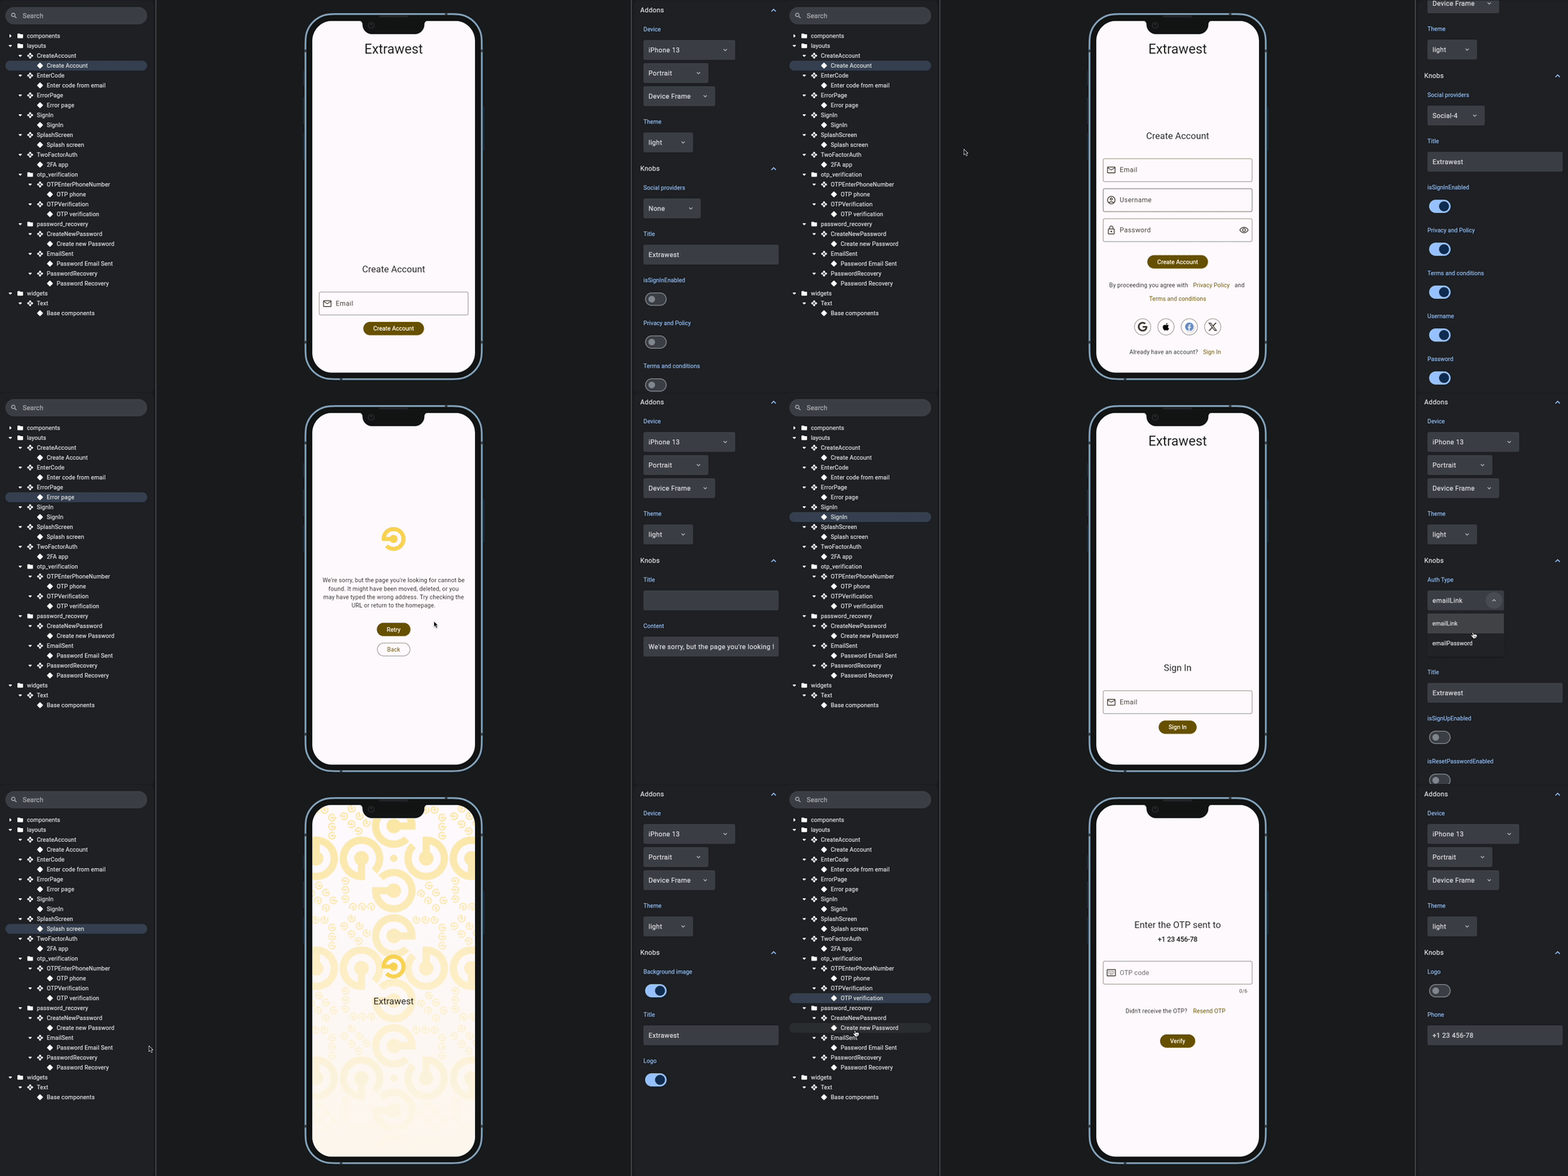
现成的布局,可以动态更改组件
- 登录布局(包含 Email、Password 输入框、密码恢复部分等)
- 注册账户布局(带文本字段验证)
- 密码重置:发送邮件链接、打开邮箱、创建新密码
- OTP 验证:输入手机号码、输入 OTP 码
- 两步验证应用
- 启动屏幕(包含 logo、标题、背景)
- 错误页面(包含 logo、标题、内容、重试和返回按钮)
- 联系我们发送页面(包含 logo、标题、内容、返回按钮)
- 无网络连接页面(包含 logo、标题、内容、重试按钮)
- 使用条款页面(包含 logo、标题、内容、返回按钮)
这些布局的优势在于它们自带了具有默认参数的内置组件,也可以根据应用程序的需求进行自定义。
使用方法
使用方法一:使用现成的布局并指定必要的参数
使用方法二:单独使用组件以达到自己的目的
可用的可定制组件
1. EWBaseButton
// 使用工厂构造函数创建填充按钮
EWBaseButton.filled(
  onPressed: () {},
  title: 'Sign In'
),

// 通过传递参数创建边框按钮
EWBaseButton(
  buttonType: Filled(), // 指定按钮类型为填充
  onPressed: () {},
  title : 'Sign In'
),
2. EWBaseTextFormField
// 使用带有自定义配置的基础文本字段
EWTextField(
  controller: controller,
  autoValidateMode: AutovalidateMode.always,
  keyboardType: TextInputType.phone,
  prefixIcon: const Icon(Icons.add),
  errorText: 'Error',
  cursorColor: Colors.red,
  suffixIcon: const Text('Clear'),
),
3. 基于 EWBaseTextFormField 的输入组件:EmailInput、PasswordInput
// Email输入组件
EmailInput(
  controller: emailController,
  hintText: 'Email Address',
  validator: (value) {
    if (value == null || value.isEmpty) {
      return 'Invalid email';
    }
    return null;
  },
),
4. 社交认证提供商按钮:Google、Apple、Facebook、X
// 使用社交按钮
AppleButton(
  showTitle: false,
  onTap: () {
    // 添加点击处理程序
  },
),
5. 具有各种 Material 3 缩放比例的文本小部件 (titleLarge, labelMedium, labelSmall 等)
// 访问 BuildContext 中的 TextStyle 并传递 TextScale 作为位置参数
Text(
  'Sign In',
  style: context.textStyle(TextScale.titleLarge),
),

// 也可以指定其他默认的 TextStyle 参数
Text(
  'Sign In',
  style: context.textStyle(
    TextScale.titleLarge,
    fontStyle: FontStyle.italic,
    color: Colors.black,
  ),
),
6. Logo
Logo(
  title: title,
  asset: 'path/to/asset',
),
可用的可定制布局
SignInCreateAccountPasswordRecoveryEmailSentCreateNewPasswordOTPEnterPhoneNumberOTPVerificationTwoFactorAuthSplashScreenErrorPageNoInternetConnectionContactUsTermsOfConditions
布局使用示例
SignIn 布局
import 'package:extrawest_ui_kit/extrawest_ui_kit.dart';
import 'package:extrawest_ui_kit_app/common/screens/sign_up.dart';
import 'package:flutter/material.dart';

class HomeScreen extends StatefulWidget {
  const HomeScreen({Key? key}) : super(key: key);

  @override
  State<HomeScreen> createState() => _HomeScreenState();
}

class _HomeScreenState extends State<HomeScreen> {
  final TextEditingController _emailController = TextEditingController();
  final TextEditingController _passwordController = TextEditingController();

  @override
  void dispose() {
    _emailController.dispose();
    _passwordController.dispose();
    super.dispose();
  }

  @override
  Widget build(BuildContext context) {
    return SignIn(
      emailController: _emailController,
      passwordController: _passwordController,
      useSafeArea: true,
      authType: AuthType.emailPassword,
      title: 'Test',
      isSignUpEnabled: true,
      isResetPasswordEnabled: true,
      isGuestEnabled: true,
      onCreateAccountTap: () =>
          Navigator.push(
            context,
            MaterialPageRoute(
              builder: (context) => const SignUpScreen(),
            ),
          ),
      onSignInTap: () =>
          ScaffoldMessenger.of(context).showSnackBar(
            const SnackBar(
              duration: Duration(seconds: 2),
              content: Text('Sign In Attempt'),
            ),
          ),
      onSignInAsGuestTap: () =>
          ScaffoldMessenger.of(context).showSnackBar(
            const SnackBar(
              duration: Duration(seconds: 2),
              content: Text('Sign In as Guest Tap'),
            ),
          ),
      onPasswordRecoveryTap: () =>
          ScaffoldMessenger.of(context).showSnackBar(
            const SnackBar(
              duration: Duration(seconds: 2),
              content: Text('Password recovery'),
            ),
          ),
      socialAuthProviders: [
        SocialAuthProviderElement(
          socialAuthProvider: SocialAuthProvider.facebook,
          onTap: () {
            ScaffoldMessenger.of(context).showSnackBar(
              const SnackBar(
                content: Text('Facebook login'),
              ),
            );
          },
        ),
        SocialAuthProviderElement(
          socialAuthProvider: SocialAuthProvider.google,
          onTap: () {
            ScaffoldMessenger.of(context).showSnackBar(
              const SnackBar(
                content: Text('Google login'),
              ),
            );
          },
        ),
        SocialAuthProviderElement(
          socialAuthProvider: SocialAuthProvider.x,
          onTap: () {
            ScaffoldMessenger.of(context).showSnackBar(
              const SnackBar(
                content: Text('X login'),
              ),
            );
          },
        ),
        SocialAuthProviderElement(
          socialAuthProvider: SocialAuthProvider.appleId,
          onTap: () {
            ScaffoldMessenger.of(context).showSnackBar(
              const SnackBar(
                content: Text('Apple login'),
              ),
            );
          },
        ),
      ],
    );
  }
}
OTPEnterPhoneNumber 布局
OTPEnterPhoneNumber(
  controller: TextEditingController(),
  logo: Image.asset('path/to/asset'),
  onSendPressed: () {
    // 添加逻辑
  },
);
ErrorPage 布局
ErrorPage(
  logo: Image.asset('path/to/asset'),
  title: 'Title',
  contentText: 'Enter content text here', // 如果未提供,则使用默认内容
  onRetryPressed: () {
    // 添加重试按钮点击处理程序
  },
  onBackPressed: () {
    // 添加返回按钮点击处理程序
  },
);
无网络连接页面
NoInternetConnection(
  appBar: EWAppBar.medium(
    title: 'No Internet Connection',
    isTitleCentered: false,
    actions: [
      IconButton(
        icon: const Icon(Icons.search),
        onPressed: () {},
      ),
    ],
    leading: IconButton(
      icon: const Icon(Icons.arrow_back),
      onPressed: () {
        Navigator.pop(context);
      },
    ),
    titleStyle: Theme.of(context).textTheme.headlineSmall,
  ),
  useSafeArea: true,
  logo: Image.asset(errorImg, package: 'extrawest_ui_kit'),
  contentText: 'Check your internet connection and try again',
  onBackPressed: () {},
  onRetryPressed: () {},
);
联系我们页面
DateInput(
  labelText: 'Date of Birth',
  hintText: 'Date of Birth',
  onDatePicked: (date) {
    // log('Date picked: $date');
  },
),

EWGenderCheckboxList(
  genderBlockTitle: 'Gender',
  onGenderChanged: (gender) {
    setState(() {
      selectedGender = gender;
    });
  },
  genderList: const ['Male', 'Female', 'Other', 'Prefer not to say'],
  selectedGender: selectedGender,
  isEnabled: true,
),

EWAvatarWidget(
  onImagePicked: (List<XFile>? files) {},
  pickImageCameraText: 'Use Camera',
  pickImageGalleryText: 'Use Gallery',
),

EWAddressPicker.fiveLines(
  appBar: EWAppBar.medium(
    title: 'User Profile',
    isTitleCentered: false,
    leading: IconButton(
      icon: const Icon(Icons.arrow_back),
      onPressed: () {
        Navigator.pop(context);
      },
    ),
    titleStyle: Theme.of(context).textTheme.headlineSmall,
  ),
  controllerAddressLine1: address1Controller,
  hintTextAddressLine1: 'Address Line 1',
  labelTextAddressLine1: 'Address Line 1',
  prefixIconAddressLine1: const Icon(Icons.location_on),
  controllerAddressLine2: address2Controller,
  hintTextAddressLine2: 'Address Line 2',
  labelTextAddressLine2: 'Address Line 2',
  prefixIconAddressLine2: const Icon(Icons.location_on),
  controllerZipCode: zipCodeController,
  hintTextZipCode: 'Zip Code',
  labelTextZipCode: 'Zip Code',
  prefixIconZipCode: const Icon(Icons.local_post_office_sharp),
  controllerState: stateController,
  hintTextState: 'State ',
  labelTextState: 'State ',
  hintTextCountry: 'Country',
  labelTextCountry: 'Country',
  prefixIconCountry: const Icon(Icons.location_city_outlined),
  prefixIconState: const Icon(Icons.house_outlined),
  controllerCountry: countryController,
  addressLine1FocusNode: FocusNode(),
  addressLine2FocusNode: FocusNode(),
  zipCodeFocusNode: FocusNode(),
  stateFocusNode: FocusNode(),
  countryFocusNode: FocusNode(),
  isEnabled: true,
  readOnly: true,
),

ContactUs(
  appBar: EWAppBar.medium(
    title: 'Support',
    isTitleCentered: false,
    actions: [
      IconButton(
        icon: const Icon(Icons.search),
        onPressed: () {
          Navigator.pop(context);
        },
      ),
    ],
    leading: IconButton(
      icon: const Icon(Icons.arrow_back),
      onPressed: () {},
    ),
    titleStyle: Theme.of(context).textTheme.headlineSmall,
  ),
  showMissingMessengerError: true,
  sendMessageButtonText: 'Send message',
  chooseMessengerTitle: 'Choose your preferred messenger',
  changeMessengerButtonText: 'Change preferred messenger',
  onContactTypeChanged: (MessengerType messengerType) {},
  onContactItemTap: (ContactActionableSchema contactActionableSchema) {},
  sendMessageScreenAppbarTitle: 'Send us a message',
  sendMessageHintText: 'Your message',
  actionableContactListItems: [
    ContactActionableSchema(
      schemaType: SchemaType.tel,
      value: '00000000000',
      description: 'For calls in Ukraine (free)',
      iconData: Icons.phone,
    ),
    ContactActionableSchema(
      schemaType: SchemaType.email,
      value: 'some_mail@mail.com',
      description: 'For calls in Ukraine (free)',
      iconData: Icons.phone,
    ),
    ContactActionableSchema(
      schemaType: SchemaType.website,
      value: 'https://flutter.dev',
      description: 'For calls from other countries',
      iconData: Icons.phone,
    ),
  ],
  messengerProviders: const [
    MessengerTypeElement(
      recipient: 'Telegram_user_id',
      title: 'Telegram',
      messengerType: MessengerType.telegram,
    ),
    MessengerTypeElement(
      title: 'Viber',
      messengerType: MessengerType.viber,
    ),
    MessengerTypeElement(
      title: 'Facebook',
      messengerType: MessengerType.facebook,
      recipient: 'Facebook_id',
    ),
  ],
);
更多关于Flutter UI组件库插件extrawest_ui_kit的使用的实战系列教程也可以访问 https://www.itying.com/category-92-b0.html
更多关于Flutter UI组件库插件extrawest_ui_kit的使用的实战系列教程也可以访问 https://www.itying.com/category-92-b0.html
当然,以下是一个关于如何在Flutter项目中使用extrawest_ui_kit插件的示例代码案例。这个插件提供了一系列预定义的UI组件,可以加快开发速度并保持应用的一致性。
首先,确保你已经在pubspec.yaml文件中添加了extrawest_ui_kit依赖:
dependencies:
  flutter:
    sdk: flutter
  extrawest_ui_kit: ^最新版本号  # 请替换为实际的最新版本号
然后,运行flutter pub get来安装依赖。
接下来,在你的Flutter应用中导入extrawest_ui_kit并使用其中的组件。以下是一个简单的示例,展示了如何使用其中的按钮和卡片组件:
import 'package:flutter/material.dart';
import 'package:extrawest_ui_kit/extrawest_ui_kit.dart';

void main() {
  runApp(MyApp());
}

class MyApp extends StatelessWidget {
  @override
  Widget build(BuildContext context) {
    return MaterialApp(
      title: 'ExtraWest UI Kit Demo',
      theme: ThemeData(
        primarySwatch: Colors.blue,
      ),
      home: Scaffold(
        appBar: AppBar(
          title: Text('ExtraWest UI Kit Demo'),
        ),
        body: Center(
          child: Column(
            mainAxisAlignment: MainAxisAlignment.center,
            children: <Widget>[
              // 使用ExtraWest UI Kit的按钮组件
              EWButton(
                title: 'Click Me',
                onPressed: () {
                  // 按钮点击事件处理
                  ScaffoldMessenger.of(context).showSnackBar(
                    SnackBar(content: Text('Button Clicked!')),
                  );
                },
                buttonStyle: EWButtonStyle.filled, // 按钮样式:实心
                buttonColor: Colors.blue, // 按钮颜色
                textColor: Colors.white, // 文字颜色
              ),
              SizedBox(height: 20),

              // 使用ExtraWest UI Kit的卡片组件
              EWCard(
                child: Padding(
                  padding: const EdgeInsets.all(16.0),
                  child: Column(
                    crossAxisAlignment: CrossAxisAlignment.start,
                    children: <Widget>[
                      Text(
                        'Card Title',
                        style: TextStyle(fontSize: 20, fontWeight: FontWeight.bold),
                      ),
                      SizedBox(height: 8),
                      Text(
                        'This is a sample card using ExtraWest UI Kit.',
                        style: TextStyle(fontSize: 16),
                      ),
                    ],
                  ),
                ),
              ),
            ],
          ),
        ),
      ),
    );
  }
}
在这个示例中:
- 我们导入了
extrawest_ui_kit包。 - 创建了一个简单的Flutter应用,包含一个应用栏和居中的两个组件:一个按钮和一个卡片。
EWButton组件用于创建一个按钮,设置了按钮的标题、点击事件处理函数、按钮样式、按钮颜色和文字颜色。EWCard组件用于创建一个卡片,卡片内部包含了一些文本信息。
请注意,实际使用时,你可能需要根据extrawest_ui_kit的文档来调整组件的属性,因为插件可能会更新并添加新的功能或属性。确保查阅最新的文档以获取最新信息。


