


Flutter屏幕锁定认证插件auth_screen_lock的使用
Flutter屏幕锁定认证插件auth_screen_lock的使用
Flutter插件auth_screen_lock提供了屏幕锁定的功能。通过输入密码可以解锁屏幕,还可以选择性地使用生物识别认证。
功能展示
竖屏视图
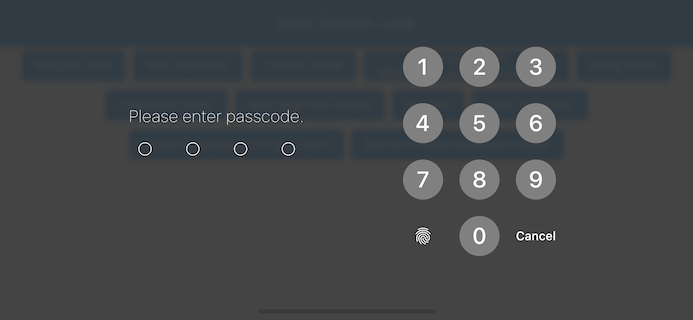
横屏视图
特性
- 支持指定密码长度
- 可以更改“取消”和“删除”按钮的样式
- 根据设备大小和方向优化UI
- 可禁用取消功能
- 支持生物识别(依赖
local_auth插件) - 生物识别可以在首次启动时显示
- 提供解锁回调
- 可自定义密码不匹配事件
- 可限制最大重试次数
使用方法
简单示例
如果输入的密码与correctString相同,则自动关闭屏幕。
import 'package:flutter_screen_lock/flutter_screen_lock.dart';

screenLock(
  context: context,
  correctString: '1234',
);
阻止用户取消
提供一个无法取消的屏幕锁。
import 'package:flutter_screen_lock/flutter_screen_lock.dart';

screenLock(
  context: context,
  correctString: '1234',
  canCancel: false,
);
创建密码
允许用户创建新密码并进行确认。
import 'package:flutter_screen_lock/flutter_screen_lock.dart';

screenLockCreate(
  context: context,
  onConfirmed: (value) => print(value), // 在此处存储新密码
);
控制创建状态
import 'package:flutter_screen_lock/flutter_screen_lock.dart';

final inputController = InputController();

screenLockCreate(
  context: context,
  inputController: inputController,
);

// 在其他地方...
inputController.unsetConfirmed(); // 重置并重新确认输入
使用生物识别
在pubspec.yaml中添加local_auth包。
它包括一个示例,在didOpened中调用生物识别。
import 'package:flutter_screen_lock/flutter_screen_lock.dart';
import 'package:local_auth/local_auth.dart';
import 'package:flutter/material.dart';
Future<void> localAuth(BuildContext context) async {
final localAuth = LocalAuthentication();
final didAuthenticate = await localAuth.authenticateWithBiometrics(
localizedReason: '请进行身份验证');
if (didAuthenticate) {
Navigator.pop(context);
}
}
screenLock(
context: context,
correctString: '1234',
customizedButtonChild: Icon(Icons.fingerprint),
customizedButtonTap: () async => await localAuth(context),
didOpened: () async => await localAuth(context),
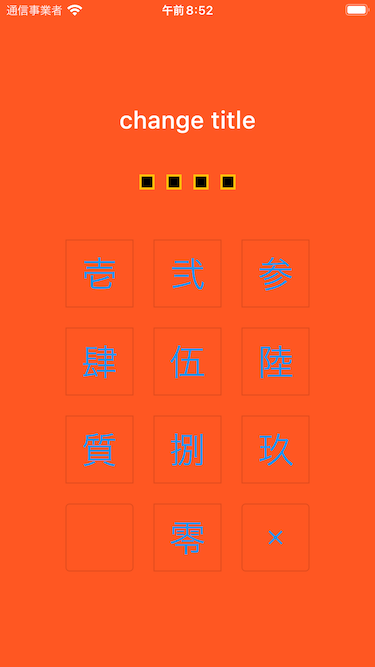
);完全自定义
你可以自定义屏幕锁的各个方面。以下是一个示例:
import 'package:flutter/material.dart';
import 'package:flutter_screen_lock/flutter_screen_lock.dart';

screenLockCreate(
  context: context,
  title: const Text('更改标题'),
  confirmTitle: const Text('更改确认标题'),
  onConfirmed: (value) => Navigator.of(context).pop(),
  config: const ScreenLockConfig(
    backgroundColor: Colors.deepOrange,
  ),
  secretsConfig: SecretsConfig(
    spacing: 15, // 或使用 spacingRatio
    padding: const EdgeInsets.all(40),
    secretConfig: SecretConfig(
      borderColor: Colors.amber,
      borderSize: 2.0,
      disabledColor: Colors.black,
      enabledColor: Colors.amber,
      height: 15,
      width: 15,
      build: (context,
              {required config, required enabled}) =>
          Container(
        decoration: BoxDecoration(
          shape: BoxShape.rectangle,
          color: enabled
              ? config.enabledColor
              : config.disabledColor,
          border: Border.all(
            width: config.borderSize,
            color: config.borderColor,
          ),
        ),
        padding: const EdgeInsets.all(10),
        width: config.width,
        height: config.height,
      ),
    ),
  ),
  keyPadConfig: KeyPadConfig(
    buttonConfig: StyledInputConfig(
      textStyle:
          StyledInputConfig.getDefaultTextStyle(context)
              .copyWith(
        color: Colors.orange,
        fontWeight: FontWeight.bold,
      ),
      buttonStyle: OutlinedButton.styleFrom(
        shape: const RoundedRectangleBorder(),
        backgroundColor: Colors.deepOrange,
      ),
    ),
    displayStrings: [
      '零',
      '壱',
      '弐',
      '参',
      '肆',
      '伍',
      '陸',
      '質',
      '捌',
      '玖'
    ],
  ),
  cancelButton: const Icon(Icons.close),
  deleteButton: const Icon(Icons.delete),
);
版本迁移
8.x 到 9 迁移
- 将参数
screenLockConfig更改为config - 将参数
keyPadConfig更改为config
7.x 到 8 迁移
- 将所有回调名称从
didSomething更改为onSomething - 将
screenLock中的confirm: true更改为screenLockCreate - 将
ScreenLock中的confirm: true更改为ScreenLock.create - 替换
StyledInputConfig为KeyPadButtonConfig - 替换
spacingRatio为固定值spacing在Secrets中
6.x 到 7 迁移
- 需要dart >= 2.17 和 Flutter 3.0
- 替换
InputButtonConfig为KeyPadConfig - 将
delayChild更改为delayBuilder。delayBuilder不再显示在一个新屏幕上,而是位于Secrets上方。 - 在
secretsBuilder中接受BuildContext
5.x 到 6 迁移
ScreenLock不再内部使用Navigator.pop。开发者应在需要时手动弹出。- 如果
onUnlocked为null,screenLock调用将自动弹出。
4.x 到 5 迁移
- 导入名称已更改:
更改为:import 'package:flutter_screen_lock/functions.dart';import 'package:flutter_screen_lock/flutter_screen_lock.dart';


更多关于Flutter屏幕锁定认证插件auth_screen_lock的使用的实战系列教程也可以访问 https://www.itying.com/category-92-b0.html
auth_screen_lock 是一个 Flutter 插件,用于在应用程序中实现屏幕锁定功能,通常用于需要用户进行身份验证的场景,如 PIN 码、密码或生物识别认证。以下是如何使用 auth_screen_lock 插件的基本步骤:
1. 添加依赖
首先,在 pubspec.yaml 文件中添加 auth_screen_lock 插件的依赖:
dependencies:
  flutter:
    sdk: flutter
  auth_screen_lock: ^1.0.0  # 请使用最新版本
然后运行 flutter pub get 来安装依赖。
2. 导入包
在需要使用 auth_screen_lock 的 Dart 文件中导入包:
import 'package:auth_screen_lock/auth_screen_lock.dart';3. 使用 AuthScreenLock 组件
AuthScreenLock 是一个小部件,你可以将其嵌入到你的应用程序中。以下是一个简单的示例,展示如何使用 AuthScreenLock 来实现 PIN 码认证:
import 'package:flutter/material.dart';
import 'package:auth_screen_lock/auth_screen_lock.dart';

void main() {
  runApp(MyApp());
}

class MyApp extends StatelessWidget {
  @override
  Widget build(BuildContext context) {
    return MaterialApp(
      home: AuthScreenLock(
        correctString: '1234', // 正确的 PIN 码
        onUnlocked: () {
          // 认证成功后的回调
          print('Unlocked!');
          Navigator.of(context).pushReplacement(
            MaterialPageRoute(builder: (context) => HomeScreen()),
          );
        },
        canBiometric: true, // 是否启用生物识别认证
        biometricAuthenticate: () async {
          // 生物识别认证逻辑
          return true; // 返回 true 表示认证成功
        },
        biometricTitle: 'Use biometric to unlock', // 生物识别认证的标题
        biometricButtonTitle: 'Biometric', // 生物识别认证按钮的标题
        title: 'Enter your PIN', // 认证界面的标题
        confirmTitle: 'Confirm your PIN', // 确认 PIN 码的标题
        inputTitle: 'Enter PIN', // 输入 PIN 码的标题
        wrongCodeText: 'Wrong PIN, try again', // 错误 PIN 码的提示
        deleteButtonText: 'Delete', // 删除按钮的文本
        cancelButtonText: 'Cancel', // 取消按钮的文本
        onCancel: () {
          // 取消认证后的回调
          print('Cancelled!');
        },
      ),
    );
  }
}

class HomeScreen extends StatelessWidget {
  @override
  Widget build(BuildContext context) {
    return Scaffold(
      appBar: AppBar(
        title: Text('Home'),
      ),
      body: Center(
        child: Text('Welcome to the Home Screen!'),
      ),
    );
  }
}
4. 配置生物识别认证
如果你希望启用生物识别认证(如指纹或面部识别),你需要配置 canBiometric 和 biometricAuthenticate 参数。biometricAuthenticate 是一个异步函数,用于执行生物识别认证逻辑。你可以使用 local_auth 插件来实现生物识别认证。
首先,添加 local_auth 插件的依赖:
dependencies:
  local_auth: ^2.0.0  # 请使用最新版本
然后,在 biometricAuthenticate 中使用 local_auth 进行认证:
import 'package:local_auth/local_auth.dart';

final LocalAuthentication auth = LocalAuthentication();

biometricAuthenticate: () async {
  bool authenticated = false;
  try {
    authenticated = await auth.authenticate(
      localizedReason: 'Authenticate to unlock the app',
      options: const AuthenticationOptions(
        biometricOnly: true,
      ),
    );
  } catch (e) {
    print(e);
  }
  return authenticated;
},