HarmonyOS 鸿蒙Next基础(四)- HarmonyOS ArkTs 组件状态
HarmonyOS 鸿蒙Next基础(四)- HarmonyOS ArkTs 组件状态 概述:
ArkTS作为一种声明式UI,它特点是状态驱动UI更新。界面交互或者有外部事件触发状态改变,状态变化组件就触发更新。
ArKTS提供了多种装饰器来修饰变量,使用装饰器修饰的变量称状态变量
| 场景 | 装饰器 |
|---|---|
| 组件内的状态管理 | @State |
| 从父组件单项同步状态 | @Prop |
| 与父组件双向同步状态 | @Link |
| 跨组件层级向同步状态 | @Provide和@Consume |
| 嵌套类对象属性变化 | @Observed和@ObjectLink |
前4个是组件内状态修饰符。最后一个是实际开发中,应用会根据需要封装数据。如何需要观察嵌套类对象属性变化,需要使用@Observed和@ObjectLink装饰器,这两个会做单独章节记录。因为前面4个装饰器只能观察到对象的第一层属性变化。下面详细介绍。
当状态改变,需要对状态进行监听做一些响应的操作是,可以使用@Watch装饰器来修饰状态。跟Vue的Watch监听很像。后面文章会详细介绍。
@State修饰符:组件内的状态
使用@State装饰器定义的变量,当其状态改变时,会引起相关组件的渲染刷新。
案例

[@Entry](/user/Entry)
@Component
struct Index {
  [@State](/user/State) message: string = 'Hello World'

  build() {
    Row() {
      Column() {
        Text(this.message)
          .fontSize(30)
          .fontWeight(FontWeight.Bold)
        Button("点击")
          .type(ButtonType.Capsule)
          .width(120)
          .margin({
            top: '60vp'
          })
          .onClick(event => {
            this.message = "Hello HarmonyOS";
          })
      }
      .width('100%')
    }
    .height('100%')
  }
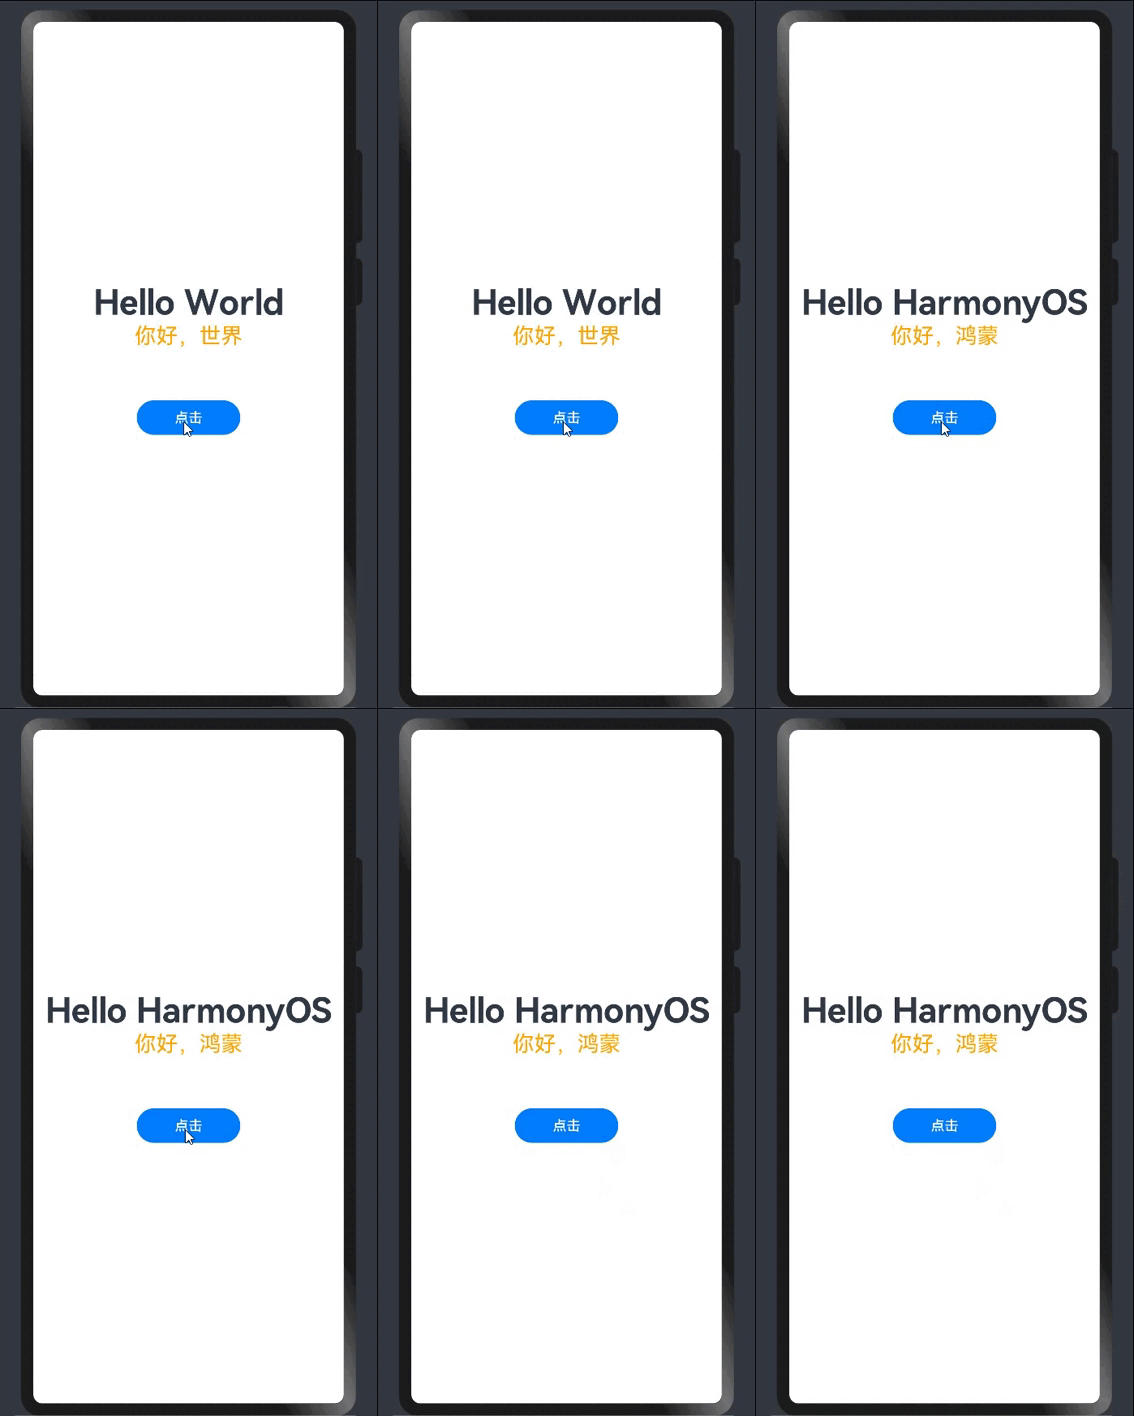
}可以看到当我们点击Button时候,@State定义的变量message从新定义为Hello HarmonyOS,并且UI也跟新了,类似React的useState()或Vue3的ref()和reactive()。
@Prop修饰符: 父子单向同步
Prop是组件和父组件建立通行的方式。当父组件的@State修饰符定义的变量可以传递给我子组件,并在子组件内的@Prop接收。这里如果是学过Vue的前端小伙伴很容易理解。
特点:
- 单向数据流;
- 定义不用默认赋值;
- 父子组件定义类型必须相同;
- 子组件允许修改,但不会同步回父组件;
- 父子组件同时修改,父组件值覆盖子组件值;
注:@Prop装饰器不能在@Entry装饰的自定义组件中使用。
案例:

父组件:
import ComponentA from '../view/ComponentA'
[@Entry](/user/Entry)
@Component
struct Index {
  [@State](/user/State) message: string = 'Hello World'
  [@State](/user/State) describe: string = "你好,世界";
  build() {
    Row() {
      Column() {
        ComponentA({
          message: this.message,
          describe: this.describe
        })
        Button("点击")
          .type(ButtonType.Capsule)
          .width(120)
          .margin({
            top: '60vp'
          })
          .onClick(event => {
            this.message = "Hello HarmonyOS";
            this.describe = "你好,鸿蒙";
          })
      }
      .width('100%')
    }
    .height('100%')
  }
}
子组件:
@Component
export default struct ComponentA {
  [@Prop](/user/Prop) message: string;
  [@Prop](/user/Prop) describe: string;
  build(){
    Column(){
      Text(this.message)
        .fontSize(40)
        .fontWeight(FontWeight.Bold)
      Text(this.describe)
        .fontSize(25)
        .fontColor(Color.Orange)
    }
  }
}定义一个ComponentA的子组件,并在父组件中把message和describe两个变量传递进去。点击按钮改变变量内容。子组件接收到父组件@State变量的变化,并更新UI。
@Link修饰符:父子双向同步
@Link修饰的变量与父组件中对应的数据源建立双向数据绑定。就是不光父组件修改后,子组件跟着变化,子组件修改后,父组件也会同步跟着变化。
注意:@Link只能父子组件之间相互传递,不能跨组件。子组件在定义@Link装饰器变量接收时候,不能初始化。而且@Link装饰器不能在@Entry装饰的自定义组件中使用。
案例:

父组件:
Column() {
        Text(this.message)
          .fontSize(40)
          .fontWeight(FontWeight.Bold)
        Text(this.cnMsg)
          .fontSize(25)
          .fontColor(Color.Orange)
        Button("PageAButton")
          .type(ButtonType.Capsule)
          .width(120)
          .margin({
            top: '20vp'
          })
          .onClick(event => {
            this.message = "Hello HarmonyOS";
            this.cnMsg = "你好,鸿蒙";
          })
        componentB({
          message: $message,
          cnMsg: $cnMsg
        })
      }
      .width('100%')
子组件:
@Component
export default struct ComponentB {
  [@Link](/user/Link) message: string;
  [@Link](/user/Link) cnMsg: string;
  build(){
    Column(){
      Button("ComponentB")
        .type(ButtonType.Capsule)
        .width(120)
        .margin({
          top: '6vp'
        })
        .onClick(event => {
          this.message = 'be way ahead';
          this.cnMsg = "遥遥领先";
        })
    }
  }
}先定义@State定义两个变量,并传递给子组件componentB。在componentB种我们使用@Link去接手这两个变量。这里注意我们传递给我componentB的时候,使用$符号,不能使用this。在父组件里我们点击按钮。文字变成"你好,鸿蒙"。在点击子组件时文字变成了"遥遥领先"。
@Provide装饰器和@Consume装饰器:与后代组件上向同步
@Proviede和@Comsume相较于前面的@Link跟进一步,可以父子,父孙(重孙…)的之间的数据双向同步能力。更准确讲就是可以在多个层阶之间传递的能力。
注意:
- @Provide定义在祖先节点上,@Consume定义在后代组件上。它俩是双向同步的,它俩是双向同步的,它俩是双向同步的,重要的事情说三遍。
- @Provide和@Consume可以通过相同的变量或者相同的变量别名,变量类型必须相同。
别名:常量字符串,可选
指定了别名,则通过别名来绑定变量;如果没指定别名,则通过变量名绑定变量。
// 通过相同的变量名绑定
[@Provide](/user/Provide) a: number = 0;
[@Consume](/user/Consume) a: number;

// 通过相同的变量别名绑定
[@Provide](/user/Provide)('a') b: number = 0;
[@Consume](/user/Consume)('a') c: number;相同的变量名或相同变量别名时,@Provide和@Consume修饰的变量是一对多的关系。但允许在同一个自定义组件内,包括其子组件中声明多个同名或者同别名的@Provide装饰的变量。
案例
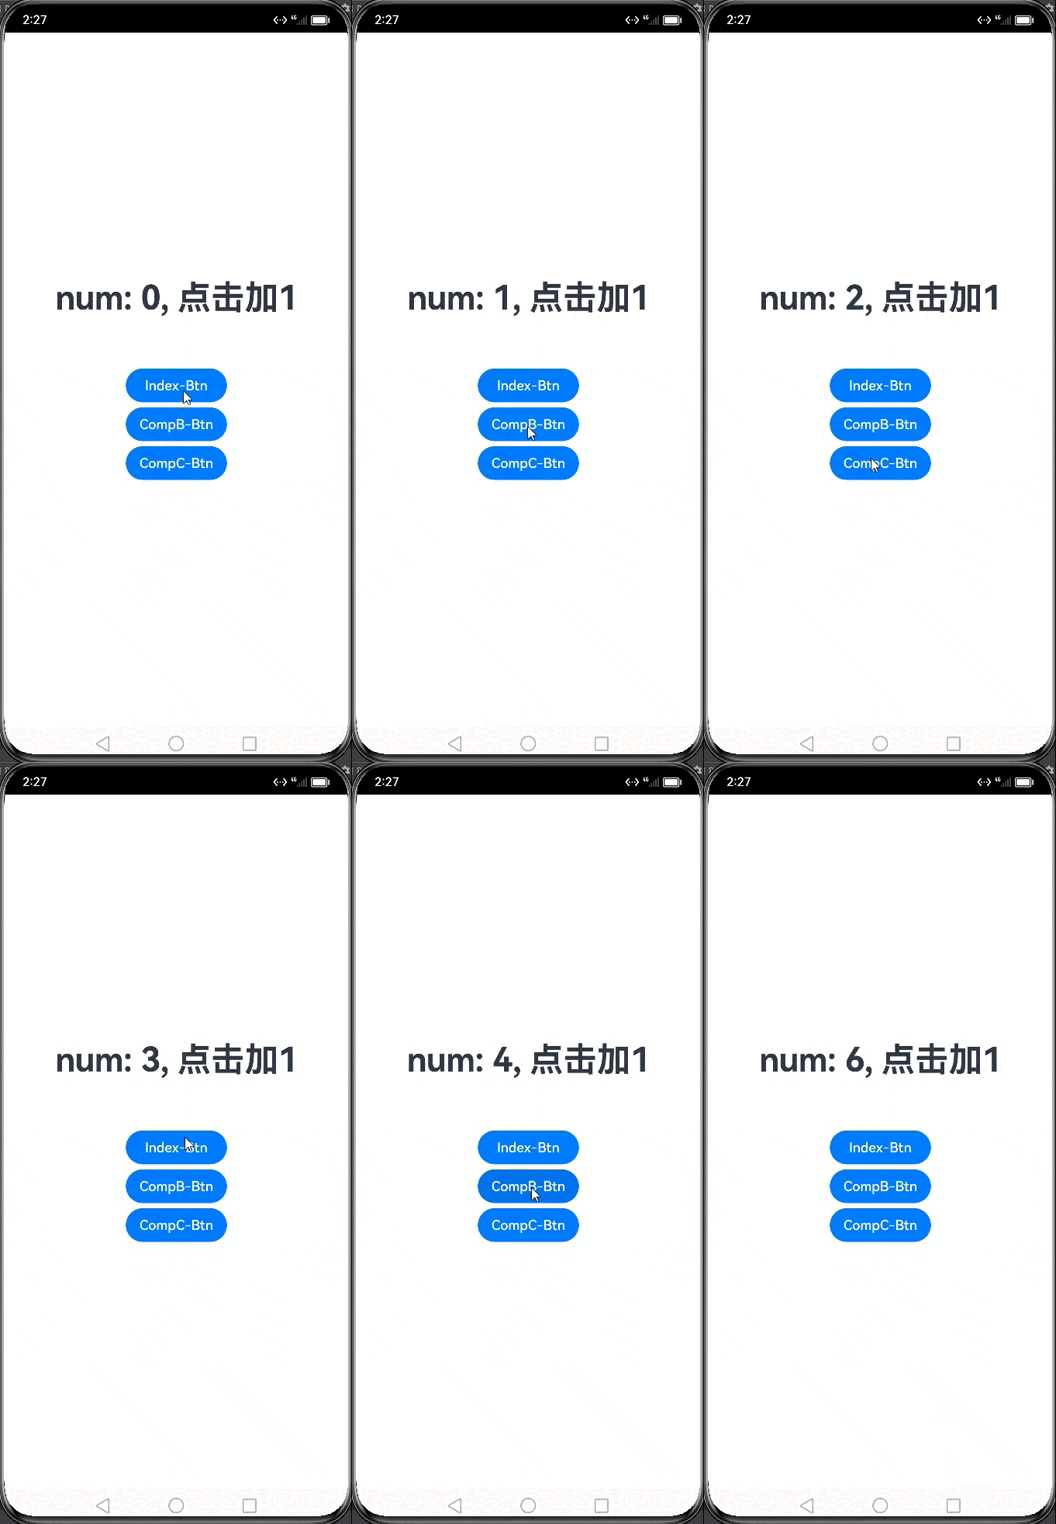
在index.ets使用@Provide定一个别名"index"变量,引入CompA组件。在CompA组件中引入CompB和CompC组件。并且在CompB和CompC孙子组件中用@Comuse装饰器引入index。让后在index.ets、CompB.ets、CompC.ets都设置按钮点击。点击后Index加1。同步的都会修改别名index变量。

// Index.ets
import CompA from '../view/CompA'
[@Entry](/user/Entry)
@Component
struct Index {
  [@State](/user/State) message: string = 'Hello World'
  [@State](/user/State) describe: string = "你好,世界";
  [@Provide](/user/Provide)('Index') num:number = 0;
  build() {
    Row() {
      Column() {
        Text(`num: ${this.num}, 点击加1`)
          .fontSize(40)
          .fontWeight(FontWeight.Bold)
        Button(`Index-Btn`)
          .type(ButtonType.Capsule)
          .width(120)
          .margin({
            top: '60vp'
          })
          .onClick(event => {
            this.num++
          })
        CompA({
          message: this.message,
          describe: this.describe
        })
      }
      .width('100%')
    }
    .height('100%')
  }
}

// CompA.ets
export default struct ComponentA {
  [@Prop](/user/Prop) message: string;
  [@Prop](/user/Prop) describe: string;
  build(){
    Column(){
      CompB()
      CompC()
    }
  }
}

// CompB.ets
export default struct ComponentB {
  [@Consume](/user/Consume)('Index') num: number;

  build(){
    Column(){
      Button(`CompB-Btn`)
        .type(ButtonType.Capsule)
        .width(120)
        .margin({
          top: '6vp'
        })
        .onClick(event => {
          this.num++
        })
    }
  }
}

// CompC.ets
export default struct ComponentB {
  [@Consume](/user/Consume)('Index') num: number;

  build(){
    Column(){
      Button(`CompC-Btn`)
        .type(ButtonType.Capsule)
        .width(120)
        .margin({
          top: '6vp'
        })
        .onClick(event => {
          this.num++;
        })
    }
  }
}
更多关于HarmonyOS 鸿蒙Next基础(四)- HarmonyOS ArkTs 组件状态的实战系列教程也可以访问 https://www.itying.com/category-93-b0.html
HarmonyOS ArkTS 是鸿蒙Next中的一种声明式UI开发框架,用于构建用户界面。组件状态是ArkTS中的核心概念之一,用于管理组件的动态数据和行为。
在ArkTS中,组件状态分为两种:局部状态和全局状态。
-
局部状态:局部状态是组件内部的状态,通常用于管理组件自身的动态数据。局部状态通过
@State装饰器来定义,只能在当前组件内部使用。当局部状态发生变化时,组件会自动重新渲染。[@Component](/user/Component) struct MyComponent { @State count: number = 0; build() { Column() { Text(`Count: ${this.count}`) Button('Increment').onClick(() => { this.count++; }) } } } -
全局状态:全局状态是跨组件共享的状态,通常用于管理多个组件之间的共享数据。全局状态通过
[@Observed](/user/Observed)和@ObjectLink装饰器来定义。[@Observed](/user/Observed)用于标记一个类为可观察对象,@ObjectLink用于在组件中引用全局状态。[@Observed](/user/Observed) class Counter { count: number = 0; } [@Component](/user/Component) struct MyComponent { @ObjectLink counter: Counter; build() { Column() { Text(`Count: ${this.counter.count}`) Button('Increment').onClick(() => { this.counter.count++; }) } } }
此外,ArkTS还提供了@Prop和@Link装饰器,用于在父子组件之间传递状态。@Prop用于单向传递数据,@Link用于双向绑定数据。
[@Component](/user/Component)
struct ParentComponent {
    @State count: number = 0;

    build() {
        Column() {
            ChildComponent({ count: this.count })
            Button('Increment').onClick(() => {
                this.count++;
            })
        }
    }
}

[@Component](/user/Component)
struct ChildComponent {
    @Prop count: number;

    build() {
        Text(`Count: ${this.count}`)
    }
}
ArkTS的组件状态管理机制使得开发者能够高效地构建动态、响应式的用户界面。
更多关于HarmonyOS 鸿蒙Next基础(四)- HarmonyOS ArkTs 组件状态的实战系列教程也可以访问 https://www.itying.com/category-93-b0.html
HarmonyOS ArkTS 组件状态管理是开发高效、响应式应用的关键。ArkTS 提供了多种状态管理机制,包括 @State、@Prop、@Link 和 @Observed 等装饰器。@State 用于管理组件内部状态,状态变化会自动触发 UI 更新。@Prop 用于父组件向子组件传递数据,子组件不能直接修改 @Prop 的值。@Link 则允许父子组件双向绑定,子组件可以修改父组件的状态。@Observed 用于观察对象或数组的变化,适用于复杂数据结构。合理使用这些状态管理工具,可以提升应用性能和开发效率。


