


HarmonyOS 鸿蒙Next:基于List和Scroller由简单到复杂列表布局开发实践
HarmonyOS 鸿蒙Next:基于List和Scroller由简单到复杂列表布局开发实践
场 景 描述
在多列表页面开发中,数据展示往往有联动关系,
场景一:单列表布局多长列表页面,如门户首页、商城首页
场景二:双列表滚动联动,如城市选择
场景三:多列表滚动横向纵向联动,如汽车参数对比,股票信息列表
方案描述
场景一:
单列表布局多长列表页面,如门户首页、商城首页效果图

方案
运用List组件作为整个首页长列表的容器,通过ListItem对不同模块进行定制。
- Refresh包裹List实现下拉刷新
- ListItem-0嵌套Swiper实现轮播图。
- ListItem-1嵌套Grid实现快捷入口。
- ListItem-2嵌套Column实现秒杀
- ListItemGroup实现商品分类列表
- 最底部ListItem实现触底自动加载
核心代码
build() {
Column() {
// 搜索框 置顶
if (this.searchSticky) {
this.searchBarBuilder()
}
// 下拉刷新组件
Refresh({ refreshing: $$this.isRefreshing }) {
// List组件作为长列表布局
List({ space: 10 }) {
// 搜索框跟随
if (!this.searchSticky) {
ListItem() {
this.searchBarBuilder()
}
}
// ListItem 自定义Swiper轮播图模块
ListItem() {
this.bannerBuilder()
}
// ListItem 自定义Grid快接入口模块
ListItem() {
this.quickBuilder()
}
// ListItem 自定义Column秒杀模块
ListItem() {
this.flashBuilder()
}
// ListItemGroup 商品分类列表
this.productsBuilder()
// 最后ListItem 自定义触底加载更多
ListItem() {
this.footerLoadingBuilder()
}.height(50).width(‘100%’).backgroundColor(0xeeeeee)
}
.sticky(StickyStyle.Header)
.edgeEffect(EdgeEffect.Spring, { alwaysEnabled: true })
.height(‘100%’)
.layoutWeight(2)
// List组件触底模拟网络请求
.onReachEnd(() => {
if (this.productsArray.length >= 20) {
this.noMoreData = true
return
}
setTimeout(() => {
this.productsArray.push(‘商品’ + (this.productsArray.length + 1))
}, 2000)
})
}
// 下拉刷新模拟网络请求
.onRefreshing(() => {
setTimeout(() => {
this.productsArray = [‘商品1’, ‘商品2’, ‘商品3’, ‘商品4’, ‘商品5’]
this.noMoreData = false
this.isRefreshing = !this.isRefreshing
}, 2000)
})
.layoutWeight(1)
.width(‘95%’)
}
}
<button style="position: absolute; padding: 4px 8px 0px; cursor: pointer; top: 8px; right: 8px; font-size: 14px;">复制</button>场景二:
双列表滚动同向联动,如城市选择
效果图
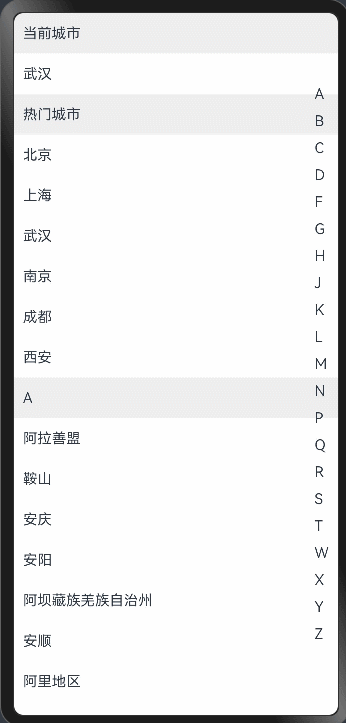
方案
整体运用Stack组件(List组件+List组件)布局,左List作为城市列表,右List快捷导航列表,通过ListItem对对应数据进行渲染。
1.左List用ListItemGroup对城市数据进行分组
2.右List用ListItem对首字母进行渲染
3.通过右List首字母导航点击可以切换左List滚动到对应分组
核心代码
@State private selectGroupIndex: number = -1 //导航栏选中index
private cityScroller: ListScroller = new ListScroller() // 城市列表Scoller控制器
private navgationScroller: ListScroller = new ListScroller() // 导航列表Scoller控制器
private isClickScroll:boolean = false // 导航列表点击标记为true,城市列表触摸滚动为false
build() {
Stack({alignContent : Alignment.End}) {
this.cityList()
this.navigationList()
}
.width(‘100%’)
.height(‘100%’).backgroundColor(0xFFFFFF)
}
// 城市列表
cityList() {
List({ scroller: this.cityScroller }) {
ListItemGroup({ header: this.itemHead(‘当前城市’) }) {
ListItem() {
Text(this.currentCity)
…
}
}
ListItemGroup({ header: this.itemHead(‘热门城市’) }) {
ForEach(this.hotCities, (hotCity: string) => {
ListItem() {
Text(hotCity)
…
}
})
}
// A~Z城市分组
ForEach(this.groupNameList, (item: string) => {
ListItemGroup({ header: this.itemHead(item) }) {
ForEach(this.getCitiesWithGroupName(item), (cityItem: City) => {
ListItem() {
Text(cityItem.city)
…
}
}, (item: City) => item.city)
}
})
}
.width(‘100%’)
.height(‘100%’)
.scrollBar(BarState.Off)
.sticky(StickyStyle.Header)
.onTouch(()=>{
// 城市列表触摸滚动,isClickScroll=false,防止滚动过程中与导航列表触发滚动冲突
this.isClickScroll = false
})
.onScrollIndex((start: number, end: number, center: number)=>{
// 通过selectGroupIndex状态变量与start联动控制导航列表选中状态
if(!this.isClickScroll)
this.selectGroupIndex = start - 2
})
}
// 导航列表@Builder
navigationList() {
List({scroller:this.cityScroller1}) {
ForEach(this.groupNameList, (item: string, index: number) => {
ListItem() {
Text(item)
…
.onClick(() => {
// 导航列表选中isClickScroll=true,防止与城市列表滚动过程中带动导航列表状态变化
this.isClickScroll = true
this.selectGroupIndex = index
// 通过导航选中selectGroupIndex与Scroller控制城市列表滚动到对应位置
this.cityScroller.scrollToIndex(index + 2, true, ScrollAlign.START)
})
}
}, (item: string) => item)
}
.listDirection(Axis.Vertical)
.backgroundColor(Color.Transparent)
.width(‘10%’)
}
<button style="position: absolute; padding: 4px 8px 0px; cursor: pointer; top: 8px; right: 8px; font-size: 14px;">复制</button>场景三:
多列表滚动横向纵向联动,如汽车参数对比,股票信息列表
效果图

方案
1.Column组件(Row组件1 + Row组件2)整体布局上下两部分,Row1代表上部分,Row2代表下部分
2.上部分Row组件1(Column组件+ List组件0),Column组件用来布局固定信息,List组件0用来渲染底部内容区域表头,与下部分List组件3+进行联动滚动,如股票参数,车型列表。
3.下部分Row组件2(List组件1 + Scroll组件(List组件2)),List组件1渲染每条信息的头部,内部用ListItemGroup进行分组渲染,竖向滚动;Scroll组件用来包裹详细内容数据List组件2,与List组件1进行竖向滚动联动;List组件2用来渲染内容数据,与List组件0进行横向滚动联动。
4.List组件2作为内容数据容器,ListItem中嵌套List组件3+横向滚动,联动List组件0进行横向滚动。
核心代码
export class ShowData {
sticky?:string
sub?: string[];
scrollerArray?: Scroller[] = [];
}
@State remainOffset: number = 0 // 内容行在横向滚动时回调的offset
private bottomRightScroller: Scroller = new Scroller() //下部分左侧标题List(行标题)
private bottomLeftScroller: Scroller = new Scroller() // 下部分右侧内容List(内容)
private topRightScroller: Scroller = new Scroller() // 上部分右侧类型List(列标题)
// 整体布局
build() {
Column() {
// 上部分
this.topFixed()
// 下部分
Row() {
this.leftList()
this.rightList()
Line().height(‘100%’).width(0.5).backgroundColor(’#EEEEEE’).position({ x: LeftItemWidth })
}
.justifyContent(FlexAlign.Start)
.alignItems(VerticalAlign.Top)
}.height(‘100%’)
.justifyContent(FlexAlign.Start)
.alignItems(HorizontalAlign.Start)
}
// 上部分整体Row(Column + List)
topFixed() {
Row() {
// 上部分左侧固定信息
Column() {
…
}
…
.padding(10)
// 分割线
Line().height(100).width(0.5).backgroundColor(0xeeeeee)
// 上部分右侧车型横向滚动列表
List({ scroller: this.topRightScroller/* 绑定Scroller控制器与其他控制器联动*/ }) {
ForEach(this.topRightArr, (item: string, index: number) => {
ListItem() {
…
}
}, (item: string) => item)
}
…
.onScrollFrameBegin((offset: number, state: ScrollState) => {
// 关键联动,通过对象保存的Scroller控制器数组遍历保持offset同步
this.dataSource.getAllData().forEach(showData => {
showData.scrollerArray!.forEach(scroller => {
scroller.scrollTo({ xOffset: this.topRightScroller.currentOffset().xOffset + offset, yOffset: 0 })
})
})
return { offsetRemain: offset }
})
}.height(100).width(‘100%’)
}
// 下部分右侧内容显示区域纵向List(ListItem(List))
rightList() {
List({ initialIndex: 0, scroller: this.bottomRightScroller }) {
// 通过LazyForEach加载每一行
LazyForEach(this.dataSource, (item: ShowData, index: number) => {
ListItemGroup({ header: this.rightStickyHeader(index) }) {
ForEach(item.sub, (subItem: string, index1: number) => {
// 自定义ListItem中包含横向滚动List
ItemComponent({
scroller: item.scrollerArray![index1],
scrollCallBack: (value) => {
// value为子List横向滚动onScrollFrameBegin回传offset,在手指拖动时保持联动一致
// 顶部车型List跟随联动
this.topRightScroller.scrollTo({ xOffset: value, yOffset: 0 })
// 通过对象保存的Scroller数组跟随保持联动
this.dataSource.getAllData().forEach(showData => {
showData.scrollerArray!.forEach(scroller => {
if (scroller != item.scrollerArray![index1]) {
scroller.scrollTo({ xOffset: value, yOffset: 0 })
}
})
})
},
remainOffsetCallBack: (value) => {
// 滚动过程中回传保持同步的offset值
this.remainOffset = value
}
})
}, (item: string) => item)
}
}, (item: ShowData, index: number) => item.sticky! + index)
}
…
.onScrollFrameBegin((offset: number, state: ScrollState) => {
// 内容List纵向滚动带动左侧标题List跟随滚动
this.bottomLeftScroller.scrollTo({
xOffset: 0,
yOffset: this.bottomRightScroller.currentOffset().yOffset + offset,
animation: false
})
return { offsetRemain: offset }
})
.onScroll(() => {
// 内容List纵向滚动过程中,每一行中子List的Scroller滚动到remainOffset与已显示的行位置保持一致
this.dataSource.getAllData().forEach(showData => {
showData.scrollerArray!.forEach(scroller => {
scroller.scrollTo({ xOffset: this.remainOffset, yOffset: 0 })
})
})
})
…
}
struct ItemComponent {
private arr: string[] = [
‘1’, ‘2’, ‘3’, ‘4’, ‘5’, ‘6’, ‘7’, ‘8’]
private dataSource = new CommonDataSource<string>()
private scroller?: Scroller = undefined // 内容行List绑定Scroller
private scrollCallBack?: (param: number) => void // 触摸滚动过程中回调实时offset
private remainOffsetCallBack?: (param: number) => void // 滚动时回调同步offset
aboutToAppear(): void {
this.dataSource.setData(this.arr)
}
// 下部分参数列表每行数据List
RightSingleLineList() {
List({ scroller: this.scroller }) {
LazyForEach(this.dataSource, (item: string, index: number) => {
ListItem() {
…
}
.width(RightItemWidth)
}, (item: string) => item)
}
…
.onScroll(() => {
// 通过callBack回调行在横向滚动时,Scroller当前的offset
if (this.remainOffsetCallBack)
this.remainOffsetCallBack(this.scroller!.currentOffset().xOffset)
})
.onScrollFrameBegin((offset: number, state: ScrollState) => {
// 触摸滚动实时跟随回调
if (this.scrollCallBack) {
this.scrollCallBack(this.scroller!.currentOffset().xOffset + offset)
}
return { offsetRemain: offset }
})
}
build() {
Column() {
this.RightSingleLineList()
Line().width(“100%”).height(0.5).backgroundColor(0xeeeeee)
}.height(ItemHeight)
}
}
<button style="position: absolute; padding: 4px 8px 0px; cursor: pointer; top: 8px; right: 8px; font-size: 14px;">复制</button>其他常见问题
1,滑动卡顿
LazyForEach数据懒加载:数据量大的List尽量用LazyForEach加载数据,可明显优化性能,经过测试列数为100以上,LazyForEach也无明显卡顿。
2,错位分析
查看左右List行高是否一致,ListItemGroup高度是否一致;onScrollFrameBegin联动回调中是否跟随保持一致。
3,嵌套滚动
如需要外层附加其他滚动,可运 用嵌套 属性.nestedScroll进行联动。关于HarmonyOS 鸿蒙Next:基于List和Scroller由简单到复杂列表布局开发实践的问题,您也可以访问:https://www.itying.com/category-93-b0.html 联系官网客服。
更多关于HarmonyOS 鸿蒙Next:基于List和Scroller由简单到复杂列表布局开发实践的实战教程也可以访问 https://www.itying.com/category-93-b0.html

更多关于HarmonyOS 鸿蒙Next:基于List和Scroller由简单到复杂列表布局开发实践的实战系列教程也可以访问 https://www.itying.com/category-93-b0.html

找HarmonyOS工作还需要会Flutter的哦,有需要Flutter教程的可以学学大地老师的教程,很不错,B站免费学的哦:https://www.bilibili.com/video/BV1S4411E7LY/?p=17


list能否默认从右测开始显示呢。Grid可以,Grid有个参数,layoutDirection,设置为GridDirection.Row,是默认的方向,从左侧开始向右显示。设置为GridDirection.RowReverse,就是反向,从页面右侧,向左侧开始显示

现在用List的initialIndex属性,达到了目的,这个指定当前List初次加载时视口起始位置显示的item的索引值,不过如果list能加一个Reverse参数就好了