


Flutter圆形菜单插件pie_menu的使用
Flutter圆形菜单插件pie_menu的使用
Flutter Pie Menu 🥧
![]()
![]()
Flutter Pie Menu 是一个提供高度可定制化的圆形/径向上下文菜单的包,类似于 Pinterest 的菜单。
| 图片 | 动图示例1 | 动图示例2 |
|---|---|---|
 |
 |
 |
使用方法
将响应手势的组件包装在 PieMenu 组件中,并为菜单提供一个 PieAction 数组以显示为圆形按钮。
PieMenu(
  onPressed: () => print('pressed'),
  actions: [
    PieAction(
      tooltip: const Text('like'),
      onSelect: () => print('liked'),
      child: const Icon(Icons.favorite), // 可以是任何小部件
    ),
  ],
  child: ChildWidget(),
),
💡 注意:你只能在 PieCanvas 小部件的后代中使用 PieMenu。
为了使菜单显示在最前面,可以像下面这样将 Scaffold 包装在一个 PieCanvas 中:
PieCanvas(
  child: Scaffold(
    body: YourScaffoldBody(
      ...
        PieMenu(),
      ...
    ),
  ),
),
💡 你可以利用 PieMenu 中定义的 onPressed 回调来管理点击事件,而无需额外使用 GestureDetector 等小部件。
定制化
你可以通过 PieTheme 来自定义菜单的外观和行为。
按钮主题
按钮的背景色和图标颜色由主题的 buttonTheme 和 buttonThemeHovered 定义。你可以创建自定义的 PieButtonTheme 实例用于你的画布和菜单主题。
PieTheme(
  buttonTheme: PieButtonTheme(),
  buttonThemeHovered: PieButtonTheme(),
),
你可以甚至使用 decoration 属性给按钮添加自定义样式。
PieButtonTheme(
  decoration: BoxDecoration(),
),
自定义按钮小部件
如果你想在按钮内使用自定义小部件而不是仅限于图标,建议使用 PieAction.builder() 并提供一个 builder 函数作为参数,该函数会告知动作是否被悬停。
PieAction.builder(
  tooltip: const Text('like'),
  onSelect: () => print('liked'),
  builder: (hovered) {
    return Text(
      '<3',
      style: TextStyle(
        color: hovered ? Colors.green : Colors.red,
      ),
    );
  },
),
菜单按钮的显示角度
如果你不想动态计算角度而是希望菜单出现在固定角度上,可以在 PieTheme 中设置 customAngle 和 customAngleAnchor 属性。
PieTheme(
  customAngle: 90, // 以度为单位
  customAngleAnchor: PieAnchor.center, // start, center, end
),
你也可以使用 customAngleDiff 或 spacing 来调整按钮之间的角度,或使用 angleOffset 来旋转菜单。
特定菜单位置
使用 menuAlignment 属性(位于 PieTheme 中)可以让菜单出现在特定位置,无论按下的点在哪里。结合 menuDisplacement 属性可以微调位置。
PieTheme(
  menuAlignment: Alignment.center,
  menuDisplacement: Offset(0, 0),
),
点击、长按或右键打开菜单
将 delayDuration 设置为 Duration.zero 可以立即打开菜单。
PieTheme(
  delayDuration: Duration.zero,
),
使用 rightClickShowsMenu 和 leftClickShowsMenu 属性(位于 PieTheme 中),你可以自定义鼠标按键的行为。
PieTheme(
  rightClickShowsMenu: true,
  leftClickShowsMenu: false,
),
控制器与回调
要编程方式打开、关闭或切换菜单,可以为其分配一个 PieMenuController。
// 在状态组件内部创建一个控制器。
final _pieMenuController = PieMenuController();

// 将控制器分配给 PieMenu。
PieMenu(
  controller: _pieMenuController,
  ...
),

// 使用控制器控制菜单。
_pieMenuController.open(
  menuAlignment: Alignment.center,
);
如果需要在菜单切换时执行某些操作,可以使用 PieMenu 的 onToggle 回调,或者 PieCanvas 的 onMenuToggle 回调。
PieMenu(
  onToggle: (menuOpen) => print('Menu ${menuOpen ? 'opened' : 'closed'}'),
  ...
),

PieCanvas(
  onMenuToggle: (menuOpen) => print('A menu ${menuOpen ? 'opened' : 'closed'}'),
  ...
),
示例代码
以下是一个完整的演示应用示例,它展示了如何使用 flutter_pie_menu 插件来构建应用程序的不同页面。
import 'package:flutter/gestures.dart';
import 'package:flutter/material.dart';
import 'package:flutter/services.dart';
import 'package:font_awesome_flutter/font_awesome_flutter.dart';
import 'package:pie_menu/pie_menu.dart';
import 'package:url_launcher/url_launcher_string.dart';
extension ContextExtension on BuildContext {
void showSnackBar(String message) {
ScaffoldMessenger.of(this).removeCurrentSnackBar();
ScaffoldMessenger.of(this).showSnackBar(
SnackBar(
content: Text(message),
duration: const Duration(seconds: 2),
),
);
}
}
void launchUrlExternally(String url) {
launchUrlString(url, mode: LaunchMode.externalApplication);
}
void main() {
WidgetsFlutterBinding.ensureInitialized();
SystemChrome.setEnabledSystemUIMode(SystemUiMode.edgeToEdge);
SystemChrome.setSystemUIOverlayStyle(
const SystemUiOverlayStyle(
statusBarColor: Colors.transparent,
systemNavigationBarColor: Colors.transparent,
),
);
runApp(const ExampleApp());
}
class ExampleApp extends StatelessWidget {
const ExampleApp({super.key});
@override
Widget build(BuildContext context) {
return MaterialApp(
debugShowCheckedModeBanner: false,
title: 'Flutter Pie Menu',
home: const HomePage(),
theme: ThemeData(
fontFamily: 'Poppins',
textTheme: const TextTheme().apply(fontFamily: 'Poppins'),
snackBarTheme: const SnackBarThemeData(
contentTextStyle: TextStyle(
fontFamily: 'Poppins',
color: Colors.white,
),
),
),
);
}
}
class HomePage extends StatefulWidget {
const HomePage({super.key});
@override
State<HomePage> createState() => _HomePageState();
}
class _HomePageState extends State<HomePage> {
var _navigationIndex = 0;
@override
Widget build(BuildContext context) {
return PieCanvas(
theme: const PieTheme(
rightClickShowsMenu: true,
tooltipTextStyle: TextStyle(
fontSize: 32,
fontWeight: FontWeight.w600,
),
),
child: Scaffold(
appBar: AppBar(
title: const Text(
'Flutter Pie Menu 🥧',
style: TextStyle(fontWeight: FontWeight.w600),
),
),
body: IndexedStack(
index: _navigationIndex,
children: const [
StylingPage(),
ListViewPage(),
AboutPage(),
],
),
bottomNavigationBar: BottomNavigationBar(
currentIndex: _navigationIndex,
onTap: (index) => setState(() => _navigationIndex = index),
items: const [
BottomNavigationBarItem(
icon: FaIcon(FontAwesomeIcons.palette),
label: 'Styling',
),
BottomNavigationBarItem(
icon: FaIcon(FontAwesomeIcons.list),
label: 'ListView',
),
BottomNavigationBarItem(
icon: FaIcon(FontAwesomeIcons.circleInfo),
label: 'About',
),
],
),
),
);
}
}
//* different styles *//
class StylingPage extends StatelessWidget {
const StylingPage({super.key});
static const double spacing = 20;
@override
Widget build(BuildContext context) {
return PieCanvas(
theme: const PieTheme(
delayDuration: Duration.zero,
tooltipTextStyle: TextStyle(
fontSize: 32,
fontWeight: FontWeight.w600,
),
),
child: Builder(
builder: (context) {
return SafeArea(
child: Padding(
padding: const EdgeInsets.all(spacing),
child: Row(
children: [
Expanded(
child: Column(
children: [
Expanded(
child: PieMenu(
actions: [
PieAction(
tooltip: const Text('Play'),
onSelect: () => context.showSnackBar('Play'),
/// 光学校正
child: const Padding(
padding: EdgeInsets.only(left: 4),
child: FaIcon(FontAwesomeIcons.play),
),
),
PieAction(
tooltip: const Text('Like'),
onSelect: () => context.showSnackBar('Like'),
child: const FaIcon(
FontAwesomeIcons.solidThumbsUp,
),
),
PieAction(
tooltip: const Text('Share'),
onSelect: () => context.showSnackBar('Share'),
child: const FaIcon(FontAwesomeIcons.share),
),
],
child: _buildCard(
color: Colors.orangeAccent,
iconData: FontAwesomeIcons.solidSun,
),
),
),
const SizedBox(height: spacing),
Expanded(
child: PieMenu(
theme: PieTheme.of(context).copyWith(
buttonTheme: const PieButtonTheme(
backgroundColor: Colors.deepOrange,
iconColor: Colors.white,
),
buttonThemeHovered: const PieButtonTheme(
backgroundColor: Colors.orangeAccent,
iconColor: Colors.black,
),
brightness: Brightness.dark,
),
actions: [
PieAction.builder(
tooltip: const Text('how'),
onSelect: () => context.showSnackBar('1'),
builder: (hovered) {
return _buildTextButton('1', hovered);
},
),
PieAction.builder(
tooltip: const Text('cool'),
onSelect: () => context.showSnackBar('2'),
builder: (hovered) {
return _buildTextButton('2', hovered);
},
),
PieAction.builder(
tooltip: const Text('is'),
onSelect: () => context.showSnackBar('3'),
builder: (hovered) {
return _buildTextButton('3', hovered);
},
),
PieAction.builder(
tooltip: const Text('this?!'),
onSelect: () =>
context.showSnackBar('Pretty cool :)'),
builder: (hovered) {
return _buildTextButton('4', hovered);
},
),
],
child: _buildCard(
color: Colors.deepPurple,
iconData: FontAwesomeIcons.solidMoon,
),
),
),
],
),
),
const SizedBox(width: spacing),
Expanded(
child: Column(
children: [
Expanded(
child: PieMenu(
theme: PieTheme.of(context).copyWith(
tooltipTextStyle: const TextStyle(
color: Colors.white,
),
overlayColor: Colors.teal.withOpacity(0.7),
pointerSize: 40,
pointerDecoration: BoxDecoration(
shape: BoxShape.circle,
color: Colors.red.withOpacity(0.5),
),
buttonTheme: const PieButtonTheme(
backgroundColor: Colors.black,
iconColor: Colors.white,
),
buttonThemeHovered: const PieButtonTheme(
backgroundColor: Colors.white,
iconColor: Colors.black,
),
buttonSize: 84,
leftClickShowsMenu: false,
rightClickShowsMenu: true,
),
onPressedWithDevice: (kind) {
if (kind == PointerDeviceKind.mouse) {
context.showSnackBar(
'Right click to show the menu',
);
}
},
actions: [
PieAction(
tooltip: const Text('Available on pub.dev'),
onSelect: () {
launchUrlExternally(
'https://pub.dev/packages/pie_menu',
);
},
child: const FaIcon(FontAwesomeIcons.boxOpen),
),
PieAction(
tooltip: const Text('Highly customizable'),
onSelect: () {
launchUrlExternally(
'https://pub.dev/packages/pie_menu',
);
},
/// 自定义背景颜色
buttonTheme: PieButtonTheme(
backgroundColor:
Colors.black.withOpacity(0.7),
iconColor: Colors.white,
),
child: const FaIcon(FontAwesomeIcons.palette),
),
PieAction(
tooltip:
const Text('Now with right click support!'),
buttonTheme: PieButtonTheme(
backgroundColor:
Colors.black.withOpacity(0.5),
iconColor: Colors.white,
),
onSelect: () {
launchUrlExternally(
'https://pub.dev/packages/pie_menu',
);
},
child: const FaIcon(
FontAwesomeIcons.computerMouse,
),
),
],
child: _buildCard(
color: Colors.teal,
iconData: FontAwesomeIcons.solidHeart,
),
),
),
],
),
),
],
),
),
);
},
),
);
}
Widget _buildCard({
Color? color,
required IconData iconData,
}) {
return DecoratedBox(
decoration: BoxDecoration(
color: color,
borderRadius: BorderRadius.circular(16),
),
child: Center(
child: FaIcon(
iconData,
color: Colors.white,
size: 64,
),
),
);
}
Widget _buildTextButton(String text, bool hovered) {
return Text(
text,
style: TextStyle(
color: hovered ? Colors.black : Colors.white,
fontSize: 20,
fontWeight: FontWeight.w600,
),
);
}
}
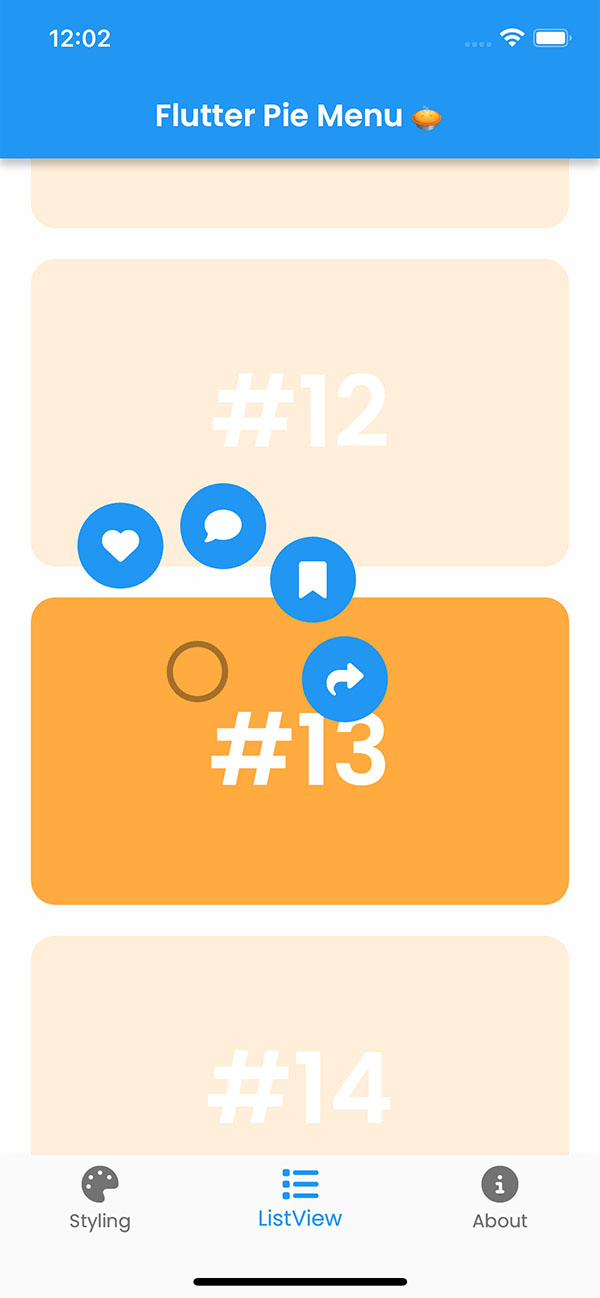
//* list view example *//
class ListViewPage extends StatelessWidget {
const ListViewPage({super.key});
static const spacing = 20.0;
@override
Widget build(BuildContext context) {
return ListView.separated(
padding: EdgeInsets.only(
top: spacing,
bottom: spacing,
left: MediaQuery.of(context).padding.left + spacing,
right: MediaQuery.of(context).padding.right + spacing,
),
physics: const BouncingScrollPhysics(),
itemCount: 16,
separatorBuilder: (context, index) => const SizedBox(height: spacing),
itemBuilder: (context, index) {
return SizedBox(
height: 200,
child: PieMenu(
onPressed: () {
context.showSnackBar(
'#$index — Long press or right click to show the menu',
);
},
actions: [
PieAction(
tooltip: const Text('Like'),
onSelect: () => context.showSnackBar('Like #$index'),
child: const FaIcon(FontAwesomeIcons.solidHeart),
),
PieAction(
tooltip: const Text('Comment'),
onSelect: () => context.showSnackBar('Comment #$index'),
child: const FaIcon(FontAwesomeIcons.solidComment),
),
PieAction(
tooltip: const Text('Save'),
onSelect: () => context.showSnackBar('Save #$index'),
child: const FaIcon(FontAwesomeIcons.solidBookmark),
),
PieAction(
tooltip: const Text('Share'),
onSelect: () => context.showSnackBar('Share #$index'),
child: const FaIcon(FontAwesomeIcons.share),
),
],
child: DecoratedBox(
decoration: BoxDecoration(
color: Colors.orangeAccent,
borderRadius: BorderRadius.circular(16),
),
child: Center(
child: Text(
'#$index',
style: const TextStyle(
color: Colors.white,
fontWeight: FontWeight.w600,
fontSize: 64,
),
),
),
),
),
);
},
);
}
}
//* about the developer *//
class AboutPage extends StatelessWidget {
const AboutPage({super.key});
@override
Widget build(BuildContext context) {
return PieCanvas(
theme: PieTheme(
delayDuration: Duration.zero,
tooltipTextStyle: const TextStyle(
fontSize: 32,
fontWeight: FontWeight.w600,
),
tooltipUseFittedBox: true,
buttonTheme: const PieButtonTheme(
backgroundColor: Colors.black,
iconColor: Colors.white,
),
buttonThemeHovered: PieButtonTheme(
backgroundColor: Colors.lime[200],
iconColor: Colors.black,
),
overlayColor: Colors.blue[200]?.withOpacity(0.7),
rightClickShowsMenu: true,
),
child: Center(
child: SingleChildScrollView(
padding: const EdgeInsets.all(20),
child: Column(
crossAxisAlignment: CrossAxisAlignment.stretch,
children: [
const Row(
mainAxisAlignment: MainAxisAlignment.center,
children: [
FlutterLogo(size: 100),
SizedBox(width: 16),
Text(
'🥧',
style: TextStyle(
fontSize: 100,
height: 0.8,
),
),
],
),
const SizedBox(height: 32),
Center(
child: PieMenu(
actions: [
PieAction(
tooltip: const Text('github/rasitayaz'),
onSelect: () {
launchUrlExternally('https://github.com/rasitayaz');
},
child: const FaIcon(FontAwesomeIcons.github),
),
PieAction(
tooltip: const Text('linkedin/rasitayaz'),
onSelect: () {
launchUrlExternally(
'https://linkedin.com/in/rasitayaz/',
);
},
child: const FaIcon(FontAwesomeIcons.linkedinIn),
),
PieAction(
tooltip: const Text('mrasitayaz@gmail.com'),
onSelect: () {
launchUrlExternally('mailto:mrasitayaz@gmail.com');
},
child: const FaIcon(FontAwesomeIcons.solidEnvelope),
),
PieAction(
tooltip: const Text('buy me a coffee'),
onSelect: () {
launchUrlExternally(
'https://buymeacoffee.com/rasitayaz',
);
},
child: const FaIcon(FontAwesomeIcons.mugSaucer, size: 20),
),
],
child: FittedBox(
child: Container(
padding: const EdgeInsets.all(32),
decoration: BoxDecoration(
color: Colors.blue,
borderRadius: BorderRadius.circular(16),
),
child: const Column(
mainAxisSize: MainAxisSize.min,
children: [
Text(
'created by',
style: TextStyle(
color: Colors.white,
fontSize: 36,
),
),
Text(
'Raşit Ayaz',
style: TextStyle(
color: Colors.white,
fontWeight: FontWeight.w800,
fontSize: 40,
),
),
],
),
),
),
),
),
],
),
),
),
);
}
}
此段代码创建了一个包含多个页面的应用程序,每个页面都展示了 flutter_pie_menu 插件的不同功能和用法。从简单的圆形菜单到复杂的自定义样式,再到列表视图中的菜单项,以及关于开发者的页面,全面地介绍了如何在Flutter项目中集成并使用这个插件。
更多关于Flutter圆形菜单插件pie_menu的使用的实战教程也可以访问 https://www.itying.com/category-92-b0.html

更多关于Flutter圆形菜单插件pie_menu的使用的实战系列教程也可以访问 https://www.itying.com/category-92-b0.html
当然,下面是一个关于如何在Flutter项目中使用pie_menu插件来实现圆形菜单的示例代码。pie_menu是一个流行的Flutter插件,用于创建圆形菜单(也称为径向菜单或饼菜单)。
首先,你需要在你的pubspec.yaml文件中添加pie_menu依赖项:
dependencies:
  flutter:
    sdk: flutter
  pie_menu: ^x.y.z  # 请将x.y.z替换为当前最新版本号
然后,运行flutter pub get来安装依赖项。
接下来,在你的Flutter项目中创建一个圆形菜单。以下是一个完整的示例,包括如何设置和显示圆形菜单:
import 'package:flutter/material.dart';
import 'package:pie_menu/pie_menu.dart';

void main() {
  runApp(MyApp());
}

class MyApp extends StatelessWidget {
  @override
  Widget build(BuildContext context) {
    return MaterialApp(
      title: 'Pie Menu Demo',
      theme: ThemeData(
        primarySwatch: Colors.blue,
      ),
      home: PieMenuDemo(),
    );
  }
}

class PieMenuDemo extends StatefulWidget {
  @override
  _PieMenuDemoState createState() => _PieMenuDemoState();
}

class _PieMenuDemoState extends State<PieMenuDemo> with SingleTickerProviderStateMixin {
  late AnimationController _controller;
  late Animation<double> _animation;

  @override
  void initState() {
    super.initState();
    _controller = AnimationController(
      duration: const Duration(milliseconds: 500),
      vsync: this,
    );
    _animation = Tween<double>(begin: 0.0, end: 1.0).animate(_controller);
  }

  @override
  void dispose() {
    _controller.dispose();
    super.dispose();
  }

  void showPieMenu(BuildContext context) {
    showMenu(
      context: context,
      position: RelativeRect.fromLTRB(100, 100, 300, 300),  // 菜单显示的位置
      items: [
        PieMenuItem(
          title: 'Item 1',
          icon: Icons.star,
          onTap: () {
            // 处理点击事件
            print('Item 1 tapped');
            _controller.reverse();  // 关闭菜单
          },
        ),
        PieMenuItem(
          title: 'Item 2',
          icon: Icons.settings,
          onTap: () {
            // 处理点击事件
            print('Item 2 tapped');
            _controller.reverse();  // 关闭菜单
          },
        ),
        PieMenuItem(
          title: 'Item 3',
          icon: Icons.home,
          onTap: () {
            // 处理点击事件
            print('Item 3 tapped');
            _controller.reverse();  // 关闭菜单
          },
        ),
      ],
      elevation: 8.0,
      shape: RoundedRectangleBorder(
        borderRadius: BorderRadius.circular(16.0),
      ),
      backgroundColor: Colors.white,
      animation: _animation,
      controller: _controller,
    );
  }

  @override
  Widget build(BuildContext context) {
    return Scaffold(
      appBar: AppBar(
        title: Text('Pie Menu Demo'),
      ),
      body: Center(
        child: ElevatedButton(
          onPressed: () => showPieMenu(context),
          child: Text('Show Pie Menu'),
        ),
      ),
    );
  }
}
在这个示例中,我们创建了一个Flutter应用,其中包含一个按钮。点击按钮时,会显示一个圆形菜单。菜单包含三个项目,每个项目都有一个标题和图标,以及一个点击事件处理函数。
注意:
showMenu函数用于显示圆形菜单。它接受多个参数,包括菜单项(PieMenuItem),菜单的位置,以及动画参数。PieMenuItem是用于定义菜单项的类,包括标题、图标和点击事件处理函数。AnimationController和Animation用于控制菜单的打开和关闭动画。
请确保你已经安装了pie_menu插件的最新版本,并根据需要进行调整。希望这个示例能帮助你理解如何在Flutter项目中使用pie_menu插件。