


Flutter表单生成插件gsform的使用_gsform 是一个用于Flutter应用程序的表单生成库
Flutter表单生成插件gsform的使用_gsform 是一个用于Flutter应用程序的表单生成库
表单创建利器:gsform
![]()
gsform 是一个用于Flutter应用程序的表单生成库,它通过减少构建表单所需的样板代码、验证字段、响应变化和收集用户最终输入来帮助开发者更高效地创建表单。此外,它还提供了常用的预设表单输入字段,使得开发者无需从零开始构建 FormBuilderField。

查看实际例子:GitHub Example
安装
安装gsform非常简单,只需运行以下命令:
flutter pub add gsform
这将在您的pubspec.yaml文件中添加如下依赖项(并隐式执行flutter pub get):
dependencies:
  gsform: ^0.3.6
或者,您可以直接在pubspec.yaml中添加上述依赖,并使用编辑器支持的flutter pub get来同步依赖。
样式与主题
样式
你可以自定义表单的样式,如背景颜色、标题样式、提示文本样式等。下面是一个样式的示例配置:
GSFormStyle(
  backgroundFieldColor: COLOR,
  backgroundSectionColor: COLOR,
  sectionCardElevation: 0,
  titleStyle: TextStyle,
  fieldHintStyle: TextStyle,
  fieldTextStyle: TextStyle,
  sectionRadius: 10.0,
  errorTextStyle: TextStyle,
  fieldRadius: double,
  helpTextStyle: TextStyle,
  requireType: GSFieldRequireTypeEnum, // text, star
  sectionCardPadding: 8.0,
  requiredText: '(required)'
)
暗黑模式支持
gsform 支持暗黑模式。如果你没有为组件设置自定义样式,则默认支持暗黑模式;否则你需要自行处理。
文本方向支持
对于RTL语言(如阿拉伯语、希伯来语等),gsform也提供了支持。
必填项显示类型
你可以设置必填项的显示类型为文本或星号。
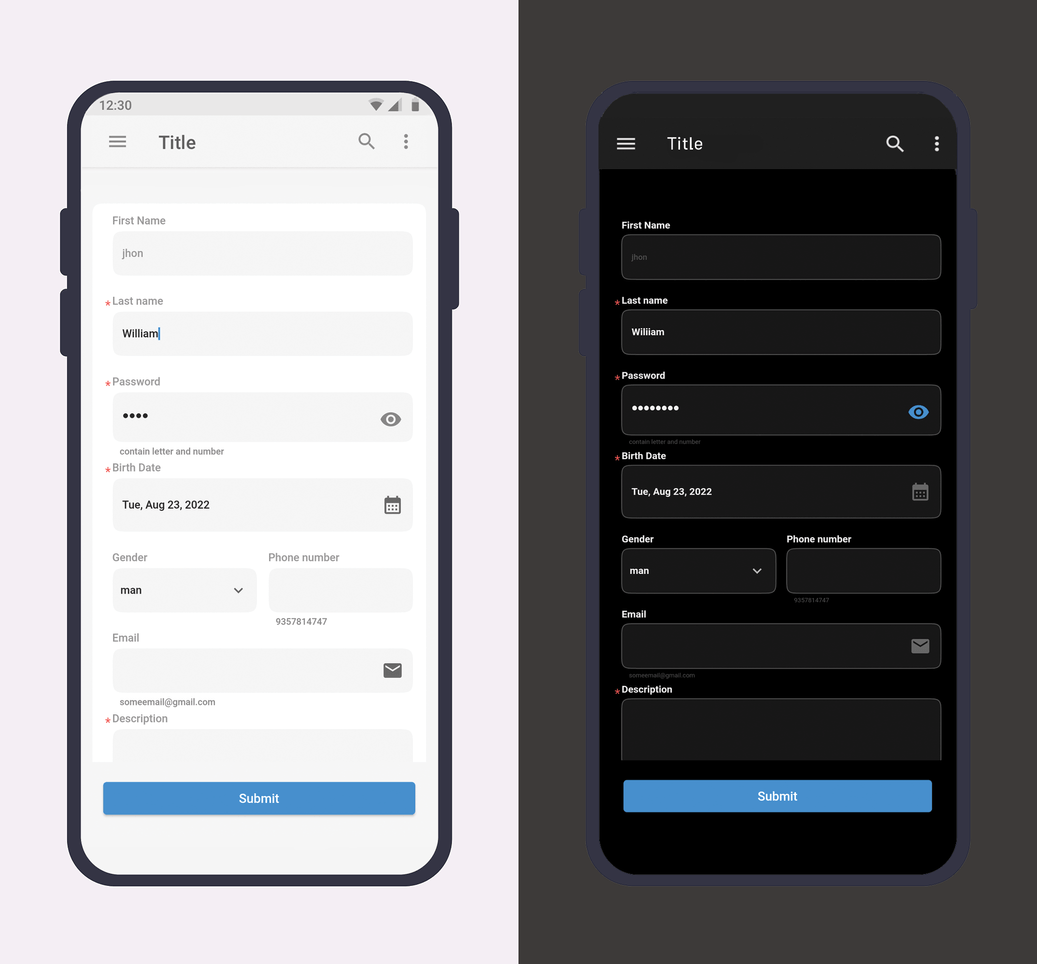
字段类型
gsform 提供了多种类型的字段,包括但不限于文本框、数字输入框、日期选择器、时间选择器、电话号码输入框、邮箱输入框、密码输入框、价格输入框等。每个字段都有其特定的属性,例如最大长度、是否必填、错误信息、提示信息等。
| 序号 | 字段名称 | 示例代码 | 预览 |
|---|---|---|---|
| 1 | Text | dart GSField.text(tag: 'postalCode', title: 'title', minLine: 1, maxLine: 1, weight: 12, required: true, maxLength: 100, errorMessage: 'error message', hint: 'hint message', helpMessage: 'help message', validateRegEx: regX, postfixWidget: widget, prefixWidget: widget,) |
 |
| 2 | Text Plain | dart GSField.textPlain(tag: 'textualAddress', title: 'title', weight: 12, required: true, errorMessage: 'error message', hint: 'hint message', helpMessage: 'help message', maxLength: 100, maxLine: 2, minLine: 1, postfixWidget: widget, prefixWidget: widget,) |
 |
| … | … | … | … |
更多字段类型的详细信息可以参考官方文档或源码中的注释。
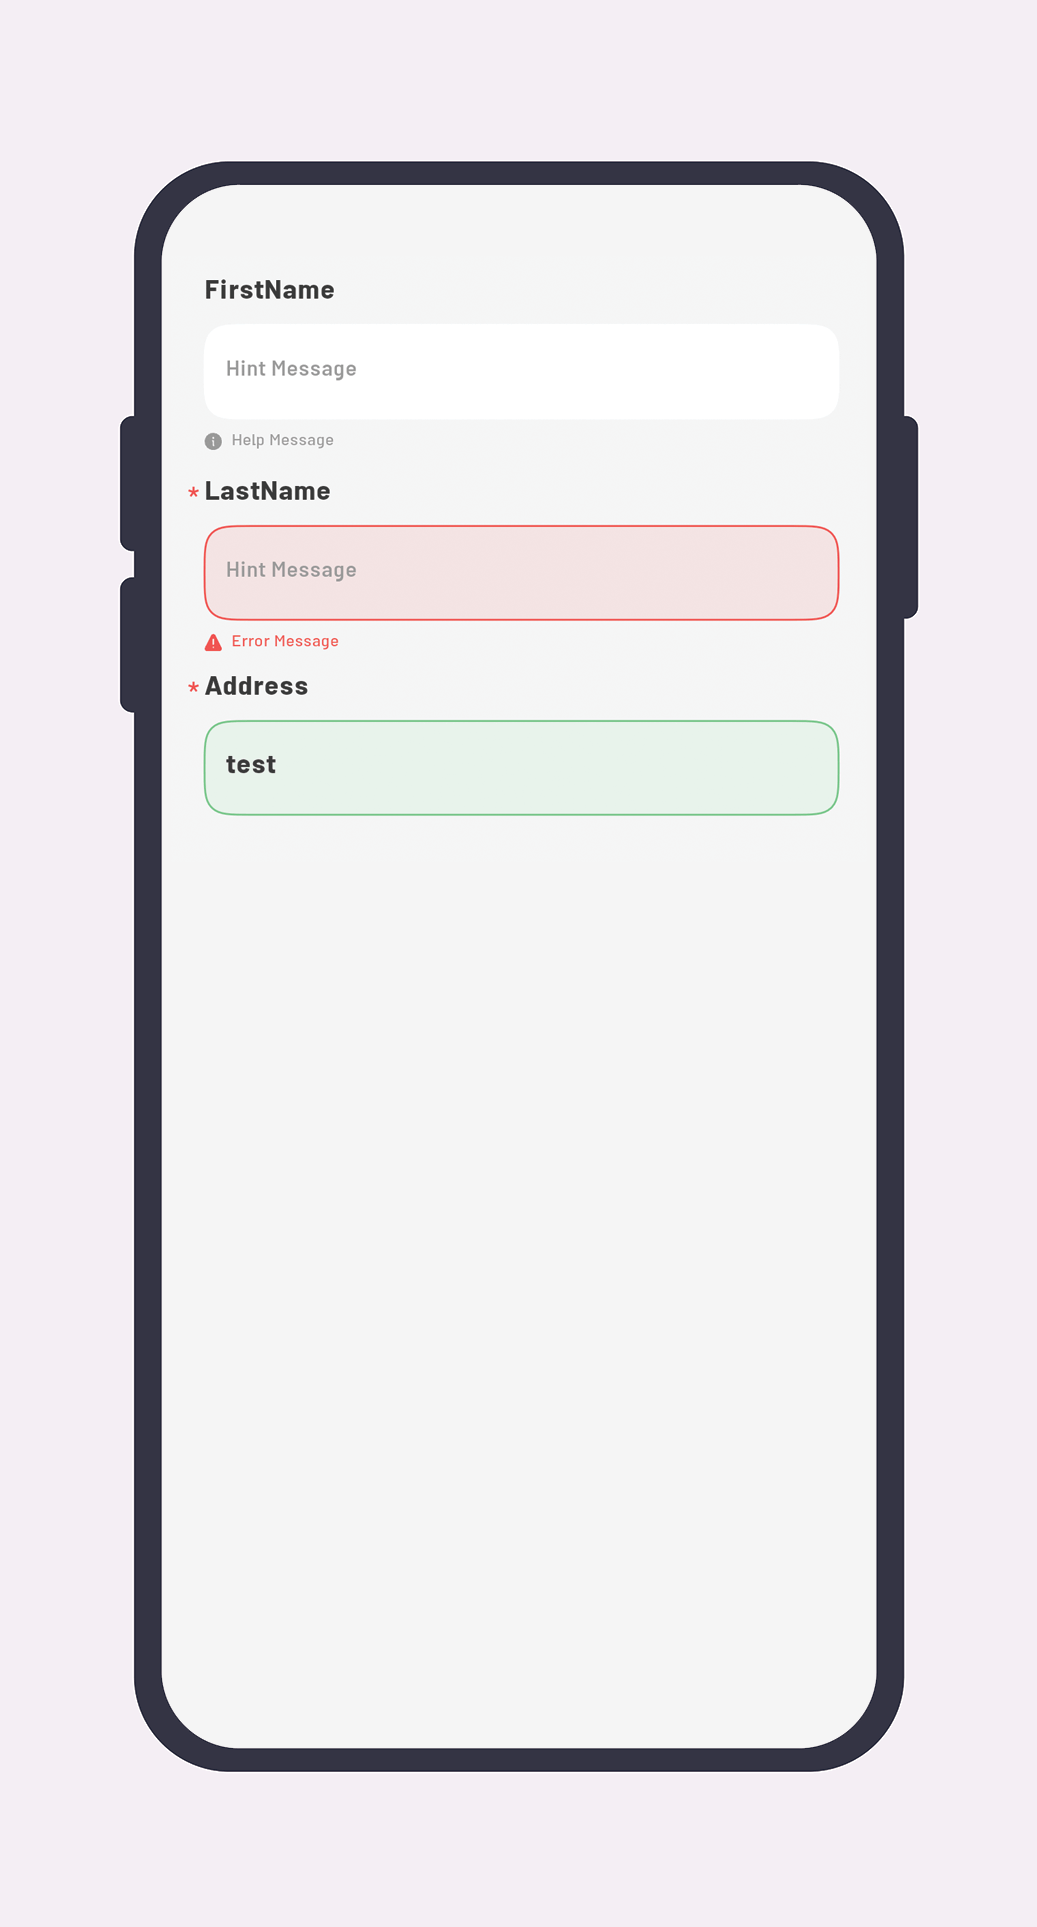
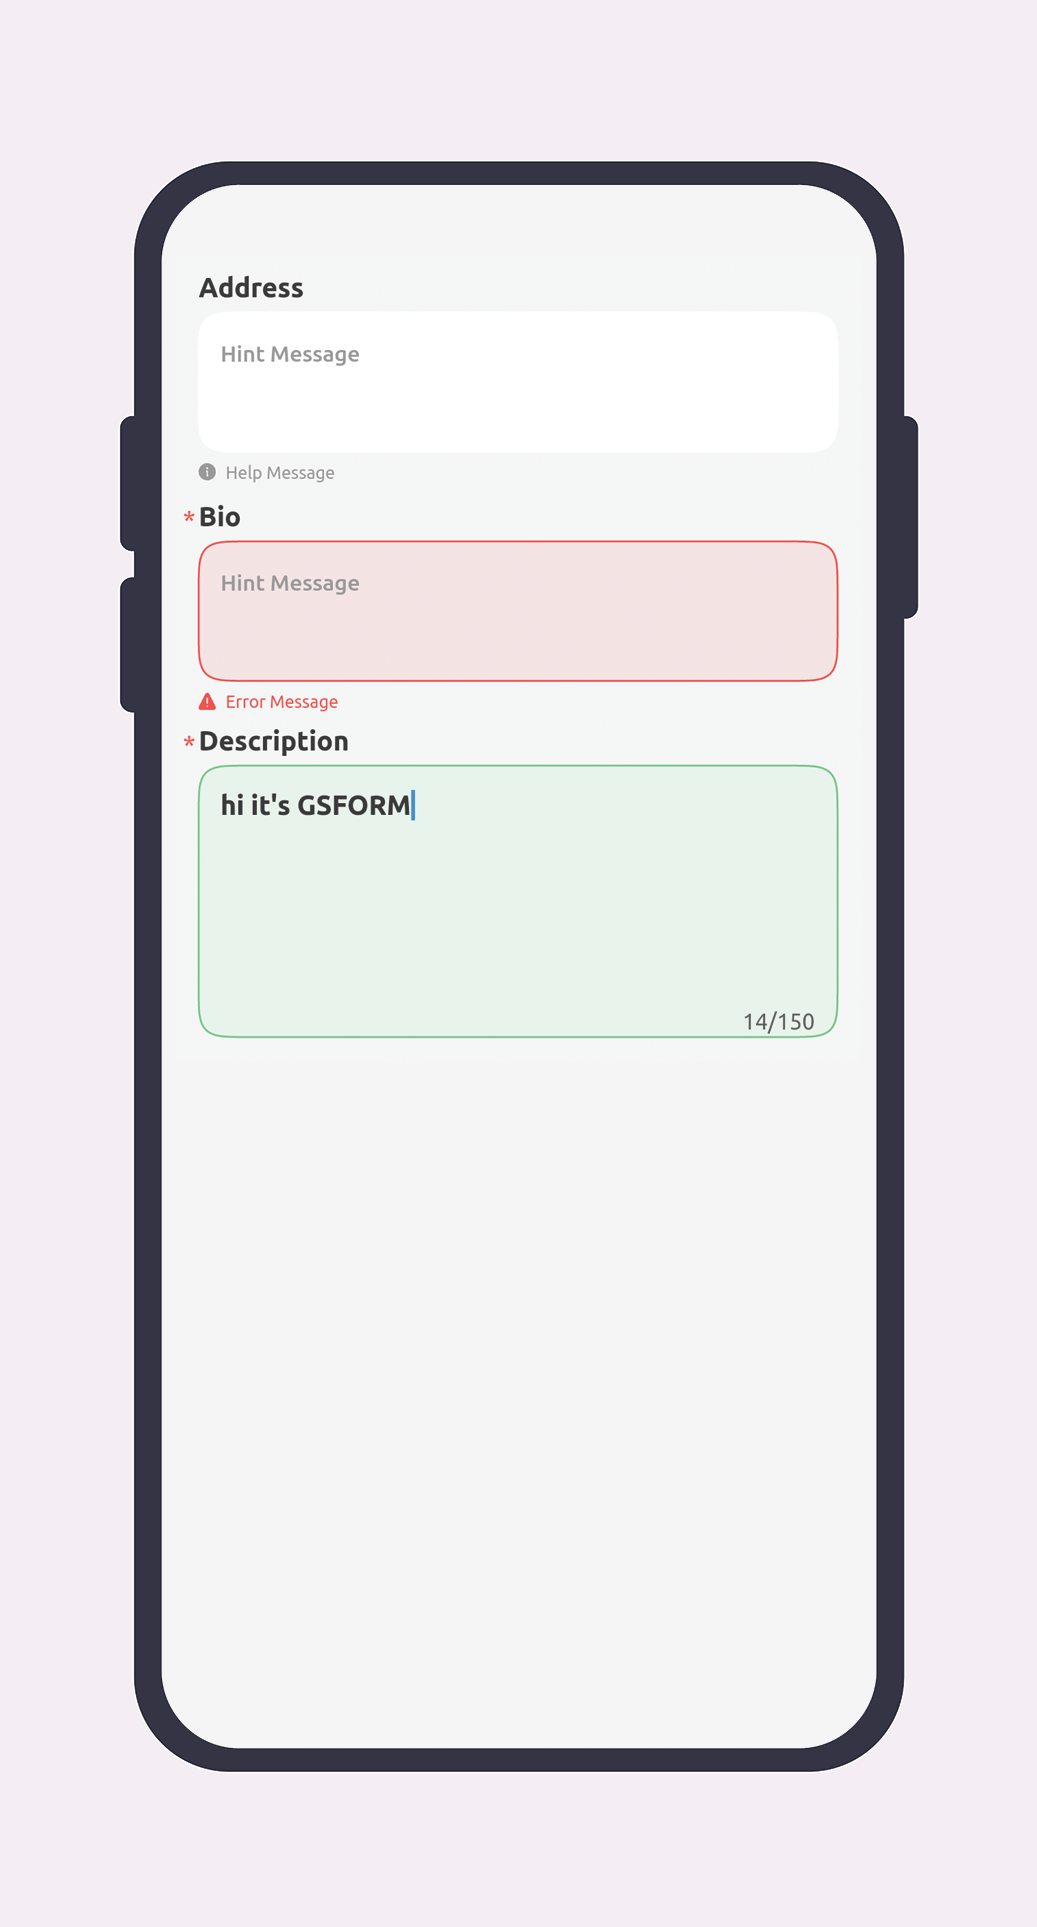
属性
所有字段都有一些通用的属性,例如标题、标签、错误信息、帮助信息、前缀/后缀小部件、是否必填等。这些属性的具体说明如下表所示:
| 属性 | 类型 | 可选值 | 是否必需 | 描述 |
|---|---|---|---|---|
| title | String | - | false | 组件标题 |
| tag | String | - | true | 组件ID,用于接收数据 |
| errorMessage | String | - | false | 错误提示信息 |
| helpMessage | String | - | false | 帮助信息 |
| prefixWidget | Widget | - | false | 前缀小部件 |
| postfixWidget | Widget | - | false | 后缀小部件 |
| required | bool | - | false | 是否必填 |
| showTitle | bool | - | false | 是否显示标题 |
| status | GSFieldStatusEnum | normal, success, error | false | 组件状态 |
| validateRegEx | RegExp | - | false | 自定义正则表达式 |
| weight | int | - | false | 组件权重,一行内最大为12 |
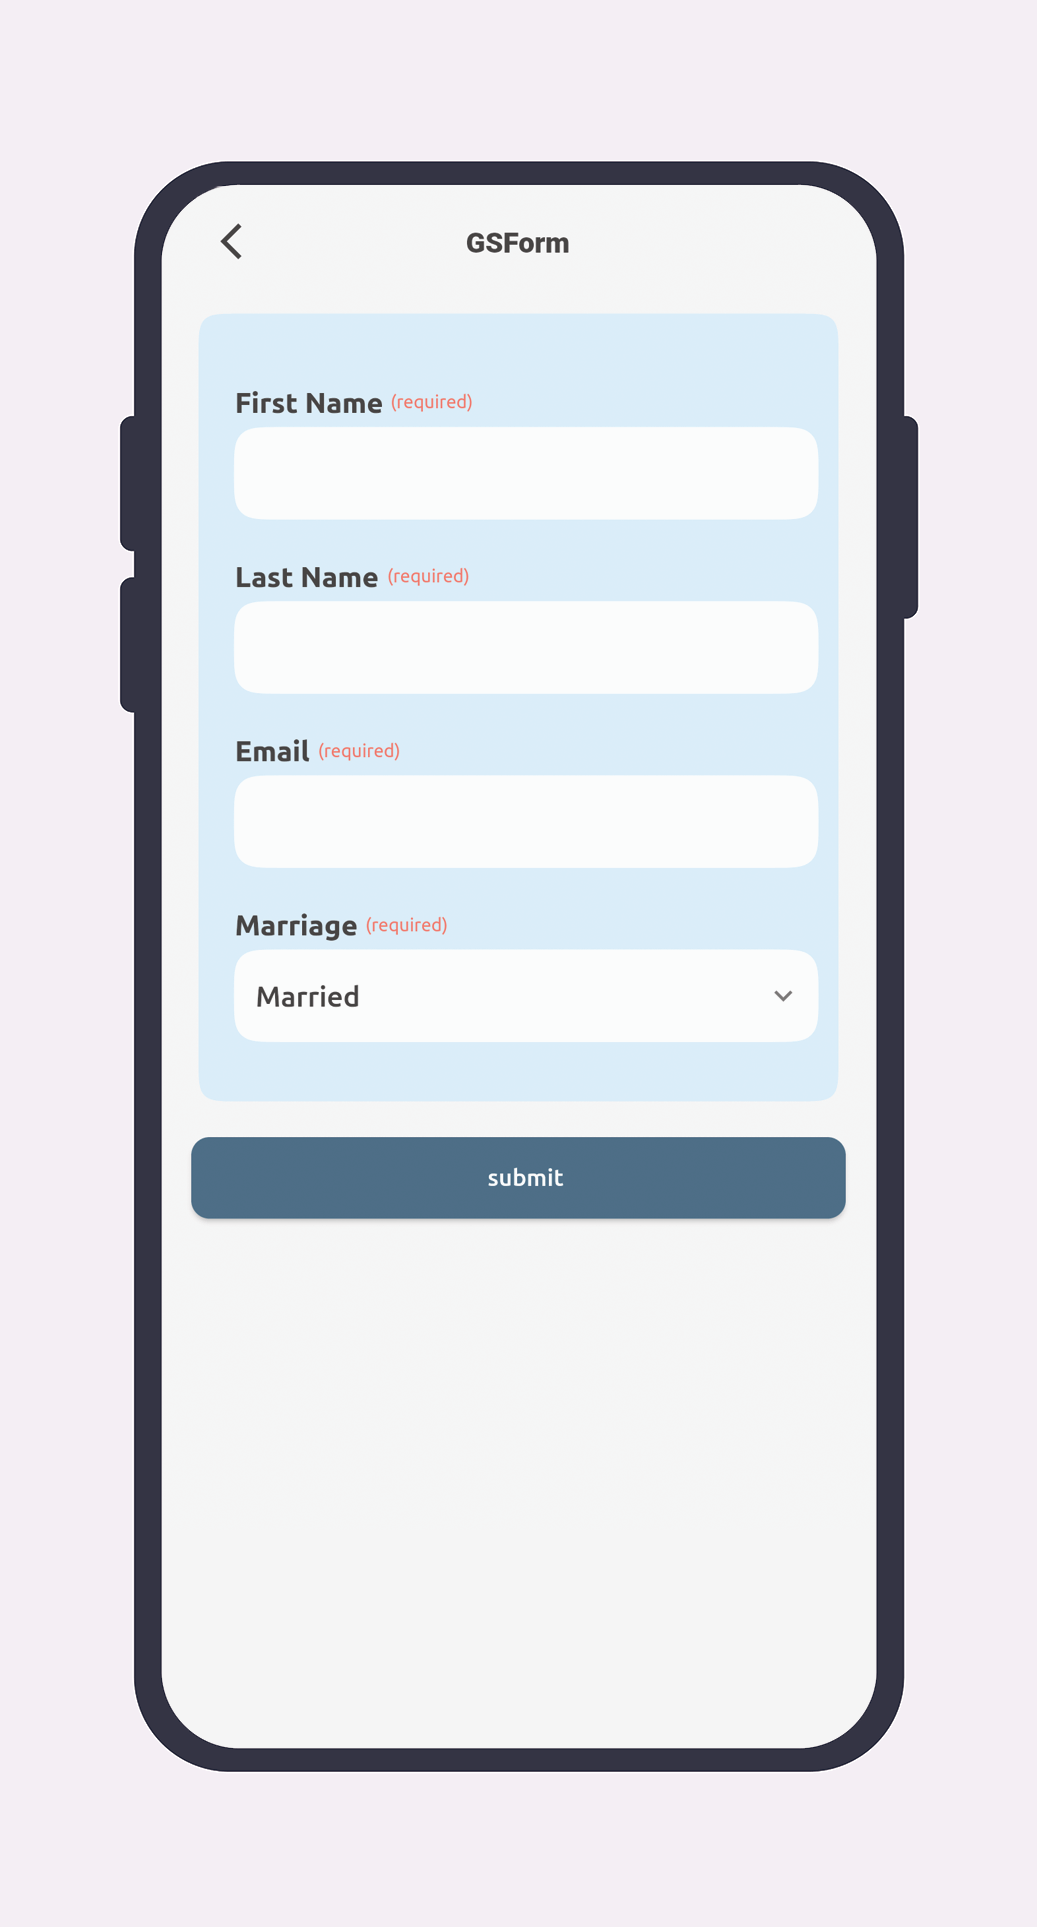
实例演示
接下来,我们将通过一个完整的示例来展示如何使用gsform创建一个包含多个部分的表单。此示例展示了如何创建一个多部分表单以及如何处理提交事件。
主页入口
void main() {
  runApp(const MyApp());
}

class MyApp extends StatelessWidget {
  const MyApp({Key? key}) : super(key: key);

  @override
  Widget build(BuildContext context) {
    return MaterialApp(
      title: 'Flutter Demo',
      debugShowCheckedModeBanner: false,
      themeMode: ThemeMode.light,
      locale: const Locale('en', 'US'),
      supportedLocales: const [Locale('en', 'US'), Locale('fa', 'IR')],
      theme: ThemeData(
        brightness: Brightness.light,
        primaryColor: Colors.blue,
        textTheme: null,
        colorScheme: null,
      ),
      darkTheme: ThemeData(brightness: Brightness.dark, colorScheme: null),
      home: MainTestPage(),
    );
  }
}
页面导航按钮
// ignore: must_be_immutable
class MainTestPage extends StatelessWidget {
  MainTestPage({Key? key}) : super(key: key);

  late GSForm form;

  @override
  Widget build(BuildContext context) {
    return SafeArea(
      child: Scaffold(
        appBar: AppBar(
          title: const Text('GSForm example'),
        ),
        body: Center(
          child: Padding(
            padding: const EdgeInsets.only(top: 0.0),
            child: Column(
              children: [
                ElevatedButton(
                  onPressed: () {
                    Navigator.pushAndRemoveUntil<dynamic>(
                      context,
                      MaterialPageRoute<dynamic>(builder: (BuildContext context) => MultiSectionForm()),
                      (route) => true, //if you want to disable back feature set to false
                    );
                  },
                  child: const Text('Multi Section form'),
                ),
                ElevatedButton(
                  onPressed: () {
                    Navigator.pushAndRemoveUntil<dynamic>(
                        context,
                        MaterialPageRoute<dynamic>(builder: (BuildContext context) => SingleSectionForm()),
                        (route) => true);
                  },
                  child: const Text('Single Section form'),
                ),
              ],
            ),
          ),
        ),
      ),
    );
  }
}
单一部分表单
// ignore: must_be_immutable
class SingleSectionForm extends StatefulWidget {
  SingleSectionForm({Key? key}) : super(key: key);
  String? value;

  late GSFieldStatusEnum status;

  @override
  State<SingleSectionForm> createState() => _SingleSectionFormState();
}

class _SingleSectionFormState extends State<SingleSectionForm> {
  late GSForm form;
  int id = 0;

  @override
  void initState() {
    widget.value = 'dfhbdkfhbdasffffteryuiei577y ';
    widget.status = GSFieldStatusEnum.normal;
    super.initState();
  }

  @override
  Widget build(BuildContext context) {
    return Scaffold(
      appBar: AppBar(
        title: const Text('Single section Page'),
      ),
      body: Padding(
        padding: const EdgeInsets.all(0.0),
        child: Column(
          children: [
            Expanded(
              child: SingleChildScrollView(
                child: Padding(
                  padding: const EdgeInsets.all(20.0),
                  child: form = GSForm.singleSection(
                      style: GSFormStyle(titleStyle: const TextStyle(color: Colors.black87, fontSize: 16.0)),
                      context,
                      fields: [
                        GSField.email(
                          tag: 'email',
                          title: 'login',
                          weight: 12,
                          required: true,
                          maxLength: 100,
                          errorMessage: 'erro',
                          value: 'dastras.saeed@gmail.com',
                        ),
                        GSField.spinner(
                          tag: 'customer_type',
                          required: false,
                          weight: 12,
                          showTitle: false,
                          onChange: (model) {
                            id = model!.id;
                            setState(() {});
                          },
                          items: [
                            SpinnerDataModel(
                              name: 'm1',
                              id: 0,
                            ),
                            SpinnerDataModel(
                              name: 'm2',
                              id: 1,
                            ),
                            SpinnerDataModel(
                              name: 'm3',
                              id: 2,
                            ),
                          ],
                        ),
                        GSField.spinner(
                          tag: 'customer_type',
                          required: false,
                          weight: 6,
                          title: 'Gender',
                          onChange: (model) {},
                          items: [
                            SpinnerDataModel(name: '3', id: 0, isSelected: id == 0),
                            SpinnerDataModel(
                              name: '4',
                              id: 1,
                              isSelected: id == 1,
                            ),
                            SpinnerDataModel(name: '8', id: 2, isSelected: id == 2),
                          ],
                        ),
                      ]),
                ),
              ),
            ),
            Padding(
              padding: const EdgeInsets.all(16.0),
              child: Row(
                children: [
                  Expanded(
                    flex: 1,
                    child: ElevatedButton(
                      onPressed: () {
                        bool isValid = form.isValid();
                        Map<String, dynamic> map = form.onSubmit();
                        debugPrint(map.toString());
                        debugPrint(isValid.toString());
                        setState(() {});
                      },
                      child: const Text('Submit'),
                    ),
                  ),
                ],
              ),
            ),
          ],
        ),
      ),
    );
  }
}
多部分表单
// ignore: must_be_immutable
class MultiSectionForm extends StatelessWidget {
  MultiSectionForm({Key? key}) : super(key: key);

  late GSForm form;

  @override
  Widget build(BuildContext context) {
    return Scaffold(
      appBar: AppBar(
        title: const Text('Multi section screen'),
      ),
      body: Padding(
        padding: const EdgeInsets.only(left: 12.0, right: 12, top: 24),
        child: Column(
          children: [
            Expanded(
              child: SingleChildScrollView(
                child: form = GSForm.multiSection(context, sections: [
                  GSSection(sectionTitle: 'User information', fields: [
                    GSField.text(
                      value: 'Some text',
                      tag: 'name',
                      title: 'Name',
                      minLine: 1,
                      maxLine: 1,
                    ),
                    GSField.text(
                      value: 'Some text',
                      tag: 'name',
                      title: 'Name',
                      minLine: 1,
                      maxLine: 1,
                    ),
                    GSField.radioGroup(
                      hint: 'Radio Group',
                      tag: 'radio',
                      showScrollBar: true,
                      scrollBarColor: Colors.red,
                      scrollDirection: Axis.horizontal,
                      height: 50,
                      scrollable: true,
                      required: true,
                      weight: 12,
                      title: 'Size number',
                      searchable: false,
                      searchHint: 'Search...',
                      searchIcon: const Icon(Icons.search),
                      searchBoxDecoration: BoxDecoration(
                        border: Border.all(
                          color: Colors.blue,
                          width: 1,
                        ),
                        borderRadius: BorderRadius.circular(8),
                      ),
                      items: [
                        RadioDataModel(title: 'lorem', isSelected: false),
                        RadioDataModel(title: 'ipsum', isSelected: false),
                      ],
                      callBack: (data) {},
                    ),
                    GSField.datePicker(
                      calendarType: GSCalendarType.gregorian,
                      tag: 'licenceExpireDate',
                      title: 'DatePicker',
                      weight: 12,
                      required: false,
                      initialDate: GSDate(day: 10, month: 5, year: 2023),
                      errorMessage: 'please enter a name',
                    ),
                    GSField.text(
                      value: 'سعید دسترس3',
                      tag: 'lastName',
                      title: 'Last name',
                      minLine: 1,
                      maxLine: 1,
                      weight: 12,
                      required: true,
                    ),
                    GSField.spinner(
                      tag: 'customer_type',
                      required: false,
                      weight: 6,
                      title: 'Gender',
                      value: SpinnerDataModel(
                        name: 'woman',
                        id: 2,
                      ),
                      onChange: (model) {},
                      items: [
                        SpinnerDataModel(
                          name: 'man',
                          id: 1,
                        ),
                        SpinnerDataModel(
                          name: 'woman',
                          id: 2,
                        ),
                        SpinnerDataModel(
                          name: 'woman',
                          id: 2,
                        ),
                      ],
                    ),
                    GSField.mobile(
                      tag: 'mobile',
                      title: 'Phone number',
                      maxLength: 11,
                      helpMessage: '9357814747',
                      weight: 6,
                      required: false,
                      errorMessage: 'some error',
                    ),
                  ]),
                  GSSection(
                    sectionTitle: 'Market information',
                    fields: [
                      GSField.text(
                        tag: 'name',
                        title: 'Market name',
                        minLine: 1,
                        maxLine: 1,
                        weight: 12,
                        required: false,
                        errorMessage: 'please enter a name',
                      ),
                      GSField.textPlain(
                        hint: 'sds',
                        tag: 'lastName',
                        title: 'Market address',
                        maxLine: 4,
                        maxLength: 233,
                        showCounter: false,
                        weight: 12,
                        prefixWidget: const Icon(Icons.location_city, color: Colors.blue),
                        required: true,
                      ),
                      GSField.spinner(
                        tag: 'customer_type',
                        required: false,
                        weight: 6,
                        title: 'Market type',
                        items: [
                          SpinnerDataModel(
                            name: 'Super market',
                            id: 1,
                          ),
                          SpinnerDataModel(
                            name: 'woman',
                            id: 2,
                          ),
                        ],
                      ),
                      GSField.mobile(
                        tag: 'mobile',
                        title: 'Telephone',
                        maxLength: 11,
                        helpMessage: '9357814747',
                        weight: 6,
                        required: false,
                        errorMessage: 'some error',
                      ),
                    ],
                  ),
                ]),
              ),
            ),
            Padding(
              padding: const EdgeInsets.all(16.0),
              child: Row(
                children: [
                  Expanded(
                    flex: 1,
                    child: ElevatedButton(
                      onPressed: () {
                        bool isValid = form.isValid();
                        Map<String, dynamic> map = form.onSubmit();
                        debugPrint(isValid.toString());
                        debugPrint(map.toString());
                      },
                      child: const Text('Submit'),
                    ),
                  ),
                ],
              ),
            ),
          ],
        ),
      ),
    );
  }
}
通过以上代码,我们可以看到gsform的强大之处在于它能够快速搭建复杂的表单结构,并且提供了丰富的配置选项来满足不同的需求。希望这个帖子能帮助你更好地理解和使用gsform插件!
更多关于Flutter表单生成插件gsform的使用_gsform 是一个用于Flutter应用程序的表单生成库的实战教程也可以访问 https://www.itying.com/category-92-b0.html

更多关于Flutter表单生成插件gsform的使用_gsform 是一个用于Flutter应用程序的表单生成库的实战系列教程也可以访问 https://www.itying.com/category-92-b0.html
在探索使用Flutter中未知的第三方插件,如gsform时,了解其功能和API文档是非常重要的步骤。由于gsform可能是一个特定领域或小众的插件,没有直接的官方文档或广泛的使用案例,我们可以通过分析插件的源代码或示例代码来了解其使用方法。
假设你已经通过pubspec.yaml文件添加了gsform插件,并且已经完成了基本的Flutter项目设置。以下是一个基于假设的代码示例,展示如何可能使用gsform插件(请注意,这里的代码是虚构的,因为gsform的具体API和功能未知,但我会尽量提供一个合理的结构)。
首先,确保你的pubspec.yaml文件中包含了gsform插件的依赖项:
dependencies:
  flutter:
    sdk: flutter
  gsform: ^x.y.z  # 替换为实际的版本号
然后,在你的Flutter项目中,你可以尝试以下方式使用gsform插件:
import 'package:flutter/material.dart';
import 'package:gsform/gsform.dart';  // 假设这是gsform插件的导入路径

void main() {
  runApp(MyApp());
}

class MyApp extends StatelessWidget {
  @override
  Widget build(BuildContext context) {
    return MaterialApp(
      title: 'Flutter Demo',
      theme: ThemeData(
        primarySwatch: Colors.blue,
      ),
      home: MyHomePage(),
    );
  }
}

class MyHomePage extends StatefulWidget {
  @override
  _MyHomePageState createState() => _MyHomePageState();
}

class _MyHomePageState extends State<MyHomePage> {
  // 假设gsform有一个初始化函数和配置选项
  late GSFormController gsFormController;

  @override
  void initState() {
    super.initState();
    // 初始化gsform插件
    gsFormController = GSFormController(
      // 假设需要一些配置参数
      apiKey: 'your_api_key',  // 替换为你的实际API密钥
      endpoint: 'https://example.com/gsform/endpoint',  // 替换为实际的API端点
    );

    // 监听gsform的事件,如提交成功或失败
    gsFormController.onSubmitSuccess.listen((event) {
      print('Form submitted successfully: $event');
      // 处理提交成功的情况
    });

    gsFormController.onSubmitFailure.listen((error) {
      print('Form submission failed: $error');
      // 处理提交失败的情况
    });
  }

  @override
  Widget build(BuildContext context) {
    return Scaffold(
      appBar: AppBar(
        title: Text('GSForm Example'),
      ),
      body: Padding(
        padding: const EdgeInsets.all(16.0),
        child: Column(
          crossAxisAlignment: CrossAxisAlignment.start,
          children: [
            // 假设gsform提供了一个widget来展示表单
            GSFormWidget(
              controller: gsFormController,
              fields: [
                // 定义表单字段
                GSFormField(
                  label: 'Name',
                  type: GSFormFieldType.text,
                  required: true,
                ),
                GSFormField(
                  label: 'Email',
                  type: GSFormFieldType.email,
                  required: true,
                ),
                // 添加更多字段...
              ],
              onSubmit: () {
                // 提交表单
                gsFormController.submit();
              },
            ),
          ],
        ),
      ),
    );
  }

  @override
  void dispose() {
    // 释放资源
    gsFormController.dispose();
    super.dispose();
  }
}

// 假设的GSFormController和GSFormWidget类
// 这些类应该由gsform插件提供,以下只是假设的API结构
class GSFormController {
  String apiKey;
  String endpoint;
  StreamController<String> onSubmitSuccess = StreamController<String>();
  StreamController<dynamic> onSubmitFailure = StreamController<dynamic>();

  GSFormController({required this.apiKey, required this.endpoint});

  void submit() {
    // 提交表单的逻辑
    // 假设这里发送HTTP请求到endpoint
    // 并根据响应触发onSubmitSuccess或onSubmitFailure事件
  }

  void dispose() {
    onSubmitSuccess.close();
    onSubmitFailure.close();
  }
}

class GSFormWidget extends StatefulWidget {
  final GSFormController controller;
  final List<GSFormField> fields;
  final VoidCallback onSubmit;

  GSFormWidget({required this.controller, required this.fields, required this.onSubmit});

  @override
  _GSFormWidgetState createState() => _GSFormWidgetState();
}

class _GSFormWidgetState extends State<GSFormWidget> {
  // 实现表单的UI和逻辑
  @override
  Widget build(BuildContext context) {
    // 渲染表单字段和提交按钮
    // ...
    return Column(children: []);
  }
}

class GSFormField {
  String label;
  GSFormFieldType type;
  bool required;

  GSFormField({required this.label, required this.type, required this.required});
}

enum GSFormFieldType {
  text,
  email,
  // 添加更多字段类型...
}
请注意,上述代码完全是基于假设的,因为gsform插件的具体API和功能未知。在实际使用中,你应该参考gsform插件的官方文档或源代码来了解如何正确初始化和使用该插件。如果gsform插件没有提供文档,你可以尝试查看其源代码或在其GitHub仓库中查找示例代码。