


Flutter树状图展示插件progression_tree_map的使用
Flutter树状图展示插件progression_tree_map的使用
Progression TreeMap 是一个开源的Flutter包,用于在UI中显示树形列表。您可以使用它来解释任何复杂的树或进度图,并根据需要进行自定义。
如何使用
添加依赖
首先,在您的 pubspec.yaml 文件中添加以下依赖:
dependencies:
  progression_tree_map: ^1.1.0
然后确保导入该库:
import 'package:progression_tree_map/progression_tree_map.dart';
该包会生成左侧树形图对应的用户界面(UI)。
示例用法
创建一个包含节点及其子列表的变量,如下所示:
Map<TreeNode?, List<TreeNode>> nodes = {
  TreeNode(): [
    TreeNode(nodes: [
      TreeNode(),
      TreeNode(nodes: [
        TreeNode(nodes: [
          TreeNode(nodes: [TreeNode(), TreeNode()])
        ])
      ])
    ])
  ]
};
然后调用 ProgressionTreeMap 组件:
ProgressionTreeMap(treeNodes: nodes);
截图与实现示例
示例 1 - 带颜色和边框的节点

ProgressionTreeMap(
    treeNodes: nodes,
    circleBoundaryColor: Colors.grey.shade300,
    circleBoundaryShade: false,
    nodeSeparationAngleFac: 1.3,
    globalNodeSize: 20,
    centerNodeSize: 40,
    circleBoundaryStrokeWidth: 1.5,
    linesStrokeWidth: 2,
    linesStrokeColor: Colors.blueAccent,
    nodeDecoration: const BoxDecoration(
        shape: BoxShape.circle, color: Colors.blueAccent)
)
示例 2 - 带颜色和图标的节点
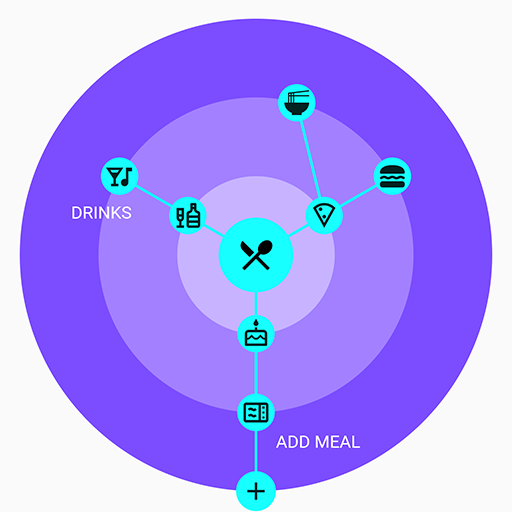
ProgressionTreeMap(
    treeNodes: nodes,
    circleBoundaryPaintingStyle: PaintingStyle.fill,
    circleBoundaryColor: Colors.deepPurpleAccent,
    nodePlacement: NodesPlacement.border,
    nodeSeparationAngleFac: 3,
    globalNodeSize: 30,
    centerNodeSize: 60,
    linesStartFromOrigin: true,
    linesStrokeWidth: 2,
    linesStrokeColor: Colors.cyanAccent,
    nodeDecoration: const BoxDecoration(
        shape: BoxShape.circle, color: Colors.cyanAccent)
)
示例 3 - 发光节点和背景文本

ProgressionTreeMap(
    treeNodes: nodes,
    circleBoundaryPaintingStyle: PaintingStyle.fill,
    circleBoundaryColor: Colors.red,
    nodePlacement: NodesPlacement.centerOut,
    nodeSeparationAngleFac: 1.2,
    globalNodeSize: 20,
    centerNodeSize: 40,
    linesStrokeWidth: 3,
    nodeDecoration: const BoxDecoration(
        shape: BoxShape.circle, gradient: RadialGradient(
            colors: [Colors.white, Colors.white30])
    )
)
示例 4 - 集合和UI元素
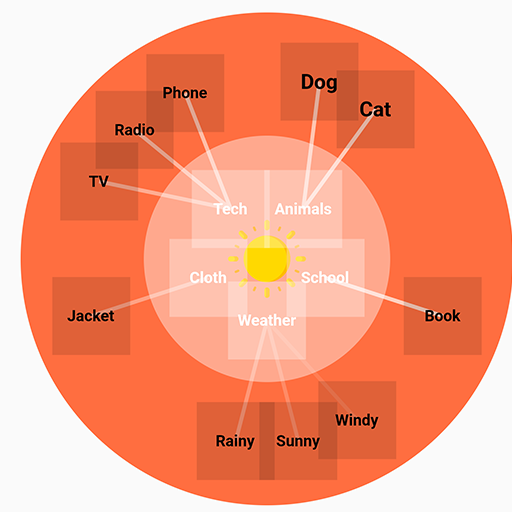
ProgressionTreeMap(
    treeNodes: nodes,
    circleBoundaryPaintingStyle: PaintingStyle.fill,
    circleBoundaryColor: Colors.deepOrangeAccent,
    nodePlacement: NodesPlacement.centerIn,
    nodeSeparationAngleFac: 1.3,
    centerNodeSize: 60,
    linesStartFromOrigin: false,
    linesStrokeWidth: 3,
    linesStrokeColor: Colors.white10)
),
更多信息
TreeNode 可以有多个属性,您可以单独自定义每个属性,如下所示:
TreeNode(
    child: Icon(
        Icons.restaurant_menu,
        color: Colors.black,
        size: 32,
    ),
    decoration: BoxDecoration(shape: BoxShape.circle, color: Colors.blue),
    size: 30
)
非常灵活,可以根据您的需求自由定制!😎
完整示例代码
import 'package:flutter/material.dart';
import 'package:progression_tree_map/progression_tree_map.dart';

void main() {
  runApp(const MyApp());
}

class MyApp extends StatelessWidget {
  const MyApp({super.key});

  @override
  Widget build(BuildContext context) {
    return const MaterialApp(
      home: ProgressionTreeHome(),
    );
  }
}

class ProgressionTreeHome extends StatelessWidget {
  const ProgressionTreeHome({super.key});

  @override
  Widget build(BuildContext context) {
    return Scaffold(
      appBar: AppBar(
        title: const Text(
          "Progression TreeMap Demo",
          style: TextStyle(color: Colors.black),
        ),
      ),
      body: SingleChildScrollView(
        padding: const EdgeInsets.all(16),
        child: Column(
          mainAxisAlignment: MainAxisAlignment.center,
          children: <Widget>[
            ..._titleAndMapWidgets(
                title: "Colored Nodes & Outlines",
                map: ProgressionTreeMap(
                  treeNodes: _tNodeColoredNodesAndOutlines,
                  circleBoundaryColor: Colors.grey.shade300,
                  circleBoundaryShade: false,
                  nodeSeparationAngleFac: 1.3,
                  globalNodeSize: 20,
                  centerNodeSize: 40,
                  circleBoundaryStrokeWidth: 1.5,
                  linesStrokeWidth: 2,
                  linesStrokeColor: Colors.blueAccent,
                  nodeDecoration: const BoxDecoration(
                      shape: BoxShape.circle, color: Colors.blueAccent),
                )),
            // 其他示例同理...
          ],
        ),
      ),
    );
  }

  Map<TreeNode?, List<TreeNode>> get _tNodeColoredNodesAndOutlines => {
    const TreeNode(): [
      TreeNode(
          partnerWidget: const Text(
            "HEALTH",
            style: TextStyle(
                color: Colors.grey,
                fontWeight: FontWeight.w400,
                fontSize: 12),
          ),
          partnerWidgetOffset: const Offset(0, 20),
          popUpWidget: const Column(
            children: [
              Text("Widget title is here"),
            ],
          ),
          decoration: const BoxDecoration(color: Colors.red),
          nodes: [
            TreeNode(nodes: [
              const TreeNode(size: 15),
              TreeNode(
                  nodes: [
                    TreeNode(
                        decoration: BoxDecoration(
                            shape: BoxShape.circle,
                            color: Colors.blue.shade300))
                  ],
                  decoration: BoxDecoration(
                      shape: BoxShape.circle, color: Colors.blue.shade300)),
              const TreeNode()
            ])
          ]),
      // 其他节点同理...
    ]
  };

  List<Widget> _titleAndMapWidgets(
      {required String title, required Widget map}) =>
      [
        Container(
          alignment: Alignment.centerLeft,
          padding: const EdgeInsets.symmetric(vertical: 18),
          child: Text(
            title,
            maxLines: 1,
            style: const TextStyle(
                fontSize: 18,
                fontWeight: FontWeight.w500,
                letterSpacing: 0,
                color: Colors.black),
          ),
        ),
        SizedBox(
          width: 400,
          height: 400,
          child: map,
        ),
        const SizedBox(
          height: 48,
        ),
      ];
}
以上是一个完整的示例代码,展示了如何使用 progression_tree_map 包来创建和展示树状图。
更多关于Flutter树状图展示插件progression_tree_map的使用的实战教程也可以访问 https://www.itying.com/category-92-b0.html

更多关于Flutter树状图展示插件progression_tree_map的使用的实战系列教程也可以访问 https://www.itying.com/category-92-b0.html
当然,以下是一个关于如何使用Flutter中的progression_tree_map插件来展示树状图的示例代码。这个插件可以帮助你以图形化的方式展示层级数据。
首先,确保你已经在pubspec.yaml文件中添加了progression_tree_map依赖:
dependencies:
  flutter:
    sdk: flutter
  progression_tree_map: ^最新版本号 # 请替换为当前最新版本号
然后,运行flutter pub get来安装依赖。
接下来,下面是一个完整的Flutter应用示例,展示了如何使用progression_tree_map插件:
import 'package:flutter/material.dart';
import 'package:progression_tree_map/progression_tree_map.dart';

void main() {
  runApp(MyApp());
}

class MyApp extends StatelessWidget {
  @override
  Widget build(BuildContext context) {
    return MaterialApp(
      title: 'Flutter Tree Map Demo',
      theme: ThemeData(
        primarySwatch: Colors.blue,
      ),
      home: TreeMapPage(),
    );
  }
}

class TreeMapPage extends StatelessWidget {
  final List<TreeMapNode> data = [
    TreeMapNode(
      'Root',
      100,
      children: [
        TreeMapNode('Child 1', 40),
        TreeMapNode('Child 2', 30, children: [
          TreeMapNode('Grandchild 1', 20),
          TreeMapNode('Grandchild 2', 10),
        ]),
        TreeMapNode('Child 3', 30),
      ],
    ),
  ];

  @override
  Widget build(BuildContext context) {
    return Scaffold(
      appBar: AppBar(
        title: Text('Tree Map Demo'),
      ),
      body: Padding(
        padding: const EdgeInsets.all(16.0),
        child: TreeMap(
          nodes: data,
          tileBuilder: (context, node) {
            return Container(
              color: Colors.blueGrey[node.depth * 100],
              child: Center(
                child: Text(
                  '${node.name}\n${node.value}',
                  style: TextStyle(color: Colors.white),
                ),
              ),
            );
          },
          onTileTap: (node) {
            print('Tile tapped: ${node.name}');
          },
        ),
      ),
    );
  }
}

class TreeMapNode {
  final String name;
  final int value;
  final List<TreeMapNode>? children;
  final int depth;

  TreeMapNode(this.name, this.value, {this.children, int? initialDepth})
      : depth = initialDepth ?? 0;
}
解释:
-
依赖引入:在
pubspec.yaml文件中添加progression_tree_map依赖。 -
数据模型:定义一个
TreeMapNode类来表示树状图中的一个节点。每个节点有一个名称、一个值、一个子节点列表以及一个深度属性。 -
UI构建:
MyApp是应用的入口,它包含一个MaterialApp。TreeMapPage是主页面,它包含一个Scaffold,在body中展示了一个TreeMap。TreeMap组件接收一个节点列表(nodes)和一个tileBuilder函数,用于构建每个节点的UI。tileBuilder函数返回一个Container,其中包含节点的名称和值。颜色根据节点的深度变化。onTileTap回调用于处理节点点击事件。
注意:
progression_tree_map插件的具体API可能会有所不同,上述代码是一个假设性的示例。如果你使用的版本API有所不同,请参考该版本的文档进行调整。- 由于
progression_tree_map插件可能不是官方或广泛使用的插件,所以具体的实现和API可能会有所变化。如果找不到这个插件或API不兼容,可以考虑使用其他树状图展示插件或自定义实现。
希望这个示例对你有帮助!如果有更多问题,欢迎继续提问。