


Flutter获取当前位置插件current_location的使用
Flutter获取当前位置插件current_location的使用
简介
这个插件可以获取用户的当前位置信息。返回的数据包括以下内容:
Location({
    this.country,
    this.countryCode,
    this.region,
    this.regionName,
    this.timezone,
    this.latitude,
    this.longitude,
    this.isp,
    this.currentIP,
});
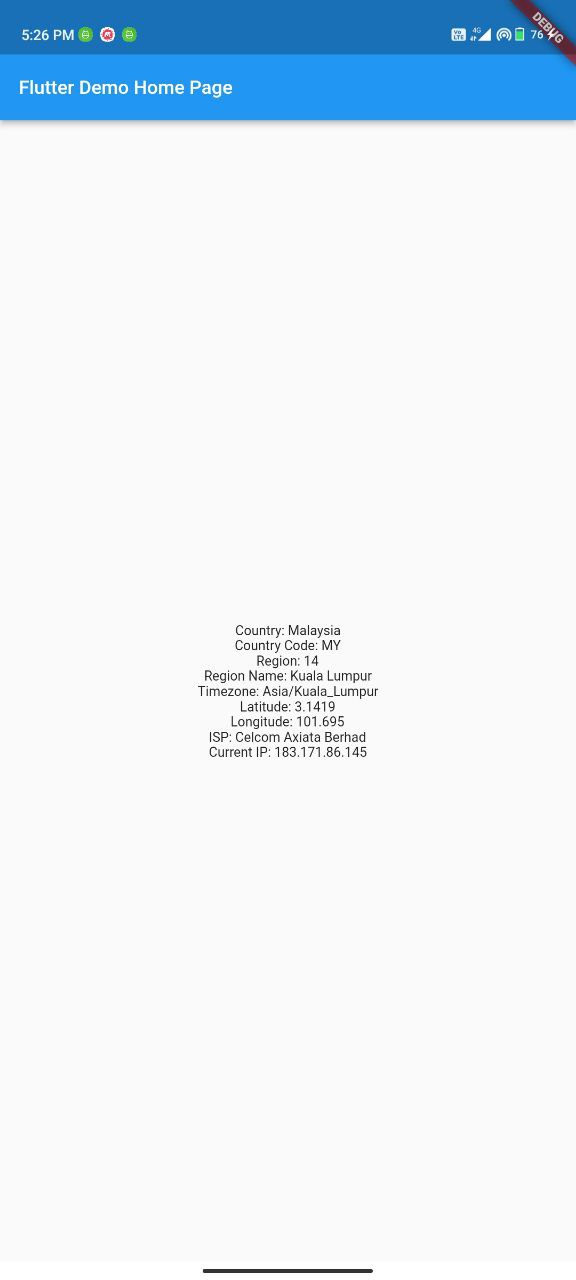
以下是演示图示:
如何使用?
-
安装
在
pubspec.yaml中添加current_location,并运行flutter pub get命令。或者运行:
flutter pub add current_locationpubspec.yaml文件中的依赖项配置如下:dependencies: current_location: any -
实现
在实现之前,请确保你理解了参数。
首先需要导入包:
import 'package:current_location/current_location.dart';下面是一个在小部件中调用函数的示例:
FutureBuilder(
    future: UserLocation.getValue(),
    builder: (BuildContext context, dynamic snapshot) {
        if (snapshot.hasData) {
            return Center(
                child: Column(
                    mainAxisAlignment: MainAxisAlignment.center,
                    crossAxisAlignment: CrossAxisAlignment.center,
                    children: [
                        Text('Country: ${snapshot.data!.country}'), // 国家
                        Text('Country Code: ${snapshot.data!.countryCode}'), // 国家代码
                        Text('Region: ${snapshot.data!.region}'), // 地区
                        Text('Region Name: ${snapshot.data!.regionName}'), // 地区名称
                        Text('Timezone: ${snapshot.data!.timezone}'), // 时区
                        Text('Latitude: ${snapshot.data!.latitude}'), // 纬度
                        Text('Longitude: ${snapshot.data!.longitude}'), // 经度
                        Text('ISP: ${snapshot.data!.isp}'), // ISP
                        Text('Current IP: ${snapshot.data!.currentIP}'), // 当前IP
                    ],
                ),
            );
        }

        return const CircularProgressIndicator(); // 加载指示器
    },
)
返回原始数据的示例:
UserLocation.getValue().then((value) => print(value?.{REPLACE_THIS_OBJECT}));或者
late final UserLocation userLocation =  await UserLocation.getValue();

print(userLocation.country!);
print(userLocation.{REPLACE_THIS_OBJECT}!)
完整示例Demo
下面是一个完整的Flutter应用示例,展示了如何使用current_location插件来获取当前位置信息:
import 'package:current_location/current_location.dart';
import 'package:flutter/material.dart';

void main() {
  runApp(const MyApp());
}

class MyApp extends StatelessWidget {
  const MyApp({Key? key}) : super(key: key);

  [@override](/user/override)
  Widget build(BuildContext context) {
    return MaterialApp(
      title: 'Flutter Demo',
      theme: ThemeData(
        primarySwatch: Colors.blue,
      ),
      home: const MyHomePage(title: 'Flutter Demo Home Page'),
    );
  }
}

class MyHomePage extends StatefulWidget {
  const MyHomePage({Key? key, required this.title}) : super(key: key);

  final String title;

  [@override](/user/override)
  State<MyHomePage> createState() => _MyHomePageState();
}

class _MyHomePageState extends State<MyHomePage> {
  [@override](/user/override)
  Widget build(BuildContext context) {
    return Scaffold(
      appBar: AppBar(
        title: Text(widget.title),
      ),
      body: FutureBuilder(
        future: UserLocation.getValue(), // 获取位置信息
        builder: (BuildContext context, dynamic snapshot) {
          if (snapshot.hasData) {
            return Center(
              child: Column(
                mainAxisAlignment: MainAxisAlignment.center,
                crossAxisAlignment: CrossAxisAlignment.center,
                children: [
                  Text('Country: ${snapshot.data!.country}'), // 国家
                  Text('Country Code: ${snapshot.data!.countryCode}'), // 国家代码
                  Text('Region: ${snapshot.data!.region}'), // 地区
                  Text('Region Name: ${snapshot.data!.regionName}'), // 地区名称
                  Text('Timezone: ${snapshot.data!.timezone}'), // 时区
                  Text('Latitude: ${snapshot.data!.latitude}'), // 纬度
                  Text('Longitude: ${snapshot.data!.longitude}'), // 经度
                  Text('ISP: ${snapshot.data!.isp}'), // ISP
                  Text('Current IP: ${snapshot.data!.currentIP}'), // 当前IP
                ],
              ),
            );
          }
          return const CircularProgressIndicator(); // 加载指示器
        },
      ),
    );
  }
}
更多关于Flutter获取当前位置插件current_location的使用的实战教程也可以访问 https://www.itying.com/category-92-b0.html
1 回复

更多关于Flutter获取当前位置插件current_location的使用的实战系列教程也可以访问 https://www.itying.com/category-92-b0.html
当然,下面是一个使用Flutter插件current_location来获取当前位置的示例代码。这个示例将展示如何请求位置权限、获取当前位置并在UI上显示这些信息。
首先,确保你在pubspec.yaml文件中添加了current_location依赖:
dependencies:
  flutter:
    sdk: flutter
  current_location: ^x.y.z  # 请将x.y.z替换为当前最新版本号
然后,运行flutter pub get来安装依赖。
接下来是主要的Dart代码,通常放在lib/main.dart文件中:
import 'package:flutter/material.dart';
import 'package:current_location/current_location.dart';
import 'package:permission_handler/permission_handler.dart';

void main() {
  runApp(MyApp());
}

class MyApp extends StatelessWidget {
  @override
  Widget build(BuildContext context) {
    return MaterialApp(
      home: LocationScreen(),
    );
  }
}

class LocationScreen extends StatefulWidget {
  @override
  _LocationScreenState createState() => _LocationScreenState();
}

class _LocationScreenState extends State<LocationScreen> {
  String _locationStatus = "Checking location...";
  double? _latitude;
  double? _longitude;

  @override
  void initState() {
    super.initState();
    _getCurrentLocation();
  }

  Future<void> _getCurrentLocation() async {
    // 请求位置权限
    var status = await Permission.locationWhenInUse.status;
    if (!status.isGranted) {
      var result = await Permission.locationWhenInUse.request();
      if (!result.isGranted) {
        setState(() {
          _locationStatus = "Location permission denied.";
        });
        return;
      }
    }

    // 获取当前位置
    var locationResult = await CurrentLocation.getLocation();
    if (locationResult.error != null) {
      setState(() {
        _locationStatus = "Error fetching location: ${locationResult.error!.message}";
      });
      return;
    }

    setState(() {
      _locationStatus = "Location fetched successfully.";
      _latitude = locationResult.latitude;
      _longitude = locationResult.longitude;
    });
  }

  @override
  Widget build(BuildContext context) {
    return Scaffold(
      appBar: AppBar(
        title: Text("Current Location Example"),
      ),
      body: Center(
        child: Column(
          mainAxisAlignment: MainAxisAlignment.center,
          children: <Widget>[
            Text(
              _locationStatus,
              style: TextStyle(fontSize: 20),
            ),
            SizedBox(height: 20),
            if (_latitude != null && _longitude != null)
              Text(
                "Latitude: $_latitude, Longitude: $_longitude",
                style: TextStyle(fontSize: 18),
              ),
          ],
        ),
      ),
    );
  }
}
注意事项
-
权限处理:
- 代码中使用了
permission_handler插件来处理位置权限请求。确保你同样在pubspec.yaml中添加了permission_handler依赖。
- 代码中使用了
-
iOS配置:
- 如果你在iOS上运行这个示例,确保在
Info.plist文件中添加了必要的权限描述,例如:<key>NSLocationWhenInUseUsageDescription</key> <string>We need your location to provide services</string>
- 如果你在iOS上运行这个示例,确保在
-
Android配置:
- 在Android上,你可能需要在
AndroidManifest.xml中添加位置权限声明:<uses-permission android:name="android.permission.ACCESS_FINE_LOCATION"/> <uses-permission android:name="android.permission.ACCESS_COARSE_LOCATION"/>
- 在Android上,你可能需要在
这个示例代码展示了如何使用current_location插件来获取当前位置,并在UI上显示位置信息。如果有任何问题或需要进一步的帮助,请告诉我!