


Flutter Zalo登录集成插件flutter_zalo_login的使用
Flutter Zalo登录集成插件flutter_zalo_login的使用
1. 插件介绍
Flutter Zalo Login 是一个用于在Flutter应用中集成Zalo登录功能的插件。通过该插件,开发者可以轻松实现Zalo用户的登录、获取用户信息以及登出等功能。
插件图标


登录演示
2. 安装
2.1 添加依赖
在项目的 pubspec.yaml 文件中添加以下依赖:
dependencies:
  flutter_zalo_login:
3. 使用方法
3.1 初始化
在 initState 中调用 ZaloLogin().init() 方法进行初始化:
[@override](/user/override)
void initState() {
  super.initState();
  _initZalo();
}

void _initZalo() async {
  String hashKey = await ZaloLogin().init();
  setState(() {
    _hashKey = hashKey;
  });
  log('$hashKey');
}
3.2 登录
调用 ZaloLogin().logIn() 方法进行登录,返回类型为 ZaloLoginResult,包含以下属性:
| 属性名 | 类型 |
|---|---|
| userId | String |
| errorCode | int |
| errorMessage | String |
| oauthCode | String |
示例代码:
void _loginZalo() async {
  ZaloLoginResult res = await ZaloLogin().logIn();
  setState(() {
    zaloLoginResult = res;
  });
  log('${res.toJson()}');
}
3.3 检查是否已登录
调用 ZaloLogin().isAuthenticated() 方法检查用户是否已登录,返回类型为 bool:
void _isAuthenticated() async {
  bool isAuthenticated = await ZaloLogin().isAuthenticated();
  log('$isAuthenticated');
  setState(() {
    _authenticated = isAuthenticated;
  });
}
3.4 获取用户信息
调用 ZaloLogin().getInfo() 方法获取用户信息,返回类型为 ZaloProfileModel,包含以下属性:
| 属性名 | 类型 |
|---|---|
| id | String |
| name | String |
| birthday | String |
| gender | String |
| picture.data.url | String |
示例代码:
void _getInfo() async {
  ZaloProfileModel info = await ZaloLogin().getInfo();
  setState(() {
    zaloInfo = info;
  });
  log('${info.toJson()}');
}
3.5 登出
调用 ZaloLogin().logOut() 方法进行登出:
void _logoutZalo() async {
  await ZaloLogin().logOut();
  setState(() {
    zaloLoginResult = null;
    zaloInfo = null;
    _authenticated = false;
  });
}
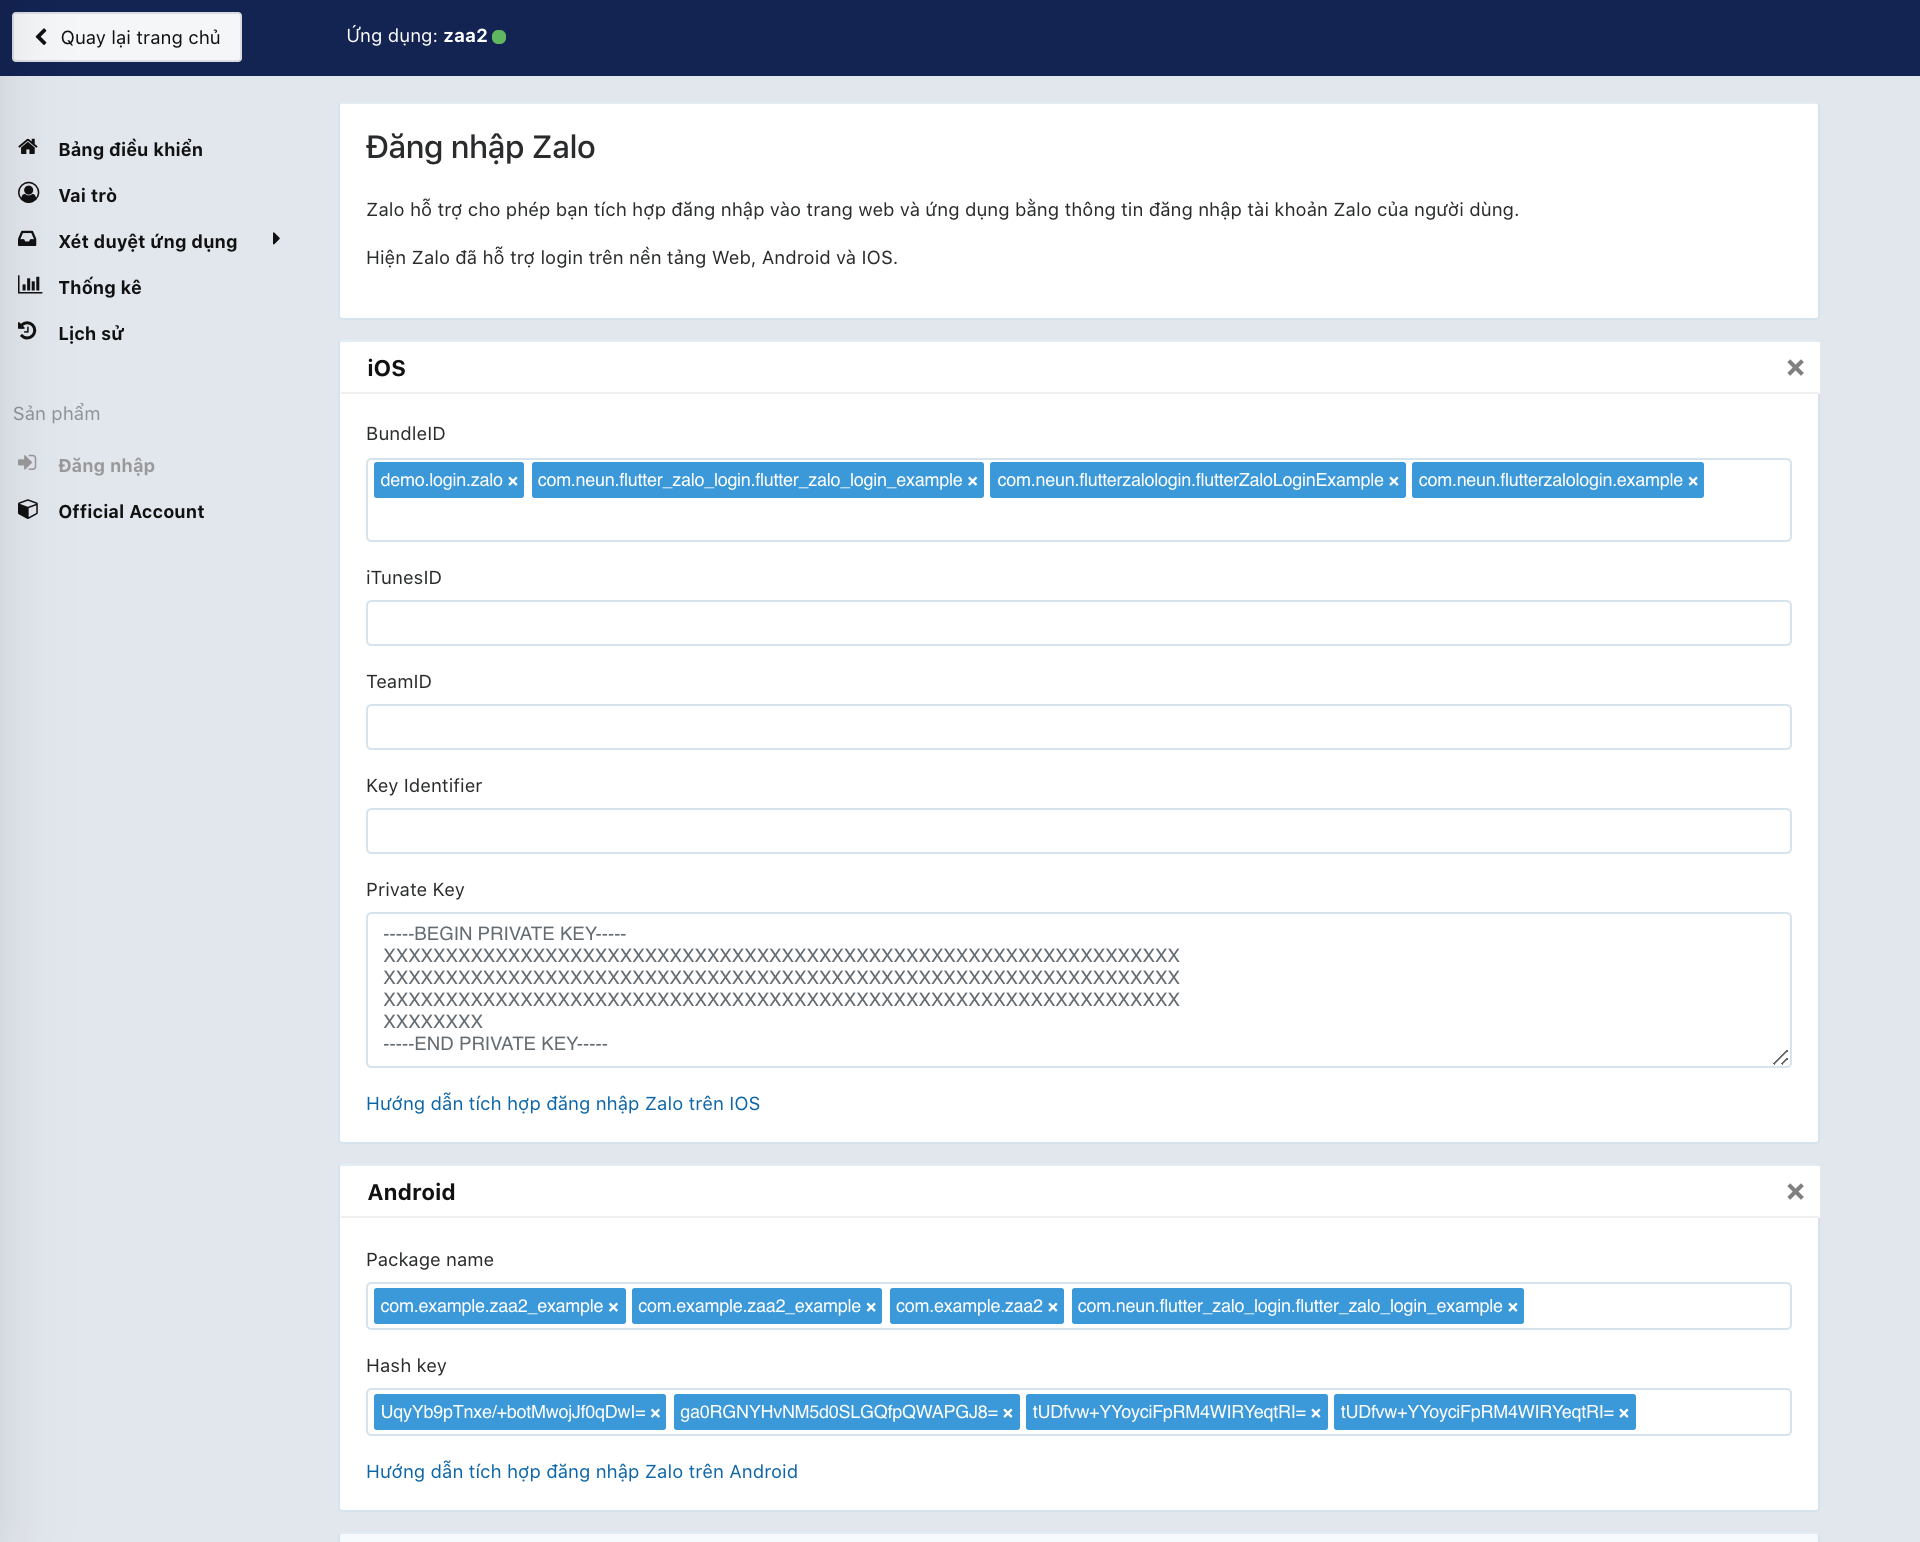
4. Zalo开发者平台配置
为了使插件正常工作,需要在Zalo开发者平台上创建应用并获取以下关键信息:
- YOUR_ZALO_APP_ID
- Android Hash Key(仅限Android)
- YOUR_ZALO_APP_SECRET_KEY(仅限iOS)
4.1 创建应用
- 访问Zalo开发者平台并创建新应用。
- 应用创建后会生成两个值:
- ID:
YOUR_ZALO_APP_ID - Secret Key:
YOUR_ZALO_APP_SECRET_KEY
- ID:
4.2 配置Bundle ID、Package Name和Hash Key
在Zalo开发者平台上配置应用的Bundle ID、Package Name和Hash Key。对于Android,Hash Key会在调用 ZaloLogin().init() 时显示在控制台日志中,格式如下:
V/ZaloLogin(28932): ---------------------------------------------------------------------------
V/ZaloLogin(28932): |     Please add this Hash Key to Zalo developers dashboard for Login     |
V/ZaloLogin(28932): tUDfvw+YYoyciFpRM4WIRYeqtRI= <-- YOUR ANDROID HASH CODE
V/ZaloLogin(28932): ---------------------------------------------------------------------------
将生成的Hash Key添加到Zalo开发者平台的应用设置中。
4.3 配置截图
5. Android配置
5.1 最低SDK版本
确保 android/app/build.gradle 文件中的 minSdkVersion 不低于18:
minSdkVersion 18 // 或更高
5.2 修改 AndroidManifest.xml
在 android/app/src/main/AndroidManifest.xml 文件中添加以下配置:
<application
    android:name=".MyApplication"
    android:label="zaa_example"
    android:icon="@mipmap/ic_launcher">

    <!-- ... -->
    <!-- ... -->

    <!-- 不要删除下面的meta-data,这是Flutter工具生成GeneratedPluginRegistrant.java所必需的 -->
    <meta-data
        android:name="flutterEmbedding"
        android:value="2" />

    <!-- ADD HERE -->
    <meta-data
        android:name="com.zing.zalo.zalosdk.appID"
        android:value="@string/appID" />
    <activity
            android:name="com.zing.zalo.zalosdk.oauth.BrowserLoginActivity">
        <intent-filter>
            <action android:name="android.intent.action.VIEW"/>
            <category android:name="android.intent.category.DEFAULT"/>
            <category android:name="android.intent.category.BROWSABLE"/>
            <data android:scheme="@string/zalosdk_login_protocol_schema"/>
        </intent-filter>
    </activity>
    <!-- ADD HERE -->

    <!-- ... -->

</application>
5.3 创建 strings.xml
在 android/app/src/main/res/values/ 目录下创建 strings.xml 文件,并替换 YOUR_ZALO_APP_ID 为你自己的应用ID:
<?xml version="1.0" encoding="utf-8"?>
<resources>
    <string name="app_name">zaa2</string>
    <string name="appID">YOUR_ZALO_APP_ID</string>
    <string name="zalosdk_app_id">YOUR_ZALO_APP_ID</string>
    <string name="zalosdk_login_protocol_schema">zalo-YOUR_ZALO_APP_ID</string>
</resources>
5.4 创建 MyApplication.kt
在与 MainActivity.kt 同一目录下创建 MyApplication.kt 文件,并替换 your.app.name 为你的应用包名:
package your.app.name;  // <-- 替换此行

import io.flutter.app.FlutterApplication;
import io.flutter.plugin.common.PluginRegistry;
import com.zing.zalo.zalosdk.oauth.ZaloSDKApplication;

class MyApplication : FlutterApplication(), PluginRegistry.PluginRegistrantCallback {
  override fun onCreate() {
    super.onCreate();
    ZaloSDKApplication.wrap(this);
  }
  override fun registerWith(registry: PluginRegistry) {}
}
5.5 修改 MainActivity.kt
修改 MainActivity.kt 文件,添加对 ZaloSDK 的回调处理,并替换 your.app.name 为你的应用包名:
package your.app.name;  // <-- 替换此行

import io.flutter.embedding.android.FlutterActivity
import android.content.Intent
import com.zing.zalo.zalosdk.oauth.ZaloSDK // <-- 添加此行

class MainActivity: FlutterActivity() {
    override fun onActivityResult(requestCode:Int, resultCode:Int, data:Intent) {
        super.onActivityResult(requestCode, resultCode, data)
        ZaloSDK.Instance.onActivityResult(this, requestCode, resultCode, data) // <-- 添加此行
    }
}
5.6 修改 AndroidManifest.xml
在 AndroidManifest.xml 文件中引用自定义的 Application 类:
<application
    android:name=".MyApplication"
    ...
    <activity
        android:name=".MainActivity"
5.7 运行应用并获取Hash Key
运行应用后,控制台会输出类似如下的日志,将生成的Hash Key添加到Zalo开发者平台的应用设置中:
V/ZaloLogin(28932): ---------------------------------------------------------------------------
V/ZaloLogin(28932): |     Please add this Hash Key to Zalo developers dashboard for Login     |
V/ZaloLogin(28932): tUDfvw+YYoyciFpRM4WIRYeqtRI= <-- YOUR ANDROID HASH CODE
V/ZaloLogin(28932): ---------------------------------------------------------------------------
6. iOS配置
6.1 修改 Info.plist
在 ios/Runner/Info.plist 文件中添加以下配置:
...
<key>CFBundleURLTypes</key>
<array>
    <dict>
        <key>CFBundleTypeRole</key>
        <string>Editor</string>
        <key>CFBundleURLName</key>
        <string>zalo</string>
        <key>CFBundleURLSchemes</key>
        <array>
            <string>zalo-YOUR_ZALO_APP_ID</string>
        </array>
    </dict>
</array>
<key>ZaloAppID</key>
<string>YOUR_ZALO_APP_ID</string>
<key>ZaloAppKey</key>
<string>YOUR_ZALO_APP_SECRET_KEY</string>
...
6.2 修改 AppDelegate.swift
在 ios/Runner/AppDelegate.swift 文件中添加以下代码:
...
override func application(
    _ application: UIApplication,
    open url: URL,
    sourceApplication: String?,
    annotation: Any
) -> Bool {
    return ZDKApplicationDelegate.sharedInstance().application(application,
        open: url,
        sourceApplication: sourceApplication,
        annotation: annotation
    )
}

@available(iOS 9.0, *)
override func application(
    _ app: UIApplication,
    open url: URL,
    options: [UIApplication.OpenURLOptionsKey : Any] = [:]) -> Bool {

    return ZDKApplicationDelegate
        .sharedInstance()
        .application(app,
                        open: url as URL?,
                        sourceApplication: options[UIApplication.OpenURLOptionsKey.sourceApplication] as! String?,
                        annotation: options[UIApplication.OpenURLOptionsKey.annotation]
        )
    return false
}

override func application(
    _ application: UIApplication,
    didFinishLaunchingWithOptions launchOptions: [UIApplication.LaunchOptionsKey: Any]?
) -> Bool {
    GeneratedPluginRegistrant.register(with: self)

    return super.application(application, didFinishLaunchingWithOptions: launchOptions)
}
6.3 如果项目使用Objective-C
如果项目使用Objective-C,则在 ios/Runner/AppDelegate.m 文件中添加以下代码:
...
- (BOOL)application:(UIApplication *)application openURL:(nonnull NSURL *)url options:(nonnull NSDictionary<NSString *,id> *)options {
  return [[ZDKApplicationDelegate sharedInstance] application:application openURL:url options:options];
}
7. 完整示例代码
以下是完整的示例代码,展示了如何在Flutter应用中集成Zalo登录功能:
import 'dart:developer';

import 'package:flutter/material.dart';
import 'package:flutter_zalo_login/flutter_zalo_login.dart';

void main() => runApp(MyApp());

class MyApp extends StatelessWidget {
  [@override](/user/override)
  Widget build(BuildContext context) {
    return MaterialApp(
      title: 'Flutter Demo',
      home: MyHomePage(title: 'Flutter Demo Home Page'),
    );
  }
}

class MyHomePage extends StatefulWidget {
  MyHomePage({Key? key, required this.title}) : super(key: key);

  final String title;

  [@override](/user/override)
  _MyHomePageState createState() => _MyHomePageState();
}

class _MyHomePageState extends State<MyHomePage> {
  ZaloProfileModel? zaloInfo = ZaloProfileModel(
    birthday: "",
    gender: "",
    id: "",
    name: "",
    picture: null,
  );

  ZaloLoginResult? zaloLoginResult = ZaloLoginResult(
    errorCode: -1,
    errorMessage: "",
    oauthCode: "",
    userId: "",
  );

  bool _authenticated = false;
  String _hashKey = '';

  [@override](/user/override)
  void initState() {
    super.initState();
    _initZalo();
  }

  void _initZalo() async {
    String hashKey = await ZaloLogin().init();
    setState(() {
      _hashKey = hashKey;
    });
    log('$hashKey');
  }

  void _loginZalo() async {
    ZaloLoginResult res = await ZaloLogin().logIn();
    setState(() {
      zaloLoginResult = res;
    });
    log('${res.toJson()}');
  }

  void _isAuthenticated() async {
    bool isAuthenticated = await ZaloLogin().isAuthenticated();
    log('$isAuthenticated');
    setState(() {
      _authenticated = isAuthenticated;
    });
  }

  void _logoutZalo() async {
    await ZaloLogin().logOut();
    setState(() {
      zaloLoginResult = null;
      zaloInfo = null;
      _authenticated = false;
    });
  }

  void _getInfo() async {
    ZaloProfileModel info = await ZaloLogin().getInfo();
    setState(() {
      zaloInfo = info;
    });
    log('${info.toJson()}');
  }

  [@override](/user/override)
  Widget build(BuildContext context) {
    return Scaffold(
      appBar: AppBar(
        title: Text(widget.title),
      ),
      body: SingleChildScrollView(
        child: Column(
          mainAxisAlignment: MainAxisAlignment.center,
          children: <Widget>[
            const SizedBox(height: 16),
            Row(
              children: <Widget>[
                VerticalDivider(),
                SizedBox(
                  child: TextButton(
                    child: Text(
                      "Init Zalo",
                      style: TextStyle(color: Colors.white),
                    ),
                    onPressed: _initZalo,
                  ),
                  width: 150,
                ),
                VerticalDivider(),
                if (_hashKey.isNotEmpty)
                  Expanded(
                    child: Column(
                      crossAxisAlignment: CrossAxisAlignment.start,
                      children: <Widget>[
                        Text(
                          "hashKey: " + _hashKey,
                        ),
                      ],
                    ),
                  ),
              ],
            ),
            Divider(),
            Row(
              children: <Widget>[
                VerticalDivider(),
                SizedBox(
                  child: TextButton(
                    child: Text(
                      "Login Zalo",
                      style: TextStyle(color: Colors.white),
                    ),
                    onPressed: _loginZalo,
                  ),
                  width: 150,
                ),
                VerticalDivider(),
                if (zaloLoginResult != null)
                  Expanded(
                    child: Column(
                      crossAxisAlignment: CrossAxisAlignment.start,
                      children: <Widget>[
                        Text(
                          "oauthCode: " +
                              (zaloLoginResult?.oauthCode.toString() ?? ''),
                        ),
                        Text("errorCode: " +
                            (zaloLoginResult?.errorCode.toString() ?? '')),
                        Text("userId: " + (zaloLoginResult?.userId ?? '')),
                      ],
                    ),
                  ),
              ],
            ),
            Divider(),
            Row(
              children: <Widget>[
                VerticalDivider(),
                SizedBox(
                  width: 150,
                  child: TextButton(
                    child: Text(
                      "Is Authenticated",
                      style: TextStyle(color: Colors.white),
                    ),
                    onPressed: _isAuthenticated,
                  ),
                ),
                VerticalDivider(),
                Expanded(
                  child: Text(
                    "Is Authenticated: " + _authenticated.toString(),
                    textAlign: TextAlign.start,
                  ),
                ),
              ],
            ),
            Divider(),
            Row(
              children: <Widget>[
                VerticalDivider(),
                SizedBox(
                  width: 150,
                  child: TextButton(
                    child: Text(
                      "Get info",
                      style: TextStyle(color: Colors.white),
                    ),
                    onPressed: _getInfo,
                  ),
                ),
                VerticalDivider(),
                if (zaloInfo != null && zaloInfo?.id != null)
                  Expanded(
                    child: Column(
                      crossAxisAlignment: CrossAxisAlignment.start,
                      children: <Widget>[
                        if (zaloInfo != null && zaloInfo?.picture != null)
                          Image.network(zaloInfo?.picture?.data?.url ?? ''),
                        Text(
                          "id: " + (zaloInfo?.id ?? ''),
                        ),
                        Text(
                          "name: " + (zaloInfo?.name ?? ''),
                        ),
                        Text(
                          "birthday: " + (zaloInfo?.birthday ?? ''),
                        ),
                        Text(
                          "gender: " + (zaloInfo?.gender ?? ''),
                        ),
                      ],
                    ),
                  )
              ],
            ),
            Divider(),
            Row(
              children: <Widget>[
                VerticalDivider(),
                SizedBox(
                  width: 150,
                  child: TextButton(
                    child: Text("Logout"),
                    onPressed: _logoutZalo,
                  ),
                ),
              ],
            ),
          ],
        ),
      ),
    );
  }
}
更多关于Flutter Zalo登录集成插件flutter_zalo_login的使用的实战教程也可以访问 https://www.itying.com/category-92-b0.html

更多关于Flutter Zalo登录集成插件flutter_zalo_login的使用的实战系列教程也可以访问 https://www.itying.com/category-92-b0.html
当然,以下是如何在Flutter项目中集成和使用flutter_zalo_login插件的示例代码。请注意,实际使用时,你需要确保已经添加了必要的依赖并正确配置了Zalo开发者信息。
1. 添加依赖
首先,在你的pubspec.yaml文件中添加flutter_zalo_login依赖:
dependencies:
  flutter:
    sdk: flutter
  flutter_zalo_login: ^最新版本号 # 请替换为实际可用的最新版本号
然后运行flutter pub get来安装依赖。
2. 配置Zalo开发者信息
在使用Zalo登录之前,你需要在Zalo开发者平台注册你的应用并获取相关的API凭证(如App ID和App Secret)。确保你已经完成了这些步骤,并将必要的信息添加到你的Flutter项目中。
3. 使用flutter_zalo_login插件
以下是一个简单的示例,展示如何在Flutter应用中使用flutter_zalo_login插件来实现Zalo登录功能:
import 'package:flutter/material.dart';
import 'package:flutter_zalo_login/flutter_zalo_login.dart';

void main() {
  runApp(MyApp());
}

class MyApp extends StatefulWidget {
  @override
  _MyAppState createState() => _MyAppState();
}

class _MyAppState extends State<MyApp> {
  String _zaloUserInfo = '';

  @override
  Widget build(BuildContext context) {
    return MaterialApp(
      home: Scaffold(
        appBar: AppBar(
          title: Text('Flutter Zalo Login Example'),
        ),
        body: Center(
          child: Column(
            mainAxisAlignment: MainAxisAlignment.center,
            children: <Widget>[
              Text('Zalo User Info:'),
              Text(_zaloUserInfo, style: TextStyle(fontSize: 18)),
              SizedBox(height: 20),
              ElevatedButton(
                onPressed: _zaloLogin,
                child: Text('Login with Zalo'),
              ),
            ],
          ),
        ),
      ),
    );
  }

  Future<void> _zaloLogin() async {
    try {
      // 替换为你的Zalo App ID
      final String zaloAppId = '你的Zalo App ID';

      // 初始化Zalo登录
      final ZaloLoginResult result = await ZaloLogin.login(appId: zaloAppId);

      if (result.isSuccess) {
        // 登录成功,获取用户信息
        final ZaloUserInfo userInfo = result.userInfo;
        setState(() {
          _zaloUserInfo = 'Name: ${userInfo.name}\nID: ${userInfo.id}\nEmail: ${userInfo.email}';
        });
      } else {
        // 登录失败,处理错误
        print('Zalo login failed: ${result.errorMessage}');
      }
    } catch (e) {
      print('Error during Zalo login: $e');
    }
  }
}

// ZaloUserInfo 类定义(通常插件会提供,这里仅作为示例)
class ZaloUserInfo {
  final String id;
  final String name;
  final String email;

  ZaloUserInfo({required this.id, required this.name, required this.email});
}

// ZaloLoginResult 类定义(通常插件会提供,这里仅作为示例)
class ZaloLoginResult {
  final bool isSuccess;
  final String? errorMessage;
  final ZaloUserInfo? userInfo;

  ZaloLoginResult({required this.isSuccess, this.errorMessage, this.userInfo});
}
注意事项
- 依赖版本:确保你使用的是
flutter_zalo_login插件的最新稳定版本。 - 错误处理:在实际应用中,你应该添加更详细的错误处理逻辑。
- 安全性:不要将你的Zalo App ID硬编码在客户端代码中,考虑使用环境变量或安全的存储方式。
- 用户隐私:确保你遵守相关的隐私政策和法规,正确处理用户数据。
这个示例提供了一个基本的框架,你可以根据需要进行扩展和修改。如果你遇到任何问题,建议查阅flutter_zalo_login插件的官方文档或在其GitHub仓库中查找相关信息。