Flutter主题管理插件themexpert的使用
Flutter主题管理插件ThemeXpert的使用
ThemeXpert 是一个高度可定制的主题解决方案,专为 Flutter 应用设计,旨在使在应用中应用多个主题变得容易,并且可以根据需要更改应用的视觉标识。
为什么你应该使用ThemeXpert?

- 轻松支持暗模式。
- 轻松获取主要的设计令牌。
- 为小部件应用特定主题以实现优秀的设计和用户体验。
- 在同一页面中使用多个主题。
使用
1. 添加ThemeXpert包到你的依赖项
在 pubspec.yaml 文件中添加 themexpert 包:
dependencies:
  themexpert: ^x.x.x
然后运行 flutter pub get。
2. 创建自定义主题类
创建一个扩展自 BaseTheme 的 AppTheme 类,并确保传递 context。在这个主题类中添加你的主题令牌。
class AppTheme extends BaseTheme {
    const AppTheme(
        super.context,
    );

    Color get surfaceColor => darkMode ? const Color(0xFF0C152C) : Colors.white;

    Color get textColor => darkMode ? Colors.white : Colors.black;

    TextStyle get txBody => const TextStyle(
            fontSize: 20,
            fontWeight: FontWeight.w600,
            height: 1.5,
            leadingDistribution: TextLeadingDistribution.even,
        ).copyWith(color: textColor);
}
3. 创建更具体的主题
如果你需要更具体的主题,可以扩展自 AppTheme 类以便轻松覆盖必要的字段。
class BlueWidgetTheme extends AppTheme {
    const BlueWidgetTheme(
        super.context,
    );

    [@override](/user/override)
    Color get surfaceColor => darkMode ? const Colors.black : Colors.blue;

    [@override](/user/override)
    Color get textColor => Colors.white;
}
注意:你可以覆盖某些主题属性,如上面示例中的 surfaceColor 和 textColor。你不需要改变 txBody 属性,因为它使用了覆盖后的 textColor。这在你需要为某个小部件创建特定主题但不想创建全新的主题或覆盖所有属性时非常有用。
4. 应用主题
使用 ThemeXWrapper 将你的小部件树包裹起来,并传递所需的主题。
ThemeXWrapper(
    theme: SecondaryTheme(context),
    builder: (context) => Container(
        color: ThemeX.ofType<AppTheme>(context).primaryColor,
        child: Text(
            'Secondary Theme',
            style: ThemeX.ofType<AppTheme>(context).txBody,
        ),
    ),
);
5. 使用主题的令牌
如果你的令牌是 AppTheme 属性的覆盖,则可以使用 ThemeX.ofType<AppTheme>(context) 来访问它。
如果你的令牌是唯一的并且不在通用的 AppTheme 中,可以使用 ThemeX.ofType<YourSpecificTheme>(context) 来访问它们。
以下示例展示了两种用法:
- 在容器的颜色属性上
- 在文本的样式属性上
ThemeXWrapper(
    theme: SpecificWidgetTheme(context),
    builder: (context) => Container(
        margin: const EdgeInsets.all(12),
        width: double.maxFinite,
        color: ThemeX.ofType<AppTheme>(context).primaryColor,
        child: Center(
            child: Text(
            'Specific widget Theme',
            style: ThemeX.ofType<SpecificWidgetTheme>(context)
                .txTitle,
            textAlign: TextAlign.center,
            ),
        ),
    ),
),
注意:你需要先应用 SpecificWidgetTheme 才能使用 ThemeX.ofType<SpecificWidgetTheme>(context)。
6. 可选:添加一个顶级方法来访问主题令牌
我们建议在 AppTheme 类的文件中创建一个顶级函数,以便更容易地访问主题令牌。
AppTheme themeOf(BuildContext context) {
  return ThemeX.ofType<AppTheme>(context);
}
这样,你可以像这样获取令牌:
ThemeXWrapper(
    theme: SecondaryTheme(context),
    builder: (context) => Container(
        color: themeOf(context).primaryColor,
        child: Text(
            'Secondary Theme',
            style: themeOf(context).txBody,
        ),
    ),
);
7. 可选:为你的应用添加暗模式支持
a. 添加 ThemeXConfiguration 到你的应用根部或 ThemeXWrapper 出现之前
如果你选择使用 MaterialApp,你的小部件树的开头将如下所示:
[@override](/user/override)
Widget build(BuildContext context) {
    return ThemeXConfiguration(
        darkMode: isDarkMode,
        builder: (context) => ThemeXWrapper(
            theme: AppTheme(context),
            builder: (context) => MaterialApp(
                // ...
b. 切换暗模式
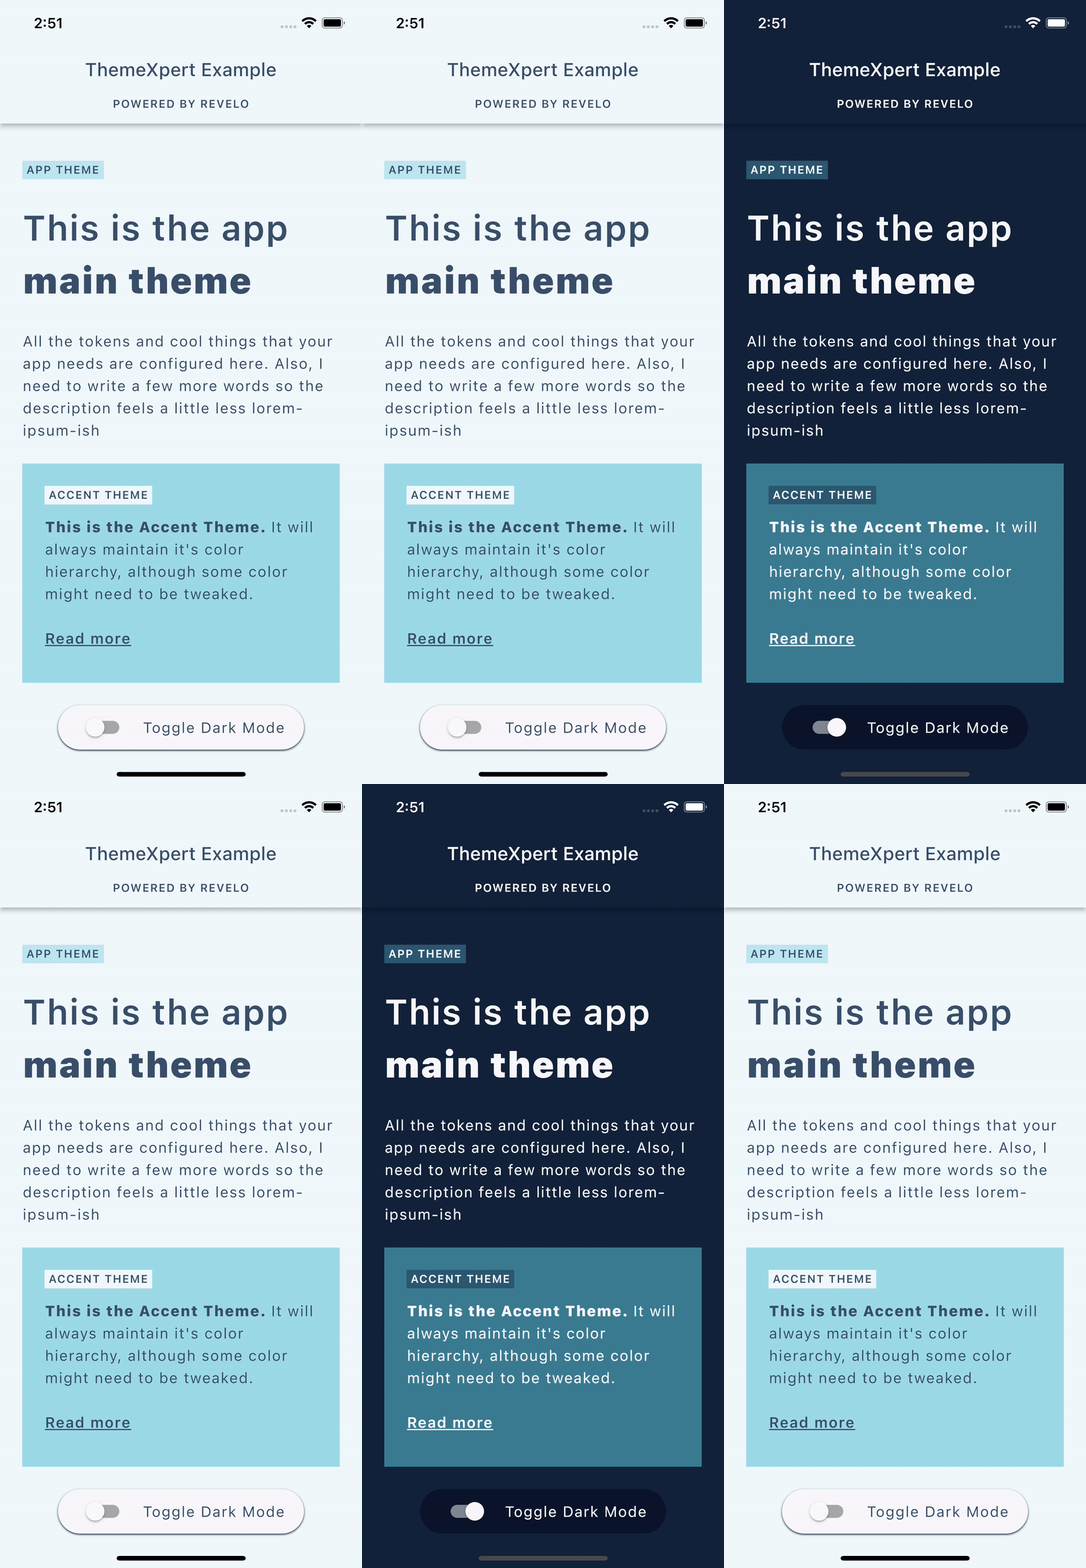
更新 ThemeXConfiguration 的 darkMode 属性以切换暗模式。这将更新应用中所有主题的新暗模式配置。示例应用中有快速示例。
完整示例
以下是一个完整的示例代码,演示了如何使用 ThemeXpert。
import 'package:flutter/material.dart';
import 'package:themexpert/themexpert.dart';
import 'package:themexpert_example/theme/app_theme.dart';
import 'package:themexpert_example/theme/accent_theme.dart';
import 'package:themexpert_example/theme/switch_component_theme.dart';
void main() {
runApp(const MyApp());
}
class MyApp extends StatefulWidget {
const MyApp({super.key});
[@override](/user/override)
State<MyApp> createState() => _MyAppState();
}
class _MyAppState extends State<MyApp> {
bool isDarkMode = false;
[@override](/user/override)
Widget build(BuildContext context) {
return ThemeXConfiguration(
darkMode: isDarkMode,
builder: (context) => ThemeXWrapper(
theme: AppTheme(context),
builder: (context) => MaterialApp(
debugShowCheckedModeBanner: false,
home: Scaffold(
backgroundColor: themeOf(context).surfaceColor,
appBar: AppBar(
backgroundColor: themeOf(context).surfaceColor,
title: Text(
'ThemeXpert 示例',
style: TextStyle(color: themeOf(context).highlightTextColor),
),
systemOverlayStyle: themeOf(context).uiOverlayStyle,
bottom: PreferredSize(
preferredSize: const Size.fromHeight(30),
child: SizedBox(
height: 30,
child: Align(
alignment: Alignment.topCenter,
child: Text(
'POWERED BY REVELO',
style: themeOf(context).txBodySmaller,
),
),
),
),
),
body: SafeArea(
child: CustomScrollView(
slivers: [
SliverToBoxAdapter(
child: Column(
crossAxisAlignment: CrossAxisAlignment.start,
children: [
Container(
margin: const EdgeInsets.only(
left: 24,
right: 24,
top: 40,
bottom: 12,
),
padding: const EdgeInsets.symmetric(
horizontal: 4,
vertical: 1,
),
color: themeOf(context).badgeColor,
child: Text(
'APP THEME',
style: themeOf(context).txBodySmaller,
),
),
Container(
padding: const EdgeInsets.only(
left: 24,
right: 24,
top: 12,
bottom: 12,
),
child: RichText(
text: TextSpan(
children: [
TextSpan(
text: '这是应用 ',
style: themeOf(context).txBodyBig,
),
TextSpan(
text: '主主题',
style: themeOf(context).txBodyBig.copyWith(
fontWeight: FontWeight.w900,
),
),
],
),
),
),
Container(
padding: const EdgeInsets.only(
left: 24,
right: 24,
top: 12,
bottom: 12,
),
child: Text(
'所有需要的令牌和酷炫的东西都在这里配置。我还需要写一些话让描述感觉不那么像伪文。',
style: themeOf(context).txBody,
),
),
ThemeXWrapper(
theme: AccentTheme(context),
builder: (context) {
return Container(
margin: const EdgeInsets.only(
left: 24,
right: 24,
top: 12,
bottom: 12,
),
padding: const EdgeInsets.all(24),
color: themeOf(context).surfaceColor,
child: Column(
crossAxisAlignment: CrossAxisAlignment.start,
children: [
Container(
padding: const EdgeInsets.symmetric(
horizontal: 4,
vertical: 1,
),
color: themeOf(context).badgeColor,
child: Text(
'ACCENT THEME',
style: themeOf(context).txBodySmaller,
),
),
Container(
padding: const EdgeInsets.only(
top: 12,
bottom: 12,
),
child: RichText(
text: TextSpan(
children: [
TextSpan(
text: '这是强调主题。 ',
style: themeOf(context)
.txBody
.copyWith(
fontWeight:
FontWeight.w800),
),
TextSpan(
text:
'它将始终维持其颜色层次结构,尽管某些颜色可能需要调整。',
style: themeOf(context).txBody,
),
],
),
),
),
Container(
padding: const EdgeInsets.only(
top: 12,
bottom: 12,
),
child: Text(
'阅读更多',
style: themeOf(context).txBody.copyWith(
fontWeight: FontWeight.w600,
decoration:
TextDecoration.underline,
),
),
),
],
),
);
},
),
],
),
),
SliverFillRemaining(
hasScrollBody: false,
child: ThemeXWrapper(
theme: SwitchComponentTheme(context),
builder: (context) => Align(
alignment: Alignment.bottomCenter,
child: Container(
margin: const EdgeInsets.all(12),
padding: const EdgeInsets.symmetric(
horizontal: 20,
),
decoration: BoxDecoration(
borderRadius:
ThemeX.ofType<SwitchComponentTheme>(context)
.borderRadius,
color: themeOf(context).surfaceColor,
boxShadow:
ThemeX.ofType<SwitchComponentTheme>(context)
.shadow,
),
clipBehavior: Clip.hardEdge,
child: Row(
mainAxisSize: MainAxisSize.min,
children: [
Switch(
activeColor:
themeOf(context).highlightTextColor,
value: isDarkMode,
onChanged: (value) {
setState(() {
isDarkMode = value;
});
},
),
const SizedBox(
width: 12,
),
Text(
'切换暗模式',
style: themeOf(context).txBody,
),
],
),
),
),
),
)
],
),
),
),
),
),
);
}
}
更多关于Flutter主题管理插件themexpert的使用的实战教程也可以访问 https://www.itying.com/category-92-b0.html
更多关于Flutter主题管理插件themexpert的使用的实战系列教程也可以访问 https://www.itying.com/category-92-b0.html
当然,以下是如何在Flutter项目中使用themexpert插件进行主题管理的代码示例。themexpert是一个强大的Flutter插件,用于动态管理和应用主题。以下示例将展示如何集成和使用themexpert。
1. 添加依赖
首先,在你的pubspec.yaml文件中添加themexpert依赖:
dependencies:
  flutter:
    sdk: flutter
  themexpert: ^latest_version  # 请替换为最新版本号
然后运行flutter pub get来获取依赖。
2. 初始化ThemeExpert
在你的应用的主文件中(通常是main.dart),初始化ThemeExpert:
import 'package:flutter/material.dart';
import 'package:themexpert/themexpert.dart';

void main() {
  runApp(MyApp());
}

class MyApp extends StatelessWidget {
  @override
  Widget build(BuildContext context) {
    return ThemeExpert(
      builder: (context, theme) {
        return MaterialApp(
          title: 'Flutter ThemeExpert Demo',
          theme: theme,
          home: MyHomePage(),
        );
      },
      defaultTheme: ThemeData(
        primarySwatch: Colors.blue,
      ),
      // 你可以在这里添加更多的主题
      themes: {
        'Light': ThemeData(
          brightness: Brightness.light,
          primarySwatch: Colors.blue,
        ),
        'Dark': ThemeData(
          brightness: Brightness.dark,
          primarySwatch: Colors.indigo,
        ),
      },
    );
  }
}
3. 使用ThemeExpert更改主题
在你的MyHomePage或任何其他小部件中,你可以通过调用ThemeExpert.of(context)来更改主题。例如,添加一个按钮来切换主题:
import 'package:flutter/material.dart';
import 'package:themexpert/themexpert.dart';

class MyHomePage extends StatefulWidget {
  @override
  _MyHomePageState createState() => _MyHomePageState();
}

class _MyHomePageState extends State<MyHomePage> {
  String currentThemeKey = 'Light';

  void changeTheme(String themeKey) {
    setState(() {
      currentThemeKey = themeKey;
      ThemeExpert.of(context).setTheme(themeKey);
    });
  }

  @override
  Widget build(BuildContext context) {
    return Scaffold(
      appBar: AppBar(
        title: Text('ThemeExpert Demo'),
      ),
      body: Center(
        child: Column(
          mainAxisAlignment: MainAxisAlignment.center,
          children: <Widget>[
            Text(
              'Current Theme: $currentThemeKey',
              style: TextStyle(fontSize: 24),
            ),
            SizedBox(height: 20),
            ElevatedButton(
              onPressed: () => changeTheme('Light'),
              child: Text('Switch to Light Theme'),
            ),
            SizedBox(height: 10),
            ElevatedButton(
              onPressed: () => changeTheme('Dark'),
              child: Text('Switch to Dark Theme'),
            ),
          ],
        ),
      ),
    );
  }
}
4. 运行应用
现在,当你运行应用时,你应该能够看到一个按钮来切换主题。点击按钮将应用不同的主题,并且当前主题会显示在屏幕上。
总结
以上代码展示了如何在Flutter应用中使用themexpert插件进行主题管理。通过ThemeExpert,你可以轻松地定义、存储和切换应用的主题,从而提供更好的用户体验。确保在实际项目中根据需求调整主题数据和逻辑。


