Flutter步进器插件easy_bi_stepper的使用

Flutter步进器插件easy_bi_stepper的使用

Easy-Bi-Stepper Flutter 包提供了一个简单易用的双向步进器小部件。
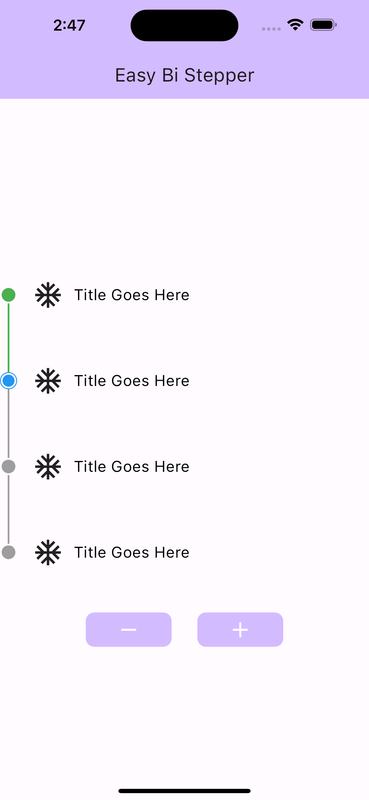
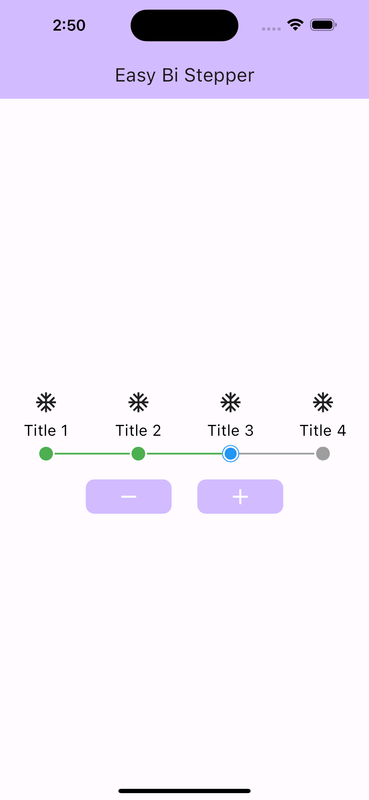
屏幕截图

垂直步进器 水平步进器

特性

  • 双向步进器:提供一个允许水平和垂直步骤的步进器小部件。
  • 可定制范围:用户可以指定步进器的最小值和最大值。
  • 步进值:用户可以定义步进器的增量或减量步长。
  • 跨平台兼容性:在所有提到的平台上无缝工作。
  • 轻量级:包体积小,性能高效,以提供流畅的用户体验。

安装

要使用 Easy-Bi-Stepper 包,请遵循以下步骤:

  1. pubspec.yaml 文件中添加包依赖:

    dependencies:
      easy_bi_stepper: <最新版本>
    
  2. 运行以下命令以获取包:

    flutter pub get
    
  3. 在 Dart 代码中导入包:

    import 'package:easy_bi_stepper/easy_bi_stepper.dart';
    

使用

要在 Flutter 应用中使用 Easy-Bi-Stepper,请参阅以下示例:

class MyHomePage extends StatefulWidget {
  const MyHomePage({super.key, required this.title});

  final String title;

  [@override](/user/override)
  State<MyHomePage> createState() => _MyHomePageState();
}

class _MyHomePageState extends State<MyHomePage> {
  int activeIndex = 0;

  [@override](/user/override)
  Widget build(BuildContext context) {
    List<StepperData> stepperData = [
      StepperData(
        title: Column(
          children: [
            Container(
              height: 40.0,
              width: 40.0,
              alignment: Alignment.center,
              child: const Icon(
                Icons.ac_unit,
                size: 36.0,
              ),
            ),
            const SizedBox(
              height: .0,
              width: 10.0,
            ),
            const Text("Title Goes Here",
              style: TextStyle(
                color: Colors.black,
                fontSize: 18.0
              ),
            ),
          ],
        ),
      ),
      // 其他步进项...
    ];

    return Scaffold(
      appBar: AppBar(
        backgroundColor: Theme.of(context).colorScheme.inversePrimary,
        title: Text(widget.title),
      ),
      body: Center(
        child: Column(
          mainAxisAlignment: MainAxisAlignment.center,
          children: [
            EasyBiStepper(
              stepperList: stepperData,
              activeBarColor: Colors.green,
              activeIndex: activeIndex,
              stepperDirection: Axis.vertical,
            ),
            const SizedBox(
              height: 20.0,
              width: 0.0,
            ),
            Row(
              mainAxisAlignment: MainAxisAlignment.center,
              children: [
                GestureDetector(
                  onTap: () {
                    setState(() {
                      activeIndex--;
                    });
                  },
                  child: Container(
                    height: 40.0,
                    width: 100.0,
                    decoration: BoxDecoration(
                      color: Theme.of(context).colorScheme.inversePrimary,
                      borderRadius: BorderRadius.circular(10.0),
                    ),
                    alignment: Alignment.center,
                    child: const Icon(
                      Icons.remove,
                      color: Colors.white,
                      size: 30.0,
                    ),
                  ),
                ),
                const SizedBox(
                  height: 0.0,
                  width: 30.0,
                ),
                GestureDetector(
                  onTap: () {
                    setState(() {
                      activeIndex++;
                    });
                  },
                  child: Container(
                    height: 40.0,
                    width: 100.0,
                    decoration: BoxDecoration(
                      color: Theme.of(context).colorScheme.inversePrimary,
                      borderRadius: BorderRadius.circular(10.0),
                    ),
                    alignment: Alignment.center,
                    child: const Icon(
                      Icons.add,
                      color: Colors.white,
                      size: 30.0,
                    ),
                  ),
                ),
              ],
            ),
          ],
        ),
      ),
    );
  }
}

更多关于Flutter步进器插件easy_bi_stepper的使用的实战教程也可以访问 https://www.itying.com/category-92-b0.html

1 回复

更多关于Flutter步进器插件easy_bi_stepper的使用的实战系列教程也可以访问 https://www.itying.com/category-92-b0.html


当然,下面是一个关于如何在Flutter项目中使用easy_bi_stepper插件的示例代码。easy_bi_stepper是一个用于创建步进器(Stepper)的Flutter插件,它可以帮助用户通过一系列步骤完成任务。

首先,你需要在你的pubspec.yaml文件中添加easy_bi_stepper依赖:

dependencies:
  flutter:
    sdk: flutter
  easy_bi_stepper: ^latest_version  # 请替换为最新的版本号

然后运行flutter pub get来安装依赖。

接下来,你可以在你的Dart文件中使用EasyBiStepper组件。以下是一个简单的示例,展示了如何使用easy_bi_stepper创建一个基本的步进器:

import 'package:flutter/material.dart';
import 'package:easy_bi_stepper/easy_bi_stepper.dart';

void main() {
  runApp(MyApp());
}

class MyApp extends StatelessWidget {
  @override
  Widget build(BuildContext context) {
    return MaterialApp(
      title: 'Flutter Stepper Demo',
      theme: ThemeData(
        primarySwatch: Colors.blue,
      ),
      home: MyStepperPage(),
    );
  }
}

class MyStepperPage extends StatefulWidget {
  @override
  _MyStepperPageState createState() => _MyStepperPageState();
}

class _MyStepperPageState extends State<MyStepperPage> with SingleTickerProviderStateMixin {
  late int _currentStep = 0;
  final List<Step> _steps = [
    Step(
      title: Text('Step 1: Information'),
      content: Text('Enter your basic information.'),
      actions: [
        TextButton(
          onPressed: () {
            setState(() {
              _currentStep = _currentStep + 1;
            });
          },
          child: Text('Continue'),
        ),
      ],
    ),
    Step(
      title: Text('Step 2: Address'),
      content: Text('Enter your shipping address.'),
      actions: [
        TextButton(
          onPressed: () {
            setState(() {
              _currentStep = _currentStep + 1;
            });
          },
          child: Text('Continue'),
        ),
      ],
    ),
    Step(
      title: Text('Step 3: Payment'),
      content: Text('Select your payment method.'),
      actions: [
        TextButton(
          onPressed: () {
            // Perform the final action, e.g., submit form
            print('Payment completed');
          },
          child: Text('Done'),
        ),
      ],
    ),
  ];

  @override
  Widget build(BuildContext context) {
    return Scaffold(
      appBar: AppBar(
        title: Text('Stepper Demo'),
      ),
      body: Padding(
        padding: const EdgeInsets.all(16.0),
        child: EasyBiStepper(
          currentStep: _currentStep,
          steps: _steps,
          onStepTapped: (step) {
            setState(() {
              _currentStep = step;
            });
          },
          onStepContinue: () {
            setState(() {
              if (_currentStep < _steps.length - 1) {
                _currentStep = _currentStep + 1;
              }
            });
          },
          onStepCancel: () {
            setState(() {
              if (_currentStep > 0) {
                _currentStep = _currentStep - 1;
              }
            });
          },
          type: StepperType.VERTICAL,  // 可以选择 StepperType.VERTICAL 或 StepperType.HORIZONTAL
        ),
      ),
    );
  }
}

在这个示例中,我们创建了一个包含三个步骤的步进器:

  1. 信息输入:用户输入基本信息。
  2. 地址输入:用户输入配送地址。
  3. 支付方式:用户选择支付方式。

每个步骤都有标题、内容和操作按钮。用户可以点击“Continue”按钮进入下一步,点击“Done”按钮完成整个流程。同时,我们提供了onStepTappedonStepContinueonStepCancel回调方法,以便在步骤切换时执行相应的操作。

你可以根据需要自定义每个步骤的内容和样式,以及添加更多的逻辑来处理用户输入和表单验证。

回到顶部