


Flutter图像捕获插件capturesdk_flutter的使用
Flutter图像捕获插件capturesdk_flutter的使用
设备兼容性和CaptureSDK版本
| 设备 | <= 1.2 | 1.3 | 1.4 | 1.5 |
|---|---|---|---|---|
| SocketCam C860 | ❌ | ❌ | ✅ | ✅ |
| SocketCam C820 | ❌ | ❌ | ✅ | ✅ |
| S720/D720/S820 | ❌ | ✅ | ✅ | ✅ |
| D600, S550等 | ✅ | ✅ | ✅ | ✅ |
| S370 | ❌ | ❌ | ✅ | ✅ |
| DW930/XS930 | ❌ | ❌ | ❌ | ✅ |
| S320 | ❌ | ❌ | ❌ | ✅ |
安装
在pubspec.yaml文件中添加以下依赖:
dependencies:
  ...
  capturesdk_flutter: ^1.5.41
  ...
然后,在应用的main.dart文件中导入capturesdk_flutter包:
import 'package:capturesdk_flutter/capturesdk.dart';
iOS 获取开始 - 重要说明
你需要更新你的应用的Podfile以与我们SDK所用的版本兼容,并且是我们的iOS CaptureSDK CocoaPods私有仓库的源。
source 'https://github.com/CocoaPods/Specs.git'

platform :ios, '13.0' # 最低目标要求为CaptureSDK iOS

target 'MyProject' do
  ....
end
开始
创建一个Capture实例:
Capture capture = Capture(logger);
logger是一个可选参数,可以传递给Capture,有助于在整个应用程序中跟踪值和请求,特别是在Capture和HttpTransport中处理大部分Capture逻辑和请求。
打开连接:
int? response = await capture.openClient(appInfo, _onCaptureEvent);
stat = 'handle: $response';
mess = 'capture open success';
appInfo是一个AppInfo类的实例,包含其他CaptureSDKs中的相同参数。示例如下:
final appInfo = AppInfo(
    'android:com.example.example',
    'MC4CFQDNCtjazxILEh8oyT6w/wlaVKqS1gIVAKTz2W6TB9EgmjS1buy0A+3j7nX4',
    'ios:com.example.example',
    'MC0CFA1nzK67TLNmSw/QKFUIiedulUUcAhUAzT6EOvRwiZT+h4qyjEZo9oc0ONM=',
    'bb57d8e1-f911-47ba-b510-693be162686a');
生成appInfo,请前往文档并遵循提示注册您的应用并生成appInfo凭据。
接下来,_onCaptureEvent是在open方法中传递的回调,可以处理来自CaptureSDK的事件通知。以下是三个重要的事件,可以在CaptureEventIds类中访问。
_onCaptureEvent(e, handle) {
  if (e == null) {
    return;
  } else if (e.runtimeType == CaptureException) {
    _updateVals("${e.code}", e.message, e.method, e.details);
    return;
  }

  logger.log('onCaptureEvent from: ', '$handle');

  switch (e.id) {
    case CaptureEventIds.deviceArrival:
      Capture deviceCapture = Capture(logger);
      setState(() {
        _deviceCapture = deviceCapture;
      });
      _openDeviceHelper(deviceCapture, e);
      break;
    case CaptureEventIds.deviceRemoval:
      _closeDeviceHelper(e, handle);
      break;
    case CaptureEventIds.decodedData:
      setState(() {
        _currentScan = e;
      });
      _updateVals('Decoded Data', "Successful scan!");
      break;
  }
}
数据用户需要预见到的将是一个CaptureEvent,它可能包含DecodedData,CaptureException,客户端或设备句柄等。当你第一次连接到服务时,响应将是一个客户端句柄(一个整数)或抛出一个CaptureException实例。
在成功连接扫描器到设备后创建另一个Capture实例(见var newCapture = Capture(logger);)。这个捕获实例与你的设备绑定,并允许根捕获实例保持打开状态,无论设备发生什么。新实例允许你创建一个设备连接来处理特定于连接设备的各种操作,如getProperty和setProperty。
获取特定值:
Future<void> _handleGetNameProperty() async {
  CaptureProperty property = CaptureProperty(
      CapturePropertyIds.friendlyNameDevice,
      CapturePropertyTypes.none,
      {});

  try {
    CaptureProperty propertyResponse = await _deviceCapture!.getProperty(property);
    print('Successfully Retrieved "name" property for device: ${propertyResponse.value}');
    // 可以结合UI逻辑来更新设备列表中的设备
  } on CaptureException catch (e) {
    print(e.code);
  }
}
设置特定值:
Future<void> _handleSetNameProperty() async {
  CaptureProperty property = CaptureProperty(
      CapturePropertyIds.friendlyNameDevice,
      CapturePropertyTypes.string,
      _newName);

  try {
    CaptureProperty propertyResponse = await _deviceCapture!.setProperty(property);
    print('Successfully set "name" property to "$_newName".');
    // 可以结合UI逻辑来更新设备列表中的设备
  } on CaptureException catch (e) {
    print(e.code);
  }
}
iOS 获取开始
你需要更新你的应用的Podfile以与我们SDK所用的版本兼容,并且是我们的iOS CaptureSDK CocoaPods私有仓库的源。
source 'https://github.com/CocoaPods/Specs.git'

platform :ios, '13.0'

target 'MyProject' do
  ....
end
其次,转到ios/Runner/Info.plist并在底部,就在</dict>之前,包括以下代码:
<key>NSBluetoothAlwaysUsageDescription</key>
<string>Bluetooth is needed to connect to a Socket Mobile device</string>
<key>UISupportedExternalAccessoryProtocols</key>
<array>
  <string>com.socketmobile.chs</string>
</array>
<key>NSCameraUsageDescription</key>
<string>Need to enable camera access for SocketCam</string>
<key>LSApplicationQueriesSchemes</key>
<array>
  <string>sktcompanion</string>
</array>
对于SocketCam C860,您还需要向Info.plist添加以下键:LSApplicationQueriesSchemes(查询URL方案),新项:sktcompanion(小写)。
要使用它,您需要在您的设备上安装Socket Mobile Companion。
有关SocketCam C860的更多详细信息,请访问我们的网站。
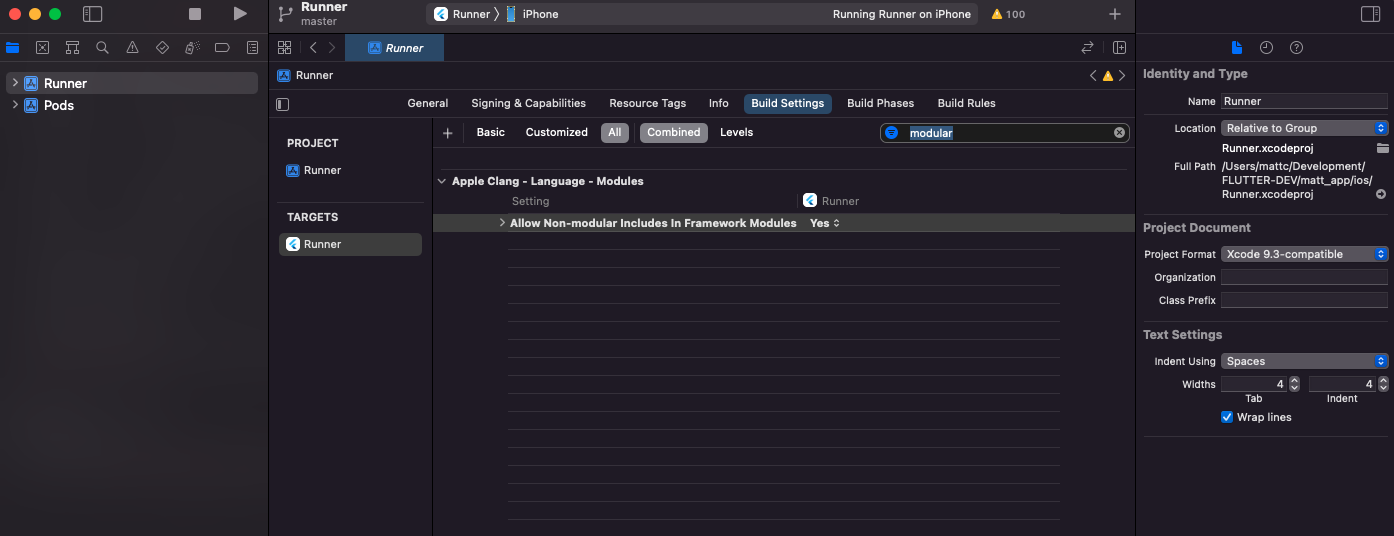
第三,打开项目的iOS目录在xcode中。完成此操作后,选择Runner并导航到构建设置。在搜索栏中输入’module’,然后查找’Allow Non-modular includes in Framework Modules’。一旦找到该属性,请选择"Yes"。下面是应该的样子:
Android 获取开始
您需要更新网络配置以启用Android Capture客户端。您可以在这里了解有关网络配置的更多信息:此处。
为了通过互联网权限,您需要在Android清单文件中包含以下行:
<uses-permission android:name="android.permission.INTERNET" />
为了使用SocketCam C820,您需要在Android清单文件中添加以下内容:
<activity android:name="com.facebook.react.devsupport.DevSettingsActivity" />
<meta-data android:name="com.socketmobile.capture.APP_KEY" android:value="{YOUR_APP_KEY}"/>
<meta-data android:name="com.socketmobile.capture.DEVELOPER_ID" android:value="{YOUR_DEVELOPER_ID}"/>
其中YOUR_APP_KEY,您需要包含您在注册应用时获得的Android应用密钥。其中YOUR_DEVELOPER_ID是您在Socket Mobile开发者门户中使用的开发人员ID。
此外,AndroidManifest.xml中的包名必须全部小写,并且必须与您在应用注册信息中的Bundle ID匹配。
<manifest xmlns:android="http://schemas.android.com/apk/res/android" package="com.yourpackagename">
在MainActivity.java文件中,注册CaptureSDK作为插件:
package com.example.example; // 替换为您应用的包名

import com.capturesdk_flutter.CaptureModule; // 导入CaptureModule原生模块
import io.flutter.embedding.android.FlutterActivity;
import io.flutter.embedding.engine.FlutterEngine;

public class MainActivity extends FlutterActivity {
    @Override
    public void configureFlutterEngine(FlutterEngine flutterEngine) {
        flutterEngine.getPlugins().add(new CaptureModule(getApplicationContext())); // 在这里注册CaptureSDK作为插件
    }
}
在您的应用的build.gradle文件中添加以下两个选项:
buildTypes {
    release {
        minifyEnabled false       // 添加
        shrinkResources false     // 添加
        signingConfig = signingConfigs.debug
    }
}
在Android上启用启动捕获服务
您可能还需要添加network_security_config.xml文件到android/app/src/main/res/xml以避免clearText权限错误。以下是该文件的代码:
<?xml version="1.0" encoding="utf-8"?>
<network-security-config>
    <base-config cleartextTrafficPermitted="false" />
    <domain-config cleartextTrafficPermitted="true">
        <domain includeSubdomains="false">localhost</domain>
        <domain includeSubdomains="false">127.0.0.1</domain>
    </domain-config>
</network-security-config>
然后,在他们的应用的AndroidManifest.xml文件中,开发人员需要在<application>标签中添加以下属性:
android:networkSecurityConfig="@xml/network_security_config"
最后,在AndroidManifest.xml文件的关闭</manifest>标签前添加以下行:
<queries>
    <package android:name="com.socketmobile.companion"/>
</queries>
有关Android的网络安全配置,请参阅Android文档中的明文部分:此处。
重要事项
为了为Flutter注册您的应用,您可以先选择Flutter语言,然后选择两个平台选项之一;Android和iOS。以下是iOS注册期间生成的凭据示例:
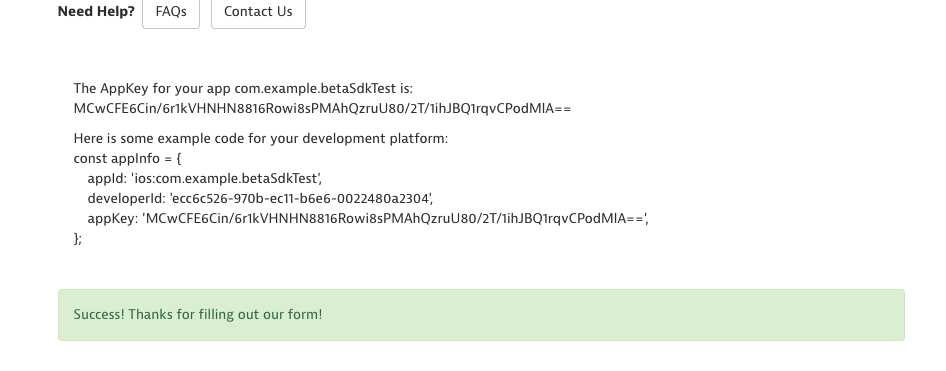
如果您想同时支持两个平台,您需要先为一个平台生成应用密钥,然后再为另一个平台单独生成。一旦生成了这两个密钥,您只需在同一个AppInfo实例中包含iOS和Android的应用密钥和应用ID。
要使其工作,您需要向AppInfo添加五个参数,顺序如下:
- Android appId
- Android注册后的AppKey
- iOS appId
- iOS注册后的AppKey
- 开发者ID
有关Flutter CaptureSDK的更多信息,请访问文档。
有关完整的演示,请查看此视频。
环境信息
运行flutter doctor -v查看您的环境工具。您需要:
- Visual Studio Code with Flutter扩展
- Flutter SDK v3.0.0和Dart v3.0.0最低版本
- DevTools v2.31.1,可选Chrome
- Xcode 15
- Android Studio
要确保所有内容都已安装,您还可以运行flutter upgrade。这将升级Flutter SDK和Android和iOS的工具。
构建和运行指令
cd example- 运行
flutter pub get
然后,您可以通过Android Studio和Xcode或直接通过Visual Studio Code使用调试模块运行应用程序。有关详细信息,请参阅:此处。
Android
cd android- 运行
flutter run或在Android Studio中打开项目以在连接的iOS设备上运行。
iOS
cd ios- 运行
pod install --repo-update - 运行
flutter run或在Xcode中打开项目以在连接的iOS设备上运行。
示例代码
// ignore_for_file: invalid_use_of_protected_member

import 'dart:io';

import 'package:example/widgets/footer.dart';
import 'package:example/widgets/mainview.dart';
import 'package:example/widgets/socketcam.dart';
import 'package:flutter/material.dart';
import 'package:capturesdk_flutter/capturesdk.dart';

const AppInfo appInfo = AppInfo(
    appIdAndroid: 'android:com.example.example',
    appKeyAndroid:
        'MC4CFQDNCtjazxILEh8oyT6w/wlaVKqS1gIVAKTz2W6TB9EgmjS1buy0A+3j7nX4',
    appIdIos: 'ios:com.example.example',
    appKeyIos:
        'MC0CFA1nzK67TLNmSw/QKFUIiedulUUcAhUAzT6EOvRwiZT+h4qyjEZo9oc0ONM=',
    developerId: 'bb57d8e1-f911-47ba-b510-693be162686a');

void main() {
  runApp(const MyApp());
}

class MyApp extends StatelessWidget {
  const MyApp({Key? key}) : super(key: key);

  [@override](/user/override)
  Widget build(BuildContext context) {
    return MaterialApp(
      title: 'Flutter CaptureSDK Demo',
      theme: ThemeData(
        primarySwatch: Colors.blue,
      ),
      home: const MyHomePage(title: 'Flutter CaptureSDK Demo Homepage'),
    );
  }
}

class MyHomePage extends StatefulWidget {
  const MyHomePage({Key? key, required this.title}) : super(key: key);

  final String title;

  [@override](/user/override)
  State<MyHomePage> createState() => _MyHomePageState();
}

class _MyHomePageState extends State<MyHomePage> {
  String _status = 'starting';
  String _message = '--';
  List<DeviceInfo> _devices = [];
  List<DecodedData> _decodedDataList = [];
  Capture? _capture;
  Capture? _deviceCapture;
  Capture? _bleDeviceManagerCapture;
  Capture? _socketcamDevice;
  bool _useSocketCam = false;
  bool _isOpen = false;

  Logger logger = Logger((message, arg) {
    if (message.isNotEmpty) {
      // ignore: avoid_print
      print('CaptureSDK: $message $arg\n\n');
    } else {
      // ignore: avoid_print
      print('CaptureSDK: $arg\n\n');
    }
  });

  void _updateVals(String stat, String mess,
      [String? method, String? details]) {
    setState(() {
      _status = stat;
      String tempMsg = mess;
      if (method != null) {
        tempMsg += '\n Method: ' + method + '\n';
      }
      if (details != null) {
        tempMsg += '\n Details: ' + details + '\n';
      }
      _message = tempMsg;
    });
  }

  [@override](/user/override)
  void initState() {
    super.initState();
    if (Platform.isAndroid) {
      // 需要在不手动打开Socket Mobile Companion的情况下启动服务
      // 启动Socket Cam前,先启动Capture服务
      _initializeCaptureService();
    } else {
      _openCapture();
    }
  }

  Future<void> _initializeCaptureService() async {
    try {
      // 等待startCaptureService的完成
      await CapturePlugin.startCaptureService();
      // startCaptureService完成后,调用_openCapture
      _openCapture();
    } catch (error) {
      // 处理错误
      _updateVals('Error initializing CaptureSDK Service', error.toString());
    }
  }

  Future _openCapture() async {
    Capture capture = Capture(logger);

    setState(() {
      _capture = capture;
    });

    String stat = _status;
    String mess = _message;
    String? method;
    String? details;

    try {
      int? response = await capture.openClient(appInfo, _onCaptureEvent);
      stat = 'handle: $response';
      mess = 'CaptureSDK open success';
      setState(() {
        _isOpen = true;
      });
    } on CaptureException catch (exception) {
      stat = exception.code.toString();
      mess = exception.message;
      method = exception.method;
      details = exception.details;
      if (Platform.isAndroid) {
        if (details != null) {
          details = details + " Is Socket Mobile Companion app installed?";
        } else {
          details = "Is Socket Mobile Companion app installed?";
        }
      }
    }
    _updateVals(stat, mess, method, details);
  }

  Future _openDeviceHelper(
      Capture deviceCapture, CaptureEvent e, bool isManager, int handle) async {
    // deviceArrival检查是否有可用设备
    // openDevice允许使用设备(用于decodedData)
    List<DeviceInfo> arr = _devices;

    DeviceInfo _deviceInfo = e.deviceInfo;

    logger.log('Device ${isManager ? 'Manager' : ''} Arrival =>',
        '${_deviceInfo.name} (${_deviceInfo.guid})');

    _capture!.clientOrDeviceHandle = handle;

    try {
      await deviceCapture.openDevice(_deviceInfo.guid, _capture);
      if (isManager) {
        setState(() {
          _bleDeviceManagerCapture = deviceCapture;
        });
        _getFavorite(deviceCapture);
      } else {
        if (!arr.contains(_deviceInfo)) {
          if (SocketCamTypes.contains(_deviceInfo.type)) {
            setState(() {
              _socketcamDevice = deviceCapture;
            });
          } else {
            setState(() {
              _deviceCapture = deviceCapture;
            });
          }
          arr.add(_deviceInfo);
          setState(() {
            _devices = arr;
          });
        }
      }
      _updateVals('Device${isManager ? ' Manager' : ''} Opened',
          'Successfully added "${_deviceInfo.name}"');
    } on CaptureException catch (exception) {
      _updateVals(exception.code.toString(), exception.message,
          exception.method, exception.details);
    }
  }

  Future<void> _closeDeviceHelper(e, handle, bool isManager) async {
    String guid = e.value["guid"];
    String name = e.value["name"];
    logger.log(
        'Device ${isManager ? 'Manager' : ''} Removal =>', name + ' (' + guid + ')');

    try {
      dynamic res;
      if (_deviceCapture != null) {
        res = await _deviceCapture!.close();
      } else if (_socketcamDevice != null) {
        res = await _socketcamDevice!.close();
      }
      if (res == 0) {
        List<DeviceInfo> arr = _devices;
        arr.removeWhere((element) => element.guid == guid);
        if (SocketCamTypes.contains(e.deviceInfo.type)) {
          setState(() {
            _devices = arr;
            _socketcamDevice = null;
          });
        } else {
          setState(() {
            _devices = arr;
            _deviceCapture = null;
          });
        }
        if (_bleDeviceManagerCapture != null && guid == _bleDeviceManagerCapture!.guid) {
          setState(() {
            _bleDeviceManagerCapture = null;
          });
          (null);
        } else {
          setState(() {
            _deviceCapture = null;
          });
        }
      }
      _updateVals('Device ${isManager ? 'Manager' : ''} Closed',
          'Successfully removed "' + name + '"');
    } on CaptureException catch (exception) {
      _updateVals('${exception.code}', 'Unable to remove "' + name + '"',
          exception.method, exception.details);
    }
  }

  _onCaptureEvent(e, handle) {
    if (e == null) {
      return;
    } else if (e.runtimeType == CaptureException) {
      _updateVals("${e.code}", e.message, e.method, e.details);
      return;
    }

    logger.log('onCaptureEvent from: ', '$handle');

    switch (e.id) {
      case CaptureEventIds.deviceArrival:
        Capture deviceCapture = Capture(logger);
        _openDeviceHelper(deviceCapture, e, false, handle);
        break;
      case CaptureEventIds.deviceRemoval:
        _closeDeviceHelper(e, handle, false);
        break;
      case CaptureEventIds.decodedData:
        setStatus('Decoded Data', 'Successfully decoded data!');
        List<DecodedData> _myList = [..._decodedDataList];
        Map<String, dynamic> jsonMap = e.value as Map<String, dynamic>;
        DecodedData decoded = DecodedData.fromJson(jsonMap);
        _myList.add(decoded);
        setState(() {
          _decodedDataList = _myList;
        });
        break;
      case CaptureEventIds.deviceManagerArrival:
        Capture bleDeviceManagerCapture = Capture(logger);
        _openDeviceHelper(bleDeviceManagerCapture, e, true, handle);
        break;
      case CaptureEventIds.deviceManagerRemoval:
        if (_deviceCapture != null) {
          _closeDeviceHelper(e, handle, true);
        }
        break;
    }
  }

  void setStatus(String stat, [String? msg]) {
    setState(() {
      _status = stat;
      _message = msg ?? _message;
    });
  }

  void _setUseSocketCam(bool val) {
    setState(() {
      _useSocketCam = val;
    });
  }

  void _clearAllScans() {
    setState(() {
      _decodedDataList = [];
    });
  }

  Future<void> _getFavorite(Capture dev) async {
    CaptureProperty property = const CaptureProperty(
      id: CapturePropertyIds.favorite,
      type: CapturePropertyTypes.none,
      value: {},
    );

    String stat = "retrieving BLE Device Manager favorite...";
    setStatus(stat);
    try {
      var favorite = await dev.getProperty(property);
      logger.log(favorite.value, 'GET Favorite');
      if (favorite.value.length == 0) {
        setFavorite(dev);
      } else {
        stat = "Favorite found! Try using an NFC Reader.";
      }
    } on CaptureException catch (exception) {
      var code = exception.code.toString();
      var message = exception.message;
      logger.log(code, message);
      stat = 'failed to get favorite: $code : $message';
    }
    setStatus(stat);
  }

  Future<void> setFavorite(Capture dev) async {
    CaptureProperty property = const CaptureProperty(
      id: CapturePropertyIds.favorite,
      type: CapturePropertyTypes.string,
      value: '*',
    );

    String stat = 'successfully set favorite for BLE Device Manager';

    try {
      var data = await dev.setProperty(property);
      logger.log(data.value.toString(), 'SET Favorite');
    } on CaptureException catch (exception) {
      var code = exception.code.toString();
      var message = exception.message;
      logger.log(code, message);
      stat = 'failed to set favorite: $code : $message';
    }
    setStatus(stat);
  }

  [@override](/user/override)
  Widget build(BuildContext context) {
    return Scaffold(
        appBar: AppBar(
          title: Text(widget.title),
        ),
        body: Padding(
          padding: const EdgeInsets.all(8.0),
          child: Column(
            mainAxisAlignment: MainAxisAlignment.start,
            children: [
              // TestWidget(),
              Row(children: [
                const Text(
                  'Status: ',
                ),
                Text(
                  _status,
                  style: Theme.of(context).textTheme.bodyLarge,
                ),
              ]),
              Row(children: [
                const Text(
                  'Message: ',
                ),
                Flexible(
                  child: Text(
                    _message,
                    style: Theme.of(context).textTheme.bodyLarge,
                  ),
                ),
              ]),
              !_useSocketCam
                  ? MainView(
                      deviceCapture: _deviceCapture, setStatus: setStatus)
                  : SocketCamWidget(
                      clientOrDeviceHandle: _capture!.clientOrDeviceHandle,
                      socketCamCapture: _capture,
                      socketCamDevice: _socketcamDevice,
                      logger: logger,
                      setStatus: setStatus),
              const Row(children: [
                Text(
                  'Devices',
                ),
              ]),
              _devices.isEmpty
                  ? const Center(child: Text('No Devices Available'))
                  : ListView.builder(
                      shrinkWrap: true,
                      padding: const EdgeInsets.only(left: 10, right: 10),
                      itemCount: _devices.length,
                      itemBuilder: (BuildContext context, int index) {
                        return Text('${index + 1}. ' +
                            _devices[index].name +
                            ': ' +
                            _devices[index].guid);
                      },
                    ),
              FooterWidget(
                  clearAllScans: _clearAllScans,
                  decodedDataList: _decodedDataList,
                  isOpen: _isOpen,
                  openCapture: _openCapture,
                  useSocketCam: _useSocketCam,
                  setUseSocketCam: _setUseSocketCam)
            ],
          ),
        ));
  }
}
更多关于Flutter图像捕获插件capturesdk_flutter的使用的实战教程也可以访问 https://www.itying.com/category-92-b0.html

更多关于Flutter图像捕获插件capturesdk_flutter的使用的实战系列教程也可以访问 https://www.itying.com/category-92-b0.html
当然,以下是如何在Flutter项目中集成和使用capturesdk_flutter插件来捕获图像的示例代码。capturesdk_flutter是一个假定的插件名称,实际使用时请确保插件名称正确,并参考其官方文档。
1. 添加依赖
首先,在你的pubspec.yaml文件中添加capturesdk_flutter插件的依赖项:
dependencies:
  flutter:
    sdk: flutter
  capturesdk_flutter: ^x.y.z  # 请替换为实际版本号
然后运行flutter pub get来安装依赖。
2. 导入插件
在你的Dart文件中导入插件:
import 'package:capturesdk_flutter/capturesdk_flutter.dart';
3. 请求权限(如果需要)
如果捕获图像需要相机和存储权限,请确保在Android和iOS项目中配置这些权限。以下是如何在Android的AndroidManifest.xml中添加权限:
<uses-permission android:name="android.permission.CAMERA" />
<uses-permission android:name="android.permission.WRITE_EXTERNAL_STORAGE" />
在iOS的Info.plist中添加相机使用说明:
<key>NSCameraUsageDescription</key>
<string>We need your permission to use the camera</string>
<key>NSPhotoLibraryUsageDescription</key>
<string>We need your permission to save photos to the photo library</string>
4. 初始化插件并捕获图像
在你的Flutter代码中,初始化插件并捕获图像:
import 'package:flutter/material.dart';
import 'package:capturesdk_flutter/capturesdk_flutter.dart';
import 'package:permission_handler/permission_handler.dart';

void main() {
  runApp(MyApp());
}

class MyApp extends StatelessWidget {
  @override
  Widget build(BuildContext context) {
    return MaterialApp(
      home: CaptureScreen(),
    );
  }
}

class CaptureScreen extends StatefulWidget {
  @override
  _CaptureScreenState createState() => _CaptureScreenState();
}

class _CaptureScreenState extends State<CaptureScreen> {
  String? imagePath;

  @override
  void initState() {
    super.initState();
    _requestPermissions();
  }

  Future<void> _requestPermissions() async {
    Map<Permission, PermissionStatus> statuses = await Permission.getPermissions([
      Permission.camera,
      Permission.storage,
    ]);

    if (statuses[Permission.camera] != PermissionStatus.granted ||
        statuses[Permission.storage] != PermissionStatus.granted) {
      Map<Permission, PermissionResult> results = await Permission.requestPermissions([
        Permission.camera,
        Permission.storage,
      ]);

      if (results[Permission.camera]?.isGranted == true &&
          results[Permission.storage]?.isGranted == true) {
        // Permissions granted, proceed to capture image
        _captureImage();
      }
    } else {
      // Permissions already granted, proceed to capture image
      _captureImage();
    }
  }

  Future<void> _captureImage() async {
    try {
      String? capturedImagePath = await CapturesdkFlutter.captureImage();
      if (capturedImagePath != null) {
        setState(() {
          imagePath = capturedImagePath;
        });
      }
    } catch (e) {
      print("Error capturing image: $e");
    }
  }

  @override
  Widget build(BuildContext context) {
    return Scaffold(
      appBar: AppBar(
        title: Text('Image Capture'),
      ),
      body: Center(
        child: Column(
          mainAxisAlignment: MainAxisAlignment.center,
          children: <Widget>[
            ElevatedButton(
              onPressed: _captureImage,
              child: Text('Capture Image'),
            ),
            if (imagePath != null)
              Image.file(File(imagePath!)),
          ],
        ),
      ),
    );
  }
}
注意事项
- 权限处理:上面的代码示例使用了
permission_handler插件来处理权限请求。如果capturesdk_flutter内部处理了权限请求,你可能不需要手动处理权限。 - 错误处理:在实际应用中,应添加更多的错误处理和用户反馈。
- 插件文档:务必参考
capturesdk_flutter的官方文档,因为插件的API和用法可能会有所不同。
这个示例展示了如何在Flutter应用中集成和使用一个图像捕获插件。确保你根据插件的实际API和文档进行调整。