


Flutter加载占位符动画插件adaptive_shimmer的使用
Flutter加载占位符动画插件adaptive_shimmer的使用
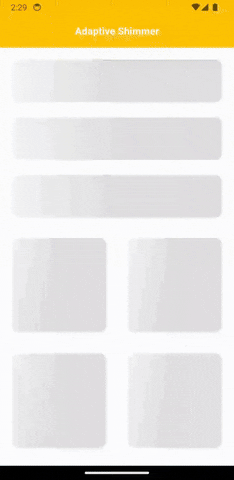
Adaptive Shimmer 提供了一个简便的方式来为任何子部件添加闪烁效果,并且可以随时开启或关闭闪烁效果,从而减少代码重复和额外的代码编写。
获取开始
Adaptive Shimmer 能够模拟其子部件的形状,闪烁颜色、循环次数、动画持续时间、闪烁方向等都是可自定义的。
特性
- 支持Android、iOS、Linux、macOS、Web、Windows平台。
使用方法
AdaptiveShimmer 可以用于在应用程序中实现最小化的编码和简单的闪烁效果,并提供交互式的UI。
AdaptiveShimmer(
  // 你可以传递任何你希望闪烁的部件作为 AdaptiveShimmer 的子部件,
  // 其他属性如颜色、循环、周期、方向等都可以自定义。
  child: child,
  // 设置 loading 为 true 以开启闪烁,false 则关闭闪烁(通常用来表示数据是否正在加载)
  loading: true,
  // baseColor: Colors.grey[300]!,
  // highlightColor: Colors.grey[100]!,
  // enabled: true,
  // period:  const Duration(milliseconds: 1500),
  // direction:ShimmerDirection.ltr,
  // loop: 0,
);
示例代码
以下是一个完整的示例,展示了如何在Flutter应用中使用 AdaptiveShimmer 插件:
import 'package:adaptive_shimmer/adaptive_shimmer.dart';
import 'package:flutter/material.dart';

void main() {
  runApp(const MyApp());
}

class MyApp extends StatelessWidget {
  const MyApp({super.key});

  [@override](/user/override)
  Widget build(BuildContext context) {
    return MaterialApp(
      title: 'Adaptive Shimmer Example',
      theme: ThemeData(
        colorScheme: ColorScheme.fromSeed(seedColor: Colors.deepPurple),
        useMaterial3: true,
      ),
      home: const MyHomePage(title: 'Adaptive Shimmer Example'),
    );
  }
}

class MyHomePage extends StatefulWidget {
  const MyHomePage({super.key, required this.title});

  final String title;

  [@override](/user/override)
  State<MyHomePage> createState() => _MyHomePageState();
}

class _MyHomePageState extends State<MyHomePage> {
  [@override](/user/override)
  Widget build(BuildContext context) {
    return Scaffold(
      appBar: AppBar(
        backgroundColor: Theme.of(context).colorScheme.inversePrimary,
        title: Text(widget.title),
      ),
      body: Center(
        child: AdaptiveShimmer(
          // 传递一个空的容器作为闪烁的子部件
          // 其他属性如颜色、循环、周期等都是可自定义的
          child: Container(
            color: Colors.amber,
            height: 100,
            width: 100,
          ),
          // 设置 loading 为 true 以开启闪烁
          loading: true,
        ),
      ),
    );
  }
}
更多关于Flutter加载占位符动画插件adaptive_shimmer的使用的实战教程也可以访问 https://www.itying.com/category-92-b0.html

更多关于Flutter加载占位符动画插件adaptive_shimmer的使用的实战系列教程也可以访问 https://www.itying.com/category-92-b0.html
当然,以下是如何在Flutter项目中使用adaptive_shimmer插件来加载占位符动画的示例代码。adaptive_shimmer插件非常适合在加载数据时为用户提供视觉反馈。
首先,确保你已经在pubspec.yaml文件中添加了adaptive_shimmer依赖:
dependencies:
  flutter:
    sdk: flutter
  adaptive_shimmer: ^x.x.x  # 请替换为最新版本号
然后运行flutter pub get来安装依赖。
接下来,你可以在你的Flutter应用中创建一个使用AdaptiveShimmer的占位符动画。以下是一个完整的示例:
import 'package:flutter/material.dart';
import 'package:adaptive_shimmer/adaptive_shimmer.dart';

void main() {
  runApp(MyApp());
}

class MyApp extends StatelessWidget {
  @override
  Widget build(BuildContext context) {
    return MaterialApp(
      title: 'AdaptiveShimmer Demo',
      theme: ThemeData(
        primarySwatch: Colors.blue,
      ),
      home: Scaffold(
        appBar: AppBar(
          title: Text('AdaptiveShimmer Demo'),
        ),
        body: Center(
          child: ShimmerLoadingWidget(),
        ),
      ),
    );
  }
}

class ShimmerLoadingWidget extends StatelessWidget {
  @override
  Widget build(BuildContext context) {
    return Column(
      mainAxisAlignment: MainAxisAlignment.center,
      children: <Widget>[
        // 模拟一个加载中的用户卡片
        SizedBox(
          height: 100,
          child: AdaptiveShimmer(
            child: Row(
              crossAxisAlignment: CrossAxisAlignment.center,
              children: <Widget>[
                // 模拟用户头像的占位符
                Expanded(
                  flex: 1,
                  child: Container(
                    decoration: BoxDecoration(
                      color: Colors.grey[300]!,
                      borderRadius: BorderRadius.circular(50),
                    ),
                    height: 50,
                    width: 50,
                  ),
                ),
                // 模拟用户信息的占位符
                Expanded(
                  flex: 2,
                  child: Padding(
                    padding: const EdgeInsets.symmetric(horizontal: 8.0),
                    child: Column(
                      crossAxisAlignment: CrossAxisAlignment.start,
                      children: <Widget>[
                        SizedBox(
                          height: 16,
                          width: double.infinity,
                          child: Container(
                            decoration: BoxDecoration(
                              color: Colors.grey[300]!,
                              borderRadius: BorderRadius.circular(4),
                            ),
                          ),
                        ),
                        SizedBox(
                          height: 12,
                          width: double.infinity,
                          child: Container(
                            decoration: BoxDecoration(
                              color: Colors.grey[300]!,
                              borderRadius: BorderRadius.circular(4),
                            ),
                          ),
                        ),
                      ],
                    ),
                  ),
                ),
              ],
            ),
          ),
        ),
        // 模拟加载中的分隔线
        SizedBox(
          height: 16,
        ),
        // 模拟另一个加载中的用户卡片
        SizedBox(
          height: 100,
          child: AdaptiveShimmer(
            child: Row(
              crossAxisAlignment: CrossAxisAlignment.center,
              children: <Widget>[
                Expanded(
                  flex: 1,
                  child: Container(
                    decoration: BoxDecoration(
                      color: Colors.grey[300]!,
                      borderRadius: BorderRadius.circular(50),
                    ),
                    height: 50,
                    width: 50,
                  ),
                ),
                Expanded(
                  flex: 2,
                  child: Padding(
                    padding: const EdgeInsets.symmetric(horizontal: 8.0),
                    child: Column(
                      crossAxisAlignment: CrossAxisAlignment.start,
                      children: <Widget>[
                        SizedBox(
                          height: 16,
                          width: double.infinity,
                          child: Container(
                            decoration: BoxDecoration(
                              color: Colors.grey[300]!,
                              borderRadius: BorderRadius.circular(4),
                            ),
                          ),
                        ),
                        SizedBox(
                          height: 12,
                          width: double.infinity,
                          child: Container(
                            decoration: BoxDecoration(
                              color: Colors.grey[300]!,
                              borderRadius: BorderRadius.circular(4),
                            ),
                          ),
                        ),
                      ],
                    ),
                  ),
                ),
              ],
            ),
          ),
        ),
      ],
    );
  }
}
在这个示例中,我们创建了一个简单的Flutter应用,其中包含一个使用AdaptiveShimmer的Column。每个AdaptiveShimmer都包装了一个模拟用户卡片的Row,其中包含一个头像和两个信息占位符。
这个示例展示了如何使用AdaptiveShimmer来创建流畅的占位符动画,从而增强用户体验。你可以根据自己的需求调整占位符的大小、颜色和布局。