


Flutter本地推送通知插件local_push_notifications的使用
Flutter本地推送通知插件local_push_notifications的使用
特性
- 在Android、iOS和Web上创建本地通知。
- 使用附加插件发送推送通知,如
local_push_notifications_fcm。 - 在通知中添加图片、声音、表情符号、按钮和不同的布局。
- 易于使用且高度可定制。
- 通知可以在任何时刻创建(在前台、后台甚至应用程序被终止/杀死时)。
- 高可信度,在应用程序生命周期内的任何时间接收通知。
- 当通知创建、显示、被忽略或用户点击时,会在Flutter级别的代码中收到事件。
- 通知可以被定期安排重复或不重复,精度达到秒。
可用的通知类型
- 基本通知
- 大图通知
- 媒体通知
- 大文本通知
- 收件箱通知
- 消息通知
- 消息组通知
- 具有操作按钮的通知
- 分组通知
- 进度条通知(仅限Android)
所有通知都可以在本地创建或通过Firebase服务创建,具有所有功能。
停止注意 - 插件正在开发中
目前插件还在开发中,工作进度百分比为:
注意 - flutter_local_notifications插件的用户
local_notifications插件与flutter_local_notifications插件不兼容,因为这两个插件会互相竞争以获取全局通知资源来发送通知和接收通知动作。
因此,您必须不要同时使用flutter_local_notifications和local_notifications。Local Notifications包含了flutter_local_notifications插件的所有功能,并提供更多功能,因此您可以完全替换项目中的flutter_local_notifications。
注意 - firebase_messaging插件的用户
firebase_messaging插件的支持已废弃,但其他Firebase插件仍受支持。这同样是因为两个插件会互相竞争以获取全局通知资源。
要使用FCM服务与本地通知结合,您需要使用local_push_notifications_fcm插件。
仅使用local_push_notifications_fcm才能实现所有Firebase Cloud Messaging功能加上所有本地通知功能。继续使用firebase_messaging,您需要进行一些工作来处理静默推送通知,这不推荐用于显示视觉通知,并会导致您的应用在后台运行时受到惩罚。
因此,您必须不要同时使用firebase_messaging和local_notifications。相反,您应该使用local_notifications与local_push_notifications_fcm一起使用。
下一步
- 包含Web支持
- 完成允许Firebase Cloud消息传递的附加插件,所有本地功能均可用。(已完成)
- 添加选项以选择通知动作是否应将应用程序带到前台。(已完成)
- 支持其他推送通知服务(Wonderpush、One Signal、IBM、AWS、Azure等)
- 在iOS中复制所有Android布局(几乎完成)
- 自定义通知布局
目录
- 本地通知插件
- 停止注意 - 插件正在开发中
- 注意 -
flutter_local_notifications插件的用户 - 注意 -
firebase_messaging插件的用户 - 下一步
- 捐赠
- 聊天服务器
- 目录
- 主要哲学
- 从版本0.6.X迁移到0.7.X
- 开始使用
- 如何显示本地通知
- 额外的iOS设置以支持后台操作
- 示例应用
- 本地通知流程图
- 通知事件
- 通知动作类型
- 通知类别
- 请求权限
- 计划通知
- 进度条通知(仅限Android)
- 表情符号
- 唤醒屏幕通知
- 全屏通知(仅限Android)
- 通知渠道
- 通知结构
- Android前台服务(可选)
主要哲学
考虑到所有不同设备的不同硬件和软件资源,此插件始终显示通知,尽可能使用所有可用的功能。如果某个功能不可用,则通知会忽略该特定功能,但仍显示其余部分。
例如:如果设备具有彩色LED灯,则使用它。否则,忽略灯光,但显示具有所有其他可用功能的通知。最后,至少显示最基本的通知。
此外,通知渠道遵循相同的规则。如果没有通知渠道分离,使用默认配置。如果有渠道,按预期使用。
所有在应用程序被杀后发送的通知都会被注册并尽快交付到应用程序,插件初始化后按顺序交付。
这样,您的应用程序将在Flutter级别代码中接收所有通知事件。
从版本0.6.X迁移到0.7.X
- 现在可以在不将应用程序带到前台的情况下接收动作事件。查看我们的动作类型主题以了解更多信息。
- 所有的流(
createdStream、displayedStream、actionStream和dismissedStream)都被替换为全局静态方法。您必须将旧的流方法替换为静态和全局方法,换句话说,它们必须是静态Future<void>,并且使用async/await,您必须使用@pragma("vm:entry-point")以保留dart地址。 - 现在所有通知事件只有在调用
setListeners后才会被交付。 ButtonType类更名为ActionType。InputField动作类型已弃用。现在只需将requireInputText属性设置为true即可实现相同效果,但现在它与所有其他动作类型一起工作。firebase_messaging插件的支持已废弃,但所有其他Firebase插件仍受支持。您需要使用local_notifications_fcm插件来实现所有Firebase消息传递功能,而不会违反平台规则。这是唯一的方法,以完全集成本地通知,运行在原生级别。
开始使用
下面是您的应用必须满足的强制性配置,以便使用local_notifications插件:
初始配置
要在使用本地通知之前进行的必要配置。
配置Android
- 将最低Android SDK版本设置为21(Android 5.0 Lollipop),并将Java编译SDK版本设置为33(Android 13)。您可以在
build.gradle文件中更改minSdkVersion为21,将compileSdkVersion和targetSdkVersion设置为33,位于android/app/文件夹内。
android {
    compileSdkVersion 33

    defaultConfig {
        minSdkVersion 21
        targetSdkVersion 33
        ...
    }
    ...
}
- 要使您的应用完全兼容Android 13(SDK 33),您需要在应用的
AndroidManifest.xml文件中声明的所有<activity>、<activity-alias>、<service>或<receiver>组件中添加android:exported="true"属性。
<manifest xmlns:android="http://schemas.android.com/apk/res/android"
    package="com.example.myapp">

   <application
        android:label="myapp"
        android:icon="@mipmap/ic_launcher">

        <activity
            android:name=".MainActivity"
            android:exported="true">

        </activity>

    </application>
</manifest>
配置iOS
为了正确使用本地通知并构建您的应用,您需要确保为您的应用目标设置一些构建设置选项。在项目视图中,点击Runner -> Target Runner -> 构建设置…
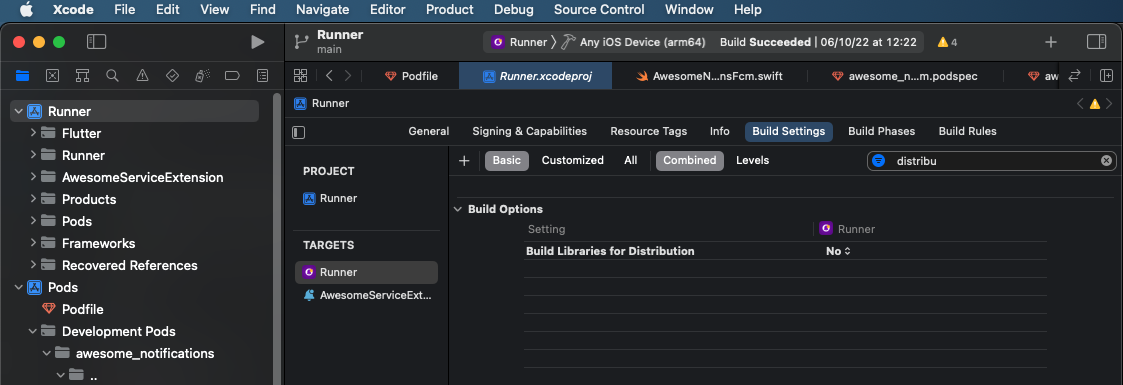
…然后设置以下选项:
在Runner目标中:
- 构建库用于分发 => 否
- 仅安全API扩展 => 否
- iOS部署目标 => 11或更高版本
在所有其他目标中:
- 构建库用于分发 => 否
- 仅安全API扩展 => 是
如何显示本地通知
- 在
pubspec.yaml文件中添加local_push_notifications作为依赖项。
local_push_notifications: any # Any attribute updates automatically your source to the last version
- 导入插件包到您的Dart代码。
import 'package:local_push_notifications/local_push_notifications.dart';
- 在
main.dart文件中初始化插件,主方法之前,MaterialApp部件之前(最好在主方法中),至少包含一个本地图标和一个频道。
LocalPushNotifications().initialize(
  // 如果您想使用默认的应用程序图标,则可以将图标设置为null
  'resource://drawable/res_app_icon',
  [
    NotificationChannel(
        channelGroupKey: 'basic_channel_group',
        channelKey: 'basic_channel',
        channelName: 'Basic notifications',
        channelDescription: 'Notification channel for basic tests',
        defaultColor: Color(0xFF9D50DD),
        ledColor: Colors.white)
  ],
  // 通道组仅是视觉上的,不是必需的
  channelGroups: [
    NotificationChannelGroup(
        channelGroupKey: 'basic_channel_group',
        channelGroupName: 'Basic group')
  ],
  debug: true
);
- 在
MaterialApp部件内,创建您的命名路由并设置全局导航键。在initState中,初始化您的静态监听方法以捕获通知的动作。
class MyApp extends StatefulWidget {

  static final GlobalKey<NavigatorState> navigatorKey = GlobalKey<NavigatorState>();

  static const String name = 'Local Notifications - Example App';
  static const Color mainColor = Colors.deepPurple;

  @override
  _MyAppState createState() => _MyAppState();
}

class _MyAppState extends State<MyApp> {

  @override
  void initState() {

    // 只有在至少调用了动作方法之后,通知事件才会被交付
    LocalPushNotifications().setListeners(
        onActionReceivedMethod:         NotificationController.onActionReceivedMethod,
        onNotificationCreatedMethod:    NotificationController.onNotificationCreatedMethod,
        onNotificationDisplayedMethod:  NotificationController.onNotificationDisplayedMethod,
        onDismissActionReceivedMethod:  NotificationController.onDismissActionReceivedMethod
    );

    super.initState();
  }

  // This widget is the root of your application.
  @override
  Widget build(BuildContext context) {
    return MaterialApp(

      // 导航键对于允许在静态方法中导航页面是必要的
      navigatorKey: MyApp.navigatorKey,

      title: MyApp.name,
      color: MyApp.mainColor,

      initialRoute: '/',
      onGenerateRoute: (settings) {
        switch (settings.name) {
          case '/':
            return MaterialPageRoute(builder: (context) =>
                MyHomePage(title: MyApp.name)
            );

          case '/notification-page':
            return MaterialPageRoute(builder: (context) {
              final ReceivedAction receivedAction = settings
                  .arguments as ReceivedAction;
              return MyNotificationPage(receivedAction: receivedAction);
            });

          default:
            assert(false, 'Page ${settings.name} not found');
            return null;
        }
      },

      theme: ThemeData(
          primarySwatch: Colors.deepPurple
      ),
    );
  }
}
观察:下面的示例不是一个有效的静态或全局方法。您可以通过MaterialApp部件中的navigatorKey实例,在任何时候检索当前上下文。
    LocalPushNotifications().setListeners(
        onActionReceivedMethod: (ReceivedAction receivedAction){
            NotificationController.onActionReceivedMethod(context, receivedAction);
        },
        onNotificationCreatedMethod: (ReceivedNotification receivedNotification){
            NotificationController.onNotificationCreatedMethod(context, receivedNotification);
        },
        onNotificationDisplayedMethod: (ReceivedNotification receivedNotification){
            NotificationController.onNotificationDisplayedMethod(context, receivedNotification);
        },
        onDismissActionReceivedMethod: (ReceivedAction receivedAction){
            NotificationController.onDismissActionReceivedMethod(context, receivedAction);
        },
    );
- 在任何地方或类中创建静态方法来捕获相应的通知事件。
class NotificationController {

  /// 用于检测新通知或日程创建时
  @pragma("vm:entry-point")
  static Future<void> onNotificationCreatedMethod(ReceivedNotification receivedNotification) async {
    // 您的代码在这里
  }

  /// 用于检测每次新通知显示时
  @pragma("vm:entry-point")
  static Future<void> onNotificationDisplayedMethod(ReceivedNotification receivedNotification) async {
    // 您的代码在这里
  }

  /// 用于检测用户是否忽略了通知
  @pragma("vm:entry-point")
  static Future<void> onDismissActionReceivedMethod(ReceivedAction receivedAction) async {
    // 您的代码在这里
  }

  /// 用于检测用户点击通知或动作按钮时
  @pragma("vm:entry-point")
  static Future<void> onActionReceivedMethod(ReceivedAction receivedAction) async {
    // 您的代码在这里

    // 导航到页面,避免打开通知详情页覆盖另一个已经打开的详情页
    MyApp.navigatorKey.currentState?.pushNamedAndRemoveUntil('/notification-page',
            (route) => (route.settings.name != '/notification-page') || route.isFirst,
        arguments: receivedAction);
  }
}
- 请求用户授权发送本地和推送通知(记得在调用此请求前显示对话框提示用户)
LocalPushNotifications().isNotificationAllowed().then((isAllowed) {
  if (!isAllowed) {
    // 这只是一个基本示例。对于真实应用,您必须显示一些友好的对话框再调用请求方法。
    // 这对用户体验非常重要
    LocalPushNotifications().requestPermissionToSendNotifications();
  }
});
- 在应用的任何地方创建新的通知
LocalPushNotifications().createNotification(
  content: NotificationContent(
      id: 10,
      channelKey: 'basic_channel',
      title: 'Simple Notification',
      body: 'Simple body',
      actionType: ActionType.Default
  )
);
🎉🎉🎉 这就是全部!恭喜我的朋友! 🎉🎉🎉
重要说明
-
您必须初始化所有本地通知插件,即使您的应用没有权限发送通知。
-
如果您需要在调用
setListeners之前捕获用户的通知动作,可以在任何时候调用getInitialNotificationAction方法。 如果您的应用是由用户通知动作启动的,getInitialNotificationAction将返回相应的ActionReceived对象。否则将返回null。
void main() async {
    ReceivedAction? receivedAction = await LocalPushNotifications().getInitialNotificationAction(
      removeFromActionEvents: false
    );
    if(receivedAction?.channelKey == 'call_channel') setInitialPageToCallPage();
    else setInitialPageToHomePage();
}
- 如果您需要在
silentAction或silentBackgroundAction事件后重定向用户,您可能会遇到这样的情况:您正在运行在一个没有有效上下文来重定向用户的dart隔离中。 对于这些情况,您需要使用ReceivePort和SendPort在隔离之间切换执行。只需在初始化过程中创建一个ReceivePort(这只会发生在主隔离中),然后,在onActionReceivedMethod内部,使用SendPort将执行发送到监听的ReceivePort。
在初始化您的notification_controller.dart:
    ReceivePort port = ReceivePort();
    IsolateNameServer.registerPortWithName(
      port,
      'background_notification_action',
    );

    port.listen((var received) async {
        _handleBackgroundAction(received);
    });

    _initialized = true;
在您的backgroundActionMethod中:
  static Future<void> onSilentActionHandle(ReceivedAction received) async {
    print('On new background action received: ${received.toMap()}');

    if (!_initialized) {
      SendPort? uiSendPort = IsolateNameServer.lookupPortByName('background_notification_action');
      if (uiSendPort != null) {
        print('Background action running on parallel isolate without valid context. Redirecting execution');
        uiSendPort.send(received);
        return;
      }
    }

    print('Background action running on main isolate');
    await _handleBackgroundAction(received);
  }

  static Future<void> _handleBackgroundAction(ReceivedAction received) async {
    // 您的后台动作处理
  }
- 在Android上,如果您按下返回按钮直到离开应用,然后通过“最近的应用列表”重新打开应用,那么最后一次应用初始化将被重复。在这种特殊情况下,通知动作会被重复。由于您知道您的业务逻辑,您需要决定该通知动作是否可以重复或必须忽略。
额外的iOS设置以支持后台操作
要在iOS中使用任何插件在后台操作,您需要手动注册每个您想要使用的插件。否则,您将遇到MissingPluginException异常。
为了避免这种情况,您需要向iOS项目的AppDelegate.m/AppDelegate.swift文件中的didFinishLaunchingWithOptions方法添加以下行:
import Flutter
import local_notifications
import shared_preferences_ios
//import all_other_plugins_that_i_need

override func application(
    _ application: UIApplication,
    didFinishLaunchingWithOptions launchOptions: [UIApplication.LaunchOptionsKey: Any]?
  ) -> Bool {
      GeneratedPluginRegistrant.register(with: self)

      // This function registers the desired plugins to be used within a notification background action
      SwiftLocalNotificationsPlugin.setPluginRegistrantCallback { registry in
          SwiftLocalNotificationsPlugin.register(
            with: registry.registrar(forPlugin: "io.flutter.plugins.localnotifications.LocalNotificationsPlugin")!)
          FLTSharedPreferencesPlugin.register(
            with: registry.registrar(forPlugin: "io.flutter.plugins.sharedpreferences.SharedPreferencesPlugin")!)
      }

      return super.application(application, didFinishLaunchingWithOptions: launchOptions)
  }
您可以检查如何正确调用每个插件,打开GeneratedPluginRegistrant.m文件。
示例应用
以下是您可以检查的所有功能以及如何实际使用本地通知的示例。简单的示例应用包含使用本地通知的基本结构,完整的示例应用包含测试的所有本地通知功能。
要运行和调试简单的示例应用,请按照以下步骤操作:
- 创建一个新的Flutter项目,至少包括Android和iOS。
- 复制示例内容到https://pub.dev/packages/local_push_notifications/example
- 将内容粘贴到
main.dart文件中。 - 使用真实设备或模拟器调试应用程序。
要运行和调试完整的示例应用,请按照以下步骤操作:
- 在您的本地机器上安装GitHub软件。强烈建议使用GitHub Desktop。
- 访问我们的GitHub仓库之一。
- 将项目克隆到您的本地机器。
- 使用Android Studio或其他IDE打开项目。
- 运行
flutter pub get同步项目依赖项。 - 在iOS上,运行
pod install在example/ios/文件夹内同步本地依赖项。 - 使用真实设备或模拟器调试应用程序。
本地通知流程图
通知通过本地代码或推送服务使用原生代码接收,因此消息会立即显示或在预定时间显示,无论您的应用程序是否正在运行。

通知事件
通知事件仅在调用setListeners方法后才被交付,并且它们不总是在发生时立即交付。
本地通知事件方法可用于跟踪您的通知:
onNotificationCreatedMethod (可选):当通知创建时触发。onNotificationDisplayedMethod (可选):当通知显示在系统状态栏时触发。onActionReceivedMethod (必选):当用户点击通知时触发。onDismissedActionReceivedMethod (可选):当用户忽略通知时触发。
…这些是交付条件:
| 平台 | 应用在前台 | 应用在后台 | 应用终止(杀死) |
|---|---|---|---|
| Android | 事件立即触发 | 事件立即触发 | 存储事件以在前台或后台触发 |
| iOS | 事件立即触发 | 存储事件以在前台触发 | 存储事件以在前台触发 |
例外:onActionReceivedMethod 在任何应用生命周期中立即触发。
通知动作类型
通知动作类型定义了本地通知应如何处理用户动作。
- 默认:这是默认动作类型,强制应用程序进入前台。
- 静默动作:不强制应用程序进入前台,但在主线程上运行,接受视觉元素,可能被主线程终止中断。
- 静默后台动作:不强制应用程序进入前台,而在后台运行,不接受任何视觉元素。执行在专用dart隔离中。
- 保持在顶部:触发相应动作时不关闭通知状态栏,不将应用程序带到前台。
- 禁用动作:当按下时,通知只是在托盘中关闭,不触发任何动作事件。
- 忽略动作:行为与用户忽略动作一样,但忽略通知并触发
onDismissActionReceivedMethod。忽略autoDismissible属性。 - 输入字段:(已弃用)当按下按钮时,打开一个快捷对话框发送文本响应。使用
requireInputText属性代替。
通知类别
通知类别是一组预定义的类别,最好描述通知的性质,某些系统可能根据这些类别对通知进行排序、延迟或过滤。强烈建议正确分类您的通知。
- 报警:闹钟或计时器。
- 电话:来电(语音或视频)或类似的同步通信请求。
- 邮件:异步群发邮件(电子邮件)。
- 错误:后台操作错误或身份验证状态。
- 活动:日历活动。
- 本地共享:临时位置共享。
- 消息:直接消息(短信、即时消息等)。
- 未接来电:来电(语音或视频)或类似的同步通信请求。
- 导航:地图逐段导航。
- 进度:长时间运行的后台操作的进度。
- 促销:促销或广告。
- 推荐:特定的、及时的推荐单个事物。例如,新闻应用可能希望推荐下一个用户想读的新闻故事。
- 提醒:用户预定的提醒。
- 服务:正在运行的后台服务指示。
- 社交:社交网络或分享更新。
- 状态:设备或上下文状态的持续信息。
- 秒表:运行中的秒表。
- 交通:媒体播放控制。
- 锻炼:跟踪用户的锻炼。
请求权限
权限让用户明白您在使用应用程序时打算做什么。要在设备上显示任何通知,您必须获得用户的同意,并记住这种同意随时可以撤销。在Android上,基本权限总是授予给新安装的应用程序,但在iOS上,即使是基本权限也必须向用户请求。
权限可以分为三类:
- 正常权限:这些权限不被认为是危险的,不需要显式用户同意就可以启用。
- 执行权限:这些权限被认为对用户更为敏感,您必须获得其明确同意才能使用。
- 特殊/危险权限:这些权限可能危害用户体验或隐私,您必须获得其明确同意,且根据您运行的平台,您可能需要获得制造商本身的许可才能使用。
作为一种良好实践,考虑始终在创建任何新通知之前检查您所需的权限是否已被授予,无论平台如何。要检查所需的权限是否需要显式用户同意,请调用shouldShowRationaleToRequest方法。权限列表可能因平台和操作系统版本而异。如果您的应用程序不需要极强地要求权限来执行所需的操作,可以考虑不请求用户权限并尊重其意愿。
通知权限
- 提醒:提醒是高优先级的通知,会在用户屏幕上弹出。普通优先级的通知只会在状态栏显示图标。
- 声音:声音允许为新显示的通知播放声音。通知声音限制为几秒钟,如果您打算播放更长时间的声音,您需要考虑同时播放背景声音。
- 徽章:徽章允许在应用图标上显示徽章提醒用户更新。徽章可以根据平台或用户在设备设置中定义显示数字或小点。Android和iOS都可以显示数字徽章,具体取决于其版本和发行。
- 灯光:允许在设备关闭屏幕时显示彩色小灯,以提醒用户更新。仅少数Android设备具有此功能。
- 振动:允许设备振动以提醒用户更新。
- 全屏意图:允许即使用户正在使用其他应用,也能显示通知。
- 精确闹钟:精确闹钟允许预定的通知在预计时间显示。此权限可能会被特殊设备模式(如省电模式)撤销。某些制造商可能会禁用此功能,如果他们认为您的应用消耗大量计算资源并降低电池寿命(而不改变您的应用的权限状态)。因此,您必须考虑到某些计划可能会被延迟甚至不显示,具体取决于您运行的平台。增加通知显示在正确时间的机会,启用此权限并设置正确的通知类别,但您永远无法保证100%准确。
- 关键警报:关键警报是一种特殊权限,允许在显示新通知时播放声音和振动,即使设备处于勿扰/静音模式。对于iOS,您必须向Apple申请授权您的应用使用它。
- 覆盖勿扰:覆盖勿扰允许通知降低勿扰/静音模式级别,以便显示关键警报。对于Android,您必须请求用户同意使用它。对于iOS,此权限始终与关键警报一起启用。
- 临时:(仅适用于iOS)允许在未经用户同意的情况下暂时显示通知。
- 汽车:允许在设备处于汽车模式时显示通知。
请注意:如果没有通过requestPermissionToSendNotifications方法请求任何权限,标准请求的权限将是提醒、徽章、声音、振动和灯光。
权限级别
权限可以分为三个不同的级别:

- 设备级别:设置在全局设备配置中的权限适用于安装在设备上的任何应用,例如禁用/启用所有通知、省电模式/低电量模式和勿扰/静音模式。
- 应用程序级别:设置在全局应用配置中的权限适用于任何渠道的通知。
- 通道级别:设置在通道中的权限仅对通过该特定通道显示的通知有效。
请求权限的完整示例
以下是如何检查所需的权限是否启用以及如何通过显示理由对话框请求它的完整示例(此示例取自我们的示例应用):
  static Future<List<NotificationPermission>> requestUserPermissions(
      BuildContext context,{
      // 如果您只打算请求应用级别的权限,请将channelKey值设置为null
      required String? channelKey,
      required List<NotificationPermission> permissionList}
    ) async {

    // 检查基本权限是否已被用户授予
    if(!await requestBasicPermissionToSendNotifications(context))
      return [];

    // 检查哪些权限您需要在此时允许
    List<NotificationPermission> permissionsAllowed = await LocalPushNotifications().checkPermissionList(
        channelKey: channelKey,
        permissions: permissionList
    );

    // 如果所有权限都允许,则无需做任何事情
    if(permissionsAllowed.length == permissionList.length)
      return permissionsAllowed;

    // 刷新权限列表,仅包含未允许的权限
    List<NotificationPermission> permissionsNeeded =
      permissionList.toSet().difference(permissionsAllowed.toSet()).toList();

    // 检查是否有些权限需要用户干预才能启用
    List<NotificationPermission> lockedPermissions = await LocalPushNotifications().shouldShowRationaleToRequest(
        channelKey: channelKey,
        permissions: permissionsNeeded
    );

    // 如果没有权限需要用户干预,则直接请求
    if(lockedPermissions.isEmpty){

      // 通过本地资源请求权限。
      await LocalPushNotifications().requestPermissionToSendNotifications(
          channelKey: channelKey,
          permissions: permissionsNeeded
      );

      // 用户回来后,检查权限是否成功启用
      permissionsAllowed = await LocalPushNotifications().checkPermissionList(
          channelKey: channelKey,
          permissions: permissionsNeeded
      );
    }
    else {
      // 如果需要向用户解释以使其理解权限,请显示它
      await showDialog(
          context: context,
          builder: (context) => AlertDialog(
            backgroundColor: Color(0xfffbfbfb),
            title: Text('Local Notifications需要您的权限',
              textAlign: TextAlign.center,
              maxLines: 2,
              style: TextStyle(fontSize: 22, fontWeight: FontWeight.w600),
            ),
            content: Column(
              mainAxisSize: MainAxisSize.min,
              children: [
                Image.asset(
                  'assets/images/animated-clock.gif',
                  height: MediaQuery.of(context).size.height * 0.3,
                  fit: BoxFit.fitWidth,
                ),
                Text(
                  '要继续,请启用上面的权限' +
                      (channelKey?.isEmpty ?? true ? '' : '在渠道 $channelKey 上') + ':',
                  maxLines: 2,
                  textAlign: TextAlign.center,
                ),
                SizedBox(height: 5),
                Text(
                  lockedPermissions.join(', ').replaceAll('NotificationPermission.', ''),
                  maxLines: 2,
                  textAlign: TextAlign.center,
                  style: TextStyle(fontSize: 14, fontWeight: FontWeight.w600),
                ),
              ],
            ),
            actions: [
              TextButton(
                  onPressed: (){ Navigator.pop(context); },
                  child: Text(
                    '拒绝',
                    style: TextStyle(color: Colors.red, fontSize: 18),
                  )
              ),
              TextButton(
                onPressed: () async {

                  // 通过本地资源请求权限。仅在这个点重定向一个页面。
                  await LocalPushNotifications().requestPermissionToSendNotifications(
                      channelKey: channelKey,
                      permissions: lockedPermissions
                  );

                  // 用户回来后,检查权限是否成功启用
                  permissionsAllowed = await LocalPushNotifications().checkPermissionList(
                      channelKey: channelKey,
                      permissions: lockedPermissions
                  );

                  Navigator.pop(context);
                },
                child: Text(
                  '允许',
                  style: TextStyle(color: Colors.deepPurple, fontSize: 18, fontWeight: FontWeight.bold),
                ),
              ),
            ],
          )
      );
    }

    // 返回更新后的允许权限列表
    return permissionsAllowed;
  }
计划通知
计划可以基于UTC或本地时区创建,并指定时间间隔或设置日历过滤器。通知可以远程创建。
注意:对于iOS,不可能定义正确的displayedDate,因为不可能与通知调度到达用户状态栏时的时间完全一致。
要发送通知计划,您需要实例化以下类之一作为通知属性schedule的一部分:
NotificationCalendar:创建一个计划在设定日期组件匹配当前日期时显示的通知。如果设置了时间组件为null,则任何值都视为有效以生成下一个有效日期。每个组件只允许一个值。NotificationInterval:创建一个计划每隔一定时间显示一次的通知,从下一个有效间隔开始。NotificationAndroidCrontab:基于精确日期列表或cron表达式创建一个计划显示的通知,具有秒精度。了解更多关于如何创建有效的cron表达式的详细信息,请参阅这篇文章。
所有这些都可以使用以下配置:
timeZone:描述该计划基于的时间区域(有效示例:America/Sao_Paulo, America/Los_Angeles, GMT+01:00, Europe/London, UTC)allowWhileIdle:确定通知是否在设备处于临界状态(如低电量)时发送。repeats:确定计划是否在显示后重复。如果没有更多的有效日期符合计划规则,通知将自动取消。
对于时区,请注意以下几点:
- UTC时区的日期在地球上所有地区同时触发,不受夏令时规则影响。
- 定义为“GMT-07:00”的本地时区日期不受夏令时规则影响。
- 定义为“Europe/Lisbon”的本地时区日期受夏令时规则影响,特别是在基于日历过滤器进行计划时。
以下是一些创建计划通知的实际示例:
  String localTimeZone = await LocalPushNotifications().getLocalTimeZoneIdentifier();
  String utcTimeZone = await LocalPushNotifications().getLocalTimeZoneIdentifier();

  await LocalPushNotifications().createNotification(
      content: NotificationContent(
          id: id,
          channelKey: 'scheduled',
          title: '每分钟一次的通知',
          body: '此通知计划每分钟重复一次。',
          notificationLayout: NotificationLayout.BigPicture,
          bigPicture: 'asset://assets/images/melted-clock.png'),
      schedule: NotificationInterval(interval: 60, timeZone: localTimeZone, repeats: true));
await LocalPushNotifications().createNotification(
  content: NotificationContent(
      id: id,
      channelKey: 'scheduled',
      title: '等待5秒显示',
      body: '现在是5秒后',
      wakeUpScreen: true,
      category: NotificationCategory.Alarm,
  ),
  schedule: NotificationInterval(
      interval: 5,
      timeZone: localTimeZone,
      preciseAlarm: true,
      timezone: await LocalPushNotifications().getLocalTimeZoneIdentifier()
  );
  await LocalPushNotifications().createNotification(
      content: NotificationContent(
          id: id,
          channelKey: 'scheduled',
          title: '每分钟恰好一次的通知',
          body: '此通知计划每分钟在时钟上重复一次。',
          notificationLayout: NotificationLayout.BigPicture,
          bigPicture: 'asset://assets/images/melted-clock.png'),
      schedule: NotificationCalendar(second: 0, timeZone: localTimeZone, repeats: true));
 await LocalPushNotifications().createNotification(
  content: NotificationContent(
    id: id,
    channelKey: 'scheduled',
    title: '正好在时间!',
    body: '此通知计划在 ' +
        (Utils.DateUtils.parseDateToString(scheduleTime.toLocal()) ?? '?') +
        ' $timeZoneIdentifier (' +
        (Utils.DateUtils.parseDateToString(scheduleTime.toUtc()) ?? '?') +
        ' utc)',
    wakeUpScreen: true,
    category: NotificationCategory.Reminder,
    notificationLayout: NotificationLayout.BigPicture,
    bigPicture: 'asset://assets/images/delivery.jpeg',
    payload: {'uuid': 'uuid-test'},
    autoDismissible: false,
  ),
  schedule: NotificationCalendar.fromDate(date: scheduleTime));
计划精度
需要注意的是,某些Android发行版可能会忽略或延迟计划执行,如果它们认为有必要节省电池寿命等,这种干预对于重复计划尤为常见。在大多数情况下,这种行为是推荐的,因为作为耗电的应用可能会损害应用程序和制造商的形象。因此,您需要在业务逻辑中考虑这一事实。
但是,对于某些计划精度是必不可少的情况,您可以使用一些功能来确保在正确的时间执行:
- 将通知的类别设置为关键类别,如报警、提醒或通话。
- 将
preciseAlarm属性设置为true。对于Android版本大于等于12,您需要显式请求用户同意启用此功能。您可以使用requestPermissionToSendNotifications请求权限或引导用户到权限页面调用showAlarmPage。 - 设置
criticalAlerts通道属性和通知内容属性为true。此功能允许您在设备处于静音/勿扰模式时显示通知并播放声音。由于此特性被认为高度敏感,您必须向Apple申请特殊授权才能使用它。对于Android版本大于等于11,您需要显式请求用户同意启用此功能。您可以使用requestPermissionToSendNotifications请求权限。
要启用精确闹钟,您需要在AndroidManifest.xml文件中添加SCHEDULE_EXACT_ALARM权限,位于Android/app/src/main/文件夹内。
<manifest xmlns:android="http://schemas.android.com/apk/res/android"
   package="com.example">

   <uses-permission android:name="android.permission.SCHEDULE_EXACT_ALARM"/>

   <application>
       ...
   </application>
</manifest>
要启用关键警报,您需要在AndroidManifest.xml文件中添加ACCESS_NOTIFICATION_POLICY权限,位于Android/app/src/main/文件夹内。
更多关于Flutter本地推送通知插件local_push_notifications的使用的实战教程也可以访问 https://www.itying.com/category-92-b0.html

更多关于Flutter本地推送通知插件local_push_notifications的使用的实战系列教程也可以访问 https://www.itying.com/category-92-b0.html
当然,下面是一个关于如何使用 local_push_notifications 插件在 Flutter 中实现本地推送通知的示例代码。这个示例展示了如何配置插件、安排一个简单的本地通知以及处理用户点击通知时的回调。
首先,确保你已经在 pubspec.yaml 文件中添加了 local_push_notifications 依赖:
dependencies:
  flutter:
    sdk: flutter
  local_push_notifications: ^x.x.x  # 请替换为最新版本号
然后运行 flutter pub get 来获取依赖。
接下来,在你的 Flutter 应用中实现通知功能。以下是一个完整的示例:
import 'package:flutter/material.dart';
import 'package:local_push_notifications/local_push_notifications.dart';

void main() {
  runApp(MyApp());
}

class MyApp extends StatelessWidget {
  @override
  Widget build(BuildContext context) {
    return MaterialApp(
      title: 'Flutter Local Notifications Demo',
      theme: ThemeData(
        primarySwatch: Colors.blue,
      ),
      home: MyHomePage(),
    );
  }
}

class MyHomePage extends StatefulWidget {
  @override
  _MyHomePageState createState() => _MyHomePageState();
}

class _MyHomePageState extends State<MyHomePage> {
  final LocalNotificationsPlugin _notificationsPlugin = LocalNotificationsPlugin();

  // 初始化通知插件
  @override
  void initState() {
    super.initState();
    var initializationSettingsAndroid = AndroidInitializationSettings('@mipmap/ic_launcher');
    var initializationSettingsIOS = IOSInitializationSettings(
      requestAlertPermission: true,
      requestBadgePermission: true,
      requestSoundPermission: true,
    );
    var initializationSettings = InitializationSettings(
      android: initializationSettingsAndroid,
      iOS: initializationSettingsIOS,
    );

    _notificationsPlugin.initialize(initializationSettings,
        onSelectNotification: onSelectNotification);
  }

  // 安排一个本地通知
  Future<void> _scheduleNotification() async {
    var androidPlatformChannelSpecifics = AndroidNotificationDetails(
      'your channel id',
      'your channel name',
      'your channel description',
      importance: Importance.max,
      priority: Priority.high,
    );
    var iOSPlatformChannelSpecifics = IOSNotificationDetails();
    var platformChannelSpecifics = NotificationDetails(
      android: androidPlatformChannelSpecifics,
      iOS: iOSPlatformChannelSpecifics,
    );
    await _notificationsPlugin.schedule(
      0,
      'Hello World',
      'This is a scheduled notification!',
      pendingIntent: PendingIntent.messaging(),
      platformChannelSpecifics: platformChannelSpecifics,
      payload: 'item x',
    );
  }

  // 用户点击通知时的回调
  Future<void> onSelectNotification(String payload) async {
    showDialog(
      context: context,
      builder: (BuildContext context) => CupertinoAlertDialog(
        title: Text('Payload'),
        content: Text('Notification payload: $payload'),
        actions: <Widget>[
          CupertinoDialogAction(
            isDefaultAction: true,
            child: Text('OK'),
            onPressed: () {
              Navigator.of(context).pop();
            },
          ),
        ],
      ),
    );
  }

  @override
  Widget build(BuildContext context) {
    return Scaffold(
      appBar: AppBar(
        title: Text('Flutter Local Notifications Demo'),
      ),
      body: Center(
        child: ElevatedButton(
          onPressed: _scheduleNotification,
          child: Text('Schedule Notification'),
        ),
      ),
    );
  }
}
说明:
-
依赖初始化:
- 在
pubspec.yaml中添加local_push_notifications依赖。 - 使用
flutter pub get获取依赖。
- 在
-
插件初始化:
- 在
initState方法中初始化LocalNotificationsPlugin。 - 配置 Android 和 iOS 的初始化设置。
- 设置用户点击通知时的回调。
- 在
-
安排通知:
- 使用
schedule方法安排一个本地通知。 - 设置通知的标题、内容、ID、平台特定细节等。
- 使用
-
处理用户点击:
- 当用户点击通知时,会调用
onSelectNotification回调。 - 在回调中显示一个对话框,显示通知的 payload。
- 当用户点击通知时,会调用
注意事项:
- 确保 Android 项目中的
mipmap/ic_launcher图标存在,或替换为你自己的图标资源。 - 对于 iOS,你可能需要在
Info.plist文件中添加必要的权限请求。 - 测试时请确保在真实设备或模拟器上运行,因为某些通知功能在纯 Flutter 环境中可能无法正常工作。
这样,你就可以在 Flutter 应用中使用 local_push_notifications 插件实现本地推送通知了。