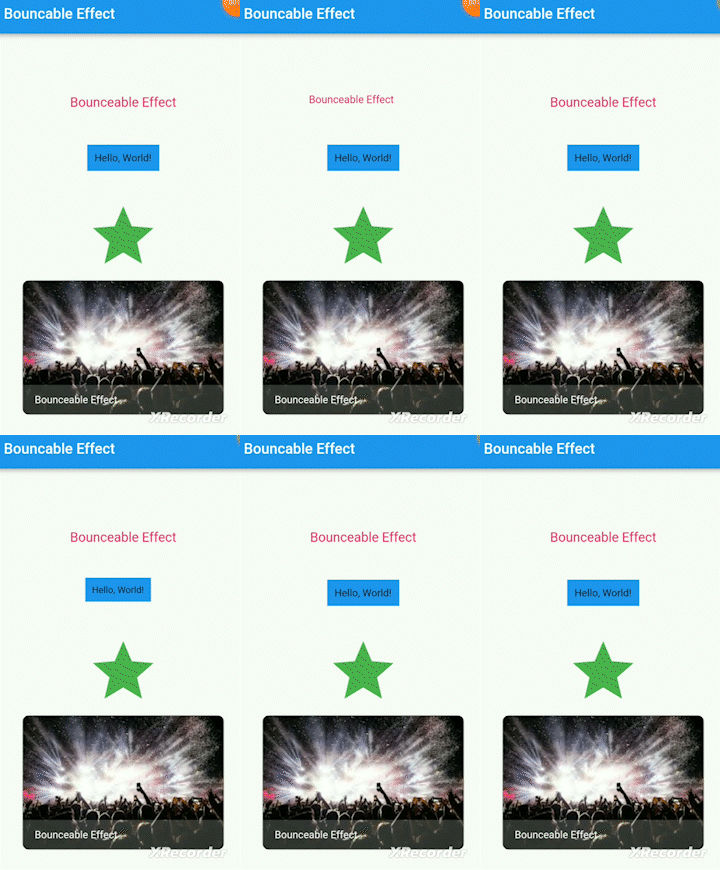
Flutter动画效果插件bounceable_effect的使用
Flutter动画效果插件bounceable_effect的使用
🏀 bounceable_effect
介绍一个用于增强用户体验和参与度的可定制点击弹跳动画。
🌟 特性
- 真正简单且高效。
- 使用此包可以仅通过一次点击创建自定义的弹跳动画。
- 它使用一个动画控制器,可以自定义到指定的速度。
- 用户可以选择所需的弹跳效果级别,并为他们的部件选择首选动画效果。
- 用户可以启用或禁用点击功能,并确保在滚动时不粘连。
- 此外,它还防止在同时点击多个Bounceable部件时触发多次点击事件,提供独特的无缝用户体验。
示例

💻 安装
在 pubspec.yaml 文件中添加依赖:
dependencies:
  bounceable_effect: ^1.0.0
然后导入该包:
import 'package:bounceable_effect/bounceable_effect.dart';
👨💻 使用
你可以通过以下简单的示例来参考如何使用这个插件。只需将你的部件包裹在 BouncableEffect 中即可:
// 基本用法
BouncableEffect(
  onTap: () {},
  child: YourWidget(),
);
你也可以通过自定义参数使其更个性化:
// 自定义参数
BouncableEffect(
  effect: Curves.easeInBack, // 动画曲线
  speed: 100, // 弹跳速度
  bouncing: .9, // 弹跳程度
  onTap: () {
    print('Click tapped!');
  },
  child: Icon(
    Icons.star,
    color: Colors.green,
    size: 100,
  ),
);
完整示例代码
以下是完整的示例代码:
import 'package:flutter/material.dart';
import 'package:bounceable_effect/bounceable_effect.dart';

void main() {
  runApp(MyApp());
}

class MyApp extends StatelessWidget {
  [@override](/user/override)
  Widget build(BuildContext context) {
    return MaterialApp(
      debugShowCheckedModeBanner: false,
      title: 'Bouncable Effect',
      home: Scaffold(
        appBar: AppBar(
          title: Text('Bouncable Effect'),
        ),
        body: Center(
          child: Column(
            mainAxisAlignment: MainAxisAlignment.center,
            children: [
              // 文本上的bounceable_effect
              BouncableEffect(
                onTap: () {
                  print('Tapped On Text Widget');
                },
                child: const Padding(
                  padding: EdgeInsets.all(8.0),
                  child: Text('Bounceable Effect', style: TextStyle(fontSize: 18, color: Colors.pink)),
                ),
              ),
              const SizedBox(height: 10),

              // 按钮上的bounceable_effect
              BouncableEffect(
                effect: Curves.bounceInOut,
                speed: 200,
                bouncing: .7,
                onTap: () {
                  print('Click tapped!');
                },
                child: Container(
                  padding: EdgeInsets.all(10),
                  margin: EdgeInsets.all(30),
                  color: Colors.blue,
                  child: Text('Hello, World!'),
                ),
              ),
              const SizedBox(height: 10),

              // 图标上的bounceable_effect
              BouncableEffect(
                effect: Curves.easeInCirc,
                bouncing: .9,
                onTap: () {
                  print('Click tapped!');
                },
                child: Icon(
                  Icons.star,
                  color: Colors.green,
                  size: 100,
                ),
              ),
              const SizedBox(height: 10),

              // 多层堆叠部件上的bounceable_effect
              BouncableEffect(
                effect: Curves.easeInBack,
                speed: 100,
                bouncing: .9,
                onTap: () {
                  print('Click tapped!');
                },
                child: Container(
                  decoration: BoxDecoration(
                    borderRadius: BorderRadius.circular(10),
                    border: Border.all(color: Colors.grey),
                  ),
                  clipBehavior: Clip.antiAliasWithSaveLayer,
                  child: Stack(
                    children: [
                      Image.network('https://encrypted-tbn0.gstatic.com/images?q=tbn:ANd9GcROw1upqPjzbLnyLZuMHMKLhnny7-8tQr08Ew&usqp=CAU'),
                      Positioned(
                        bottom: 0,
                        left: 0,
                        right: 0,
                        child: Container(
                          decoration: BoxDecoration(
                            borderRadius: BorderRadius.only(
                              bottomLeft: Radius.circular(10),
                              bottomRight: Radius.circular(10),
                            ),
                            color: Colors.white.withOpacity(.2),
                          ),
                          padding: EdgeInsets.symmetric(vertical: 12, horizontal: 16),
                          child: Text(
                            'Bounceable Effect',
                            style: TextStyle(color: Colors.white),
                          ),
                        ),
                      ),
                    ],
                  ),
                ),
              ),
            ],
          ),
        ),
      ),
    );
  }
}
更多关于Flutter动画效果插件bounceable_effect的使用的实战教程也可以访问 https://www.itying.com/category-92-b0.html
1 回复
更多关于Flutter动画效果插件bounceable_effect的使用的实战系列教程也可以访问 https://www.itying.com/category-92-b0.html
当然,下面是一个关于如何在Flutter中使用bounceable_effect插件来实现动画效果的代码示例。bounceable_effect是一个允许你轻松创建弹跳动画效果的Flutter插件。
首先,确保你已经在pubspec.yaml文件中添加了bounceable_effect依赖:
dependencies:
  flutter:
    sdk: flutter
  bounceable: ^latest_version  # 请替换为最新版本号
然后,运行flutter pub get来安装依赖。
以下是一个简单的示例代码,展示了如何使用bounceable_effect来实现一个弹跳动画效果:
import 'package:flutter/material.dart';
import 'package:bounceable/bounceable.dart';

void main() {
  runApp(MyApp());
}

class MyApp extends StatelessWidget {
  @override
  Widget build(BuildContext context) {
    return MaterialApp(
      title: 'Bounceable Effect Demo',
      theme: ThemeData(
        primarySwatch: Colors.blue,
      ),
      home: Scaffold(
        appBar: AppBar(
          title: Text('Bounceable Effect Demo'),
        ),
        body: Center(
          child: BounceableWidgetExample(),
        ),
      ),
    );
  }
}

class BounceableWidgetExample extends StatefulWidget {
  @override
  _BounceableWidgetExampleState createState() => _BounceableWidgetExampleState();
}

class _BounceableWidgetExampleState extends State<BounceableWidgetExample> with SingleTickerProviderStateMixin {
  late AnimationController _controller;
  late Animation<double> _animation;

  @override
  void initState() {
    super.initState();
    _controller = AnimationController(
      duration: const Duration(seconds: 2),
      vsync: this,
    )..repeat(reverse: true);

    _animation = CurvedAnimation(
      parent: _controller,
      curve: Curves.elasticInOut,
    );
  }

  @override
  void dispose() {
    _controller.dispose();
    super.dispose();
  }

  @override
  Widget build(BuildContext context) {
    return AnimatedBuilder(
      animation: _animation,
      child: Container(
        width: 100,
        height: 100,
        color: Colors.blue,
        child: Center(
          child: Text(
            'Bounce',
            style: TextStyle(color: Colors.white),
          ),
        ),
      ),
      builder: (context, child) {
        return Bounceable(
          child: child,
          onPressed: () {
            // 当点击时触发弹跳动画
            _controller.reset();
            _controller.forward();
          },
          animationCurve: Curves.bounceInOut,
          animationDuration: const Duration(milliseconds: 500),
        );
      },
    );
  }
}
在这个示例中,我们创建了一个简单的Flutter应用,其中包含一个带有Bounceable包装的容器。当用户点击这个容器时,它会触发一个弹跳动画。
AnimationController用于控制动画的时间线。CurvedAnimation用于给动画添加曲线效果,这里使用了Curves.elasticInOut。Bounceable是插件提供的组件,它接受一个child和一个onPressed回调函数。当用户点击时,onPressed回调被触发,从而重置并重新启动动画控制器。animationCurve和animationDuration参数允许你自定义弹跳动画的曲线和持续时间。
你可以根据需要调整动画的持续时间、曲线以及其他参数,以实现不同的弹跳效果。


