


Flutter图像处理插件image_magick_q8的使用
Flutter图像处理插件image_magick_q8的使用
目录
贡献者
特别感谢Piero5W11作为“FFI大师”并在这个插件上给予了我很多帮助。
ImageMagickFFI 插件
该插件将ImageMagick C库MagickWand带到了dart中使用。
感受原生
与C语言一样交互底层的ImageMagick C API(当然不是用指针)。
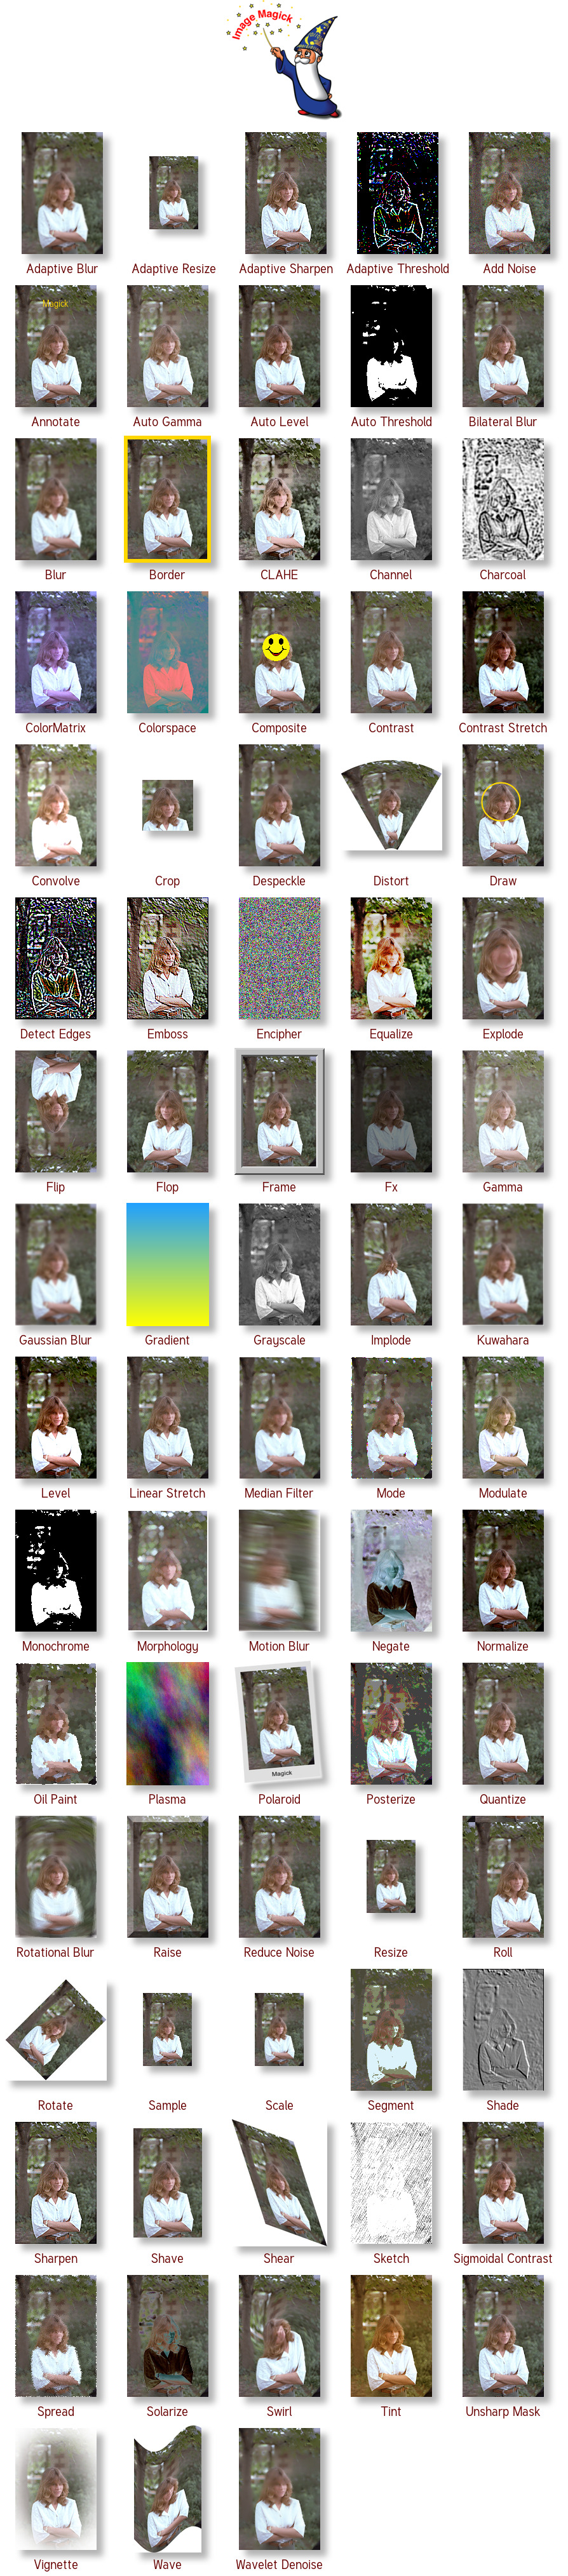
它可以做什么?
以下是一些你可以使用该插件完成的操作及其对应的函数名称。
查看下方的#Usage部分了解更多细节。
变体
该插件仅提供了ImageMagick的Q8版本。如果你想使用其他版本,请使用相应包。
Windows
支持Windows x64(32位)和Windows x86(32位)。
Android
目前仅支持arm64-v8a(64位)。如果你想帮忙添加对armeabi-v7a(32位)的支持,请参阅这里。
注意,对于某些操作(如写入图像),你可能需要从系统获取写权限。
Linux
即将推出。
MacOS
欢迎提供二进制文件的贡献。
iOS
欢迎提供二进制文件的贡献。
使用
在Flutter应用中:
初始化一个MagickWand
@override
void initState() {
  _wand = MagickWand.newMagickWand(); // 创建一个MagickWand用于编辑图像

  // 设置一个回调函数,在图像处理进度变化时调用
  WidgetsBinding.instance.addPostFrameCallback(
    (timeStamp) async => await _wand.magickSetProgressMonitor(
      (info, offset, size, clientData) => setState(() =>
          status = '[${info.split('/').first}, $offset, $size, $clientData]'),
    ),
  );

  super.initState();
}
使用MagickWand
// 读取图像,对其进行一些操作,然后保存它
Future<String> _handlePress() async {
  try {
    setState(() => isLoading = true);

    String? result;

    await _wand.magickReadImage(_inputFile!.path); // 读取图像
    _throwWandExceptionIfExists(_wand);

    ///////////////////////// 对MagickWand进行一些操作 /////////////////////////

    // 调整图像大小
    await _wand.magickAdaptiveResizeImage(1200, 800);
    _throwWandExceptionIfExists(_wand);
    // 翻转图像
    await _wand.magickFlipImage();
    _throwWandExceptionIfExists(_wand);
    // 增强图像
    await _wand.magickEnhanceImage();
    _throwWandExceptionIfExists(_wand);
    // 向图像添加噪声
    await _wand.magickAddNoiseImage(NoiseType.GaussianNoise, 1.5);
    _throwWandExceptionIfExists(_wand);

    /////////////////////////////////////////////////////////////////////////////////

    String outputFilePath = _getOutputFilePath();

    await _wand.magickWriteImage(outputFilePath); // 将图像写入文件
    _throwWandExceptionIfExists(_wand);

    _outputFile = File(outputFilePath);
    isLoading = false;
    return result ?? 'Operation Successful!';
  } catch (e) {
    _outputFile = null;
    isLoading = false;
    return 'Error: ${e.toString()}';
  }
}

String _getOutputFilePath() {
  final String ps = Platform.pathSeparator;
  final String inputFileNameWithoutExtension =
      _inputFile!.path.split(ps).last.split('.').first;
  final String outputFilePath =
      '${_outputDirectory!.path}${ps}out_$inputFileNameWithoutExtension.png';
  return outputFilePath;
}

void _throwWandExceptionIfExists(MagickWand wand) {
  MagickGetExceptionResult e =
      _wand.magickGetException(); // 获取异常信息
  if (e.severity != ExceptionType.UndefinedException) {
    throw e;
  }
}
释放MagickWand和插件
@override
dispose() {
  _wand.destroyMagickWand(); // 我们已经完成了对MagickWand的使用
  disposeImageMagick(); // 我们已经完成了对整个插件的使用
  super.dispose();
}
在一个纯Dart应用中:
- 在
pubspec.yaml中依赖该插件,就像依赖任何其他包一样。 - 然后你必须手动复制依赖项(.lib文件、.dll文件)到与你的可执行文件相同的路径下(目前这是在dart中完成的方式)。要获取这些依赖项,你可以构建一个flutter应用,然后从那里复制依赖项。
然后你可以正常使用插件,例如:
import 'dart:io';
import 'package:image_magick_q8/image_magick_q8.dart';

Future<void> main(List<String> arguments) async {
  final File inputFile1 = File("D:\\magick\\Screenshot.png");
  final File inputFile2 = File("D:\\magick\\fayruz_love.png");
  final File inputFile3 = File("D:\\magick\\untitled.png");

  print('Magick Dart App Started!');

  initializeImageMagick(); // 初始化插件

  MagickWand wand1 = MagickWand.newMagickWand(); // 创建一个MagickWand
  MagickWand wand2 = MagickWand.newMagickWand(); // 创建一个MagickWand

  await wand1.magickReadImage(inputFile3.path);
  throwWandExceptionIfExists(wand1);

  await wand2.magickReadImage(inputFile2.path);
  throwWandExceptionIfExists(wand2);

  Stopwatch stopwatch = Stopwatch()..start();
  ///////////////////////////////// 使用MagickWand /////////////////////////////////
  final imagePage =
      wand1.magickGetImagePage(); // 获取图像的尺寸
  throwWandExceptionIfExists(wand1);

  final int width = imagePage!.width;
  final int height = imagePage.height;
  final int x = 0;
  final int y = 0;

  final cropWand = await wand1.magickGetImageRegion(
    width: width ~/ 2,
    height: height ~/ 2,
    x: x,
    y: y,
  ); // 从图像中裁剪出一个新的MagickWand

  await cropWand!.magickWriteImage(getOutputFilePath(inputFile1.path));
  throwWandExceptionIfExists(wand2);

  ///////////////////////////////// 使用MagickWand /////////////////////////////////
  print('elapsed time: ${stopwatch.elapsedMilliseconds} millis');

  await wand1.destroyMagickWand(); // 释放MagickWand
  await wand2.destroyMagickWand(); // 释放MagickWand
  await cropWand.destroyMagickWand(); // 释放MagickWand

  disposeImageMagick(); // 释放插件

  print('Magick Dart App Ended!');
}

String getOutputFilePath(String inputFilePath) {
  final String outputFilePath = inputFilePath.replaceAll(
      RegExp(r'\.(png|jpg|jpeg|gif|bmp|tiff|tif|webp|pdf|ps|eps|svg|ico)$'),
      '_output.png');
  return outputFilePath;
}

Future<void> setProgressMonitor(MagickWand wand, [String? wandName]) async {
  await wand.magickSetProgressMonitor((info, offset, size, clientData) {
    print('[${wandName ?? 'unnamed wand'}] $info, $offset, $size, $clientData');
  });
}

void throwWandExceptionIfExists(MagickWand wand) {
  final exception = wand.magickGetException();
  if (exception.severity != ExceptionType.UndefinedException) {
    throw Exception(
        'An exception occurred with the wand: ${exception.description}');
  }
}
更多关于Flutter图像处理插件image_magick_q8的使用的实战教程也可以访问 https://www.itying.com/category-92-b0.html

更多关于Flutter图像处理插件image_magick_q8的使用的实战系列教程也可以访问 https://www.itying.com/category-92-b0.html
当然,以下是一个关于如何在Flutter项目中使用image_magick_q8插件进行图像处理的示例代码。image_magick_q8是一个Flutter插件,它封装了ImageMagick库,提供了强大的图像处理功能。不过,需要注意的是,由于ImageMagick本身功能非常强大且复杂,这里仅展示一些基础操作。
首先,确保你已经在pubspec.yaml文件中添加了image_magick_q8依赖:
dependencies:
  flutter:
    sdk: flutter
  image_magick_q8: ^最新版本号  # 请替换为实际可用的最新版本号
然后,运行flutter pub get来安装依赖。
接下来,在你的Flutter项目中,你可以像这样使用image_magick_q8进行图像处理:
import 'package:flutter/material.dart';
import 'package:image_magick_q8/image_magick_q8.dart';
import 'dart:typed_data';
import 'dart:ui' as ui;

void main() {
  runApp(MyApp());
}

class MyApp extends StatefulWidget {
  @override
  _MyAppState createState() => _MyAppState();
}

class _MyAppState extends State<MyApp> {
  Uint8List? imageBytes;

  @override
  void initState() {
    super.initState();
    _processImage();
  }

  Future<void> _processImage() async {
    // 加载原始图像数据(这里假设你有一个本地图像文件)
    final originalImageBytes = await rootBundle.load('assets/sample.jpg');

    // 创建ImageMagick实例
    final im = ImageMagick();

    // 将图像数据加载到ImageMagick实例中
    await im.readImageFromMemory(originalImageBytes);

    // 执行图像处理操作,例如调整大小、旋转等
    // 这里我们将图像大小调整为宽度200,高度自动按比例缩放
    await im.resizeImage(200, 0);

    // 将处理后的图像数据转换回Uint8List
    imageBytes = await im.writeImageToMemory('jpeg');

    // 释放ImageMagick实例资源
    await im.dispose();

    // 更新UI
    setState(() {});
  }

  @override
  Widget build(BuildContext context) {
    return MaterialApp(
      home: Scaffold(
        appBar: AppBar(
          title: Text('ImageMagick Q8 Example'),
        ),
        body: Center(
          child: imageBytes != null
              ? Image.memory(imageBytes!)
              : CircularProgressIndicator(),
        ),
      ),
    );
  }
}
在上面的代码中,我们做了以下几件事:
- 从
assets文件夹中加载了一个示例图像文件(你需要确保你的项目中有这个图像文件,并且在pubspec.yaml中正确声明了assets)。 - 创建了一个
ImageMagick实例。 - 使用
readImageFromMemory方法将图像数据加载到ImageMagick实例中。 - 使用
resizeImage方法调整了图像的大小。 - 使用
writeImageToMemory方法将处理后的图像数据转换回Uint8List格式。 - 使用
Image.memory在Flutter应用中显示处理后的图像。
请注意,这只是一个简单的示例,image_magick_q8插件提供了许多其他图像处理功能,如裁剪、旋转、添加滤镜等,你可以根据需求查阅官方文档以了解更多详细用法。
此外,由于image_magick_q8插件依赖于本地ImageMagick库,因此在不同平台上可能需要额外的配置步骤,请确保遵循插件的README文档中的说明进行配置。