


Flutter QQ登录功能插件flutter_qq_login的使用
Flutter QQ登录功能插件flutter_qq_login的使用
本插件集成了QQ登录的功能:
特性
- 判断是否已安装QQ应用
<code>isQQInstalled()</code> - 登录成功后获取数据,包括
OpenId、AccessToken等重要数据 - 获取用户信息
<code>getUserInfo()</code>
开始使用
在使用此插件之前,请务必详细阅读官方文档:
使用方法
import 'package:flutter_qq_login/flutter_qq_login.dart';

// 创建FlutterQqLogin对象
final flutterQqLogin = FlutterQqLogin();

// 初始化插件,并填写由QQ互联创建的应用ID
flutterQqLogin.init(appId: "Your APPID");

// 检查是否已安装QQ应用
bool isInstalled = await flutterQqLogin.isInstalled();

// 调用QQ登录,返回登录成功后的OpenId、AccessToken等重要数据
Map<String, dynamic> qqInfo = await flutterQqLogin.login();

// 获取用户信息
Map<String, dynamic> userInfo = await flutterQqLogin.getUserInfo(qqInfo['access_token'], qqInfo['openid']);
login()接口状态码描述
- 正常情况下,接口至少会返回
ret属性:0表示授权登录成功,并且此时必须有accessToken等重要数据。-1表示授权登录失败,无法获取accessToken等重要数据。-2表示取消登录授权(即跳转到QQ后点击取消再跳回)。-3表示网络异常。
配置Android版本
在android/app/build.gradle中添加以下配置:
android {
    ...

    defaultConfig {
        ...
        minSdkVersion 19
        ...
    }

}
在android/app/src/main/AndroidManifest.xml中添加以下配置:
<manifest xmlns:android="http://schemas.android.com/apk/res/android">
    <!-- 新增内容开始 -->
    <uses-permission android:name="android.permission.INTERNET" />
    <uses-permission android:name="android.permission.ACCESS_NETWORK_STATE" />
    <!-- 新增内容结束 -->

    <application>
        ...
        <!-- 新增内容开始 -->
        <activity
            android:name="com.tencent.tauth.AuthActivity"
            android:noHistory="true"
            android:launchMode="singleTask"
            android:exported="true">
            <intent-filter>
                <action android:name="android.intent.action.VIEW" />
                <category android:name="android.intent.category.DEFAULT" />
                <category android:name="android.intent.category.BROWSABLE" />
                <data android:scheme="Your APPID" />
            </intent-filter>
        </activity>
        <activity
            android:name="com.tencent.connect.common.AssistActivity"
            android:configChanges="orientation|keyboardHidden"
            android:screenOrientation="behind"
            android:theme="@android:style/Theme.Translucent.NoTitleBar" />
        <!-- 新增内容结束 -->
        ...
    </application>
    <!-- 新增内容开始 -->
    <queries>
        <package android:name="com.tencent.mobileqq" />
    </queries>
    <!-- 新增内容结束 -->
</manifest>
配置iOS版本
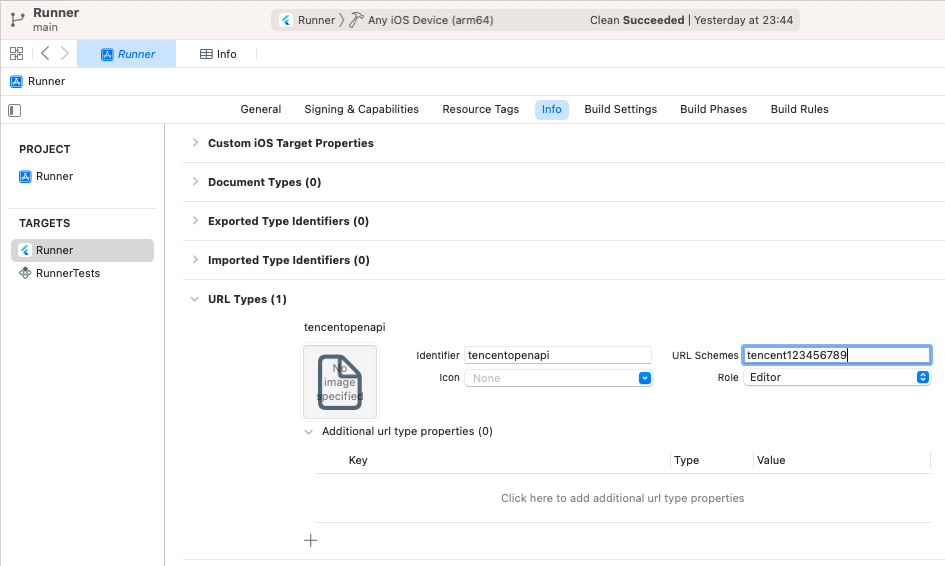
在Xcode中打开你的iOS项目Runner.xcworkspace,在info配置选项卡下的URL Types中添加新的条目:
identifier填写tencentopenapiURL Schemes填写tencent123456789,其中123456789是你的APPID
如图所示:
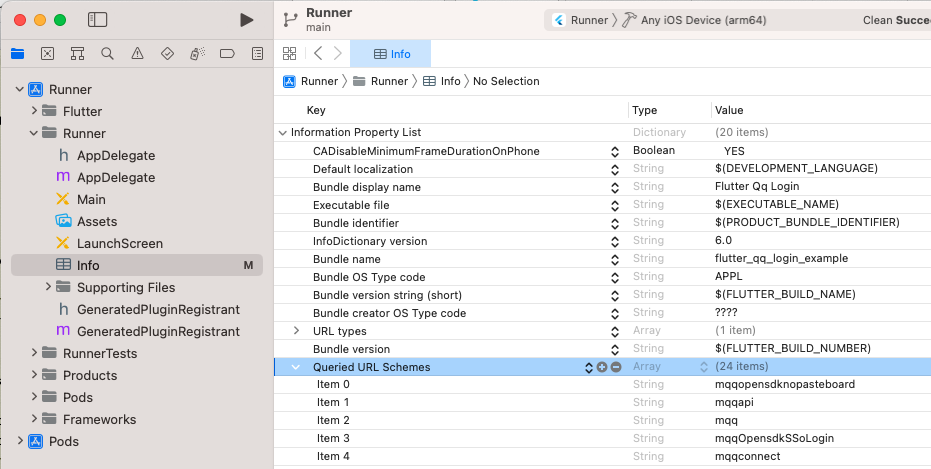
配置LSApplicationQueriesSchemes
方法1:在Xcode中配置info:
- 打开
info配置,添加LSApplicationQueriesSchemes,即Queried URL Schemes - 添加这些项:
- mqqopensdknopasteboard
- mqqapi
- mqq
- mqqOpensdkSSoLogin
- mqqconnect
- mqqopensdkdataline
- mqqopensdkgrouptribeshare
- mqqopensdkfriend
- mqqopensdkapi
- mqqopensdkapiV2
- mqqopensdkapiV3
- mqzoneopensdk
- wtloginmqq
- wtloginmqq2
- mqqwpa
- mqzone
- mqzonev2
- mqzoneshare
- wtloginqzone
- mqzonewx
- mqzoneopensdkapiV2
- mqzoneopensdkapi19
- mqzoneopensdkapi
- mqzoneopensdk
如图所示:
方法2:直接修改Info.plist文件:
- 使用
Android Studio打开项目中的ios/Runner/Info.plist - 在
dict节点下添加以下配置:
<key>LSApplicationQueriesSchemes</key>
<array>
    <string>mqqopensdknopasteboard</string>
    <string>mqqapi</string>
    <string>mqq</string>
    <string>mqqOpensdkSSoLogin</string>
    <string>mqqconnect</string>
    <string>mqqopensdkdataline</string>
    <string>mqqopensdkgrouptribeshare</string>
    <string>mqqopensdkfriend</string>
    <string>mqqopensdkapi</string>
    <string>mqqopensdkapiV2</string>
    <string>mqqopensdkapiV3</string>
    <string>mqzoneopensdk</string>
    <string>wtloginmqq</string>
    <string>wtloginmqq2</string>
    <string>mqqwpa</string>
    <string>mqzone</string>
    <string>mqzonev2</string>
    <string>mqzoneshare</string>
    <string>wtloginqzone</string>
    <string>mqzonewx</string>
    <string>mqzoneopensdkapiV2</string>
    <string>mqzoneopensdkapi19</string>
    <string>mqzoneopensdkapi</string>
    <string>mqzoneopensdk</string>
</array>
示例代码
import 'dart:async';

import 'package:flutter/material.dart';
import 'package:flutter_qq_login/flutter_qq_login.dart';

void main() {
  runApp(const MyApp());
}

class MyApp extends StatefulWidget {
  const MyApp({super.key});

  [@override](/user/override)
  State<MyApp> createState() => _MyAppState();
}

class _MyAppState extends State<MyApp> {
  final _flutterQqLogin = FlutterQqLogin();

  bool startLogin = false;
  bool _isInstalled = false;
  Map<String, dynamic> qqInfo = {};
  Map<String, dynamic> userInfo = {};

  [@override](/user/override)
  void initState() {
    super.initState();
    initData();
  }

  Future<void> initData() async {
    _flutterQqLogin.init(appId: "_Your_app_id_");
    bool isInstalled = await _flutterQqLogin.isInstalled();

    // 如果在异步平台消息传输期间小部件从树中删除,则我们希望丢弃回复而不是调用setState以更新我们的非存在的外观。
    if (!mounted) return;

    setState(() {
      _isInstalled = isInstalled;
    });
  }

  [@override](/user/override)
  Widget build(BuildContext context) {
    Widget userInfoWidget = Container();
    if (startLogin) userInfoWidget = CircularProgressIndicator();
    if (userInfo.isNotEmpty) {
      userInfoWidget = Row(
        mainAxisAlignment: MainAxisAlignment.center,
        children: [
          ClipOval(
            child: Image.network(userInfo['figureurl_qq_1']),
          ),
          SizedBox(width: 5,),
          Text(userInfo['nickname']),
        ],
      );
    }
    return MaterialApp(
      home: Scaffold(
        appBar: AppBar(
          title: const Text('QQ Login Example'),
        ),
        body: Center(
          child: Column(
            mainAxisAlignment: MainAxisAlignment.center,
            children: [
              Text('isInstalled QQ: $_isInstalled'),
              ElevatedButton(
                child: Text("Login"),
                onPressed: () {
                  doLogin();
                },
              ),
              SizedBox(height: 10,),
              userInfoWidget
            ],
          ),
        ),
      ),
    );
  }

  Future<void> doLogin() async {
    if (mounted) {
      setState(() {
        startLogin = true;
      });
    }
    Map<String, dynamic> tempQqInfo = await _flutterQqLogin.login();
    print('flutter_qq_plugin -> qqInfo = $tempQqInfo');
    if (tempQqInfo.containsKey("ret") && tempQqInfo['ret'] == 0) {
      Map<String, dynamic> tempUserInfo = await _flutterQqLogin.getUserInfo(tempQqInfo['access_token'], tempQqInfo['openid']);
      print('flutter_qq_plugin -> userInfo = $tempUserInfo');
      if (mounted) {
        setState(() {
          qqInfo = tempQqInfo;
          userInfo = tempUserInfo;
          startLogin = false;
        });
      }
    } else {
      setState(() {
        startLogin = false;
      });
    }
  }
}
更多关于Flutter QQ登录功能插件flutter_qq_login的使用的实战教程也可以访问 https://www.itying.com/category-92-b0.html

更多关于Flutter QQ登录功能插件flutter_qq_login的使用的实战系列教程也可以访问 https://www.itying.com/category-92-b0.html
当然,下面是一个关于如何在Flutter应用中使用flutter_qq_login插件来实现QQ登录功能的示例代码。这个插件允许你通过QQ进行用户认证和登录。
首先,确保你已经在pubspec.yaml文件中添加了flutter_qq_login依赖:
dependencies:
  flutter:
    sdk: flutter
  flutter_qq_login: ^最新版本号  # 请替换为实际的最新版本号
然后,运行flutter pub get来安装依赖。
接下来,你需要在QQ开放平台(https://open.qq.com/)上注册你的应用,获取APP ID和APP KEY。
以下是一个完整的示例代码,展示如何在Flutter应用中使用flutter_qq_login插件:
import 'package:flutter/material.dart';
import 'package:flutter_qq_login/flutter_qq_login.dart';

void main() {
  runApp(MyApp());
}

class MyApp extends StatefulWidget {
  @override
  _MyAppState createState() => _MyAppState();
}

class _MyAppState extends State<MyApp> {
  final FlutterQqLogin _flutterQqLogin = FlutterQqLogin(
    appId: '你的APP_ID',  // 替换为你的QQ开放平台APP ID
  );

  String _loginResult = '';

  @override
  Widget build(BuildContext context) {
    return MaterialApp(
      home: Scaffold(
        appBar: AppBar(
          title: Text('Flutter QQ登录示例'),
        ),
        body: Center(
          child: Column(
            mainAxisAlignment: MainAxisAlignment.center,
            children: <Widget>[
              Text(
                '登录结果: $_loginResult',
                style: TextStyle(fontSize: 18),
              ),
              SizedBox(height: 20),
              ElevatedButton(
                onPressed: () async {
                  try {
                    final QQUserInfo result = await _flutterQqLogin.login();
                    setState(() {
                      _loginResult = '登录成功\n用户ID: ${result.userId}\n用户名: ${result.openId}\n头像URL: ${result.figureUrl}';
                    });
                  } catch (e) {
                    setState(() {
                      _loginResult = '登录失败: ${e.message}';
                    });
                  }
                },
                child: Text('QQ登录'),
              ),
            ],
          ),
        ),
      ),
    );
  }
}
在这个示例中:
- 我们首先导入了必要的包,并创建了一个
FlutterQqLogin实例,传入你的APP ID。 - 在UI中,我们显示了一个登录按钮和一个用于显示登录结果的文本。
- 当用户点击登录按钮时,调用
_flutterQqLogin.login()方法尝试进行QQ登录。如果登录成功,我们将用户信息显示在界面上;如果登录失败,则显示错误信息。
请确保你已经正确配置了QQ开放平台的回调URL,并且已经在AndroidManifest.xml和iOS的Info.plist文件中配置了必要的权限和URL Scheme。
注意:由于QQ登录涉及到用户隐私和安全,实际开发中请务必遵循相关的隐私政策和安全规范。