Flutter屏幕截图功能插件screenshot_modes的使用
Flutter屏幕截图功能插件screenshot_modes的使用
screenshot_modes
easy screenshot take for your app
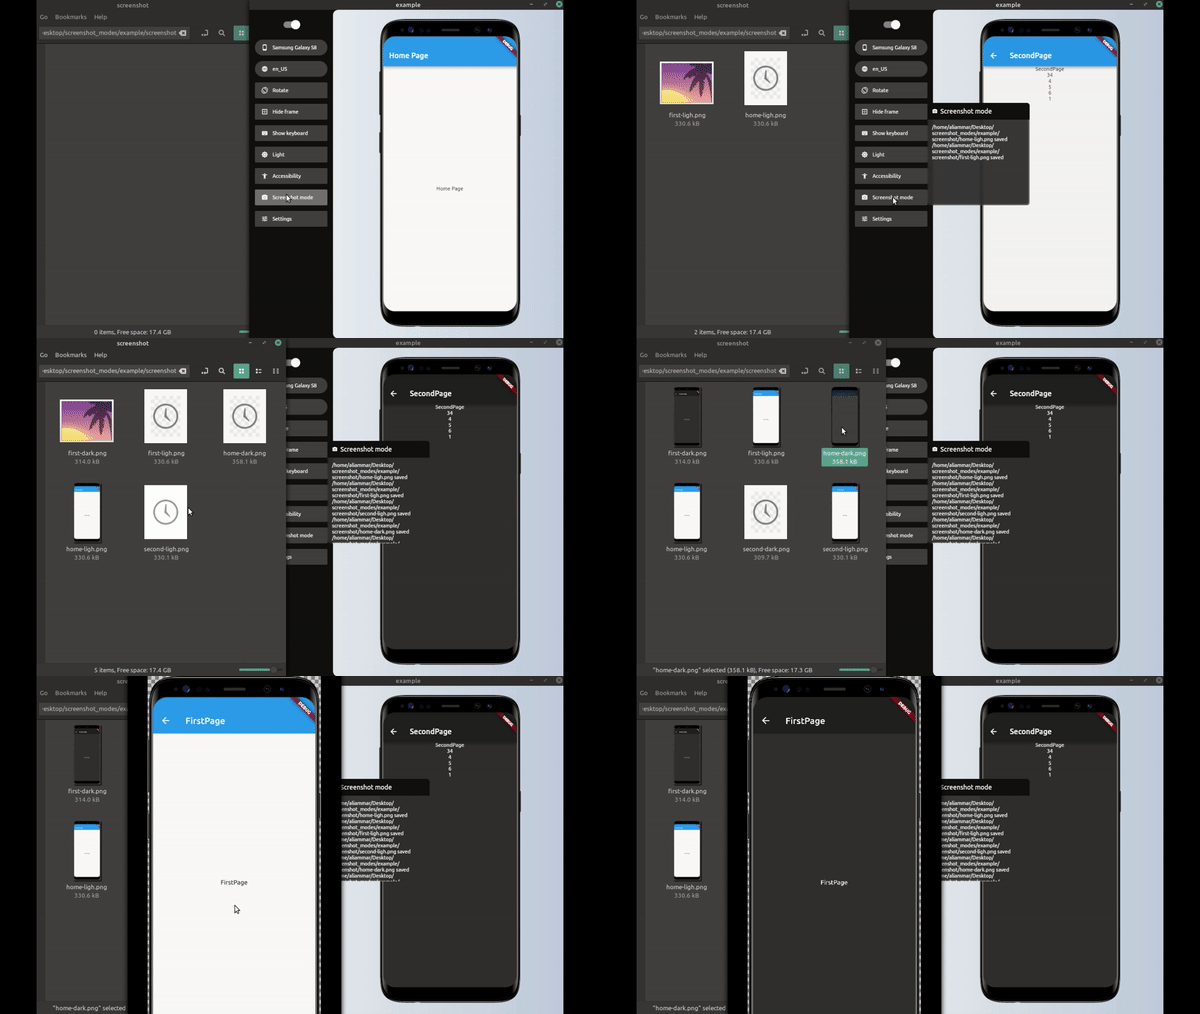
screenshot_modes 是一个 Flutter 插件,作为 device_preview 包的扩展,用于自动截取应用程序页面的屏幕截图。

设置此插件
在使用此插件之前,你需要先设置 device_preview 包。这只需要几个步骤。
简单模式:
简单模式下,你只需选择所需的设备框架,然后该插件会自动处理导航到页面并进行截图。
设置简单模式:
- 首先定义插件:
final simpleScreenShotModesPlugin = SimpleScreenShot(
  processor: saveScreenShot,
  pages: listPush,
  devices: [
    Devices.android.samsungGalaxyNote20.identifier,
    Devices.ios.iPhone13ProMax.identifier,
    Devices.ios.iPadAir4.identifier,
  ],
  lang: [Locale('ar'), Locale('en')],
  useToggleDarkMode: true,
);

final listPush = [
  ItemScreenMode(function: pushHome, label: 'home'),
  ItemScreenMode(function: pushFirst, label: 'first'),
  ItemScreenMode(function: pushSecond, label: 'second'),
];
- 然后将插件传递给 device_preview:
void main() {
  runApp(DevicePreview(
    builder: (_) => MyApp(),
    tools: [
      ...DevicePreview.defaultTools,
      simpleScreenShotModesPlugin
    ],
  ));
}
- 定义你的跳转函数(pushHome, pushFirst, pushSecond):
Future pushHome(BuildContext context) async {
  Navigator.of(navigatorKey.currentContext)
      .push(DirectPageRouteBuilder(builder: (_) => HomePage()));
}

Future pushFirst(BuildContext context) async {
  Navigator.of(navigatorKey.currentContext)
      .push(DirectPageRouteBuilder(builder: (_) => FirstPage()));
}

Future pushSecond(BuildContext context) async {
  // 我们可以从服务器获取数据;
  final data = await ApiService.getData();
  Navigator.of(navigatorKey.currentContext).push(DirectPageRouteBuilder(
      builder: (_) => SecondPage(
            nums: data,
          )));
}
- 定义保存截图的函数:
Future<String> saveScreenShot(DeviceScreenshotWithLabel screen) async {
  String name = screen.label.join('/');
  final path = join(Directory.current.path, 'screenshot', '$name.png');
  final imageFile = File(path);
  await imageFile.create(recursive: true);
  await imageFile.writeAsBytes(screen.deviceScreenshot.bytes);
  return '$path saved'; // 消息打印到 device preview 插件窗口
}
- 在 device_preview 的标签中点击新的按钮(screenshot mode)即可。
高级方式(简单方式实际依赖于此)
- 定义 ScreenShotModesPlugin:
final screenShotModesPlugin = ScreenShotModesPlugin(processor: saveScreenShot, modes: _modes);
- 将 screenShotModesPlugin 传递给 DevicePreview:
void main() {
  runApp(DevicePreview(
    builder: (_) => MyApp(),
    tools: [
      ...DevicePreview.defaultTools,
      screenShotModesPlugin,
    ],
  ));
}
- 定义保存截图的函数:
Future<String> saveScreenShot(DeviceScreenshotWithLabel screen) async {
  String name = screen.label.join('/');
  final path = join(Directory.current.path, 'screenshot', '$name.png');
  final imageFile = File(path);
  await imageFile.create(recursive: true);
  await imageFile.writeAsBytes(screen.deviceScreenshot.bytes);
  return '$path saved'; // 消息打印到 device preview 插件窗口
}
- 向 _modes 列表中添加项目:
// 简单方式
final _modes_ = [
  ItemScreenMode(function: pushHome, label: 'home'),
  ItemScreenMode(function: pushFirst, label: 'first'),
  ItemScreenMode(function: pushSecond, label: 'second'),
];

// 带主题模式切换
final listPush = [
  ItemScreenMode(function: pushHome, label: 'home'),
  ItemScreenMode(function: pushFirst, label: 'first'),
  ItemScreenMode(function: pushSecond, label: 'second'),
];

final _modes = [
  ItemScreenMode(
      function: (context) async {
        await setModeTo(context, ThemeMode.light);
      },
      label: "light",
      modes: listPush),
  ItemScreenMode(
      function: (context) async {
        await setModeTo(context, ThemeMode.dark);
      },
      label: "dark",
      modes: listPush),
];

// 带主题模式和设备框架切换
final _mode = [
  ItemScreenMode(
    function: setDeviceToIphone,
    label: "iphone",
    modes: listLightDark,
  ),
  ItemScreenMode(
      function: setDeviceToNote, label: "note", modes: listLightDark),
];
final listLightDark = [
  ItemScreenMode(
      function: (context) async {
        await setModeTo(context, ThemeMode.light);
      },
      label: "light",
      modes: listPush),
  ItemScreenMode(
      function: (context) async {
        await setModeTo(context, ThemeMode.dark);
      },
      label: "dark",
      modes: listPush),
];
final listPush = [
  ItemScreenMode(function: pushHome, label: 'home'),
  ItemScreenMode(function: pushFirst, label: 'first'),
  ItemScreenMode(function: pushSecond, label: 'second'),
];

Future<void> setDeviceToNote(BuildContext context) async {
  DevicePreviewHelper.changeDevice(
      context, Devices.android.samsungGalaxyNote20Ultra.identifier);
}

Future<void> setDeviceToIphone(BuildContext context) async {
  DevicePreviewHelper.changeDevice(context, Devices.ios.iPhone13.identifier);
}
- 在 device_preview 的标签中点击新的按钮(screenshot mode)即可。
ItemScreenMode 是什么?
它表示我们将要拍摄的每一张截图。 function 参数是一个在拍摄截图前调用的函数,我们需要导航到你想要截图的页面,可能还需要从数据库或 API 获取一些数据。 label 参数是一个字符串,用于命名处理器(saveScreenShot)中的图像。 modes 参数是另一个 ItemScreenMode 列表,用于如果我们要为所有页面更改主题模式和设备框架的情况。
我可以将 ItemScreenMode 的 function 参数设置为 null 吗?
可以,当你不需要在第一次拍摄截图前执行任何操作时,例如你已经在主页(默认页面)并且处于正确的主题模式下。 提示:如果你有多个嵌套页面,则不要这样做。
为什么我们必须使用 DirectPageRouteBuilder 进行导航?
你必须像这样使用 DirectPageRouteBuilder 进行导航:
Future pushFirst() async {
  Navigator.of(navigatorKey.currentContext)
      .push(DirectPageRouteBuilder(builder: (_) => FirstPage()));
}
更多关于Flutter屏幕截图功能插件screenshot_modes的使用的实战教程也可以访问 https://www.itying.com/category-92-b0.html
更多关于Flutter屏幕截图功能插件screenshot_modes的使用的实战系列教程也可以访问 https://www.itying.com/category-92-b0.html
当然,以下是如何在Flutter项目中使用screenshot_modes插件来实现屏幕截图功能的示例代码。screenshot_modes插件允许你以不同的模式截取屏幕截图,比如全屏截图或特定区域截图。
首先,确保你已经在pubspec.yaml文件中添加了screenshot_modes依赖:
dependencies:
  flutter:
    sdk: flutter
  screenshot_modes: ^0.4.0  # 请检查最新版本号
然后,运行flutter pub get来安装依赖。
接下来,在你的Flutter项目中,你可以按照以下步骤实现屏幕截图功能:
1. 导入必要的包
在你的Dart文件中导入screenshot_modes包:
import 'package:flutter/material.dart';
import 'package:screenshot_modes/screenshot_modes.dart';
2. 创建截图按钮和显示截图图像的组件
下面是一个完整的示例代码,它展示了如何创建一个按钮来截取屏幕截图,并在屏幕上显示该截图:
void main() {
  runApp(MyApp());
}

class MyApp extends StatelessWidget {
  @override
  Widget build(BuildContext context) {
    return MaterialApp(
      home: Scaffold(
        appBar: AppBar(
          title: Text('Screenshot Modes Example'),
        ),
        body: ScreenshotExample(),
      ),
    );
  }
}

class ScreenshotExample extends StatefulWidget {
  @override
  _ScreenshotExampleState createState() => _ScreenshotExampleState();
}

class _ScreenshotExampleState extends State<ScreenshotExample> {
  Uint8List? _screenshotBytes;

  void _captureScreenshot() async {
    final ScreenshotController screenshotController = ScreenshotController();
    final RenderRepaintBoundary? boundary =
        context.findRenderObject() as RenderRepaintBoundary?;
    if (boundary == null) {
      return;
    }

    try {
      // Capture the screenshot
      final Uint8List imageBytes = await screenshotController.captureFromBoundary(
        boundary,
        pixelRatio: MediaQuery.of(context).devicePixelRatio,
      );

      // Save the screenshot bytes to the state
      setState(() {
        _screenshotBytes = imageBytes;
      });
    } catch (e) {
      print('Error capturing screenshot: $e');
    }
  }

  @override
  Widget build(BuildContext context) {
    return Center(
      child: Column(
        mainAxisAlignment: MainAxisAlignment.center,
        children: <Widget>[
          ElevatedButton(
            onPressed: _captureScreenshot,
            child: Text('Capture Screenshot'),
          ),
          if (_screenshotBytes != null)
            Image.memory(
              _screenshotBytes!,
              fit: BoxFit.cover,
              width: double.infinity,
              height: 300,
            ),
        ],
      ),
    );
  }
}
3. 运行你的应用
保存文件并在你的设备上运行应用。点击“Capture Screenshot”按钮后,你应该会看到屏幕截图显示在按钮下方。
注意
screenshot_modes插件实际上在最新的Flutter生态系统中可能已经被集成到其他更广泛使用的包中,或者其API可能有所变化。因此,确保查阅最新的官方文档以获取最新的使用方法和API变更。- 在实际开发中,你可能需要处理更多边界情况,比如截图失败时的错误处理,或者根据用户的选择截取特定区域的截图。
这个示例展示了基本的屏幕截图功能,你可以根据需要进行扩展和定制。


