


HarmonyOS 鸿蒙Next 基于eTS的登录程序的实现
HarmonyOS 鸿蒙Next 基于eTS的登录程序的实现 1、在config.json中配置权限
{
  "reqPermissions": [
    {
      "name": "ohos.permission.INTERNET"
    }
  ]
}
2、在apipost中
(1)Body中添加
- username 为 admin
- password 为 123456
(2)编写Mock服务
{
  "loginSuccess": function() {
    let body = _req.body;
    return body.username === 'admin' && body.password === '123456';
  }
}
(3)得到的实时响应为 {“loginSuccess”: true }
2、index.ets代码如下:
import http from '@ohos.net.http'
import RequestMethod from '@ohos.net.http'
import ResponseCode from '@ohos.net.http'
import prompt from '@system.prompt'
@Entry
@Component struct Index {
username :String = "";
password :String = "";
loginSuccess :boolean=false;
build() {
Flex({ direction: FlexDirection.Column, alignItems: ItemAlign.Center, justifyContent: FlexAlign.Center }) {
Row({space: 5}) {
Text('用户:')
.fontSize(18)
.fontWeight(FontWeight.Bold)
TextInput({
placeholder: "请输入用户名"
})
.width('150')
.onChange((value) => {
this.username = value;
})
}
.width('100%')
.height(30)
.margin('bottom:50')
Row({space: 5}) {
Text('密码:')
.fontSize(18)
.fontWeight(FontWeight.Bold)
TextInput({
placeholder: "请输入密码"
})
.width('150')
.onChange((value) => {
this.password = value;
})
}
.width('100%')
.height(30)
.margin({top:20})
Row(){
Button('登录').width('150')
.onClick(() => {
this.httplogin();
})
}.margin({right:120,top:50})
}
.width('100%')
.height('100%')
.margin({left:80})
}
private httplogin() {
let httpRequest = http.createHttp();
httpRequest.request(
"https://console-mock.apipost.cn/app/mock/project/c2f3021b-fa84-4ba5-e39a-78ab02ba5d53/login",
{
method: RequestMethod.RequestMethod.POST,
header: {
'Content-Type': 'application/json; charset=utf-8'
},
readTimeout: 15000,
connectTimeout: 15000,
extraData: { "username":this.username,"password":this.password }
},
(error, data) => {
if(error) {
console.log("error code: " + error.code + ", msg: " + error.message)
} else {
let code = data.responseCode
if(ResponseCode.ResponseCode.OK == code) {
//data.result为{"loginSuccess": true }或{"loginSuccess": false }
this.loginSuccess = JSON.parse(data.result).loginSuccess
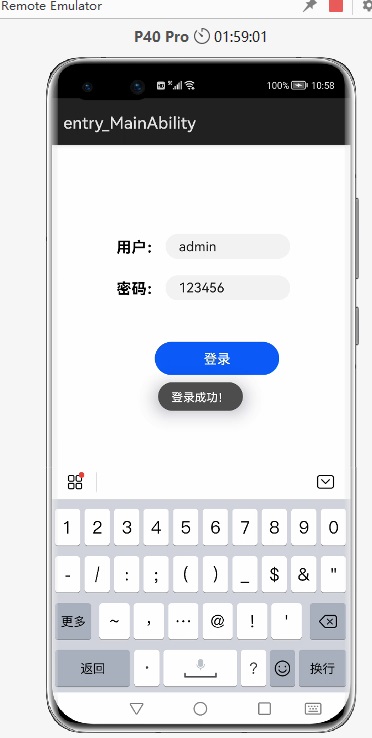
if(this.loginSuccess){
prompt.showToast({
message: "登录成功!", // 显示文本
duration: 3000, // 显示时长
bottom: 100 // 距离底部的距离
})
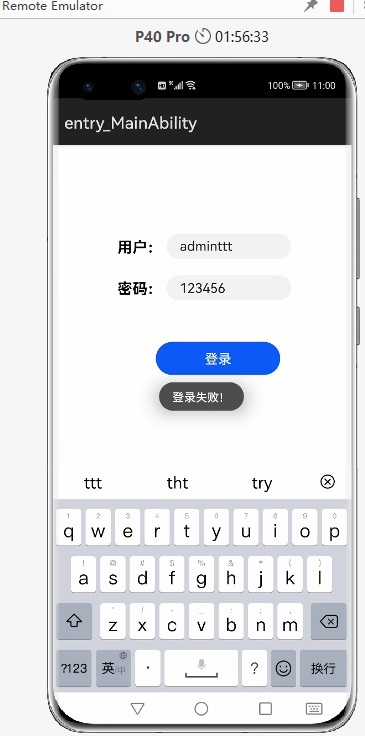
}else{
prompt.showToast({
message: "登录失败!", // 显示文本
duration: 3000, // 显示时长
bottom: 100 // 距离底部的距离
})
}
} else {
console.log("response code: " + code);
}
}
}
);
}
}
3、运行结果如下:
更多关于HarmonyOS 鸿蒙Next 基于eTS的登录程序的实现的实战教程也可以访问 https://www.itying.com/category-93-b0.html

https://gitee.com/yiyefangzhou24/hmwechat
另外有个建议,不建议把后端逻辑(Controller)和界面(View)写在一起。
更多关于HarmonyOS 鸿蒙Next 基于eTS的登录程序的实现的实战系列教程也可以访问 https://www.itying.com/category-93-b0.html


在预览器里面老师报错 [phone][Ace ERROR] 09/21 18:33:36 16888 [qjs_utils.cpp(JsStdDumpErrorAce)-(0)] [Engine Log] [DUMP] TypeError: cannot read property ‘POST’ of undefined
去掉这个参数之后 就正常了,加上就报错,不知道为什么
method: RequestMethod.RequestMethod.POST,


关于HarmonyOS(鸿蒙)Next基于eTS(Extensible TypeScript)的登录程序的实现,以下是关键步骤概述:
首先,需要确保开发环境已正确配置,包括HarmonyOS SDK、DevEco Studio以及相关的TypeScript插件。
接着,创建一个新的HarmonyOS项目,并选择eTS作为开发语言。在项目结构中,找到或创建一个页面用于登录功能。
在登录页面中,使用eTS的组件和API来设计登录界面,包括输入框(用于用户名和密码)、按钮(用于提交登录信息)等。
为实现登录逻辑,需要定义数据绑定和事件处理函数。通过双向数据绑定,将输入框的值与组件的状态进行关联。当用户点击登录按钮时,触发事件处理函数,该函数负责收集用户输入的信息,并进行相应的验证或处理。
如果验证通过,可以将登录信息发送到服务器进行验证。这部分通常涉及网络通信,可以使用HarmonyOS提供的网络API来实现。
最后,根据服务器的响应结果,更新界面状态,如显示登录成功或失败的信息。
请注意,以上步骤是基于eTS的通用实现思路,具体实现可能因项目需求和个人开发习惯而有所不同。
如果问题依旧没法解决请联系官网客服,官网地址是:https://www.itying.com/category-93-b0.html,