


Flutter 3D立体效果插件js_neomorphism的使用
Flutter 3D立体效果插件js_neomorphism的使用
特性
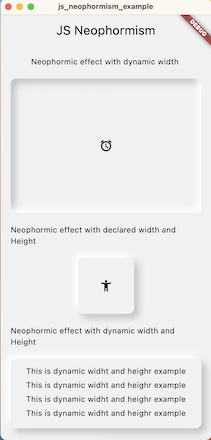
JSNeomorphism 帮助你构建具有装饰性外观的3D立体效果容器。
截图
使用方法
首先,你需要在 pubspec.yaml 文件中添加 js_neomorphism 依赖项:
dependencies:
  js_neomorphism: ^1.0.0
然后,你可以通过以下代码来创建一个3D立体效果的容器:
import 'package:flutter/material.dart';
import 'package:js_neomorphism/js_neomorphism.dart';

class MyHomePage extends StatelessWidget {
  [@override](/user/override)
  Widget build(BuildContext context) {
    return Scaffold(
      appBar: AppBar(
        title: Text('JSNeomorphism 示例'),
      ),
      body: Center(
        child: NeomorphismContainer(
          containerWidth: null, // 如果不指定宽度,它将采用设备框架的宽度
          inset: true,
          color: null,
          containerHeight: 240, // 如果高度为null,它将根据子组件的高度自动调整
          child: Icon(Icons.access_alarm_outlined),
        ),
      ),
    );
  }
}
更多关于Flutter 3D立体效果插件js_neomorphism的使用的实战教程也可以访问 https://www.itying.com/category-92-b0.html

更多关于Flutter 3D立体效果插件js_neomorphism的使用的实战系列教程也可以访问 https://www.itying.com/category-92-b0.html
当然,关于在Flutter中使用js_neomorphism插件来实现3D立体效果,这里是一个基本的代码案例来展示如何使用该插件。请注意,js_neomorphism可能不是官方或广泛认可的Flutter插件,因此以下代码假设你已经在pub.dev上找到并添加了相应的依赖,或者你有一种方式来在Flutter中运行JavaScript代码(例如通过webview_flutter或flutter_inappwebview插件,但这通常用于更复杂的情况)。
不过,由于js_neomorphism不是一个已知的官方插件,我将基于一个假设的3D立体效果插件或手动实现类似效果的Flutter代码给出一个示例。如果你确实有一个特定的js_neomorphism插件,请确保你已经正确安装并导入了它。
以下是一个使用Flutter和flutter_hooks以及自定义绘制逻辑来模拟3D立体效果的示例代码:
import 'package:flutter/material.dart';
import 'package:flutter_hooks/flutter_hooks.dart';

void main() {
  runApp(MyApp());
}

class MyApp extends StatelessWidget {
  @override
  Widget build(BuildContext context) {
    return MaterialApp(
      title: 'Flutter 3D Neomorphism Example',
      theme: ThemeData(
        primarySwatch: Colors.blue,
      ),
      home: Scaffold(
        appBar: AppBar(
          title: Text('3D Neomorphism Example'),
        ),
        body: Center(
          child: NeoMorphismBox(),
        ),
      ),
    );
  }
}

class NeoMorphismBox extends HookWidget {
  @override
  Widget build(BuildContext context) {
    final double size = useMemoized(() => 200.0);
    final Color lightColor = useMemoized(() => Colors.white.withOpacity(0.2));
    final Color darkColor = useMemoized(() => Colors.black.withOpacity(0.4));

    return CustomPaint(
      size: Size(size, size),
      painter: NeoMorphismPainter(
        size: size,
        lightColor: lightColor,
        darkColor: darkColor,
      ),
    );
  }
}

class NeoMorphismPainter extends CustomPainter {
  final double size;
  final Color lightColor;
  final Color darkColor;

  NeoMorphismPainter({required this.size, required this.lightColor, required this.darkColor});

  @override
  void paint(Canvas canvas, Size size) {
    final Paint paint = Paint()
      ..style = PaintingStyle.fill;

    // Draw the light shadow
    paint.color = lightColor;
    final Path lightPath = Path()
      ..moveTo(size.width / 2, 0)
      ..quadraticBezierTo(0, size.height / 4, 0, size.height / 2)
      ..quadraticBezierTo(0, 3 * size.height / 4, size.width / 2, size.height)
      ..quadraticBezierTo(size.width, 3 * size.height / 4, size.width, size.height / 2)
      ..quadraticBezierTo(size.width, size.height / 4, size.width / 2, 0)
      ..close();
    canvas.drawPath(lightPath, paint);

    // Draw the dark shadow
    paint.color = darkColor;
    final Path darkPath = Path()
      ..moveTo(size.width / 2, size.height)
      ..quadraticBezierTo(size.width, 3 * size.height / 4, size.width, size.height / 2)
      ..quadraticBezierTo(size.width, size.height / 4, size.width / 2, 0)
      ..quadraticBezierTo(0, size.height / 4, 0, size.height / 2)
      ..quadraticBezierTo(0, 3 * size.height / 4, size.width / 2, size.height)
      ..close();
    canvas.drawPath(darkPath, paint);
  }

  @override
  bool shouldRepaint(covariant CustomPainter oldDelegate) {
    return false;
  }
}
在这个示例中,我们创建了一个自定义的NeoMorphismPainter类,它使用CustomPainter来绘制具有3D立体效果的盒子。我们通过绘制两个路径来模拟光照和阴影效果,分别使用浅色和深色来创建立体效果。
请注意,这只是一个简单的示例,实际的3D立体效果可能需要更多的细节和调整,比如调整光照角度、阴影强度等。如果你有一个特定的js_neomorphism插件,你应该参考该插件的文档来获取更详细的用法和示例。