


Flutter腾讯位置服务插件flutter_tencent_lbs_plugin的使用
Flutter腾讯位置服务插件flutter_tencent_lbs_plugin的使用
注意事项:
- 该插件在 iOS 模拟器中不生效。
- 各平台配置摘抄自官方文档,无法及时同步,仅供参考。具体配置请以官方文档为准。
TencentLBS 版本:
| 平台 | 版本号 | 时间 |
|---|---|---|
| Android | v7.5.4.3 | 2024-01-23 |
| iOS | v4.2.0 | 2023-11-03 |
使用方式:
-
创建实例
final locationPlugin = FlutterTencentLBSPlugin(); -
设置用户是否同意隐私协议政策
调用其他接口前必须首先调用此接口进行用户是否同意隐私政策的设置。locationPlugin.setUserAgreePrivacy(); -
初始化
locationPlugin.init(key: "YOUR KEY");
单次定位
// 监听器(可选)
locationPlugin.addLocationListener((location) {
  print(location.toJson());
});

// Future 用法
locationPlugin.getLocationOnce().then((location) {
  print(location.toJson());
});
连续定位
// 设置监听器
locationPlugin.addLocationListener((location) {
  print(location.toJson());
});

// 开启连续定位
locationPlugin.getLocation(
  interval: 1000 * 15, // 获取定位的间隔时间
  backgroundLocation: true, // 是否需要设置后台定位,设置为 true 时,请确保 Android、iOS 平台进行相应配置,否则可能抛出异常
  // Android 端后台定位需要配置常驻通知
  androidNotificationOptions: AndroidNotificationOptions(
    id: 100,
    channelId: "100",
    channelName: "定位常驻通知",
    notificationTitle: "定位常驻通知标题文字",
    notificationText: "定位常驻通知内容文字",
    // iconData: const NotificationIconData(
    //   resType: ResourceType.mipmap,
    //   resPrefix: ResourcePrefix.ic,
    //   name: 'launcher',
    //   backgroundColor: Colors.red,
    // ),
  ),
);
停止连续定位
locationPlugin.stop();
Android 端配置
-
配置 Key
<application> ... <meta-data android:name="TencentMapSDK" android:value="您申请的Key" /> </application> -
权限配置
<!-- 通过GPS得到精确位置 --> <uses-permission android:name="android.permission.ACCESS_FINE_LOCATION"/> <!-- 通过网络得到粗略位置 --> <uses-permission android:name="android.permission.ACCESS_COARSE_LOCATION"/> <!-- 访问网络,某些位置信息需要从网络服务器获取 --> <uses-permission android:name="android.permission.INTERNET"/> <!-- 访问WiFi状态,需要WiFi信息用于网络定位 --> <uses-permission android:name="android.permission.ACCESS_WIFI_STATE"/> <!-- 修改WiFi状态,发起WiFi扫描, 需要WiFi信息用于网络定位 --> <uses-permission android:name="android.permission.CHANGE_WIFI_STATE"/> <!-- 访问网络状态, 检测网络的可用性,需要网络运营商相关信息用于网络定位 --> <uses-permission android:name="android.permission.ACCESS_NETWORK_STATE"/> <!-- 访问网络的变化, 需要某些信息用于网络定位 --> <uses-permission android:name="android.permission.CHANGE_NETWORK_STATE"/> <!-- 蓝牙扫描权限 --> <uses-permission android:name="android.permission.BLUETOOTH"/> <uses-permission android:name="android.permission.BLUETOOTH_ADMIN"/> <!-- 前台service权限 --> <uses-permission android:name="android.permission.FOREGROUND_SERVICE"/> <!-- 后台定位权限 --> <uses-permission android:name="android.permission.ACCESS_BACKGROUND_LOCATION"/> <!-- A-GPS辅助定位权限,方便GPS快速准确定位 --> <uses-permission android:name="android.permission.ACCESS_LOCATION_EXTRA_COMMANDS"/> -
配置后台定位(可选)
<application>
    ...
    <service
        android:name="com.tencent.map.geolocation.s"
        android:foregroundServiceType="location" />
</application>
自行决定是否需要忽略电池优化,此插件不包含该逻辑。
iOS 端配置
-
权限配置 在
info.plist中追加NSLocationWhenInUseUsageDescription或NSLocationAlwaysUsageDescription字段,以申请定位权限。 -
配置后台定位(可选) 使用 Xcode 打开
ios/Runner.xcworkspaceSigning & Capabilities -> + Capability -> 搜索 “Background Modes” -> 并勾选 `Location updates`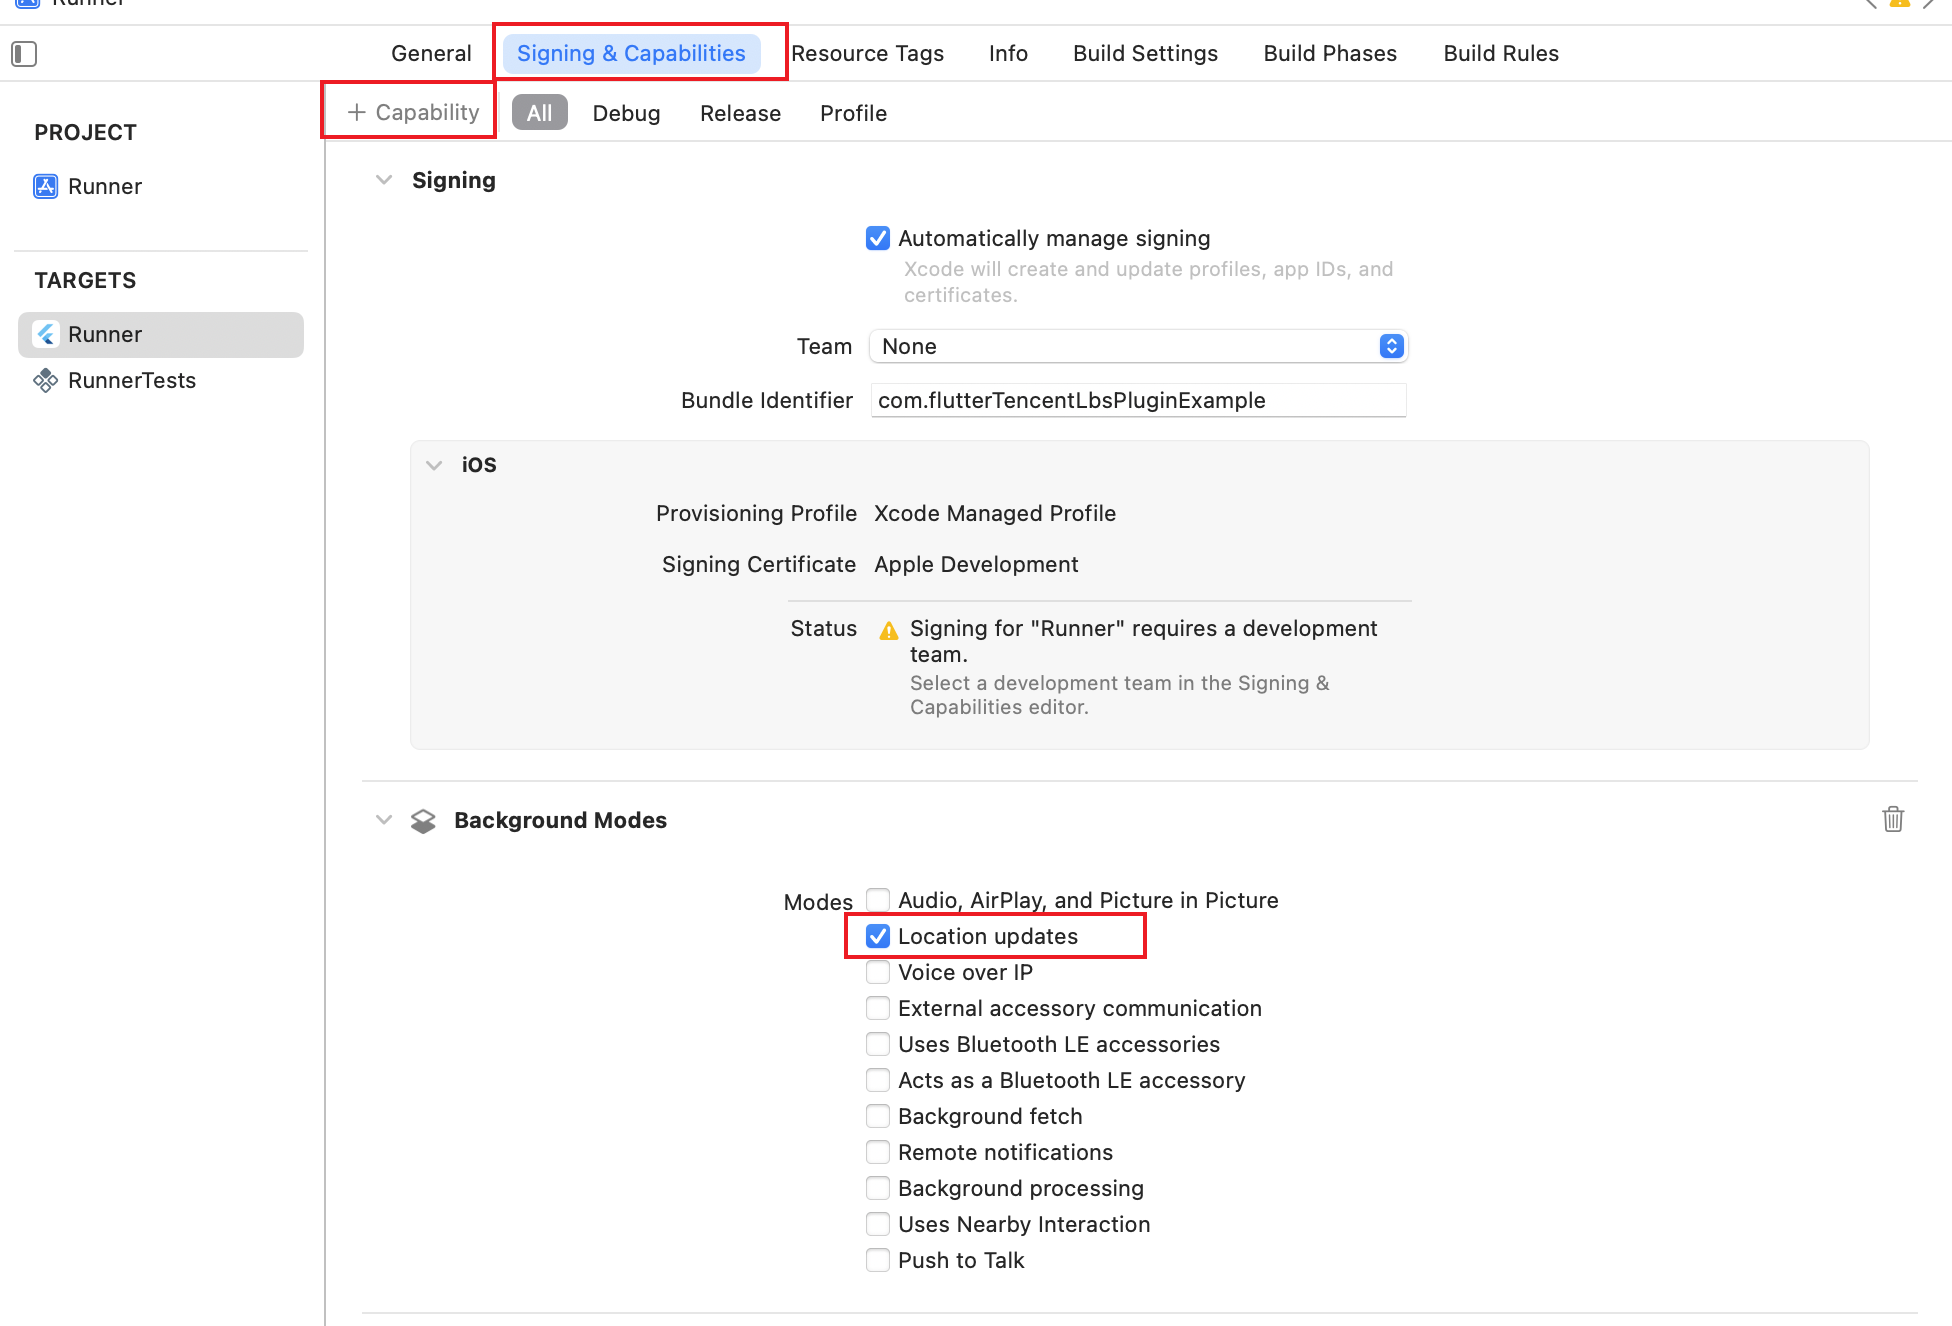
避坑
-
无法获取地址描述
- Android:需要使用 WGS84 坐标才能获取地址描述。
- iOS:需要使用 GCJ02 坐标才能获取地址描述。
这似乎是 SDK 的默认行为。
参考
完整示例Demo
import 'package:flutter/material.dart';

import 'package:flutter_local_notifications/flutter_local_notifications.dart';
import 'package:flutter_tencent_lbs_plugin/flutter_tencent_lbs_plugin.dart';
import 'package:permission_handler/permission_handler.dart';

final instance = FlutterLocalNotificationsPlugin();

void main() {
  runApp(const Root());
}

class Root extends StatelessWidget {
  const Root({super.key});

  [@override](/user/override)
  Widget build(BuildContext context) {
    return const MaterialApp(
      home: Scaffold(body: MainApp()),
    );
  }
}

class MainApp extends StatefulWidget {
  const MainApp({super.key});

  [@override](/user/override)
  State<MainApp> createState() => _MainAppState();
}

class _MainAppState extends State<MainApp> {
  final locationPlugin = FlutterTencentLBSPlugin();

  [@override](/user/override)
  void initState() {
    locationPlugin.setUserAgreePrivacy();
    locationPlugin.init(
      key: "YOUR KEY",
    );
    locationPlugin.addLocationListener((location) {
      print("[[ listener ]]: ${location.toJson()}");
    });
    super.initState();
  }

  [@override](/user/override)
  Widget build(BuildContext context) {
    return SafeArea(
      child: Center(
        child: Column(
          mainAxisAlignment: MainAxisAlignment.center,
          crossAxisAlignment: CrossAxisAlignment.center,
          children: [
            FilledButton(
              onPressed: () {
                instance
                    .resolvePlatformSpecificImplementation<AndroidFlutterLocalNotificationsPlugin>()
                    ?.requestNotificationsPermission();
              },
              child: const Text("请求 Android 通知权限"),
            ),
            FilledButton(
              onPressed: () {
                Permission.location.request();
              },
              child: const Text("请求定位权限"),
            ),
            FilledButton(
              onPressed: () {
                locationPlugin.getLocationOnce().then(
                  (value) {
                    print("[[ getLocationOnce ]]: ${value?.toJson()}");
                    showDialog(
                      context: context,
                      builder: (context) {
                        return AlertDialog(
                          content: Text(
                            "${value?.address ?? "N/A"}${value?.name ?? "N/A"}",
                          ),
                        );
                      },
                    );
                  },
                  onError: (err) {
                    print("[[ getLocationOnce ERROR ]]: $err");
                  },
                );
              },
              child: const Text("获取一次定位"),
            ),
            FilledButton(
              onPressed: () {
                locationPlugin.getLocation(
                  interval: 1000 * 15,
                  backgroundLocation: true,
                  androidNotificationOptions: AndroidNotificationOptions(
                    id: 100,
                    channelId: "100",
                    channelName: "定位常驻通知",
                    notificationTitle: "定位常驻通知标题文字",
                    notificationText: "定位常驻通知内容文字",
                    // iconData: const NotificationIconData(
                    //   resType: ResourceType.mipmap,
                    //   resPrefix: ResourcePrefix.ic,
                    //   name: 'launcher',
                    //   backgroundColor: Colors.red,
                    // ),
                  ),
                );
              },
              child: const Text("连续定位"),
            ),
            FilledButton(
              onPressed: locationPlugin.stop,
              child: const Text("停止连续定位"),
            ),
          ],
        ),
      ),
    );
  }
}
更多关于Flutter腾讯位置服务插件flutter_tencent_lbs_plugin的使用的实战教程也可以访问 https://www.itying.com/category-92-b0.html

更多关于Flutter腾讯位置服务插件flutter_tencent_lbs_plugin的使用的实战系列教程也可以访问 https://www.itying.com/category-92-b0.html
当然,以下是如何在Flutter项目中使用flutter_tencent_lbs_plugin(腾讯位置服务插件)的一个简要指南,包括代码示例。这个插件允许你访问腾讯位置服务提供的各种功能,如地图显示、地理编码、逆地理编码等。
前提条件
- 确保你已经安装并配置好了Flutter开发环境。
- 在腾讯位置服务网站上申请一个开发者账号,并获取所需的API Key。
步骤一:添加依赖
在你的pubspec.yaml文件中添加flutter_tencent_lbs_plugin依赖:
dependencies:
  flutter:
    sdk: flutter
  flutter_tencent_lbs_plugin: ^最新版本号  # 请替换为最新版本号
然后运行flutter pub get来安装依赖。
步骤二:配置Android和iOS
Android
在android/app/src/main/AndroidManifest.xml中添加必要的权限和API Key:
<manifest xmlns:android="http://schemas.android.com/apk/res/android"
    package="com.example.yourapp">

    <uses-permission android:name="android.permission.INTERNET"/>
    <uses-permission android:name="android.permission.ACCESS_FINE_LOCATION"/>
    <uses-permission android:name="android.permission.ACCESS_COARSE_LOCATION"/>

    <application
        ... >
        <meta-data
            android:name="com.tencent.lbs.apikey"
            android:value="你的腾讯位置服务API Key"/>
    </application>
</manifest>
iOS
在ios/Runner/Info.plist中添加必要的权限,然后在ios/Runner/AppDelegate.swift中配置API Key(如果你使用Swift):
import UIKit
import Flutter

@UIApplicationMain
@objc class AppDelegate: FlutterAppDelegate {
  override func application(
    _ application: UIApplication,
    didFinishLaunchingWithOptions launchOptions: [UIApplication.LaunchOptionsKey: Any]?
  ) -> Bool {
    GeneratedPluginRegistrant.register(with: self)

    // 配置腾讯位置服务API Key
    let tencentLbsApiKey = "你的腾讯位置服务API Key"
    // 这里你可以根据插件的文档来决定如何配置API Key,可能需要在某个初始化函数中设置

    return super.application(application, didFinishLaunchingWithOptions: launchOptions)
  }
}
注意:iOS的配置可能需要根据插件的具体要求进行调整,请参考插件的官方文档。
步骤三:使用插件
在你的Flutter代码中,你可以这样使用flutter_tencent_lbs_plugin:
import 'package:flutter/material.dart';
import 'package:flutter_tencent_lbs_plugin/flutter_tencent_lbs_plugin.dart';

void main() {
  runApp(MyApp());
}

class MyApp extends StatelessWidget {
  @override
  Widget build(BuildContext context) {
    return MaterialApp(
      home: Scaffold(
        appBar: AppBar(
          title: Text('Flutter Tencent LBS Demo'),
        ),
        body: TencentLBSDemo(),
      ),
    );
  }
}

class TencentLBSDemo extends StatefulWidget {
  @override
  _TencentLBSDemoState createState() => _TencentLBSDemoState();
}

class _TencentLBSDemoState extends State<TencentLBSDemo> {
  @override
  void initState() {
    super.initState();
    // 初始化插件(根据插件的API,这里只是示例)
    _initTencentLBS();
  }

  Future<void> _initTencentLBS() async {
    // 初始化代码,如设置API Key等(具体根据插件API)
    // 注意:这里的代码需要根据插件的实际API进行调整
    try {
      // 假设插件有一个初始化函数init,并接受API Key作为参数
      await TencentLbsPlugin.instance.init("你的腾讯位置服务API Key");
    } catch (e) {
      print("初始化失败: $e");
    }
  }

  @override
  Widget build(BuildContext context) {
    return Center(
      child: Column(
        mainAxisAlignment: MainAxisAlignment.center,
        children: <Widget>[
          Text('腾讯位置服务插件示例'),
          // 添加地图显示或其他功能的按钮或组件
          // 例如,显示地图的组件(根据插件API)
          // TencentMapWidget()  // 假设这是插件提供的地图组件
        ],
      ),
    );
  }
}
注意:上述代码中的TencentLbsPlugin.instance.init和TencentMapWidget等是假定的API和方法,实际使用时需要根据flutter_tencent_lbs_plugin的文档进行调整。
总结
以上是如何在Flutter项目中集成和使用flutter_tencent_lbs_plugin的基本步骤。由于插件的API可能会随时间变化,请务必参考插件的官方文档以获取最新的使用方法和API。