


Flutter表格生成插件flutter_easy_table的使用
Flutter表格生成插件flutter_easy_table的使用
本README描述了该插件。如果你将此插件发布到pub.dev,此README的内容将在你的插件首页上显示。
有关如何编写好的插件README的信息,请参阅编写插件页面指南。
有关开发插件的一般信息,请参阅Dart指南中的创建插件和Flutter指南中的开发插件和工具包。
特性
演示
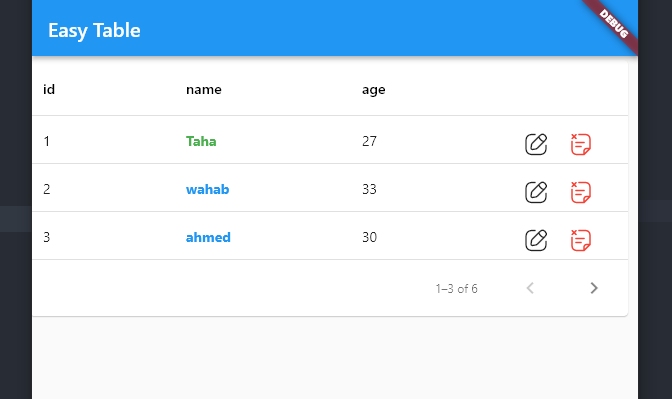
此小部件与DataTable具有相同的功能。
开始使用
只需在依赖项中添加以下行:
dependencies:
  flutter_easy_table: ^0.0.1
使用方法
EasyPaginatedTable(
  height: 300,
  width: 600,
  rowTail: true,
  rowsPerPage: 3,
  columnStyle: ColumnStyle(
    columnLabel: 'name',
    columnStyle: const TextStyle(
      color: Colors.blue,
      fontWeight: FontWeight.bold,
    ),
    rowCellLabel: 'Taha',
    rowCellStyle: const TextStyle(
      color: Colors.green,
      fontWeight: FontWeight.bold,
    ),
  ),
  onEdit: (index) {},
  onDelete: (index) {},
  columns: const ['id', 'name', 'age'],
  rows: const [
    {'id': '1', 'name': 'Taha', 'age': '27'},
    {'id': '2', 'name': 'wahab', 'age': '33'},
    {'id': '3', 'name': 'ahmed', 'age': '30'},
    {'id': '4', 'name': 'Taha', 'age': '27'},
    {'id': '5', 'name': 'wahab', 'age': '33'},
    {'id': '6', 'name': 'ahmed', 'age': '30'},
  ],
)
额外信息
GitHub仓库:https://github.com/Tahateber95/flutter_easy_table
示例代码
import 'package:flutter/material.dart';
import 'package:flutter_easy_table/flutter_easy_table.dart';

void main() {
  runApp(const MyApp());
}

class MyApp extends StatelessWidget {
  const MyApp({Key? key}) : super(key: key);

  // 此小部件是你的应用的根。
  [@override](/user/override)
  Widget build(BuildContext context) {
    return MaterialApp(
      title: 'Flutter Demo',
      theme: ThemeData(
        // 这是你的应用的主题。
        //
        // 尝试运行你的应用,你会看到应用有一个蓝色的工具栏。然后,在不退出应用的情况下,尝试将下面的primarySwatch更改为Colors.green并执行“热重载”(在运行"flutter run"的控制台中按"r",或简单地保存更改以进行“热重载”)。注意计数器没有重置回零;应用并没有重新启动。
        primarySwatch: Colors.blue,
      ),
      home: const MyHomePage(title: 'Flutter Demo Home Page'),
    );
  }
}

class MyHomePage extends StatefulWidget {
  const MyHomePage({Key? key, required this.title}) : super(key: key);

  // 此小部件是你的应用的主页。它是有状态的,这意味着它有一个包含影响其外观的字段的状态对象(在下面定义)。

  // 此类是状态的配置。它保留由父组件(在此情况下为App小部件)提供的值(在这里是title),并用于状态的构建方法。Widget子类中的字段总是标记为"final"。

  final String title;

  [@override](/user/override)
  State<MyHomePage> createState() => _MyHomePageState();
}

class _MyHomePageState extends State<MyHomePage> {
  [@override](/user/override)
  Widget build(BuildContext context) {
    return Scaffold(
      appBar: AppBar(
        title: const Text('Easy Table'),
      ),
      body: EasyPaginatedTable(
        height: 300,
        width: 600,
        rowTail: true,
        rowsPerPage: 3,
        columnStyle: ColumnStyle(
          columnLabel: 'name',
          columnStyle: const TextStyle(
            color: Colors.blue,
            fontWeight: FontWeight.bold,
          ),
          rowCellLabel: 'Taha',
          rowCellStyle: const TextStyle(
            color: Colors.green,
            fontWeight: FontWeight.bold,
          ),
        ),
        onEdit: (index) {},
        onDelete: (index) {},
        columns: const ['id', 'name', 'age'],
        rows: const [
          {'id': '1', 'name': 'Taha', 'age': '27'},
          {'id': '2', 'name': 'wahab', 'age': '33'},
          {'id': '3', 'name': 'ahmed', 'age': '30'},
          {'id': '4', 'name': 'Taha', 'age': '27'},
          {'id': '5', 'name': 'wahab', 'age': '33'},
          {'id': '6', 'name': 'ahmed', 'age': '30'},
        ],
      ),
    );
  }
}
更多关于Flutter表格生成插件flutter_easy_table的使用的实战教程也可以访问 https://www.itying.com/category-92-b0.html
1 回复

更多关于Flutter表格生成插件flutter_easy_table的使用的实战系列教程也可以访问 https://www.itying.com/category-92-b0.html
当然,下面是一个关于如何使用 flutter_easy_table 插件在 Flutter 中生成表格的代码示例。这个插件能够帮助你轻松地在 Flutter 应用中创建和显示表格。
首先,确保你已经在 pubspec.yaml 文件中添加了 flutter_easy_table 依赖:
dependencies:
  flutter:
    sdk: flutter
  flutter_easy_table: ^x.y.z  # 替换为最新版本号
然后运行 flutter pub get 来安装依赖。
以下是一个完整的示例代码,展示如何使用 flutter_easy_table 插件来生成和显示一个表格:
import 'package:flutter/material.dart';
import 'package:flutter_easy_table/flutter_easy_table.dart';

void main() {
  runApp(MyApp());
}

class MyApp extends StatelessWidget {
  @override
  Widget build(BuildContext context) {
    return MaterialApp(
      home: Scaffold(
        appBar: AppBar(
          title: Text('Flutter Easy Table Example'),
        ),
        body: Center(
          child: SingleChildScrollView(
            child: Padding(
              padding: const EdgeInsets.all(8.0),
              child: TableWidget(data: generateTableData()),
            ),
          ),
        ),
      ),
    );
  }

  List<List<Cell>> generateTableData() {
    // 定义表格的头部
    List<Cell> header = [
      Cell(data: 'Header 1'),
      Cell(data: 'Header 2'),
      Cell(data: 'Header 3'),
    ];

    // 定义表格的行数据
    List<List<Cell>> rows = [
      [
        Cell(data: 'Row 1, Col 1'),
        Cell(data: 'Row 1, Col 2'),
        Cell(data: 'Row 1, Col 3'),
      ],
      [
        Cell(data: 'Row 2, Col 1'),
        Cell(data: 'Row 2, Col 2'),
        Cell(data: 'Row 2, Col 3'),
      ],
      [
        Cell(data: 'Row 3, Col 1'),
        Cell(data: 'Row 3, Col 2'),
        Cell(data: 'Row 3, Col 3'),
      ],
    ];

    // 将头部和行数据组合成一个完整的表格数据
    List<List<Cell>> tableData = [header, ...rows];
    return tableData;
  }
}

class TableWidget extends StatelessWidget {
  final List<List<Cell>> data;

  const TableWidget({Key? key, required this.data}) : super(key: key);

  @override
  Widget build(BuildContext context) {
    return Column(
      crossAxisAlignment: CrossAxisAlignment.start,
      children: [
        // 使用 EasyTable 来生成表格
        EasyTable(
          columns: data.map((row) => row.length).reduce((a, b) => Math.max(a, b)),
          border: true,
          data: data,
          headerAlign: TextAlign.center,
          align: TextAlign.left,
        ),
      ],
    );
  }
}
在这个示例中:
- 我们定义了一个
MyApp组件,它是应用的主组件。 - 在
MyApp的build方法中,我们创建了一个Scaffold,其中包含一个AppBar和一个SingleChildScrollView,以便在内容较多时可以滚动查看。 generateTableData方法生成了表格的头部和行数据,并返回了一个包含这些数据的列表。TableWidget是一个自定义组件,它接收表格数据作为参数,并使用EasyTable组件来渲染表格。EasyTable组件接收多个参数,包括列数、是否显示边框、表格数据、头部对齐方式和单元格对齐方式。
这个示例展示了如何使用 flutter_easy_table 插件在 Flutter 应用中生成和显示一个简单的表格。你可以根据需要调整表格的数据和样式。