


Flutter天气查询插件open_weather_map_client的使用
Flutter天气查询插件open_weather_map_client的使用
Open Weather Map Client
用于通过与Open Weather Map API通信来获取气候数据的包。
开始使用
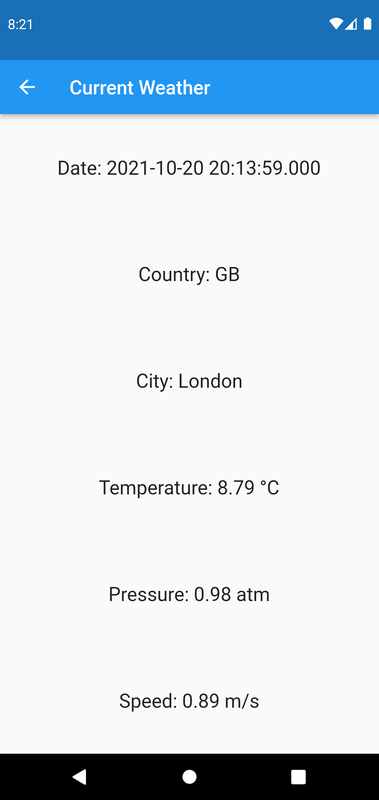
获取当前天气
查看完整的示例代码:GitHub
// 使用FutureBuilder来异步获取当前天气数据
FutureBuilder<CurrentWeather>(
    future: openWeatherMap.currentWeather(const City(name: 'London')), // 调用currentWeather方法并传入城市名称
    builder: (_, snapshot) { // 构建UI
        if (snapshot.connectionState == ConnectionState.waiting) { // 当连接状态为等待时,显示加载指示器
            return const Center(child: CircularProgressIndicator.adaptive());
        }
        if (snapshot.hasError) { // 当有错误时,显示错误卡片
            return ApiErrorCard(apiError: snapshot.error! as ApiError);
        }
        if (!snapshot.hasData) { // 当没有数据时,显示错误信息
            return const Center(
                child: Text(
                'Error obtained data, check internet connection',
                ),
            );
        }
        final CurrentWeather weather = snapshot.data!; // 获取天气数据
        return Center(
        child: Column(
            mainAxisAlignment: MainAxisAlignment.spaceAround,
                children: [ // 显示天气信息
                    Text('City: ${weather.city.name}'), // 城市名称
                    Text('Temperature: ${weather.detail.temperatureCelsius.toStringAsFixed(2)} °C'), // 温度(摄氏度)
                    Text('Speed: ${weather.wind.speed.toStringAsFixed(2)} m/s'), // 风速
                ],
            ),
        );
    },
),
完整示例代码
以下是main.dart文件的完整代码示例:
import 'package:example/src/current_weather/current_weather_view.dart'; // 导入当前天气视图
import 'package:example/src/home/home_view.dart'; // 导入主页视图
import 'package:example/src/not_found/not_found_view.dart'; // 导入未找到视图
import 'package:flutter/material.dart'; // 导入Flutter核心库

void main() {
  runApp(const MyApp()); // 启动应用
}

class MyApp extends StatelessWidget {
  const MyApp({Key? key}) : super(key: key); // 构造函数

  // 此小部件是您的应用程序的根。
  [@override](/user/override)
  Widget build(BuildContext context) {
    return MaterialApp(
      debugShowCheckedModeBanner: false, // 禁用调试横幅
      title: 'Flutter open_weather_map_client 示例', // 应用程序标题
      initialRoute: '/', // 初始路由
      onGenerateRoute: (settings) { // 生成路由
        return MaterialPageRoute(
          builder: (context) {
            switch (settings.name) { // 根据路由名称选择不同的视图
              case CurrentWeatherView.routeName:
                return const CurrentWeatherView(); // 显示当前天气视图
              case HomeView.routeName:
                return const HomeView(); // 显示主页视图
              default:
                return const NotFoundView(); // 显示未找到视图
            }
          },
          settings: settings,
        );
      },
    );
  }
}
更多关于Flutter天气查询插件open_weather_map_client的使用的实战教程也可以访问 https://www.itying.com/category-92-b0.html
1 回复

更多关于Flutter天气查询插件open_weather_map_client的使用的实战系列教程也可以访问 https://www.itying.com/category-92-b0.html
当然,以下是如何在Flutter应用中使用open_weather_map_client插件来获取天气数据的示例代码。这个插件允许你通过OpenWeatherMap API获取实时的天气信息。
首先,你需要在你的pubspec.yaml文件中添加依赖:
dependencies:
  flutter:
    sdk: flutter
  open_weather_map_client: ^x.y.z  # 请替换为最新版本号
然后运行flutter pub get来安装依赖。
接下来,你需要在OpenWeatherMap网站上注册并获取一个API密钥。一旦你有了API密钥,你就可以在你的Flutter应用中使用它来查询天气数据。
以下是一个完整的示例代码,展示了如何使用open_weather_map_client插件:
import 'package:flutter/material.dart';
import 'package:open_weather_map_client/open_weather_map_client.dart';

void main() {
  runApp(MyApp());
}

class MyApp extends StatefulWidget {
  @override
  _MyAppState createState() => _MyAppState();
}

class _MyAppState extends State<MyApp> {
  String _cityName = 'London';
  WeatherData? _weatherData;
  String _apiKey = 'YOUR_API_KEY';  // 请替换为你的OpenWeatherMap API密钥

  @override
  void initState() {
    super.initState();
    _fetchWeatherData();
  }

  Future<void> _fetchWeatherData() async {
    try {
      final client = OpenWeatherMapClient(apiKey: _apiKey);
      final response = await client.getCurrentWeatherByCityName(_cityName);
      setState(() {
        _weatherData = response;
      });
    } catch (e) {
      print('Error fetching weather data: $e');
    }
  }

  @override
  Widget build(BuildContext context) {
    return MaterialApp(
      home: Scaffold(
        appBar: AppBar(
          title: Text('Weather App'),
        ),
        body: Center(
          child: _weatherData == null
              ? CircularProgressIndicator()
              : Column(
                  mainAxisAlignment: MainAxisAlignment.center,
                  children: <Widget>[
                    Text(
                      'City: ${_weatherData!.name}',
                      style: TextStyle(fontSize: 24),
                    ),
                    Text(
                      'Temperature: ${_weatherData!.main!.temp}°',
                      style: TextStyle(fontSize: 24),
                    ),
                    Text(
                      'Weather: ${_weatherData!.weather![0].description}',
                      style: TextStyle(fontSize: 20),
                    ),
                  ],
                ),
        ),
      ),
    );
  }
}

class WeatherData {
  String? name;
  Main? main;
  List<Weather>? weather;

  WeatherData({this.name, this.main, this.weather});

  factory WeatherData.fromJson(Map<String, dynamic> json) {
    return WeatherData(
      name: json['name'],
      main: json['main'] != null ? Main.fromJson(json['main']) : null,
      weather: json['weather'] != null
          ? List<Weather>.from(json['weather'].map((x) => Weather.fromJson(x)))
          : null,
    );
  }
}

class Main {
  double? temp;

  Main({this.temp});

  factory Main.fromJson(Map<String, dynamic> json) {
    return Main(
      temp: json['temp'].toDouble(),
    );
  }
}

class Weather {
  String? description;

  Weather({this.description});

  factory Weather.fromJson(Map<String, dynamic> json) {
    return Weather(
      description: json['description'],
    );
  }
}
说明:
- 依赖安装:在
pubspec.yaml中添加open_weather_map_client依赖。 - API密钥:将你的OpenWeatherMap API密钥替换到代码中的
_apiKey变量。 - 天气数据获取:在
_fetchWeatherData方法中,使用OpenWeatherMapClient实例来获取当前城市的天气数据。 - UI显示:在
build方法中,根据获取到的天气数据来更新UI。
注意:这个示例代码假设open_weather_map_client插件的API与当前版本一致。如果API有变化,请查阅最新的插件文档并相应调整代码。