


HarmonyOS 鸿蒙Next 如何创新玩转端云一体化开发 计算十二生肖-云数据库
HarmonyOS 鸿蒙Next 如何创新玩转端云一体化开发 计算十二生肖-云数据库
- 前言
上帖子使用云函数端云一体化开发计算十二生肖,此贴使用云数据库端云一体化开发计算十二生肖,在DevEco Studio可以完成端侧代码开发和云侧代码开发,一键部署云数据库,效果与之前使用云函数一样,计算获取方式不同。
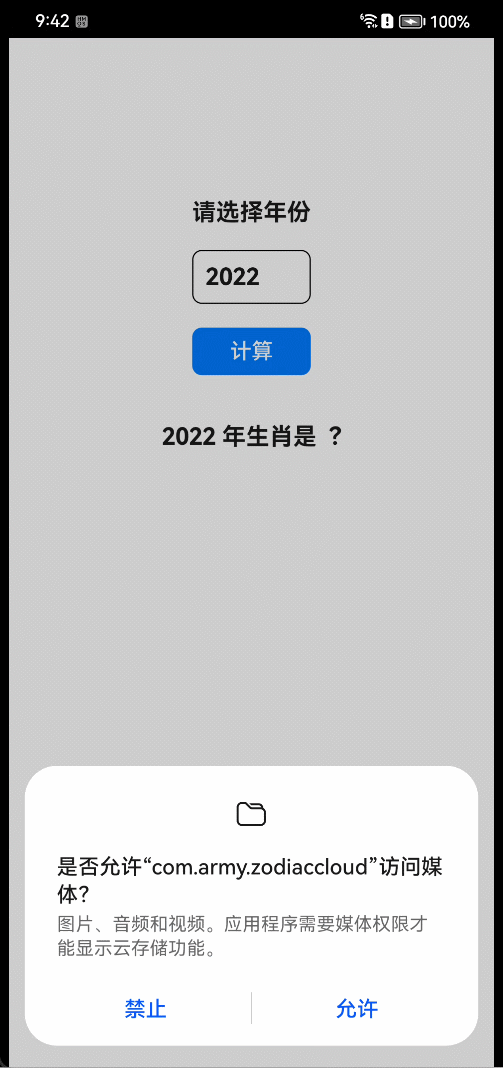
- 真机效果
- 讲解
创建端云一体化项目,这里就不介绍的,创建、部署云数据库官方详细教程 开发云数据库-开发云工程-端云一体化开发-应用/服务开发-DevEco Studio使用指南(HarmonyOS)-工具-HarmonyOS应用开发 端云一体化项目结构和之前不一样,多了CloudProgram模块, 下面介绍项目开发,先从云侧开发开始,再到端侧开发。
- 云侧开发
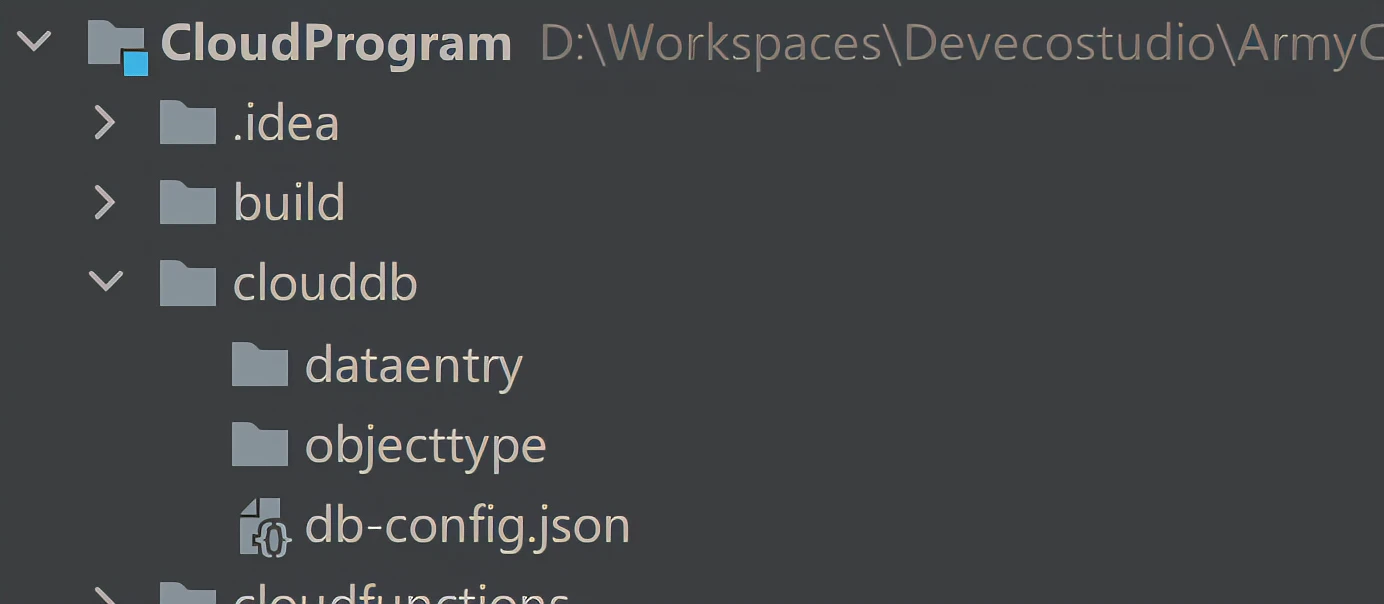
4.1 介绍云数据库目录结构
展开CloudProgram模块,展开clouddb目录,dataentry目录是存储数据条目文件,objecttype目录是存储对象类型文件,db-config.json自动生成,内容包含云数据库配置,目录结构如下图:
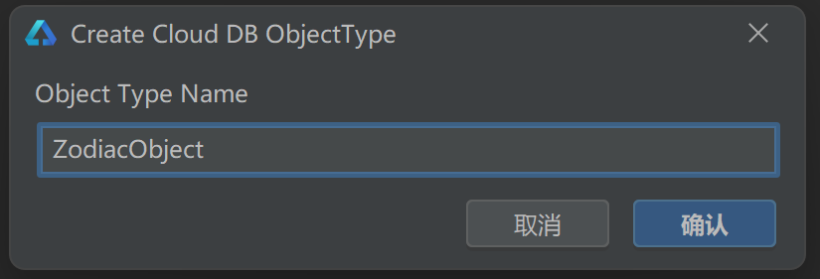
4.2 定义对象类型
右击objecttype目录,创建对象类型

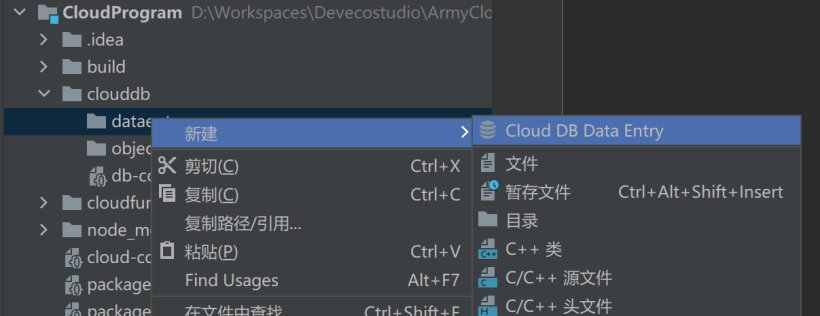
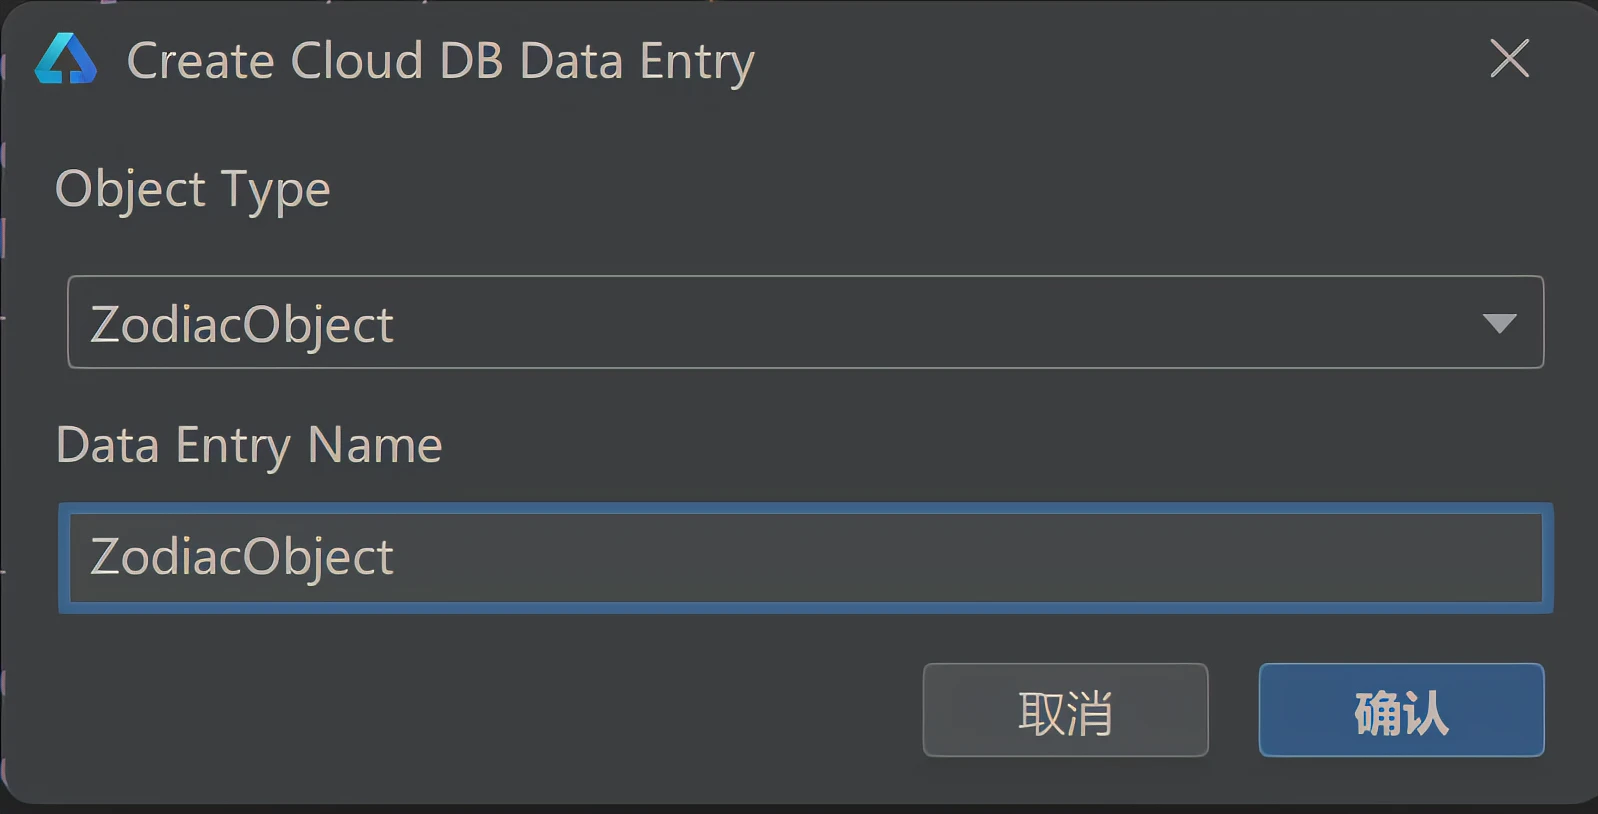
4.3 定义数据条目
右击dataentry目录,创建数据条目
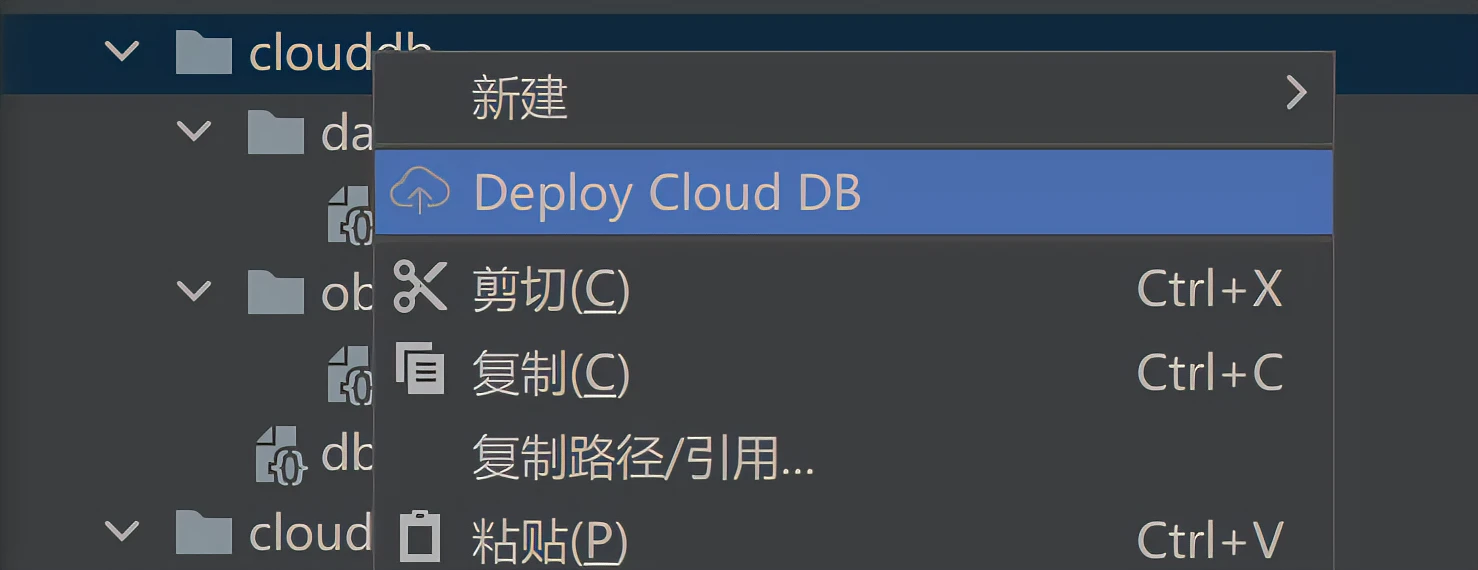
4.4 部署云数据库
部署云侧代码到AGC上,右击clouddb目录,选择Deploy Cloud DB, 自动部署到AGC上,如果提示没有登录,登录成功后,再操作一次部署。
4.5 导出文件格式
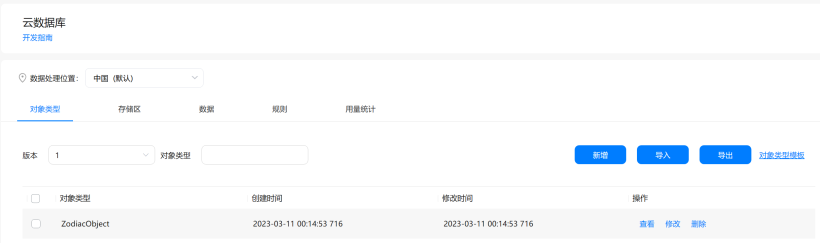
4.5.1 登录到AGC->云数据库,进入当前项目的云数据库服务菜单,可分别在“对象类型”、“存储区”与“数据”页签查看到您刚刚部署的云数据库资源。
4.5.2 导出json格式文件
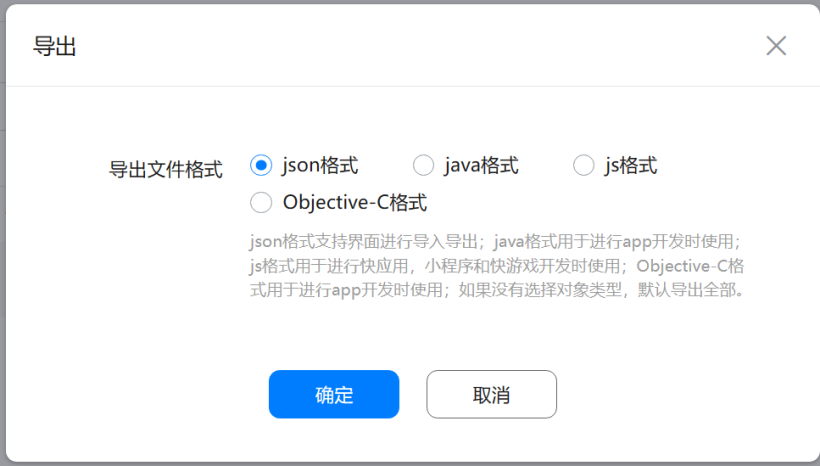
4.5.3 导出js格式文件
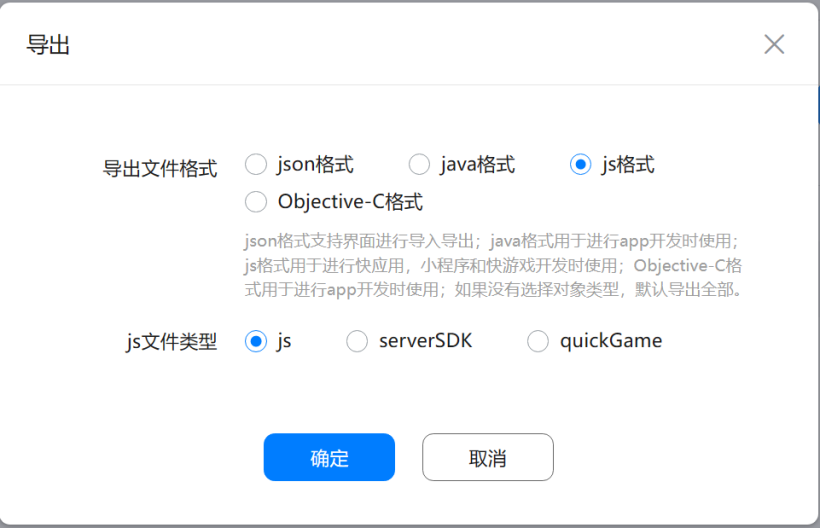
4.5.3 导出json文件和js文件,端侧使用到。
- 端侧开发
5.1 端侧模块结构
先看一下端侧模块结构:
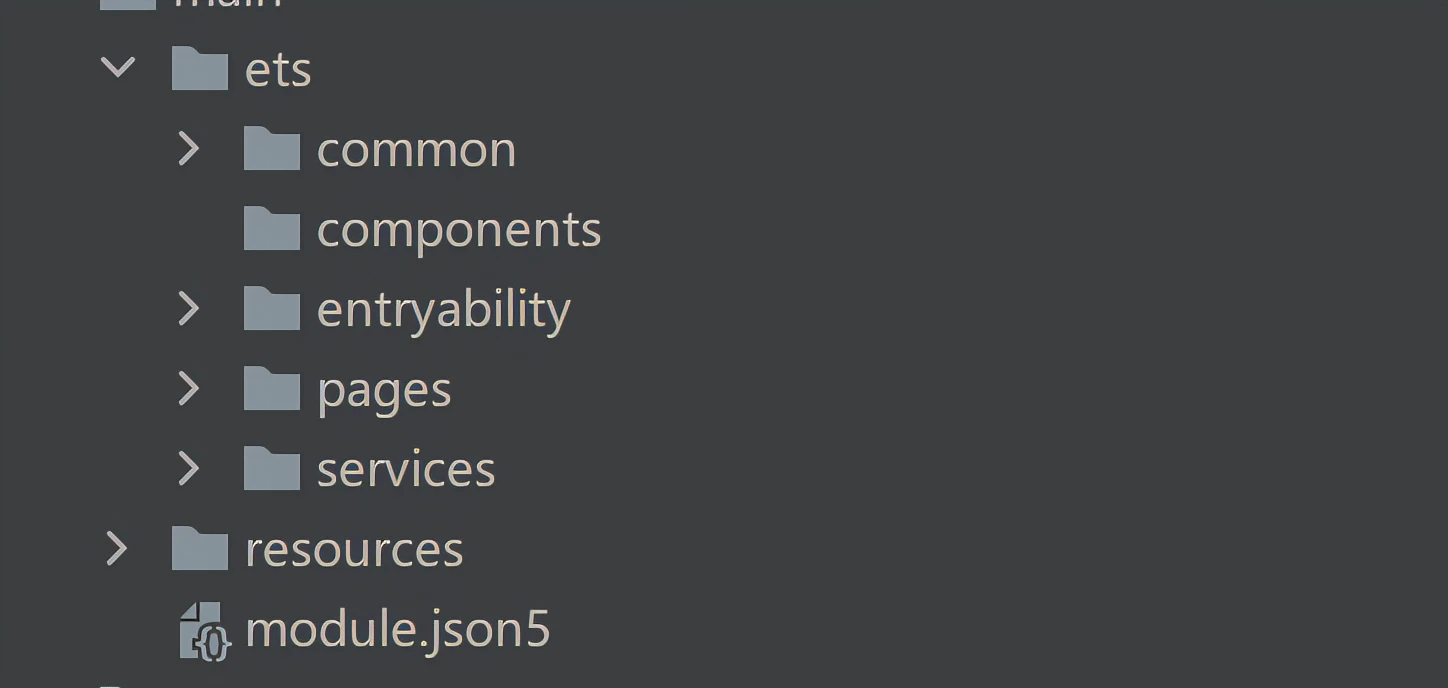
5.2 common目录
目录放一些公共的封装类,比如Log类; components目录放自定义组件;entryability是自动生成的,里面有一个EntryAbility类,包含生命周期;pages目录放UI布局页面;services目录放业务逻辑类,比如调用云侧接口。
5.3 services目录
这里只介绍services目录的工作,先介绍如何和AGC连接上的,这里使用一个单独的文件来处理:
5.3.1 services目录下AgcConfig.ts
import agconnect from '@hw-agconnect/api-ohos';
import "@hw-agconnect/core-ohos";
import "@hw-agconnect/auth-ohos";
import '@hw-agconnect/auth-types-ohos';
import { Log } from '../common/Log';
const TAG = "[AGCConfig]";
export function getAGConnect(context) {
  try {
    agconnect.instance().init(context);
    Log.info(TAG, "xx init AGC SDK success");
    return agconnect;
  }
  catch (err) {
    Log.error(TAG, "xx initAgcSDK failed" + err);
  }
}
5.3.2 在services目录下创建app-schema.json文件,复制上面在AGC下载的json格式文件内容到app-schema.json里
{
  "schemaVersion": 1,
  "permissions": [
    {
      "permissions": [
        {
          "role": "World",
          "rights": ["Read"]
        },
        {
          "role": "Authenticated",
          "rights": ["Read", "Upsert"]
        },
        {
          "role": "Creator",
          "rights": ["Read", "Upsert", "Delete"]
        },
        {
          "role": "Administrator",
          "rights": ["Read", "Upsert", "Delete"]
        }
      ],
      "objectTypeName": "ZodiacObject"
    }
  ],
  "objectTypes": [
    {
      "indexes": [
        {
          "indexName": "zodiacIndex",
          "indexList": [
            {
              "fieldName": "zodiacName",
              "sortType": "DESC"
            }
          ]
        },
        {
          "indexName": "idxIndex",
          "indexList": [
            {
              "fieldName": "idx",
              "sortType": "ASC"
            }
          ]
        }
      ],
      "objectTypeName": "ZodiacObject",
      "fields": [
        {
          "isNeedEncrypt": false,
          "fieldName": "idx",
          "notNull": true,
          "isSensitive": false,
          "belongPrimaryKey": true,
          "fieldType": "Integer"
        },
        {
          "isNeedEncrypt": false,
          "fieldName": "zodiacName",
          "notNull": false,
          "isSensitive": false,
          "belongPrimaryKey": false,
          "fieldType": "String"
        }
      ]
    }
  ]
}
5.3.3 在services目录下创建ZodiacObject.js文件,复制上面在AGC下载的js格式文件内容到ZodiacObject.js里
/*
* Copyright (c) Huawei Technologies Co., Ltd. 2020-2020. All rights reserved.
* Generated by the CloudDB ObjectType compiler. DO NOT EDIT!
*/
class ZodiacObject {
  constructor() {
    this.idx = undefined;
    this.zodiacName = undefined;
  }
  setIdx(idx) {
    this.idx = idx;
  }
  getIdx() {
    return this.idx;
  }
  setZodiacName(zodiacName) {
    this.zodiacName = zodiacName;
  }
  getZodiacName() {
    return this.zodiacName;
  }
}
ZodiacObject.className = 'ZodiacObject';
export {ZodiacObject}
5.3.4 services目录下创建CloudDB.ts
import * as schema from './app-schema.json'
import { ZodiacObject } from './ZodiacObject'
import { AGConnectCloudDB, CloudDBZone, CloudDBZoneQuery } from '@hw-agconnect/database-ohos'
import { AGCRoutePolicy } from '@hw-agconnect/core-ohos'
import { getAGConnect } from './AgcConfig'

export class CloudDBService {
  private static ZONE_NAME: string = "cloudDBZoneZodiac"
  private static async init(context: any): Promise<CloudDBZone> {
    return new Promise((resolve, reject) => {
      // 获取AGC连接
      getAGConnect(context);
      AGConnectCloudDB.initialize(context);
      AGConnectCloudDB.getInstance({
        context: context,
        agcRoutePolicy: AGCRoutePolicy.CHINA,
        objectTypeInfo: schema
      }).then((ret) => {
        return resolve(ret.openCloudDBZone(this.ZONE_NAME));
      }).catch((err) => {
        return reject(err);
      });
    })
  }
  public static async query(context: any, year: number): Promise<ZodiacObject> {
    let idx = year % 12;
    return new Promise(async (resolve, reject) => {
      const query = CloudDBZoneQuery.where(ZodiacObject).equalTo("idx", idx);
      await this.init(context).then(async (ret) => {
        await ret.executeQuery(query).then((ret) => {
          resolve(ret.getSnapshotObjects()[0]);
        })
      }).catch((err) => {
        reject(err);
      });
    })
  }
}
5.4 pages目录
目录 Index.ts 这里是页面布局,上面看到的效果,就是这里实现的。
import { CloudDBService } from '../services/CloudDB';

@Entry
@Component
struct Index {
  // 存储选择年份
  @State year: number = 2022
  // 计算出来生肖
  @State born: string = "?"
  // 是否在计算中
  @State flag: boolean = false
  // 计算生肖
  getBorn() {
    // 标识为计算中
    this.flag = true;
    console.info('xx Page year: ' + this.year)
    // 封装参数
    let params = {
      "year": this.year
    }
    // 调用云数据库
    CloudDBService.query(getContext(this), this.year).then((res) => {
      console.info('xx cloud db result: ' + JSON.stringify(res));
      // 计算完成
      this.flag = false;
      // 结果赋值给生肖变量
      this.born = res.zodiacName;
    }).catch((err) => {
      // 计算完成
      this.flag = false;
      console.error('xx error: ', err && err.message);
    });
  }
  build() {
    Stack() {
      if (!this.flag) {
        Column({space: 20}) {
          Text('请选择年份')
            .fontSize(20)
            .fontWeight(FontWeight.Bold)
          // 选择年份
          Column() {
            Text(this.year + '')
              .fontSize(20)
              .fontWeight(FontWeight.Bold)
              .padding(10)
              .width(100)
              .border({ width: 1, radius: 8 })
          }
          .bindMenu([
            { value: '2006', action: () => {this.year = 2006; this.born = '?'} },
            { value: '2007', action: () => {this.year = 2007; this.born = '?'} },
            { value: '2008', action: () => {this.year = 2008; this.born = '?'} },
            { value: '2009', action: () => {this.year = 2009; this.born = '?'} },
            { value: '2010', action: () => {this.year = 2010; this.born = '?'} },
            { value: '2011', action: () => {this.year = 2011; this.born = '?'} },
            { value: '2012', action: () => {this.year = 2012; this.born = '?'} },
            { value: '2013', action: () => {this.year = 2013; this.born = '?'} },
            { value: '2014', action: () => {this.year = 2014; this.born = '?'} },
            { value: '2015', action: () => {this.year = 2015; this.born = '?'} },
            { value: '2016', action: () => {this.year = 2016; this.born = '?'} },
            { value: '2017', action: () => {this.year = 2017; this.born = '?'} },
            { value: '2018', action: () => {this.year = 2018; this.born = '?'} },
            { value: '2019', action: () => {this.year = 2019; this.born = '?'} },
            { value: '2020', action: () => {this.year = 2020; this.born = '?'} },
            { value: '2021', action: () => {this.year = 2021; this.born = '?'} },
            { value: '2022', action: () => {this.year = 2022; this.born = '?'} },
            { value: '2023', action: () => {this.year = 2023; this.born = '?'} },
            { value: '2024', action: () => {this.year = 2024; this.born = '?'} },
            { value: '2025', action: () => {this.year = 2025; this.born = '?'} }
          ])
          // 计算按钮操作
          Button('计算', {type: ButtonType.Normal, stateEffect: true})
            .fontSize(18)
            .borderRadius(8)
            .width(100)
            .margin({bottom: 20})
            .onClick(() => {
              // 根据年份计算生肖
              this.getBorn()
            })
            // 显示计算结果
            Text(`${this.year} 年生肖是  ${this.born}`)
              .fontSize(20)
              .fontWeight(FontWeight.Bold)
        }
        .width('100%')
        .height('100%')
        .padding({top: '33%'})
      } else {
        // 计算中
        LoadingProgress().color(Color.Blue)
          .backgroundColor(Color.Transparent)
      }
    }
  }
}
- 总结
由于调用云侧云数据库是异步的,不能马上返回结果,这里添加LoadingProgress组件,让用户知道在运行中,效果看得不是很明显,可能录制时,网速很快,LoadingProgress组件闪一下就不见了,如果遇到网络慢时,LoadingProgress就会一直转,直到云数据库返回响应时,再消失LoadingProgress。
更多关于HarmonyOS 鸿蒙Next 如何创新玩转端云一体化开发 计算十二生肖-云数据库的实战教程也可以访问 https://www.itying.com/category-93-b0.html

云数据库插入或更新都是调用executeUpsert接口,批量也是调用这个接口,特别要注意的是:
如果项目里没有用到认证服务,那么云数据库权限里,要把更新权限添加给所有人,不然添加或更新不了数据 ,也就是说,CloudDB对操作权限有做限制,需要认证用户才能进行增删改操作。
//插入单条数目
public static insert(context: any, object: ZodiacObject): Promise<number> {
  return new Promise((resolve, reject) => {
    this.init(context).then((ret) => {
      ret.executeUpsert(object).then((res) => {
        resolve(res)
      })
    }).catch((err) => {
      console.warn('xx 3 ' + JSON.stringify(err))
      reject(err);
    });
  })
}

// 批量插入数目
public static batchInsert(context: any, objectList: Array<ZodiacObject>): Promise<number> {
  return new Promise((resolve, reject) => {
    this.init(context).then((ret) => {
      ret.executeUpsert(objectList).then((ret) => {
        resolve(ret)
      })
    }).catch((err) => {
      reject(err);
    });
  })
}
更多关于HarmonyOS 鸿蒙Next 如何创新玩转端云一体化开发 计算十二生肖-云数据库的实战系列教程也可以访问 https://www.itying.com/category-93-b0.html

大佬您好!我想要根据某个条件查询并返回对应的对象数组,Village:查询条件,noticeDataObject:数据对象,方法如下:
public static queryNotice(context: any,Village : string ): Promise<Array<noticeDataObject>> {
    return new Promise((resolve, reject) => {
        const query = CloudDBZoneQuery.where(noticeDataObject).equalTo("Village",Village);
        this.init(context).then((ret) => {
            ret.executeQuery(query).then((ret) => {
//                    resolve(ret.getSnapshotObjects());
            })
        }).catch((err) => {
            reject(err);
        });
    })
}
调用方法如下:
CloudDBService.queryNotice(getContext(this),this.user.Village).then((ret)=>{
    this.arr = ret;
}).catch((err)=>{
    this.value = this.value+'获取数据失败!'+err
})
返回的内容是err的内容,但是AGC控制台有对应变化,如下:

技术有限,请大佬指点迷津!

你可以在catch里面,把错误信息打印出来看看,比如这样打印:
console.error('xx ’ + JSON.stringify(err))
前面加多xx 方便在控制台过滤。 你也在services里把参数打印一下,看看参数传过去是什么


console.info('xx ' + Village )


你好,请教一下大佬,在services目录下创建CloudDB.ts下可以封装多个查询静态方法吗?但是我在页面调用这些查询静态方法时,每次都会初始化init数据库连接,而且页面只会显示空白。
下面是我的问题帖子
https://developer.huawei.com/consumer/cn/forum/topic/0201116420841632463?fid=0102822233052010012


HarmonyOS 鸿蒙Next在端云一体化开发方面提供了强大的支持,使得开发者能够轻松实现设备端与云端的无缝连接与数据交互。在计算十二生肖这一应用场景中,可以通过以下方式创新玩转端云一体化开发:
首先,利用鸿蒙系统提供的分布式数据库能力,将十二生肖的相关数据存储到云数据库中。这样,无论是设备端还是云端,都可以随时访问和更新这些数据,实现数据的实时同步和共享。
其次,通过鸿蒙系统的分布式能力,可以实现设备端与云端的协同计算。例如,设备端可以负责用户交互和数据的初步处理,而云端则可以进行更复杂的数据分析和计算。这种协同计算的方式,不仅可以提高应用的性能,还可以降低设备端的资源消耗。
最后,在开发过程中,可以利用鸿蒙系统提供的丰富API和工具,快速构建出功能完善、性能稳定的应用。同时,鸿蒙系统还支持多种编程语言和开发框架,使得开发者可以根据自己的喜好和需求选择最适合的开发方式。
如果问题依旧没法解决请联系官网客服,官网地址是:https://www.itying.com/category-93-b0.html。